

By Bryan Minear
As I sat on a plane bound for San Francisco, staring down some 40,000 feet to the clouds passing underneath me, excitement and anticipation filled my soul. It was the beginning of a journey – an epic adventure creating unique images and memories. I hoped that this pilgrimage with fellow photographers would live up to my expectations, and further inspire me to follow my dreams. After being awake for 30 hours, we arrived at dusk. On the way into Yosemite, we stopped off at tunnel view. It was my first glimpse of California that wasn’t being hidden away by the night. The rock faces lit up underneath a sea of endless stars. In that moment, it all felt like a dream. I was now experiencing this miraculous destination that I had experienced so many times before through someone else’s eyes. We spent an hour shooting before heading to drop off our bags and get settled in our condo. At 4:30 AM, we were off to glacier point to prepare for our first sunrise.
 I stared into the face of half dome, brilliant and gleaming in front of me. In some ways, I was taking a photo that millions of people had taken before me – but at the same time, I took pause to remember that the beauty of photography is that each moment captured is infinite and unique in its own way.
 The sun began to glow, and I was able to catch the last few stars in the sky over half dome. My X-Pro2 clicked away on a timelapse and my X-T2 shifted in my hand as I tried to find my perfect composition. I was awaiting the shot that I was planning on taking since the trip’s inception.
“First light over half dome” is something that I had wanted to see for myself since I knew Yosemite existed. My lens of choice for the perfect capture was the XF10-24mmF4 R OIS. It gave me the versatility I needed to grab a few shots at various focal lengths in order to choose my shot in post.
After a short and much-needed nap, we ventured down into the valley to see the golden light as it passed over us. Fall color was in full swing and there was a slight chill to the air, only further enhancing the experience. We found a spot along the Merced River with a beautiful view of half dome reflected in the water. Along a nearby boardwalk, we took in Yosemite Falls as it towered above us. The falls were not supposed to be running at this time of year, but luckily, a storm passed through the night before we arrived, giving the falls a second wind. I framed up a shot with a 10-stop ND and 3-stop ND Grad to get some cloud and water movement. Shooting long exposures during the day is one of my favorite things to do because it gives me some time to enjoy the scene around me. Oftentimes I get so caught up in getting the shot that I don’t “see” things for myself. The photos are the best way to relive the moment, sure. But it’s equally as important to live in the moment and enjoy your surroundings.
 As the light started to drop in the sky, I shifted into creative mode trying to make the absolute most of the light that I have left. I set up another timelapse in front of the half dome with my X-Pro2, and with my X-T2 and XF16mmF1.4 R WR attached, I began walking around finding different compositions to maximize my last few moments.
 Over the course of the next few days I experienced close to all that Yosemite and the surrounding area had to offer: Taft Point, the 7,503 ft lookout point, Tioga Pass, and the desert-laden Eastern Sierras that lie just outside of Yosemite proper. The trip was full of friendship, laughter, and best of all, amazing scenes to photograph.
 My favorite part about Havana was the wide variety of subjects scattered throughout the city. It seemed as if every corner I turned there was something new, whether it was a Dalmatian contently sitting on a gritty front porch or a bike taxi that seemed to ride by just in time for perfect light, it seemed as if there was always something that caught my eye.
 I particularly enjoyed shooting the neighborhoods that surrounded the capitol building, Capitolio. I did just about everything in my power to capture the lifestyle of the locals with this interesting structure in the background. From persuading locals two stories above to give us permission to shoot from their balconies, to running behind cars, to playing soccer with local kids to get their approval, I took all measures to capture various perspectives of the Capitolio with fresh subjects in the foreground on each occasion. Thankfully I had a wide variety of range of FUJINON glass to pair with my X-Pro2 and X-T1; the XF55-200mmF3.5-4.8 R LM OIS and XF10-24mmF4 R OIS were my go-to lenses for these photos.
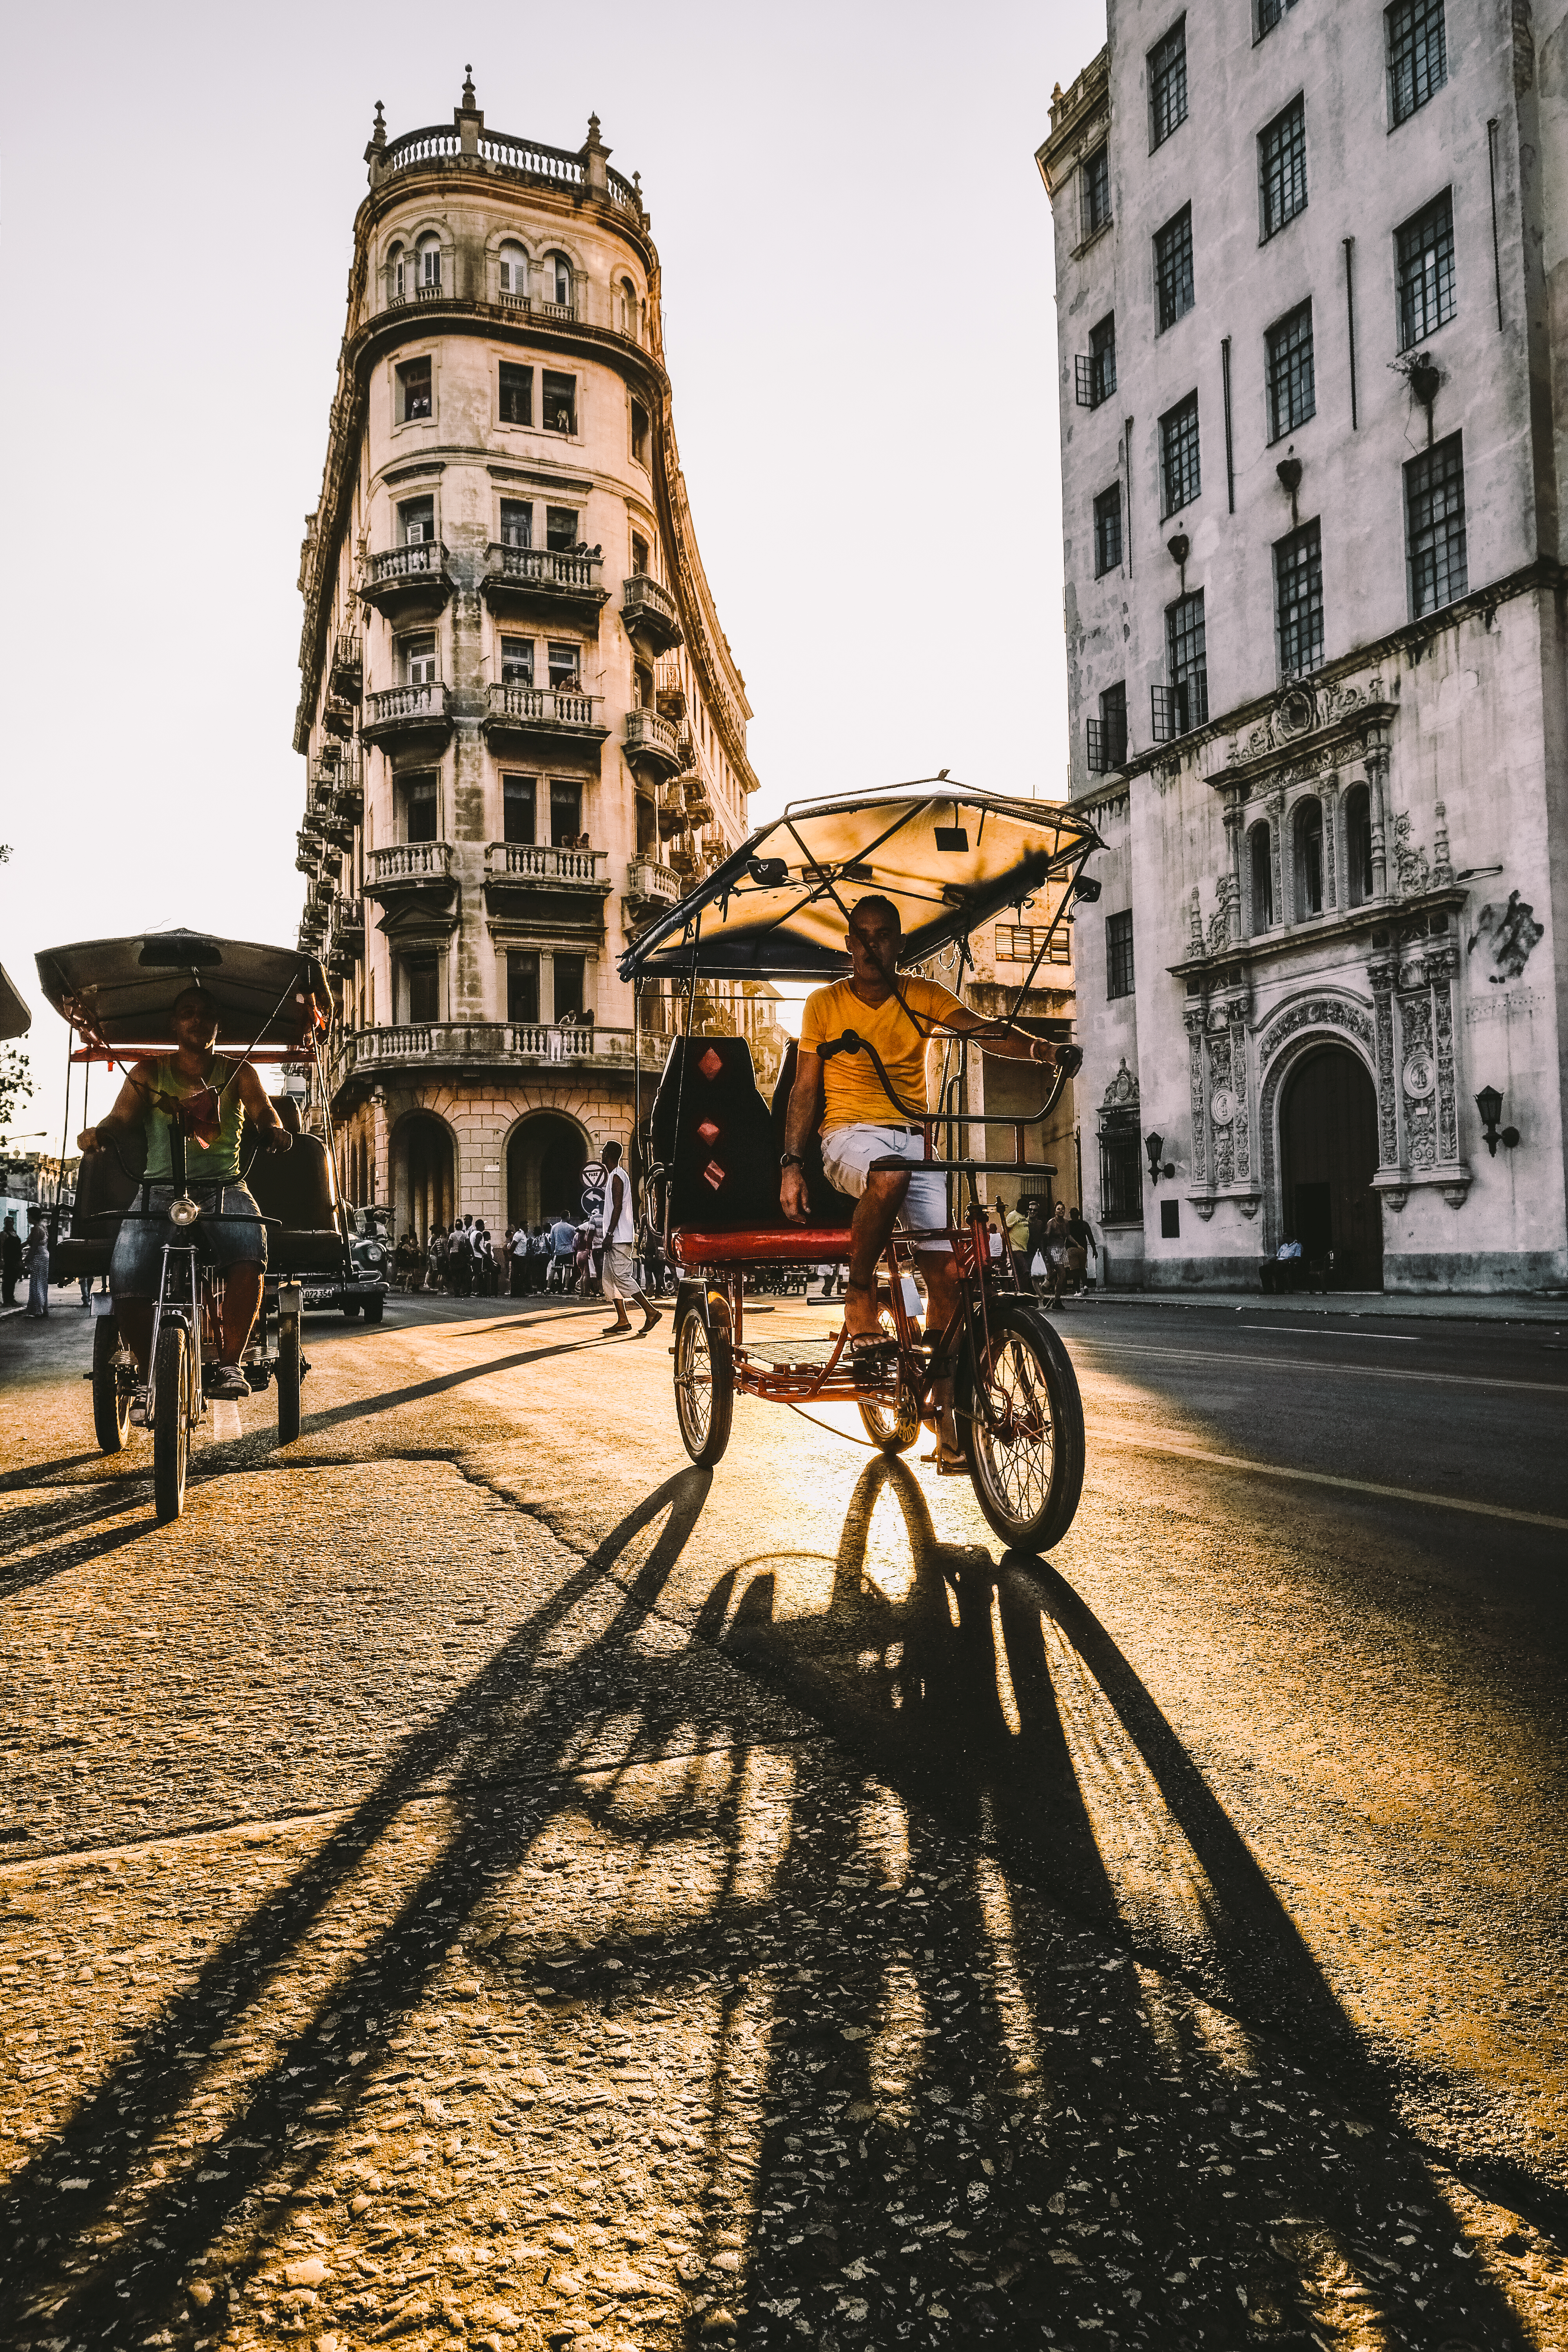
 Another one of my favorite locations in Cuba was Barrio Chino, or China Town. This area was very unique and boasted what I called the Cuban version of New York’s iconic Flat Iron building. I immediately loved this spot after catching an incredible golden hour that saw the sun light up the surrounding area of the building with a warm, glowing light that made for some of the best shots on my X-Pro2 XF10-24mmF4 combo from the trip.
 One of the most noteworthy elements of Havana are the many random puddles that form throughout alleys that provided mirror-like reflections of the colorful cityscapes, classic cars, and great city vibes. The locals would stare at me in confusion when I would stop traffic to kneel down and use the tilt-screen on the X-T1 XF10-24mmF4 combo to capture perfect angles of the glassy puddle reflections.
 As I was composing a reflection shot with my X-T1 on an overcast afternoon among a vibrant alleyway, my cousin called for me and told me I had to stop whatever I was doing and see how beautiful a baby was down the street. My first instinct was to continue to try and get my shot as that sounded a little off, but I got up and quickly walked around the block to catch the little girl and her father just before they were going to enter a home. The young dad had his daughter in his arms, and we she turned around she looked like something out of a National Geographic cover. I had never seen eyes like hers. They had a bright aqua tint of blue that could be seen from a block away. He kindly let me snap a few photographs, and I every time I looked into my electronic viewfinder of my X-Pro2 and I couldn’t believe how stunning this little girl’s features were. Cuba is full of surprises… this experience was a sure reminder of that.
 I’ve never really been an advocate of guided tours under any circumstances. Cuba is one of those destinations that only has so much information that can be found online. In order to experience and capture it properly, you can’t really have a comfort zone. You have to be willing to put yourself out there with a positive and friendly vibe and hope for the best in most instances. We were even invited into a family gathering for drinks in a broken down backyard after approaching a couple locals in hopes of entering their compound to find something interesting to shoot. I lost count of the amount of complexes, homes, and lots we entered (all after asking what seemed like owners or tenants). These were the best memories, and provided some of the best perspectives that will be extremely difficult to replicate.
 One hot afternoon the sunset was quickly approaching, and we were determined to find a rooftop vantage point to capture the moment the light brought warmth to the tattered cityscape of old Havana. After entering a building and passing by locals on each story, all with wide smiles of confusion but acceptance on their faces, we made it towards the top floor. When I looked down, there was the unique spiral staircase I had ever seen. I captured an organic image of the staircase with my X-Pro2 XF10-24mmF4 combo and we made for the roof. Unfortunately there are not very many tall buildings in Cuba; making it a bit difficult to get a great view of the sun setting on the water with the cityscape in the foreground. I completely forgot about the shot I had anticipated when several kids entered through the roof and showed us their pigeon traps, introducing us to some of their birds. I had never seen anything like this, and it really made me appreciate how a simple lifestyle brought joy to these kids. There were no iPads, no PlayStations, it was all about going out and having fun with the neighborhood kids like the old days.
 Growing up, I’ve always loved the game of soccer. I’ve played my entire life, and jumped in on just about every pick up game we came across. Towards the later end of the afternoon we decided to check out a neighborhood called Citio just outside of Havana. Apparently this neighborhood was extremely dangerous for tourists, and upon entering all eyes were on us. After passing by a few young kids playing soccer, I hopped in passed the ball around with them. The ball they had might as well have been a rag… it was completely trashed and lopsided. I offered to buy the kids a new ball, and the look on these kids’ faces was something I’ll never forget… we walked almost 2 miles looking for a store that was open. Along the way, the kids seemed to know all the other youngsters in the area, and our group grew with every few blocks we walked. When we finally found a store with someone inside, we begged the tenant to open her store for us to buy the ball for the kids. My friend Joon and I each bought them a ball that were less than $20 USD each, but it may as well have been a brand new MacBook Pro for these kids. They couldn’t believe it and were so excited to get out and play with one another. Even though we skipped shooting for a couple hours, that was one of the best memories from our trip.
 In conclusion, I highly recommend giving Cuba a visit before it becomes increasingly commercialized. Your experience in the country is up to you. I spent the majority of my time in Old Havana in hopes of capturing an unseen photo, and there are tons of interesting places to see. I was lucky enough to capture my experiences behind my FUJIFILM X Series gear, which never disappointed once. With all the impromptu moments, seconds of good light, and organic situations the X-Pro2 and X-T1 paired with a wide variety of FUJINON glass executed everything I could have asked for.
 When I first received the Fujifilm X70 I looked at it and thought…….hmmmm. Then I scratched my head and glanced sideways at my X100T which was looking back at me with suspicion and concern.


 The Fujifilm X-T2 is the camera I’ve been waiting for. It’s no surprise it’s here but what I love most is that the consultation period with X-Photographers has delivered a camera that is spot on mechanically. Everything that could have been improved on the X-T1 from the dial locks to the tilting screen has been perfected on the X-T2.


 There has been no bigger advocate of the Fujifilm


 There are many times that using a wide angle or telephoto lens just won’t get the results you want. They’re either too wide or too tight but you know in your heart that your viewpoint is correct.
