Since mirrorless digital cameras entered the photography scene in the late 2000s, the question has been whether they could be a better option than DSLRs (Digital Single Lens Reflex). Since that time, the mirrorless system has grown in popularity, so it is clear photographers are increasingly making it their preference.
What’s a DSLR?
DSLR cameras (or digital single-lens reflex) use the design of old-school 35mm bodies, with light taking a path from the lens to the prism and then to the viewfinder, where you can see the preview of your image. As you hit the shutter button, the mirror flips up, a shutter opens and light reaches the image sensor, which retains the picture.
What’s a mirrorless camera?
The big difference with the mirrorless camera is that it has no mirror that flips when you open the shutter. Instead, light moves directly from the lens to the image sensor and the shot displays on your screen.
Which style is lighter?
Because mirrorless cameras do not need to store a mirror and a prism, they do not need to be as heavy or as large. If you like to travel with your camera or just enjoy a lightweight rig, then you may prefer the mirrorless system.
Which body has better focus?
Many years ago, DSLRs had the reputation of being the better – or at least faster – model for autofocus shooting. This is because DSLRs used phase detection, a quicker method that relies more on the camera’s electronic sensor, rather than contrast detection, the slower but more accurate system utilised in most mirrorless bodies. However, mirrorless cameras have since improved in this area. Now, many mirrorless bodies, including Fujifilm’s newer models, employ a contrast-phase hybrid autofocus system.
Which style is suited for continuous shooting?
If you want to capture fast-moving action, you may want a camera with the capacity for continuous shooting. Mirrorless cameras, with their simplified path for obtaining images, excel here. For instance, the Fujifilm X-T2, when photographing from its continuous shooting boost mode, shoots about 11 frames per second, well ahead of most other cameras on the market.
Which one shows an accurate shot in its viewfinder?
Mirrorless cameras also have viewfinders that display truer to what your photograph will become. Their electronic viewfinders allow you to see, in real time, adjustments to aperture and ISO, whereas the optical viewfinder found in DSLRs displays those changes only after you shoot the image. The mirrorless style has a big advantage here, as it saves you time from going back and forth between shooting and adjusting.
As with many debates over photography equipment, the choice comes down to your personal preference. If you find a camera that you handle comfortably and shoot naturally, then proudly make it yours and enjoy creating great shots with it!
I was assigned by ‘Sports Illustrated’ to shoot a multimedia project of The USA Olympic Team Womens 8 before they travelled to Rio where they would be in the running for another Gold medal. And having recently been greatly inspired by Google’s Excellent ‘Inside Abbey Road’ I came up with the idea of shooting a 360 project with video content within it.
There is often too much emphasis on equipment but on this occasion having exactly the right tool for the job, something small, light, with superb still image quality, 4K video capable and user friendly.
Enter the brand new Fuji X-T2, the successor to the highly popular and delightful Fuji X-T1
Small, light with 4K video capability and VERY user friendly.
There are many really good camera’s out there but in my opinion none have the special ‘instantly at home’ feel for someone coming from a DSLR as Fuji does with its ‘X’ series cameras.
I am baffled as to why Fuji is alone amongst digital camera manufacturer has managed to successfully take the ‘soul’ from a film camera and transplant it in a digital offering (incidentally this is not an opinion I have reached overnight, but a view I have held for some years now.
I’m delighted to say that Fuji have been successful in carrying on this tradition with the Fuji X-T2, combining a truly intuitive user experience with superb performance on all fronts.
24.3mp X-Trans CMOS sensor which feature which debuted on the Fuji X-Pro2 is quite a step forward over the X-T1
The X-T2 is a camera with heaps of performance and is ready to shoot when you are, you can feel from the moment you pick the camera that it has massive processing power – dubbed the X Processor Pro. Aside from the sensor this is one of the key areas I look for as it is pointless having a great sensor if the camera does not have the processing power to handle it.
A powerful processor opens the gateway to all sorts of high performance feature in a camera, such as 14 frames a second (should you need it), 325 autofocus points and 4k video at up to 30fps (more of this later)
Ok so it is incredibly responsive and easy to use but what about the image quality?
I am happy to report that the image quality in terms of resolution is handy step forward over the X-T1 delivering more detail and the dynamic range, though I have not had chance to test this back to back it seems to be better.
The X-T2 viewfinder is clearer and brighter than the X-T1 and I found it easy to manually focus.
So how did it work out?
First shot of the day was the team portrait in the lake, this was carefully worked out to coincide with Sunrise (a time so early that it is actually difficult to get yourself to believe it will ever get light)
The still shot was actually way more difficult than it might first appear as there was only a limited area of hard standing in the water after that you hit deep mud…which also smelled pretty bad.
Taylor Ballentyne who shot behind the scenes of the project was kind enough to stand in so we could establish where it would be safe to stand.
Then there was the lighting.
Let me rewind a little – I hired the Profoto B1 lights along with all other kit from one of the coolest rental houses in New York City – Scheimpflug (to quote Wikipedia it takes its name from the Scheimpflug principle which is a geometric rule that describes the orientation of the plane of focus of an optical system when the lens plane is not parallel to the image plane)
The guys at Scheimpflug were super helpful and highly professional and were more than happy to let me come along a couple of days before the shoot so I could test the gear and ensure it worked as it should (this might seem a bit extreme but this shoot was super special and I wanted to make sure I made no mistakes). These guys are highly recommended.
Why Profoto B1 lights? Well right now my opinion they are the simplest, most reliable location light out there in with not a cable in sight, this gives you unparalleled flexibility – it is a photographers license to put a light just about anywhere.
I did not use the Profoto modifiers – I instead reverted to my softbox of choice the Chimera medium softbox (with a white interior).
I have been using the soft but highly directional Chimera modifiers exclusively for 20 ish years, they give me exactly the look I want and you can do so many clever things with them – they are versatility personified.
If the team were on a limited small hard(ish) standing area where could I put the lights?
I was restricted to putting the key lights at the edge of Lake Carnegie, which as you will see from my drawing, has all sorts of creatures swimming in it.
I needed a little more power and I ‘only’ had 4 lights – which sounds like a lot but when you are shooting a large group on location and you are aiming for F11 or F8 to ensure everyone is in focus it really is not a great deal of light.
I was going to put a light in the water as a back light but as the sun was a great celestial back light it freed up one more Profoto B1 head.
To get a little more ‘oomph’ to my key light bank of lights I put two heads in one softbox by slightly unconventional means (though I believe you can get a speed ring which takes two heads for the Chimera soft box)
So it was three Profoto B1 lights off to camera left, which worked very well but I needed a little fill head on so I used my last Profoto B1 in a brolly – the lights were set.
The team entered the water and I had a very short period of time with them – think around 10 – 15 mins in the water before they went training.
Team USA Womens 8s Rowing Team
Even though time was short I mounted the Fuji X-T2 on my Gitzo tripod as if needed to undertake any extensive post production (which I didn’t) it was going to be much easier – remember the tripod is your friend…..
The second shot was the 360 stills panorama where I needed to have clickable hotspots which would link to short video interviews with the team members.
I really did not want to switch between multiple cameras so the Fuji X-T2’s enhanced video capability came into play.
Though we did not output the video in in 4K(we downsampled the footage to 720p so the final file would be less ‘heavy’) we did shoot the videos in 4K as being in the throes of another major project everything HAS to be shot in 4K it seems like ‘short change’ to shoot in 1080p but perhaps more importantly it gives me the capability to crop into the video. As we were shooting with ‘just’ one camera this could be a useful feature to have to say the very least.
While I am talking video I shot in the standard 4K setting as Fuji’s F-Log, which ensures you get the maximum from a file as you shoot in a ‘flat’ profile was not yet available when I shot the project.
Even with the standard profile available to me on the day I was very pleased with the video output
Some of the enhanced video features that were available to me on the day, the ability to monitor audio via the headphone jack and the extended recording time (30 mins of 4K) came to me courtesy of the new VG-XT2 hand grip which takes two batteries in addition to the standard camera battery.
The 360 stills shot itself was shot on the Fuji X-T2 with the excellent Zeiss Touit 12mm lens which I find to be a dream for 360 panoramas and I used the Seitz Roundshot VR drive which I have come to rely on to deliver the goods day in day out without missing a beat. Ever.
When you are using a motorised VR head – sometimes with quite big lenses and battery packs the weight does add up so I use the Gitzo GT5562LTS which is a serious pro tripod which you can fit in your carry on luggage. For the still 360(and the stills team shot in the lake) I used the Gitzo 5381SQR which is perfect for panoramas and landscapes – it is however worthy of note as this tripod does take a full on video head too – one tripod which really does do it all.
Speaking of something that does it all it seems like a good place to round up with my thoughts on the Fuji X-T2.
If you use a an X-T1 and you are expecting a camera which completely different from your current camera then think again – the X-T2 is more about evolution than revolution and it is all the better for it, with tweaks and enhancements which makes it the most complete mirrorless camera to date that Fuji has yet produced
For me this is the camera which takes the ‘X’ series into everyday pro territory for the first time. Until now, for me at least, the X cameras which I love with their charm and wonderful image quality have been been my ‘fun’ cameras and I have walked out the door to shoot the ‘big’ jobs on something else.
The mixed still/360 still and 4k video nature of this assignment was a serious challenge and one that X-T2 rose to without any fuss or drama – excelling in every area WITHOUT making my brain melt.
Whisper it. Fuji might, just might have, produced the best mirrorless camera to date one that combines charm, image quality, capability and is a joy to use.
Damien Lovegrove is considered by many to be one of the worlds most influential contemporary photographers. He is best known for creating portraits that make women look fabulous. He is a confident director and great fun to shoot with too. Damien’s lighting style is distinctive and his picture composition unique.
Damien is an official Fujifilm UK ambassador and a renowned Fuji X-Photographer.
It was in May 2012 that I ditched my SLRs for a Fuji X-Pro1 and the three prime lenses it launched with. From day one I utilised the mirrorless advantage to leap ahead of my competition. I had been using a Fuji X100 fixed lens camera for a year integrating it into my workflow alongside my SLRs and I loved the pictures I captured with it so the leap to mirrorless was a gentle one for me.
The Fujifilm X-T2 is the camera I’ve been waiting for. It’s no surprise it’s here but what I love most is that the consultation period with X-Photographers has delivered a camera that is spot on mechanically. Everything that could have been improved on the X-T1 from the dial locks to the tilting screen has been perfected on the X-T2.
The Fuji X-Pro1 gave me mirrorless shooting and it rekindled my passion for photography. The X-T1 gave me the extra usability I craved, The X-Pro2 took the image file to the next level and brought the technical specification of the X system bang up to date. Now the the Fujifilm X-T2 has brought it all together and raised the bar again. The sum of all the tweaks and changes in this new camera make a huge difference and leave me not wanting more.
The Fuji X-T2 features that I love the most:
• The locking buttons on the ISO and Shutter speed dials combined with the higher profile work perfectly. Being able to lock the dials in any position is genius.
• The bi-directional tilting screen is wonderful. It’s a must for a portrait photographer.
• The camera size and weight are spot on. The ultra reliable and compact W126 battery has been retained. The weight of the camera in the hand is really important to me. I never want my photography to feel like a chore again.
• The media door has a newly designed latch that is really secure.
• The joystick to move the focus position makes the shooting process faster.
• The 1/250th second flash sync is welcome and is the new setting for all my studio flash working.
I team the Fuji X-T2 with the fast primes because I love a shallow depth of field combined with absolute resolution. A prime lens is lighter on the camera than the equivalent zoom and this suits my way of shooting well. I have the XF16mm f/1.4, XF23mm f/1.4, XF35mm f/1.4, XF56mm f/1.2, and the XF90mm f/2 lenses. There are times when a telephoto zoom is the perfect lens for a shoot and I use the XF50-140mm or the XF100-400mm lenses depending upon the assignment. The zooms offer optical image stabilisation and this really comes into its own at longer focal lengths.
And the results?
I had planned this first sequence of shots about a year ahead of the shoot. I bought the dresses from an Asian manufacturer via the internet and I transported them to the USA in my luggage. The location is in the high deserts of Arizona, USA. I used the XF100-400mm and XF50-140mm lenses to compress the perspective. These frames were all lit with natural sunlight.
I spent 12 days touring the USA and in that time I shot about 5000 frames on the Fuji X-T2.
Arielle down on a farm in Utah. There were snakes keeping us company as we shot a wonderful sequence of images. XF50-140mm f/2.8 at f/4
Arielle leans on a rat rod running a big bore Chevvy. A ¼ mile takes about 10 seconds in this loud, lean, speed machine. XF35mm f/1.4 at f/4
The narrative of the Wild West is in the fabric of abandoned buildings, and telegraph poles. Arielle sits in the window of a derelict frontier house on the old Route 66. The old road was replaced with a six lane highway just 100m behind us. XF35mm f/1.4 at f/8
Chantelle is in a restored classic car with a $30k price ticket in a showroom in Kingman on the old 66. There is an inspiring love for recent heritage in this part of the USA. XF35mm f/1.4 at f/2
Arielle sits by a cattle coral in Arizona. The dust on the wind has turned the sky a shade of pink. This figure in the landscape style is one I want to further develop in the coming months and the extra resolution of the Fuji X-T2 really comes in handy when making big exhibition prints. XF50-140mm f/2.8 at f/5.6
Since then I’ve added another 4000 frames in Europe to my camera testing routine. The camera feels just right in the hand and there is nothing I would change about the mechanics of the build.
Carole is dancing in the sun in Lucerne, Switzerland. It was baking hot and the building that’s behind her reminded me of some of the Mediterranean places I used to shoot weddings at ten years ago. I used the trusty XF35mm f/1.4 lens for this shot. The XF35mm lens is a stellar optic and is the first XF lens that I bought.
Margaux is lit with a Lupo 1000 spotlight and Scattergel. I used the tilting screen and held my monopod above the bed to get the shot. I used the self timer on 10 seconds to trigger the shutter. XF23mm f/1.4 at f/1.6
Imagine a camera that takes the best features of the Fujifilm X-T1 and X-Pro2 and combines them together to create the ultimate photographers and videographers tool.
Well, today we are excited to announce the combination of these cameras in the new Fujifilm X-T2!
The Fujifilm X-T2 is one of the most anticipated cameras in Fujifilm’s history. Not only will the impressive 24.3MP APS-C X Trans CMOS III sensor capture the joy of photographers around the world, but now with the addition of 4K and 2K video formats you will be able to film the emotion too!
Adding to this is a bundle of features that includes an electronic shutter with a limit of 1/32,000 second, an Intelligent Hybrid Phase detection AF, a robust weather resistant body, an impressive 3-way tilting 3.0” LCD and a 2.36 Million dots Electronic Viewfinder and dual SD UHS-II memory card slots that will capture up to 14 frames per second with the Performance Boost Mode turned on.
All of these features sound impressive (and they are), but the list of specs doesn’t stop there. As mentioned earlier the 4K video quality this camera now records is on par with some of the other professional cameras out there. When filming video you can expect excellent sharpness and low noise when recording up to a maximum of ISO 12800.
Another important feature unique to videographers is the ability to choose a video frame rate. Fujifilm has liaised with various professionals and industry leaders to determine what settings best suit. Within the new Fujifilm X-T2 videographers will be able to select 29.97P, 25P, 24P and 23.98P when filming in 4K and if Full HD is selected; 59.94P, 50P, 29.97P, 25P, 24P and 23.98P at a 100Mbps Video Bit rate.
There are also a lot of settings that can be changed once you press the record button. You will be able to change exposure in ⅓ stop increments, correct the colour and the angle of view. Added to this is the option to change the exposure via the external HDMI port, which is well suited for videographers using external monitors.
When you first handle the Fujifilm X-T2 you will immediately feel the magnesium alloy chassis that has been redesigned based on photographers feedback. With weather resistant sealing to suit rugged outdoor conditions, this professional body is slightly larger than the Fujifilm X-T1 due to improved control dials that turn easily with or without gloves. The new lock buttons located on the shutter and ISO dials are easily pressed to turn on or off the action of selecting a new setting. Also the enlarged drive mode and photometry selection dials can easily be accessed due to this new ergonomic design.
As shown in the video (above) the 1.62 million-dot 3-inch LCD screen has been redesigned to suit photographers. Now with a 3-way tilting screen, the photographer can turn and rotate the screen to a visible position when holding the camera above their head in a portrait orientation. Previously on the Fujifilm X-T1 the screen was only visible in a horizontal orientation.
The launch of the Fujifilm X-T1 saw photographers from many different genres switch over to Fujifilm due to the large range of Fujinon lenses available. Sports and wildlife photographers were among the newly acquainted, but this was not only due to the lens selection, but also the features on the Fujifilm
X-T1 like autofocus and UHS-II memory card compatibility. Learning from this the new Fujifilm X-T2 takes autofocus speed and memory card storage to the next level.
The Fujifilm X-T2 is slightly different in the way the camera focuses when compared to the Fujifilm X-T1. This is because of the new Intelligent Hybrid Phase detection autofocus. The new X-T2 will allow you to select up to 325 autofocus points allowing for precise focus. What this means is no matter whether the subject is within the frame, the camera will autofocus very quickly to pick up the subject.
Adding to the list of new features is also a dual memory card slot that is now capable of recording to two UHS-II compatible cards. What this means for photographers is they can record photos up to 14 frames per second (when Performance Boost mode and Electronic Shutter is selected), which will result in a total of 42 Jpeg frames or 28 RAW frames stored at Lossless compression. This option is only available when the VPB-XT2 grip is on the camera.
Not only does the optional VPB-XT2 (Vertical Power Booster Grip) increase frame rate, but it also will accommodate two additional batteries (NP-W126S) at the same time to boost in shooting interval, shutter release time lag and blackout time while extending 4K video recording to a maximum of 30 minutes.
As mentioned, when you use the optional VPB-XT2 battery grip you can select different frame rates like 14 frames per second, however, if this is too fast 11 frames per second can also be selected.
When 11 frames per second is enabled 75 Jpeg frames or 30 RAW frames stored at Lossless compression can be captured. However, if you require more frames to be recorded before the cameras buffer fills, the frame rate can be dropped to 8 frames per second enabling 83 Jpeg frames or 33 RAW frames to be stored at Lossless compression. Finally, if you need to record an endless amount of Jpeg frames, 5 frames per second can also be selected.
The X-T2’s ISO range of 200 – 12800 (RAW shooting) is exactly the same as the Fujifilm X-Pro2. When recording at high ISO like 3200 or 6400 photographers will find images and video to be very clear resulting in smooth graduation and deeper blacks.
Studio and wedding photographers will enjoy using the Fujifilm X-T2 as the camera can now act as a commander when firing off multiple flash units when using the newly announced Fujifilm EF-EX500 flash. Found within the camera’s menu is the ability to select ‘COMMANDER’ mode, which enables full manual control of up to three supported Fujifilm flash units. Each supported flash can be manual adjusted to ensure you get the best possible picture.
It is Fujifilm’s hope to design a camera that will suit a photographer’s requirements and it is refreshing to see that the X-T2 does this. Something many were not predicting though was the ability to film in 4K. Having mentioned this, it is worth thinking about to expand upon your skills to embrace this chance. Not all photographers will embrace this addition and that is okay, but to those who wish to expand on their skills the feature is there for you to explore and the same can be said to videographers when it comes to taking photos.
This article hasn’t covered all of the specifications nor the implementations of the Fujifilm X-T2, so we would encourage you to follow this global Fujifilm blog which is now supported by Fujifilm Australia, Fujifilm UK, Fujifilm USA and Fujifilm Canada. We also ask you subscribe to the global Fujiguys YouTube channel to learn more about the Fujifilm X-T2 from contributions around the world. Together we are one and together we are here to listen to you the photographer – and now the videographer too.
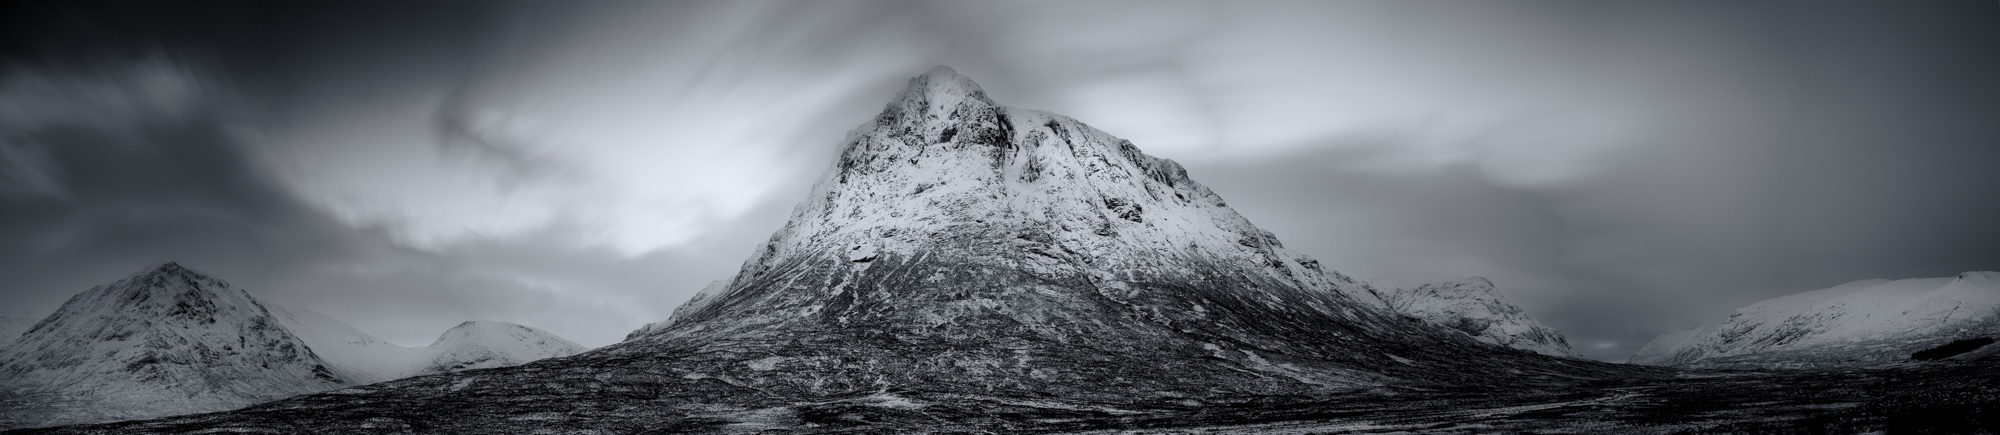
There are many times that using a wide angle or telephoto lens just won’t get the results you want. They’re either too wide or too tight but you know in your heart that your viewpoint is correct.
It’s frustrating and causes many photographers to give up and go home without a shot they’re happy with. However you should persevere and with the introduction of photo-stitching software built into Lightroom and Photoshop you should try the third option which is to shoot a stitched panorama.
By stitching together individual images you can render your scene in greater detail and make extremely large prints without the image breaking up.
For those who want a bit of background early examples of a panorama include the Bayeux Tapestry, at nearly 70 meters in length it’ll take some stitching to get a photograph that will rival that!
I’ve shot panoramas for a number of years and find the discipline fascinating. The normal guidelines of composition do apply, but they also don’t – you have much more area for the viewer to explore, more details being captured and there can be cameo roles for people in the different areas of the image. These all come together to create a story or feeling that literally absorbs the viewer – well that’s the idea anyway!
To shoot your very own panoramic image:
Firstly, if you can – use a tripod
It’ll make stitching the images together far more straightforward. Make sure your tripod is level too – most come with a spirit level but luckily most of the Fuji X series have horizon levels built in. If you press the display/back button on the back of the camera a few times this normally brings it up on screen if it has one. To check that the camera and tripod are level, gently pan the camera from left to right and check the display to see if the level line is straight throughout the motion. When attaching the camera to the tripod – set it so that you are shooting a series of upright images (portrait orientation). You’d be forgiven for thinking that you should shoot three or four landscape images – although you can if you wish, but you will end up with a very strip like image. I have found the upright method to be far more rewarding.
Your focal length is generally a little longer than when shooting conventional landscape images.
For example, I recently shot a panorama in Paris using the XF50-140mm, to get the same result normally I’d have needed to use a XF10-24, but the detail in the bridge and the compression of perspective would have been lost.
In a perfect world you would use a panoramic tripod head and set the nodal point of the lens.
Basically this means the middle of the lens sits over the middle of the tripod – but with good stitching software you can get away without it being set, if you’re careful. The reason for this is that if you have the nodal point set correctly the perspective doesn’t alter as you rotate the camera, but when the lens is off-centre perspective from the lens to the subject distorts ever-so slightly.
Once you have chosen your composition and have panned the camera backwards and forwards a few times to check your image works, you must set your focus and exposure. Once set, do not alter them, otherwise you get very awkward tonal changes between the different images. The same applies to graduated filters – although you can adjust them slightly.
Finally you are ready to shoot!
Start on the left-hand side of your shot and take your first picture. Then turn the camera using a panning motion through about 15 degrees, or using the framing grid on the screen – move it round by 1/3 of the frame – this will give you enough overlap to avoid the distortion caused by turning your camera. Repeat this shooting process until you have completed your full composition.
Once have finished your series – shoot a blank frame so you know where the start and finish is.
You may need to fine tune your shot so always check the image on the back of the camera to make sure you’ve got every aspect of the shot you need.
When you get home the process is very simple.
Load your images into Adobe Lightroom – highlight the pictures that make up your panorama – take your cursor across the top menu bar to the heading ‘Photo’ then scroll down to ‘Photomerge’ and select ‘Panorama’. Lightroom will show you a rough render of the image then simply press OK and a few seconds later you’ll get the stunning panorama you planned.
Occasionally Lightroom doesn’t quite do the job, so if that happens – open the images in Photoshop, use your cursor to navigate through File – Automate – Photomerge – Panorama – the same process will happen only this time you will have a layered Photoshop document to work with.
It will take a little practice to create the perfect image but it’s great fun to try. For more inspiration look at the work of Horst Hamann or Nick Meers
Tell us about yourself and what got you into photography?
I had a fairly round about route into becoming a full-time photographer. My background is in theatre and that’s where I worked for 20 years, first as an actor then stage manager. I bought myself a point & shoot digital camera to go on holiday with my wife in 2004 and just wandering around taking photos rekindled the interest I had in photography as a child. My dad had been a keen amateur and I often had a roll of film and an old Zenit 35mm to play with – then it was back home to develop and print the results.
Fast forward to 2005 when I started to take photography seriously again. I bought myself a DSLR and started to take photos around the theatre I was working in. I’ve never been interested in ‘posed’ imagery and a camera seemed an ideal instrument to document the ‘process’ of theatre – rehearsal photographs, technicians at work and actors acting. From there the theatre I was working at started to use some of my photos as marketing materials, the Arts Council UK commissioned me to photograph some things they were doing in schools, and I got some freelance work photographing Ballroom dancing for a couple of publications – all this work came through contacts of people I knew or had met, I didn’t even have a website at this stage!
Why did you choose to shoot with the Fujifilm X series?
I’m interested in documentary photography and telling stories. Once I started playing with the X-Pro1 (in late 2013) I found a camera that let me do this in a really subtle and intimate way. By this stage, I was a full-time photographer photographing mainly weddings and theatre. Walking into a wedding with an X-Pro1 and a 35mm lens was very freeing – I was no longer the person with the biggest kit in the room. People were not intimidated by such a small and interesting looking camera and I found I could be around any situation and get the shot I was looking for without anyone changing their behavior because the ‘official photographer’ was there.
Most of my work is taken in available light and I’ve never really had a problem getting the results I’m looking for from the Fuji X-series cameras. I work with two X-T1s mostly (with a bit of X100T thrown in) and will shoot on fast primes up to 6400iso without blinking – always I’m looking for the best light in any situation then working out how to tell the story in that light.
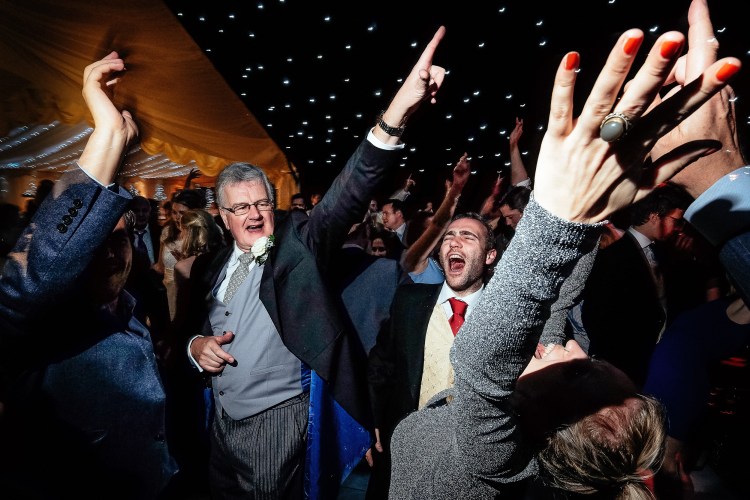
HOWEVER when it comes to the evening of a wedding and everyone is getting down on the dance floor that’s when I break out the flash!
By this stage of the day I figure everyone has relaxed and I can go for a more ‘night clubby’ look with the photos. Dance floors are a dark place, bands or DJs don’t often bring enough light to illuminate them so at this stage I often have to ADD light. But I still want to stay discreet, self contained and mobile. That’s why I choose to use the very tiny Fuji EF-X20 flash on a sync cord attached to my X-T1 (often with the 10-24mm).
With this set up I can get into the middle of the dance floor action, shoot from any angle and no-one cares you’ve got a camera (even when it’s getting ‘messy’ at the end of the night). If I was shooting with ‘Off Camera Flash’ I’d be limited in the look I would get by where my light stands could go – this way I’m a portable studio. Holding the flash in my left hand (usually high above to the side) and the camera in my right but away from my eye. I ‘zone focus’ so the camera is set manually to focus from 4ft to infinity – at f/10 this is really easy and means that I don’t have to worry about AF in low light but just what’s happening in front of my lens.
These are my default setting for Epic Dance Floor shots: ISO 2000, F10, 1/15th, 14mm, get in close and dance your ass off while photographing.
Do you have any tips or tricks you could share with us?
The best thing I could say is to develop your own style and approach to how you photograph. When we start out we all see amazing photographs in a variety of styles and try to copy those in our work – it makes what we do look a little scattergun and inconsistent. Work out what you love photographing, what you are passionate about and a philosophy about how you should approach your photography and then do that. Then do that some more. Then do that better. Then refine it. Do it more. Do it better. Refine it. And on and on it goes.
Every time I pick up a camera I want to create better photographs than I did the last time – better photographs for me equals better photographs for my clients.
What’s next for you?
Put simply – see above. Doing more of what I’m doing but hopefully doing it better.
Contact info
To see more of Andrew’s beautiful photography, please visit his website and social channels:


 The Fujifilm X-T2 is the camera I’ve been waiting for. It’s no surprise it’s here but what I love most is that the consultation period with X-Photographers has delivered a camera that is spot on mechanically. Everything that could have been improved on the X-T1 from the dial locks to the tilting screen has been perfected on the X-T2.


 There are many times that using a wide angle or telephoto lens just won’t get the results you want. They’re either too wide or too tight but you know in your heart that your viewpoint is correct.


 I had a fairly round about route into becoming a full-time photographer. My background is in theatre and that’s where I worked for 20 years, first as an actor then stage manager. I bought myself a point & shoot digital camera to go on holiday with my wife in 2004 and just wandering around taking photos rekindled the interest I had in photography as a child. My dad had been a keen amateur and I often had a roll of film and an old Zenit 35mm to play with – then it was back home to develop and print the results.


