Spring is a wonderful time of year for photography, as nature comes back to life and offers us a wealth of colors and subjects. Here are three ideas for perfect spring photos and the right camera settings for the Fujifilm X-T4.
Capture blossoms
In spring, many trees and shrubs are in full bloom, providing a great opportunity for colorful and beautiful photos. To capture the beauty of the blossoms, it is recommended to use a large aperture to achieve a shallow depth of field and highlight the main subject. The Fujifilm X-T4 offers a maximum aperture of f/1.2, which is ideal for this type of photo.
Camera settings for flower photography:
Aperture: f/1.2 – f/2.8
ISO: 100 – 400
Shutter speed: Depending on the brightness of the day and movement of the subject, between 1/60 – 1/200 seconds.
Focus: Set the focus on the main subject to bring it into sharp focus, and use the bokeh effect for an attractive background blur.
Capture landscapes in full bloom
Spring is also a great time to take landscape photos to capture the beauty of nature. When photographing a wide landscape with flowering trees or fields, it is recommended to use a small aperture to achieve a greater depth of field and capture more details in the landscape.
The Fujifilm X-T4 offers a maximum aperture of f/16, which is ideal for these types of photos.Spring is also a great time to take landscape photos to capture the beauty of nature. When photographing a wide landscape with flowering trees or fields, it is recommended to use a small aperture to achieve a greater depth of field and capture more details in the landscape. The Fujifilm X-T4 offers a maximum aperture of f/16, which is ideal for these types of photos.
Camera settings for landscape photography:
Aperture: f/11 – f/16
ISO: 100 – 400
Shutter speed: Depending on the brightness of the day, between 1/125 – 1/500 seconds
Focus: Use manual focus to focus on the main subject, or autofocus to focus on the landscape. Also use hyperfocal distance to achieve a greater depth of field.
Macro shots of flowers and insects
In spring, there are many insects and flowers that provide an excellent opportunity for macro shots. For such shots, it is advisable to use a high depth of field to bring the subject into focus and capture details. The Fujifilm X-T4 offers a maximum magnification of 0.5x, which is ideal for these types of photos.
Camera settings for macrophotography:
Aperture: f/8 – f/16
ISO: 200 – 800
Shutter speed: Depending on the brightness of the day, between 1/125 – 1/500 seconds
Focus: Use manual focus or autofocus with spot metering to focus on the main subject. Also use focus peaking mode to check the focus point and make sure the subject is in focus.
Additional tips for perfect spring photos:
Use the natural light of the day for natural and soft lighting in your photos. Avoid direct sunlight or strong shadows, which can affect colors or overexpose the subject.
Experiment with different perspectives to capture the subject from different angles and create interesting compositions.
Use RAW mode to have more flexibility in post-processing your photos.
Also use the Fujifilm X-T4’s Film Simulation mode to create different color effects and moods in your photos.
With these tips and camera settings, you can take beautiful and perfect photos with your Fujifilm X-T4 this spring. Have fun with your photography!
Get started with street photography with these handy tips and techniques from Documentary Wedding Photographer Kevin Mullins
Today I’m going to take you through some of the advice given to me by UK wedding photographer Kevin Mullins. Kevin’s approach to candid wedding photography translates precisely into his street photography style.
What makes a good “street” shot?
The three key factors that make a good street image are;
good light
good composition
interesting subject
Get all three and you have a great shot. Two of them can result in a good shot. If you can only have one, make sure it’s the interesting subject
Assignment 1 – Shoot with a theme
Start by simply shooting how you want, but with a theme. Try the theme “angles”. When I took this shot below, it was a nice sunny-but-cool day in Cambridge so there were plenty of things to choose from. Look for good light, some sort of interesting subject, and carefully consider the complete composition.
The bright sun meant that to me, the ‘angles’ would need to come from shadows. This guy caught my eye because he was using his phone one last time before getting on his bike. I wondered who he was contacting, or whether he was just checking a map. About 20 mins later we saw a cyclist nearly get taken out by a car so I wonder now if he was sending a ritual “goodbye, just in case” message. X-T1; XF18-55 @ 35; 1/640 sec; f/5.6; ISO 200
Assignment 2 – Frame your subject
Try to use people to frame shots of other people. Pair up with another photographer and go hunting interesting shots together. Use your partner to help provide a frame for the shot. The theme of “angles” was dropped but otherwise everything applied; light, composition, something of interest that tells a story.
Although personally I find the arm in the foreground a bit distracting, it does give a bit more depth to the image and the bright blue of this guy’s jacket and the sign pull your attention away from the frame . X-T1; XF18-55 @ 35; 1/200 sec; f/5.6; ISO 200
I like this one because the conversation is framed by the arm on the left, and also the stranger on the right. X-T1; XF18-55 @ 55; 1/200 sec; f/5.6; ISO 200
This last one failed the assignment in that it wasn’t framed by a person in the foreground. However, I like it because of the way the light fell on the faces of the people having the conversation. Nice light and begins to tell a story about a meeting in public. X-T1; XF18-55 @ 35; 1/200 sec; f/5.6; ISO 200
Assignment 3 – Spot Metering
The next thing to try is pre-focusing and spot metering. Put your cameras into spot metering and manual focus mode and stand facing a place where people would “break the light”. In other words, pedestrians and cyclists would travel from the bright sunshine, into the shade, or vice-versa. Use the “AF-L” button to pre-focus on the ground where we wanted them to be when we shot and then simply time them right to shoot them just as they cross from the light into the shadow. The camera will adjust for the exposure according to light on the subject, rather than the total light in the scene.
On the X100T, X-T1, X-T10 and X-Pro2 there is a setting that allows you to link the spot metering with the AF box. Activating this allows you to choose the point in your composition to expose for. On cameras without this function the spot metering will only occur in the middle of the frame so you may be slightly limited in your composition.
This shot was actually taken by Kevin himself using his X100T; 1/320 sec; f/16; ISO 640
Assignment 4 – Zone focusing
Get close to your ‘subjects’. Getting close obviously means more chance of affecting the resulting image so it’s key to try to appear like you are not taking photographs. The main reason people need to really see what they are shooting is to make sure you are focusing on the right thing.
Guy working on a market stall. Bikes were everywhere in Cambridge. X-T1; XF18-55 @ 55; 1/90 sec; f/11; ISO 400
Keep your camera in Manual Focus mode, select a nice small (big number) aperture value and then used the focus distance indicator on the screen of the camera to understand where the range of acceptable focus would be.
Focus on the ground a few metres in front of you. Your next challenge is to get in close to people and inconspicuously shoot them getting on with their life. Continuous shooting is also very handy here as it allows you to shoot a few frames, especially good if your subject is moving through your zone focus area.
Assignment 5 – Turn invisible
There is now no need to hold the camera up to your eye so all of your shooting can be at waist level, looking down onto the tilting LCD screen (if your camera has one) to check the overall composition. After a while you will be able to simply look around and be confident that you’re going to capture the interesting subject without them knowing, therefore not influencing or changing the subject, but merely documenting what is going on around you.
Not many people “at work” seemed to really be working. Zone focused and shot from the hip with X-T1; XF18-55mm @ 35mm; 1/64 sec; f/13; ISO 1000
I’m Danish, born in 1964, and have been living in Rome since 1997. I have always loved writing and at a certain point, after my arrival in Rome, I started to collaborate with magazines producing travel articles. It was from this that the Danish Daily wanted to publish a travel article of mine from an Italian island. Unfortunately the PR-photos were of a too poor quality. In other words, I had to do the photos myself. This is when I purchased my first ever 5-mega-pixel camera. That was back in 2003, and since then, my interest in photography has been steadily increasing. I had been working for the Danish Embassy in Rome for ten years, but in 2009 I took the jump to become a full time freelance journalist and photographer shooting travel, culture, food & wine and interviews. Everything with my own imagery.
The journey to Marrakesh
We – a total of eight persons – were doing a 7 day on-the-road-trip round Morocco, two days of which were spent in Marrakesh. As I needed to travel light, I packed only my Fuji gear – Fuji X-E2, the 18-55mm kit lens and the 35 mm lens for portraits & food. I must say that I find this a excellent combination and the overall weight is significantly reduced compared to DSLR gear.
Travelling in a country with a completely different culture to my own I wanted to play it safe. So I asked most people if I could take their photo, especially regarding portraits, which I guess is quite obvious. There were occasions where some scenes were too good to miss, and in these circumstances I fired from the hip, looking elsewhere.
Generally speaking, Marrakesh is a very photogenic location. There are so many varied situations, so wonderfully exotic, with such incredible faces, emotions, the colours, the textures. Everything seems to be calling you to be immortalized.
Future projects
Aside from my daily work, I like to have detailed, lengthy photographic projects and I’ll soon be leaving Rome for my summer holidays. I’ll be driving through the south of Italy to the island of Pantelleria, south of Sicily. During that month of holiday I’m planning on doing a project called “People I met”, taking portraits of people I’d casually meet during that month. On a long term basis, I’m working on a project where I’ll be photographing different kinds of Roman artisans in their working environments. This project will be continuing into 2016.
Outdoor Photographer of the Year 2014 winner Greg Whitton is the latest Fujifilm X Photographer to be featured in our Spotlight series.
Tell us about yourself and what got you into photography?
Well, I’m married to Lisa and as we don’t have any children, it leaves us plenty of free time to enjoy stuff outside of the home. We met through our walking group as we both have a love for the outdoors and it is that which helped me discover a love for photography. Initially I started heading to the hills with mates and just enjoyed climbing hills and mountains, but over time I came to appreciate the landscape and I was ended up trying to capture more than just snapshots of our hiking activities. This then developed into a strong affinity with photography.
How did you develop your style in photography?
I don’t think I really have a style, although just the other day someone said they could single out a “Greg Whitton shot” from others. I wasn’t sure how to take that but they assured me it was a good thing. I’m not sure I really believe it. I’m very much a photographer who strives to capture epic landscapes, typically made that way due to the pattern of weather in them. They tend to be very moody. I’m not a heavy user of post-processing, although I would say that I think I use most of the tools that Lightroom offers. Typically my images follow the same processing workflow which takes two or three minutes. It’s perhaps why they are easier to single out, they exhibit the same characteristics. I’m using colour a lot more these days. By that I mean I’m playing with individual colour channels to achieve a ‘mood’ that I want. It’s surprising just how effective this is, a minor nudge of the blue primary colour channel for example can do wonders.
Why did you choose Fujifilm cameras?
A friend of mine introduced me to them. He was searching for his ‘perfect camera’ and seemed to have a new camera every week, Nikon, Sony, Ricoh, etc. I was using Canon, a 5DmkII. Eventually he got a Fujifilm X-E1 and was raving about the image quality. It was small and lightweight, and it wasn’t full frame. Naturally I didn’t really believe him. However, I started to notice I wasn’t using my own set up very effectively. I was hiking a lot and it was just too heavy. I wasn’t carrying it around my neck and was leaving it in my rucksack. As a result I was missing a lot of shots (I very much tend to shoot handheld on the fly as things happen quickly in the mountains). He showed me some of his RAF files and I have to say, I was impressed. I decided to experiment and bought an X-Pro1 and a bunch of lenses in a cashback deal. I took it on one dual shoot with the Canon. The Canon was on the tripod the whole time for ‘the big shot’ while I ran around the summit of a mountain with the X-Pro1 shooting handheld. When I got home to check the results, I had more useable images from the Fuji than I did from the Canon. When comparing images that were shot side by side, the Fuji had better clarity, less noise and were sharper. That was it, that one shoot persuaded me to ditch the Canon and go full Fuji. I don’t regret it a single bit.
Do you have a photographic philosophy you live by?
Simply shoot what you love and don’t listen to others.
Key inspirations – What & who inspires you?
Colin Prior is one of my photographic heroes. My photographic eye has certainly been influenced by his amazing body of panoramic work. In recent years I’ve followed Julian Calverley because his use of mood in landscape photography is almost second to none. I’ve also become a bit of a fan of David Ward. Every image I see from him fills me with wonder. He can make the most benign foreground subject so incredibly intriguing and unique. It blows my mind sometimes.
Do you have any tips or tricks you could share with us?
Oh crikey, not really. If I told you how I got most of my images you’d realise just how un-professional I am! My few words of wisdom would extend to, if you enjoy shooting the outdoors, then you must do it because you love the outdoors. Try to appreciate them for what they are and don’t get hung up on ‘the shot’. I go out to enjoy the outdoors first. A good photograph is a bonus.
What’s next for you?
Winning Outdoor Photographer of the Year has given me a massive boost in self confidence and opened one or two doors. But I’m learning that it still doesn’t mean people are knocking down your door for stuff. You still have to be pro-active to make the most of it. I’ve been really busy since then, but it’s not all photography, I have a full time job to do too. So, you’d be surprised how little I’ve been able to capitalise on the accolade. I do have a book coming out in August, ‘Mountainscape’ published by Triplekite. It is a book that contains many of my favourite mountain images from the UK, from vistas to more personal work. It’s available to pre-order from www.triplekite.co.uk. Beyond that I’m hoping to launch workshops later in the year (folks can sign up for news on them by contacting me through the website). Mind you, if anyone wants to commission me for anything else, I’m all ears!
I’m looking forward to the next generation of cameras from Fuji, I think we are going to be treated to something special. Recently we’ve seen huge advances in resolution & technology in the digital photography world, mind you, we don’t seem to have been held back by lower resolution, I won a major competition with only 16 megapixels to play with, it was the overall image that won, not how detailed it was. Others have achieved much more with much less. It is an exciting time for digital photography and it’s great to be involved.
Professional wildlife photographer Chris Weston tells us how he got into photography and what sort of shooting philosophy he lives by. He also includes a free eBook containing some great tips for shooting wildlife
Tell us about yourself and what got you into photography?
When I was about 15 years old, I lived in Boston. Unfortunately, not the colourful, vibrant city in the United States but the quiet market town in Lincolnshire, England – historically linked to its American namesake but a place best known for its Dutch-like landscape and the agricultural prowess of its inhabitants. What I am trying to say is, I grew up in a part of England that required much of one’s imagination.
At school one day, I was asked to select my preferred employer for a 2-week work placement. The options weren’t good. Potato planting, bulb cleaning or strawberry picking were three of the more attractive options, as I recall. Seeing my inner turmoil, in a way only dads can, my father asked me what I wanted to do for a career. Without hesitation I replied, “I want to be a photojournalist”.
From where that statement came, I have no idea. Not a clue. I mean, I remember wanting to be (at various stages and in no particular order) a fireman, a policeman, a jet pilot, a train driver, a ski jumper and, of all things, an accountant … but a photojournalist? That was a new one. Even so, at my father’s behest and with the blessing of a somewhat perplexed headmaster, I began my first ever assignment.
How did you develop your style in photography?
While I was on an assignment, about a year after I turned professional, I had a light bulb moment. I was in Tanzania photographing the annual wildebeest migration, as it passed across the Grumeti River. It was a slow day and photographic opportunities were few and far between. I don’t know if you’ve ever paid a lot of attention to wildebeest but they’re not Africa’s most alluring creatures. African’s describe them as, “The animal God created out of the leftover parts of other animals”. Don’t get me wrong, I like wildebeest but they don’t do much. Their day consists of walking in a wide circle eating grass. And that’s about it. Two days into a three-week long project, I was struggling for ideas. How do you continually photograph what amounts to a large brown antelope grazing in a big brown field?
And then it struck me. I started to think about migration and what it really is. Migration is the movement of animals from point A to point B. Movement. Migration is movement and that not wildebeest was the real story. I started to make photographs that captured the story of the migration – wildebeest moving, individually, in a line, in large herds. Suddenly, my photography had purpose and it has been guided by the light from that bulb ever since. We’re not just photographers we’re storytellers. In place of a pen we have a camera but irrespective of the tool our aim is the same: to amuse, emote, inform, educate, and entertain. I believe that inside all of us is a story that is aching to be told, tales that make photography a unique and intensely personal experience.
Why did you choose Fujifilm cameras?
For the past couple of years, I have been advocating that the next major shift in camera design will be the exit of the mirror. The mirror is perhaps the single most-limiting factor in an SLR camera, which is rather surprising given that it has been the mainstay of camera design for nearly 80 years.
First of all, the mirror causes cameras to be far bigger and heavier than necessary. Secondly, to accommodate the mirror, the lens needs to be pushed further forward, increasing the distance between the rear lens element and the sensor (or film) plane, which diminishes the quality of the light transmitted by the lens.
Thirdly, the mirror slapping up against the chamber introduces vibration that, when combined with relatively slow shutter speeds, softens edge detail, reducing image quality further. This is particularly true when using ultra-high resolution DSLR cameras. Finally, mirrors are noisy. The constant slap-slap-slap cuts through the silence of dawn and dusk, echoing across open savannahs and bouncing off woodland trees, startling anxious wildlife into panic.
So, when Fuji announced the launch of the X-T1 mirror-less camera, I was intrigued enough to contact Fujifilm UK. My main question to Fuji was: Is the X-T1 up to the rigors of professional wildlife photography? They answered my question with a question: loaning me an X-T1 body and a couple of lenses they said, “You tell us!” I’ve been using the X-T1 ever since and my investment in Fujifilm products continues to grow.
Do you have a photographic philosophy you live by?
For me, a photograph begins with a caption. That may sound a little back-to-front but if you think about it, really it isn’t. For example, imagine trying to build a house with no architectural drawings. Where would you start? How would you even know what materials you needed? Nobody would approach house building this way, yet the idea that fully formed, well-composed photographs just happen seems to be accepted as the exception to the rule. It’s not. Photographs are designed and crafting an image begins with having something interesting you want to say.
Knowing what to say comes from knowing your subject. The better you know your subject, the more stories you have to tell. I became a wildlife photographer because I’m fascinated by the natural world. How it works, how it fits together and how everything is connected. I often find myself intrigued by inane questions like, “Why are zebras black-and-white striped when they live in a yellow savannah?”
It’s by asking questions and finding answers that I’m able to hit upon new ideas for images, find ways of making interesting photographs of ordinary subjects or different ways to photograph the same subject over and over. It’s how I learn about the natural world and develop a better understanding of wildlife and nature and, to some extent, my part in it all. And knowing yourself, how you feel about things and how things move you is as important a part of the process as the technical aspects of photography.
Key inspirations – What & who inspires you?
Perhaps intriguingly, I’m more inspired by people and events outside of photography. In photographic circles, I admire the work of Michael Nichols, particularly, and, in the very early days, I learned a lot of the basics from Art Wolfe. However, today, science (especially quantum mechanics) and extraordinary people and thinkers, such as astronaut Chris Hadfield, author Yuval Noah Harari and physicist Brian Cox inspire me.
Do you have any tips or tricks you could share with us?
There are so many thoughts, ideas and techniques that have led me to where I am that it’s hard to narrow them down to a few. So, instead, how about I offer Fujifilm readers a completely free e-book titled Nature Photography: Insider Secrets. To get a free copy simply click on this link: Top Wildlife Tips
What’s next for you?
I’m on an amazing personal journey of discovery, looking at how creativity through photography can inspire how we live, as individuals and within communities and society as a whole. It’s a story that I want to share with the world and I’m currently talking to Fujifilm about how we can make that happen. Watch this space!
What started as a project by Chris Upton to create a record of a local coal pit prior to its closure, soon turned into recording a piece of history and a feeling of responsibility to represent the life and work of the mining community.
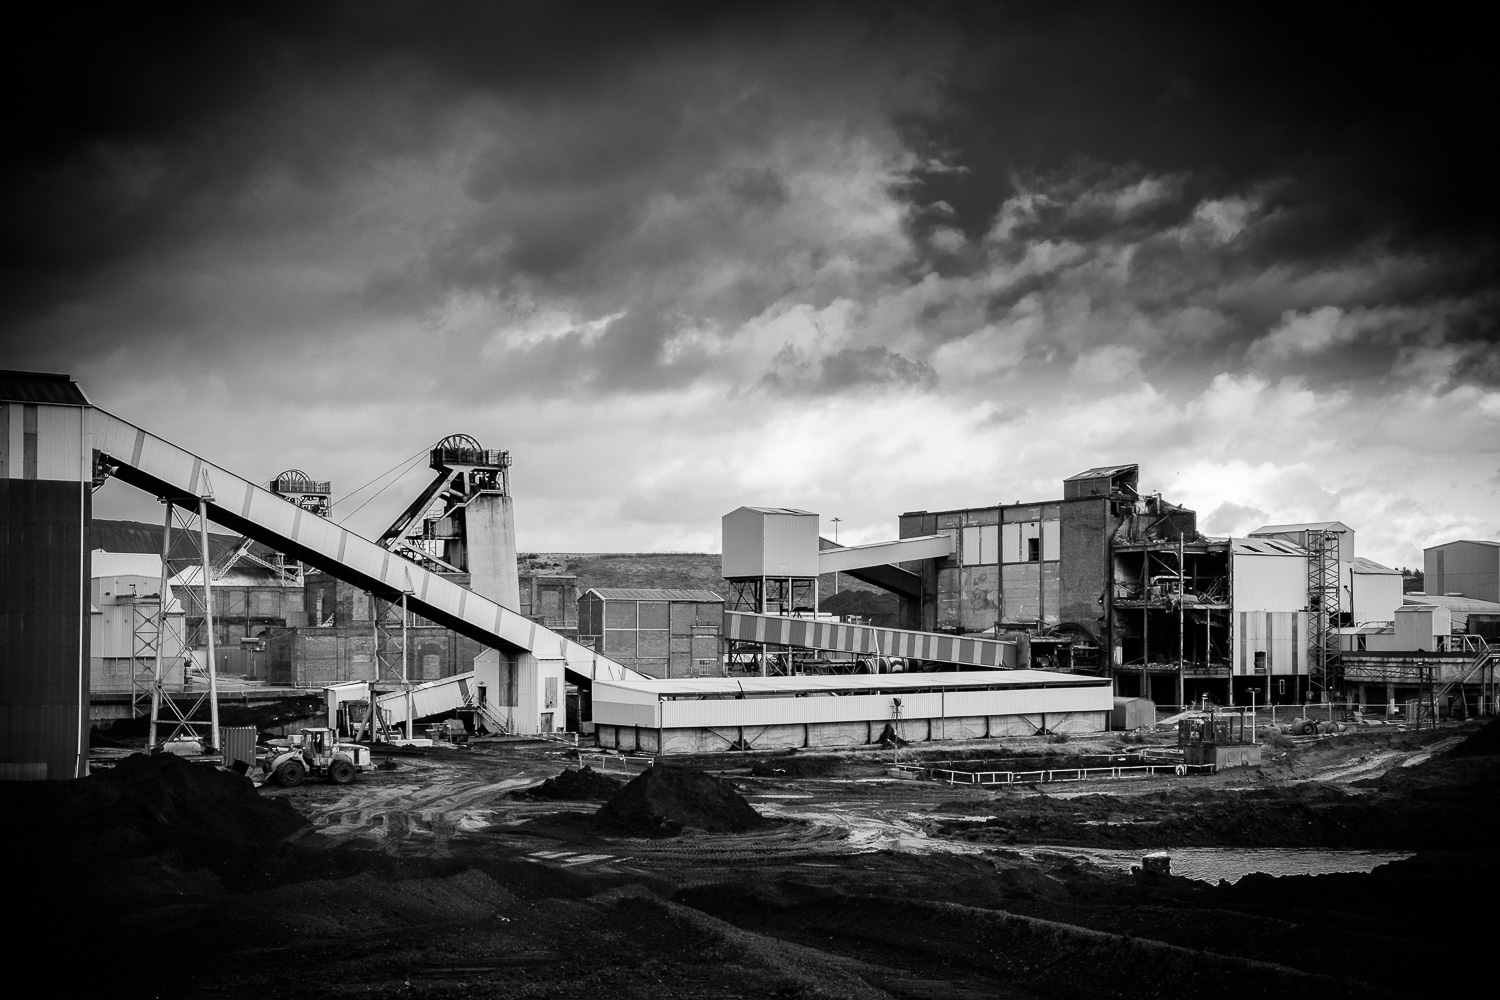
The 10th July 2015 was a landmark date in the history of Nottinghamshire. When the last shift at Thoresby Colliery finished on that day not only did it mark the end of 90 years of mining in the village of Edwinstowe but it signals the end of mining in Nottinghamshire.
The pit opened in 1925 and over the years has employed tens of thousands of local people. It was one of 46 coalmines in Nottinghamshire, which supplied more than 14 million tonnes of coal per year at their peak in the early 1960s.
The first two shafts were sunk to 690m in 1925 and subsequently deepened in the 1950s to the current pit bottom at around 900m depth.
Thoresby Colliery was the first to have fully mechanised coal production and also the first to achieve an annual saleable output of more than a million tons, it became a star performer in the British coal mining industry.
In the late 1980s it raised output to exceed 2 million tons, regularly smashing it’s production records, and the colliery became known as the Jewel in the crown of Nottinghamshire mines. A crown sits proudly on the headstocks in recognition of this achievement.
When the coal industry was nationalised in 1947 it employed a million men at 1,503 pits; prior to the miners’ strike in 1984, there were 180,000 miners at 170 pits. Today there are just two deep mines left, employing about 5,000 men, at Thoresby and Kellingley in Yorkshire. Kellingley will suffer the same fate as Thoresby and closes in the autumn.
UK Coal say market pressures have led to the closure of Thoresby Colliery. Coal generates more than a third of Britain’s electricity, but it is cheaper to import coal from countries such as Russia, South Africa and Colombia than to mine it in the UK.
For the past few months I have been recording the colliery, it’s buildings, plant and people for posterity. It was my aim to create a comprehensive record of the pit at a specific point in time immediately prior to its closure.
It was a chance conversation after giving a camera club lecture that started the ball rolling. A chap in the audience worked at Thoresby and was unfortunately in the first wave of redundancies. He asked if I would be interested in visiting the colliery to take a few pictures. It was a fantastic opportunity and I jumped at the chance. He put me in touch with the Health and Safety manager, I explained what I would like to do and we were off and running. It was at this point, after I had gained their agreement to document the colliery, that the full extent of the task dawned on me.
Starting the project
I visited the colliery on seven occasions, at different times of day, in different lighting conditions, including dawn and dusk. I planned each shoot but found that an outline plan whilst retaining a degree of flexibility to react to opportunities worked best.
At the outset I just toured the site to give me an understanding of the buildings, the machinery, the operation and the people. I took snaps to create a digital scrapbook to help me plan my approach. Essentially I was imbibing the atmosphere much as I would do when visiting a foreign destination for the first time. I wanted to get a real feeling for the place before I started the photography in earnest.
Health & Safety manager Grant was so supportive of my visits giving me more time than I could have wished for. Even coming in at 3.30am for a dawn shoot and returning to work late in the evening to get “the best of the light” didn’t diminish his enthusiasm. In fact he joked that, after watching me, he would now be able to take the best holiday snaps ever! I hope he does.
Gear used
All of the images were shot on a Fujifilm X-T1 or X-E1 camera using a selection of Fujifilm XF lenses including the 10-24, 18-55 and 55-200 zoom lenses and 14, 23, 35 and 56mm primes. I also used a Nissin i40 flash for some shots, though preferred to use natural light wherever possible.
For my portraits, the unobtrusive Fuji equipment allowed me to concentrate on building a rapport with my subjects rather than intimidate them with a large DSLR and f2.8 lens combination. Miners might be tough guy’s and supermodels they certainly are not but they seemed to relax pretty quickly in front of my Fuji lenses.
There were several challenges to overcome not least the light levels that were typically pretty low in all of the buildings. Because of the poor light I used a tripod fitted with a ball and socket head for as many shots as possible. My cameras are fitted with arca swiss type plates so that I can switch from landscape format to portrait very easily and without having to waste time readjusting the tripod.
The mix of different light sources from tungsten, to fluorescent and natural meant it was difficult to assess the ideal colour temperature. However the decision early on to convert all the images to black & white certainly helped counter that problem!
In a coal mine dust was another inevitable and unavoidable issue. As the miners told me it’s not only the dust you can see that is the problem and I was very careful when changing lenses and using two bodies certainly helped. Thankfully the in camera sensor cleaning worked well and I was pleasantly surprised at the minimum amount of dust spotting required.
Working on a project
As my photography has progressed I have found that I prefer to look at a series of images that tell a story rather than seeing individual impactful pictures. Whilst I have adopted this storytelling approach in my travel and landscape photography this project was a whole different ballgame. This wasn’t going to be a six or ten image set but a large body of work that had to be planned and created in a certain style. I found this experience fascinating, though at first it was pretty daunting. However after a couple of visits I had captured some shots I was very pleased with and the plan started to fall into place. I think the discipline required in a project such as this has helped me to improve my photography and it felt good to be succeeding in this new genre of social documentary photography.
In an attempt to capture the “feel” of the colliery, and to bring completeness to the project, I also recorded various sounds around the pit and organised a series of interviews with miners past and present. I will be producing mini AV’s including these sounds and using the miner’s comments in my presentations.
Stretch yourself
It is very easy to stick to what we know in photography and limit yourself to a particular genre. Whilst my experience as a travel photographer, where you are required to be adept at many different genres, undoubtedly helped me there were aspects of this project that were not so familiar. As a result I feel I have grown as a photographer and I would urge you to move out of your comfort zone and try something new. There will be similar opportunities in your area, seek and ye shall find!
Capturing a piece of history
As I progressed through the project I realised that I was not only taking pictures for myself but that I was actually recording a piece of history, an enduring record of a place that, in just a few months time, would be gone forever. With that came a feeling of responsibility, not only to do myself justice but also to represent the life and work of the mining community. Apart from my family photographs, this project is the most important and worthwhile piece of work that I have ever created. Whilst there is clearly interest in the work now, what will its importance be in another 10 or 20 years?
A personal perspective
This project has been a fantastic experience. It has improved my photography, taken me into a different genre and enlightened my knowledge of an otherwise mysterious industry.
It has been a pleasure to work with the team at Thoresby, without whom I would not have been able to produce this body of work. Whilst the colliery may not draw its workers from the immediate village area, as in years gone by, their camaraderie, team spirit, hard work and no nonsense attitude in this tough and uncompromising industry epitomise the best of British workers. The closure of Thoresby truly is the end of an era.
What next?
I feel it is important to showcase my images to as wide an audience as possible, especially in the local area. Therefore, after securing feature in the local and national press, I will be staging a major exhibition in Nottinghamshire and am planning to produce a book – more details to follow.
To see more Thoresby images and to keep updated on the project developments please visit my website www.chrisuptonphotography.com
Check out the latest updates to the Fujifilm X Photographers galleries. Featuring inspirational imagery by Damien Lovegrove, David Cleland, Jeff Carter, Kevin Mullins, Kerry Hendry and Matt Hart
So here’s some exciting news, the official X-Photographers website has been updated!
Six of our UK X-Photographer’s have seen further images added to their current galleries to bring even more beauty to the site. So relax, grab a cuppa and take a moment to discover some stunning new works of art within the Fuji realms.
Damien Lovegrove
Damien Lovegrove left his role as a cameraman and lighting director at the BBC back in 1998 after 14 successful years to create the renowned Lovegrove Weddings partnership with his wife Julie. Together they shot over 400 top weddings for discerning clients worldwide. In 2008 Damien turned his hand to shooting beauty and portraiture and has since amassed a dedicated following for his distinctive art. Damien now divides his time between teaching the next generation of photographers and photographing personal projects. His book Chloe-Jasmine Whichello is highly regarded as a portrait style guide and his website galleries have over 2000 images to browse through among the 30 categories.
Described as a living legend, Damien is on a roll with the best of his work yet to come.
David Cleland is a landscape and reportage photographer based in Belfast, Northern Ireland.
He is best known for his landscape and documentary photography which has featured in a number of photographic exhibitions. His solo exhibition, an exploration of the decay of a 400-year evacuated mill received critical acclaim. David also teaches film and animation applying the rules of still photography to the art of moving image.
David’s work has been accepted by Getty Images and been published in a number of national publications and used in numerous book covers.
David has written for a number of publications on the importance of photography in education and also produced tutorials and papers on a range of photography techniques.
MacLean Photographic was founded in 1996 and takes its name from owner Jeff Carter’s full name – Jeffrey Stuart MacLean Carter.
With over 20 years experience in several fields, including commercial, sport, landscape, travel and photo-journalism, Jeff Carter is based in Dunbar, near Edinburgh in Scotland. However he travels the world with his work in the motorsport and automotive industry and is constantly on the lookout for that next great image to capture.
As well as providing photographic services to editorial and commercial clients, MacLean Photographic runs a number of Photographic Workshops and Tours for individual or small groups of photographers of all abilities in and around East Lothian.
Kevin is pure documentary wedding photographer. He started shooting weddings professionally in 2008 and since then has photographed weddings right across the UK and Europe. Shooting in a documentary style he strives to tell the story of the wedding through photojournalism, rather than “traditional” contrived wedding photography.
Kerry is an award winning fine art equestrian photographer, shooting commissions across the UK and worldwide. Her work has also been published in a number of UK and international magazines, websites and blogs. Kerry was also the first female UK photographer to be named as a Fuji X-Photographer, joining a group of brand ambassadors worldwide.
Matt is a black & white street and event Photographer based in Liverpool, England.
His journey through photography has been over 40 years mostly using film. He still shoots film, but most recently he prefers the freedom and flexibility of the digital medium striving to retain the integrity of the original image.
Annual projects have helped him to focus on his personal development within the industry, constantly challenging his own ideas and concepts and forcing him to learn new skills. In 2013 he carried out a Year of Black and White project, this made him rethink his whole style and camera system.
Matt’s stock images have been used in advertising all over the world, his work has also been published in many books and magazines, including many photography magazines.
Matt runs Street Photography workshops and courses around Liverpool and other UK cities passing on his tricks and techniques in Street Photography and processing in black and white.
In this tutorial I wanted to give you some of my favourite tips to get you started with landscape photography from the more obvious tips to some of the lesser known ones. I have not listed them in order of importance as I believe this is subjective, more so the order in which they came to mind.
Remember, you don’t have to apply any or all of these ideas to take a great landscape picture, but it may just help you on your way.
Shoot Raw
Although Fujifilm JPEGs are renowned for their quality, when shooting landscapes I strongly recommend that you shoot RAW. This is because more image ‘information’ is retained in the image than from a JPEG and this will allow more flexibility when correcting exposure, enhancing colours and boosting tones. RAW files can be processed & converted with the camera specific bundled software or you can use popular programs like Adobe Lightroom, Capture One etc.
Essential accessories you may have overlooked
When you’re going to be standing in the dark on a misty morning up to your kneecaps in mud there is nothing worse than not having the right gear to keep you warm and comfortable; after all, you may be out for a few hours in these conditions. Here are some accessories that you might have overlooked taking with you:
Wellies – May be obvious for wearing in marshland environments but also extremely helpful on the beach (where you might normally associate wearing sandals)
Headtorch – When going out to shoot a sunrise, finding the perfect location can be really hard if you cannot see where you are going. Make sure that it is a headtorch rather than standard torch to keep your hands free for more important things.
Strong windproof umbrella – When shooting long exposures it is vital to keep the camera as still as possible. A tripod is a must-have accessory but I’d also recommend using an umbrella to keep strong winds from hitting the tripod & camera during these long exposures. As an obvious bonus it will also keep you dry, which is particularly important if you need to switch lens.
Waterproof jacket with zip-lock pockets – Not just to keep you dry, but more importantly to keep useful camera accessories close to hand. Things like spare batteries, remote release cable, cleaning cloth etc. Whether dawn or dusk, when the sun rises or sets it happens very quickly and this is exactly when you want all accessories within easy reach.
A further tip is to keep as much gear in your car boot at all times. That way in your daily travels if you see a beautiful landscape, you can just jump out whatever the weather, walk cross-country across muddy terrain and have a much more enjoyable experience.
Think about composition even when you don’t have a camera with you!
Training your eye to ‘see‘ the best possible shot is probably the most important skill you could hone. The key point here is to imagine the frame of your camera whenever you see something beautiful. Think about all aspects of the shot; where would you stand to take the picture? Where would you position the tree/boat/sun in the frame? What lens would you choose and why? What aperture might you select to impact on the depth of field?
The more you ask yourself these questions, the quicker you answer them too. This means when you actually go to take a picture, you might just get it perfect first time round.
When you find a nice landscape location, try every conceivable angle you can think of until you get ‘that shot’ that brings a huge smile to your face. If that means getting down on your hands and knees, let it happen. After all, the picture you take could end up being your favourite of the day, month or even the year. And don’t be afraid to try an angle, look back at the image and think ‘That was no good’ because it is all about learning what works and what doesn’t.
Remember, the more you experiment, the more ‘mistakes‘ you make, the quicker you will find your own style and know what works for you. Here’s a shot I took that ruined my jeans and shoes, but to me, it was worth it!
Use ND grad filters
You may have heard the term ‘ND grad filter’ or ‘Graduated neutral density filter’ but not necessarily known what it means. Think of an ND grad filter as a pair of gradient sunglasses (the ones that go from dark to transparent) for your camera lens. Its job is to stop a specific amount of light from reaching the sensor of your camera – but why would you want to do this?
Well, when you look at a sunset with the human eye, you can see all the detail in the lights of the sky and shadows of land without any problem. Unfortunately, even the best cameras cannot do this as well as the human eye can. Therefore to try and get the best reproduction of what the eye can see the camera is going to need a little help.
This is where the ND grad filter comes in. By choosing the right strength ND grad filter and positioning it correctly in the frame, you can perfectly balance the exposure above and below the horizon to give a stunning image that is colourful, full of tonal detail and a much truer representation as to how you saw it with your own eyes.
Your next question may be which ones should I buy? Or how exactly do I use them? My recommendation is to read forums, ask other photographers and watch videos on YouTube to get a good understanding of the best practices to ensure great results.
Check the weather
Even within small regions the weather can vary quite a bit. You may find that location A is raining in the morning but location B is not. Use this information to your advantage, amend your itinerary to get the very best out of your day. There are lots of free weather apps for smartphones out there so have a look around to find one that suits you best.
Prepare an itinerary
When you go away on a specific landscape photography trip, take the time to plot out the locations you want to visit, what times you want to visit them and how long you will spend at each location. Although this sounds very regimented it will help to keep your trip on track. Of course, if you find one of the locations particularly beautiful stay there longer, enjoy the experience. Simply think of the itinerary as a check list or a guide to get the most out of your trip as possible.
Find the sweet spot for your lens
Getting the best out of your lens is important, especially in landscape images. Now if you are looking to get as much in focus as possible in your photo, simply set your lens to the smallest aperture available (which is the largest number) for example: f/16 or f/22. But if you are looking for the sweet spot of your lens (where it performs best in terms of clarity and sharpness), this is usually around 2-3 stops from the maximum aperture of the lens (which is the smallest number) for example: if you are using the XF14mmF2.8 lens then you expect to see the sweet spot at around f/8 as this is 3 stops from f/2.8.
Here are some other examples:
Lens
Maximum Aperture
+1 stop
+2 stops
+3 stops
XF14mm
f/2.8
f/4
f/5.6
f/8
XF10-24mm
f/4
f/5.6
f/8
f/11
XF18-55mm
f/2.8*
f/4*
f/5.6*
f/8*
* at 18mm
It doesn’t mean that you have to abide by this rule of thumb but it can help you find the best quality from your lens quickly. If you find some spare time, I would recommend setting the camera on a tripod, take the same picture on a few different apertures with the same lens and then look back at the results – find an aperture that gives you the perfect balance between depth of field, sharpness and image quality. Once you know what it is, use it as a starting point when out and about taking shots.
Is there a ‘right’ hour to shoot landscapes?
One of the first tips to help capture better landscape images is to shoot at the ‘right‘ time of day. The golden hour is widely considered as the ‘best‘ time of day to take a landscape image. It is the hour in which the sun is rising or setting. This is due to a number of reasons but the main ones being the rich warm colours in the sky and the long trailing shadows that are created.
Don’t think that the only time you can take great pictures is at golden hour however, so many stunning images have been created at all times of day. Just think of it as a good starting point.
Extra tip: The time just before a sunrise or after a sunset is a great opportunity to take pictures too. This is known as the Blue Hour, it is called this because the indirect sunlight creates a blue hue in the sky and can help produce some of the most beautifully natural subdued tones.
Example image of the blue hour
The Photographer’s Ephemeris (TPE)
This is one of the most useful tools in a landscape photographer’s bag of tricks. It is a third party application map-centric sun/moon calculator that shows how the light falls on the land. This allows you to know precisely where the sun is going to rise/set in a specific location way ahead of actually being there. It can come in handy when creating your itinerary as you can plot out the suns movements across a virtual map. The application is available on desktop, iOS and Android devices so it can be taken on-the-go as well.
When shooting any image it is very important to maximise the amount of detail captured from the lowlights to the highlights. This is especially the case with landscapes due to the difference in the exposure between the land and sky. You can use your eye to judge whether an image is overexposed or not when it is very obvious, but I strongly recommend you use the camera’s histogram to tell the full story. It will allow you to make much smarter decisions when deciding the best exposure for the shot.
You may or may not know that when the highlight details in a scene are overexposed and burned out they are impossible to recover and get back regardless of how good you might be in post-editing. This could mean white blobs in the sky instead of detailed clouds or white mass areas in the sea instead of crashing waves etc.
So how do you avoid it? Well, shoot RAW (to maximise post production flexibility) and then look at your histogram. You want to aim to get the bulk of the histogram information to sit on the right hand side of the scale – this is known as exposing to the right. The most important part of this technique to ensure that the trace of the histogram does not peak right at the end of the right hand side as this would mean the highlights have been lost / burned out. An easy way to adjust this can be to use the Exposure Compensation dial / button found on the camera and decrease the exposure in 1/3EV at a time and then recheck the histogram until it looks perfect.
Don’t panic
Making mistakes is a natural part of learning any skilled craft. Accept that you are going to make mistakes along the way. You may take blurred shots, blow the highlights to kingdom come and delete your favourite image from the memory card by accident, but in the end, with practice, you will be a creative machine that can make beautiful images wherever you are, whatever time of day and with any camera & lens combination. Enjoy the journey and don’t panic, it will happen.
As with any tutorial there is always more that could be said, more tips that could be shared but the idea here is to give you a good starting point which you can grow from. Ask questions with other photographers, search tutorials online, share your images and ask for constructive criticism, look at work from inspirational landscape photographers and most importantly, enjoy photography.
Photographer Ian Boys takes you on a photographic journey around California and Nevada and shares some insightful information in case you are thinking about undertaking a similar journey yourself
I’m a people photographer normally – portraits, the odd wedding and so on. But on this trip I decided I’d give landscape photography my first serious attempt ever, after 25 years of shooting. Of course, I’d taken landscapes before when I happened to come across something that looked good but this was different: I’d make sure I got to the right place at the right time for the best light even if it meant sleeping (or failing to sleep!) in the car.
Before I went I researched my route using Flickr and Google maps. The latter was especially helpful not just for seeing if a mountain would be lit at dawn or dusk but also to see what other images had been taken nearby. This pointed me towards quite a few fascinating sights that I would never have come across otherwise. In the very bottom right hand corner of a Google maps screen is a double up arrow that reveals scenes you may not otherwise have considered.
Dear reader – I even bought a tripod. Many of you will wonder what the big deal is but it went so against my usual style of shooting that it felt like a jet pilot shopping for a submarine. But as it turned out it proved invaluable.
One last act of preparation – I looked at the absolutely stellar landscape work shown on the fredmiranda.com landscape forum and learned about things like focus stacking and night photography, things I vaguely knew about only in theory. One night before I left I went out and practised the techniques, with terrible results. But that’s how I learn.
Why the Desert?
In 1993 I worked in Somalia during the war there and travelled and lived in the northern desert communities. I fell in love with the open spaces, the peace of the evenings and the huge skies. Since then I’ve visited other deserts, notably on the India-Pakistan border and Arizona. I like the open road, the small communities and the sense that in the desert everyone can just be themselves. It is the polar opposite to the metropolitan posing of modern cities. In England I live in a small village on the doorstep of the Peak District National Park. Manchester is very close but I rarely visit.
I wanted to shoot the road, the space, the ghost towns, the mountains and the night skies, with a detour to Yosemite. There are so many fantastic wilderness parks on the Nevada/California border that going to LA or San Francisco was never an option. One tip though – when they say don’t walk in parts of Death Valley after 10 am they mean it! I once walked out at night and got back to the car at 0845 and it was already so hot. Those pictures of graves aren’t put there for your amusement.
Kit List
For the last several years I have travelled only with a Fujifilm x100 series camera – Hong Kong, New York, Volgograd, Sri Lanka and elsewhere. The x100 series are superb, not only because of the results but also because of their size and weight. But this time I’d need a bit more choice in lenses.
I decided to take the X-T1 and the 14, 23 and 56mm lenses. These are widely recognised as the best primes available (although the new 16 may have usurped the 14, I don’t know for sure yet). The 23mm would be my standard landscape lens, the 56mm would give me the extra reach one sometimes needs to isolate part of the scene and the 14mm would be perfect for night sky photography as it allows a 25 second exposure under the “600 rule” that governs whether stars are rendered as points or streaks.
The 18-55mm was under consideration but although it’s good, these other lenses are fantastic. The difference does really show.
I also took my new Manfrotto 055 tripod, 4 batteries and a remote cable release as well as a charger that allowed the batteries to be recharged while driving. Definitely a bonus for this kind of trip. I also took a big LED video light that allowed me to get set up in the moonless desert night and sometimes to light paint foreground rocks. Backlit dials and controls would be nice but are probably impractical in a small camera.
Technical Notes
Although I shot everything in JPG+RAW, all the final images except the night shots were actually from the in camera JPG’s. I used the Astia setting for all of them – it helped keep the set coherent and provides great colours without the overblown look that Velvia brings. In particular Astia renders skies very well, better (to my taste at least) than any of the other settings.
In general, I shot in Aperture Priority and used the Exposure Compensation Dial to give me the look I wanted. For some shots, especially those shot in the evening or at night I used manual exposure. One morning I rode the shutter dial all the way from 2 minutes to ¼ second as the sun rose over a freezing mountain lake. I was inside an aluminium shelter bag loving every minute of it as the light changed. The shots were terrible, as you’d expect from someone who has never done that kind of shot before. As I say, I’m not a landscape photographer but I’m so glad I saw it.
Some things did work better than expected though. Focus stacking involves sticking your camera on a tripod (weird!) and gradually changing focus so that over the course of a dozen shots or so you have focussed on all parts of the shot. You then combine them automatically (or manually, for the masochists) in Photoshop. The 14mm is absolutely perfect for this as the manual focus “pull clutch” allows you to gradually work the focus through the scene at an optimum aperture for sharpness of f5.6. In combination with the tilt screen and focus peaking (Red High for me) of the X-T1 it really couldn’t be easier, certainly much easier than with the optical viewfinder of a standard DSLR. Because it was a new technique for me, I also took a “safety shot” at f11 in case the intricacies of the procedure were beyond me but actually it is simple and the results were very much better than with the single high depth of field shot. It doesn’t matter how many times you read about it, doing it in the field is the best way to learn it. Here is a focus-stacked shot from Death Valley:
Another technique that worked well was ultra high resolution patchwork shooting with the 56mm, where I’d take perhaps 20 shots of a scene in rows and columns and stitch them together afterwards. I’m not really sure what I’d need a 200 megapixel file for but it’s nice to know it works really well and that you can zoom in one the tiniest detail from miles away. One day I’m sure I’ll find a use for it and now that I’ve done it, it’s a technique in my arsenal. Sometimes though it was more practical to use the sweep panorama feature. In this particular shot I tried both techniques (a 4 shot manual blend and the in-camera panorama) and the in camera stitch was smoother, although lower resolution. At 6400 pixels across, it still has plenty enough for me.
Night photography was fantastic in the desert: there are few lights to begin with and in Death Valley those that exist must be shielded from the sky. This was my first ever attempt at a Milky Way shot (thank you Youtube!) and as laughable as it might be to the more experienced night shooters, I’m rather pleased with it.
Notes on individual shots
This shot was actually taken on Aperture Priority from the driver’s seat with -2 stops exposure compensation dialled in. I was using the 23mm at iso 1600. The extraordinary EVF of the X-T1 let me ensure that there was still some light visible on the ground while at the same time allowing me to make sure the highlights weren’t blowing out. The high dynamic range of the X-T1 kept it all together.
This is a stitch of two horizontal shots taken at Mono Lake. There’s not a stack more to say about it except that a single 14mm shot would have looked quite different. Modern tools make this kind of stitching quite easy, even for a landscape novice and the methods are a simple search away.
This was a ten second shot of my hire car. I had stopped for a sunset but frankly I’ve seen better. I did like the way the car looked though and with the interior light on and a long enough exposure to lighten the sky and ensure passing traffic left pleasing trails and illumination I think the shot works. It was also shot with my 56mm lens, perhaps an odd choice but something I’ll bear in mind to try again next time. I love that lens.
Here’s a very different kind of car shot, a quick snapshot as I crossed the street. This old Mustang matched the sky and worked well with the yellow lines. It is (clearly) a quick grab shot – I was on my way to get a burger after several hours shooting one searingly hot morning – but it is a testament to how quickly the X-T1 will react if necessary. It starts up quickly, focuses quickly and fires without shutter lag. That’s what I want in a camera.
OK, two last shots before I’m told to knock it off! Nevada’s an odd place. But I’d never have found either of these without doing some research before I went.
So in summary – every camera is a compromise. But the X-T1 offers high quality, superb lenses, light weight and bulk, accurate focus, exposure and white balance, a tilting LCD that is way more useful than I thought and a very high chance of getting the right photo on the first shot thanks to the excellent EVF with its exposure preview, focus peaking, colour rendition and other features. I use it for all my more serious work, together with the x100T. But the X-Pro 1 still has a piece of my heart.