So here’s some exciting news, the official X-Photographers website has been updated!
Six of our UK X-Photographer’s have seen further images added to their current galleries to bring even more beauty to the site. So relax, grab a cuppa and take a moment to discover some stunning new works of art within the Fuji realms.
Damien Lovegrove
Damien Lovegrove left his role as a cameraman and lighting director at the BBC back in 1998 after 14 successful years to create the renowned Lovegrove Weddings partnership with his wife Julie. Together they shot over 400 top weddings for discerning clients worldwide. In 2008 Damien turned his hand to shooting beauty and portraiture and has since amassed a dedicated following for his distinctive art. Damien now divides his time between teaching the next generation of photographers and photographing personal projects. His book Chloe-Jasmine Whichello is highly regarded as a portrait style guide and his website galleries have over 2000 images to browse through among the 30 categories.
Described as a living legend, Damien is on a roll with the best of his work yet to come.
David Cleland is a landscape and reportage photographer based in Belfast, Northern Ireland.
He is best known for his landscape and documentary photography which has featured in a number of photographic exhibitions. His solo exhibition, an exploration of the decay of a 400-year evacuated mill received critical acclaim. David also teaches film and animation applying the rules of still photography to the art of moving image.
David’s work has been accepted by Getty Images and been published in a number of national publications and used in numerous book covers.
David has written for a number of publications on the importance of photography in education and also produced tutorials and papers on a range of photography techniques.
MacLean Photographic was founded in 1996 and takes its name from owner Jeff Carter’s full name – Jeffrey Stuart MacLean Carter.
With over 20 years experience in several fields, including commercial, sport, landscape, travel and photo-journalism, Jeff Carter is based in Dunbar, near Edinburgh in Scotland. However he travels the world with his work in the motorsport and automotive industry and is constantly on the lookout for that next great image to capture.
As well as providing photographic services to editorial and commercial clients, MacLean Photographic runs a number of Photographic Workshops and Tours for individual or small groups of photographers of all abilities in and around East Lothian.
Kevin is pure documentary wedding photographer. He started shooting weddings professionally in 2008 and since then has photographed weddings right across the UK and Europe. Shooting in a documentary style he strives to tell the story of the wedding through photojournalism, rather than “traditional” contrived wedding photography.
Kerry is an award winning fine art equestrian photographer, shooting commissions across the UK and worldwide. Her work has also been published in a number of UK and international magazines, websites and blogs. Kerry was also the first female UK photographer to be named as a Fuji X-Photographer, joining a group of brand ambassadors worldwide.
Matt is a black & white street and event Photographer based in Liverpool, England.
His journey through photography has been over 40 years mostly using film. He still shoots film, but most recently he prefers the freedom and flexibility of the digital medium striving to retain the integrity of the original image.
Annual projects have helped him to focus on his personal development within the industry, constantly challenging his own ideas and concepts and forcing him to learn new skills. In 2013 he carried out a Year of Black and White project, this made him rethink his whole style and camera system.
Matt’s stock images have been used in advertising all over the world, his work has also been published in many books and magazines, including many photography magazines.
Matt runs Street Photography workshops and courses around Liverpool and other UK cities passing on his tricks and techniques in Street Photography and processing in black and white.
In this tutorial I wanted to give you some of my favourite tips to get you started with landscape photography from the more obvious tips to some of the lesser known ones. I have not listed them in order of importance as I believe this is subjective, more so the order in which they came to mind.
Remember, you don’t have to apply any or all of these ideas to take a great landscape picture, but it may just help you on your way.
Shoot Raw
Although Fujifilm JPEGs are renowned for their quality, when shooting landscapes I strongly recommend that you shoot RAW. This is because more image ‘information’ is retained in the image than from a JPEG and this will allow more flexibility when correcting exposure, enhancing colours and boosting tones. RAW files can be processed & converted with the camera specific bundled software or you can use popular programs like Adobe Lightroom, Capture One etc.
Essential accessories you may have overlooked
When you’re going to be standing in the dark on a misty morning up to your kneecaps in mud there is nothing worse than not having the right gear to keep you warm and comfortable; after all, you may be out for a few hours in these conditions. Here are some accessories that you might have overlooked taking with you:
Wellies – May be obvious for wearing in marshland environments but also extremely helpful on the beach (where you might normally associate wearing sandals)
Headtorch – When going out to shoot a sunrise, finding the perfect location can be really hard if you cannot see where you are going. Make sure that it is a headtorch rather than standard torch to keep your hands free for more important things.
Strong windproof umbrella – When shooting long exposures it is vital to keep the camera as still as possible. A tripod is a must-have accessory but I’d also recommend using an umbrella to keep strong winds from hitting the tripod & camera during these long exposures. As an obvious bonus it will also keep you dry, which is particularly important if you need to switch lens.
Waterproof jacket with zip-lock pockets – Not just to keep you dry, but more importantly to keep useful camera accessories close to hand. Things like spare batteries, remote release cable, cleaning cloth etc. Whether dawn or dusk, when the sun rises or sets it happens very quickly and this is exactly when you want all accessories within easy reach.
A further tip is to keep as much gear in your car boot at all times. That way in your daily travels if you see a beautiful landscape, you can just jump out whatever the weather, walk cross-country across muddy terrain and have a much more enjoyable experience.
Think about composition even when you don’t have a camera with you!
Training your eye to ‘see‘ the best possible shot is probably the most important skill you could hone. The key point here is to imagine the frame of your camera whenever you see something beautiful. Think about all aspects of the shot; where would you stand to take the picture? Where would you position the tree/boat/sun in the frame? What lens would you choose and why? What aperture might you select to impact on the depth of field?
The more you ask yourself these questions, the quicker you answer them too. This means when you actually go to take a picture, you might just get it perfect first time round.
When you find a nice landscape location, try every conceivable angle you can think of until you get ‘that shot’ that brings a huge smile to your face. If that means getting down on your hands and knees, let it happen. After all, the picture you take could end up being your favourite of the day, month or even the year. And don’t be afraid to try an angle, look back at the image and think ‘That was no good’ because it is all about learning what works and what doesn’t.
Remember, the more you experiment, the more ‘mistakes‘ you make, the quicker you will find your own style and know what works for you. Here’s a shot I took that ruined my jeans and shoes, but to me, it was worth it!
Use ND grad filters
You may have heard the term ‘ND grad filter’ or ‘Graduated neutral density filter’ but not necessarily known what it means. Think of an ND grad filter as a pair of gradient sunglasses (the ones that go from dark to transparent) for your camera lens. Its job is to stop a specific amount of light from reaching the sensor of your camera – but why would you want to do this?
Well, when you look at a sunset with the human eye, you can see all the detail in the lights of the sky and shadows of land without any problem. Unfortunately, even the best cameras cannot do this as well as the human eye can. Therefore to try and get the best reproduction of what the eye can see the camera is going to need a little help.
This is where the ND grad filter comes in. By choosing the right strength ND grad filter and positioning it correctly in the frame, you can perfectly balance the exposure above and below the horizon to give a stunning image that is colourful, full of tonal detail and a much truer representation as to how you saw it with your own eyes.
Your next question may be which ones should I buy? Or how exactly do I use them? My recommendation is to read forums, ask other photographers and watch videos on YouTube to get a good understanding of the best practices to ensure great results.
Check the weather
Even within small regions the weather can vary quite a bit. You may find that location A is raining in the morning but location B is not. Use this information to your advantage, amend your itinerary to get the very best out of your day. There are lots of free weather apps for smartphones out there so have a look around to find one that suits you best.
Prepare an itinerary
When you go away on a specific landscape photography trip, take the time to plot out the locations you want to visit, what times you want to visit them and how long you will spend at each location. Although this sounds very regimented it will help to keep your trip on track. Of course, if you find one of the locations particularly beautiful stay there longer, enjoy the experience. Simply think of the itinerary as a check list or a guide to get the most out of your trip as possible.
Find the sweet spot for your lens
Getting the best out of your lens is important, especially in landscape images. Now if you are looking to get as much in focus as possible in your photo, simply set your lens to the smallest aperture available (which is the largest number) for example: f/16 or f/22. But if you are looking for the sweet spot of your lens (where it performs best in terms of clarity and sharpness), this is usually around 2-3 stops from the maximum aperture of the lens (which is the smallest number) for example: if you are using the XF14mmF2.8 lens then you expect to see the sweet spot at around f/8 as this is 3 stops from f/2.8.
Here are some other examples:
Lens
Maximum Aperture
+1 stop
+2 stops
+3 stops
XF14mm
f/2.8
f/4
f/5.6
f/8
XF10-24mm
f/4
f/5.6
f/8
f/11
XF18-55mm
f/2.8*
f/4*
f/5.6*
f/8*
* at 18mm
It doesn’t mean that you have to abide by this rule of thumb but it can help you find the best quality from your lens quickly. If you find some spare time, I would recommend setting the camera on a tripod, take the same picture on a few different apertures with the same lens and then look back at the results – find an aperture that gives you the perfect balance between depth of field, sharpness and image quality. Once you know what it is, use it as a starting point when out and about taking shots.
Is there a ‘right’ hour to shoot landscapes?
One of the first tips to help capture better landscape images is to shoot at the ‘right‘ time of day. The golden hour is widely considered as the ‘best‘ time of day to take a landscape image. It is the hour in which the sun is rising or setting. This is due to a number of reasons but the main ones being the rich warm colours in the sky and the long trailing shadows that are created.
Don’t think that the only time you can take great pictures is at golden hour however, so many stunning images have been created at all times of day. Just think of it as a good starting point.
Extra tip: The time just before a sunrise or after a sunset is a great opportunity to take pictures too. This is known as the Blue Hour, it is called this because the indirect sunlight creates a blue hue in the sky and can help produce some of the most beautifully natural subdued tones.
Example image of the blue hour
The Photographer’s Ephemeris (TPE)
This is one of the most useful tools in a landscape photographer’s bag of tricks. It is a third party application map-centric sun/moon calculator that shows how the light falls on the land. This allows you to know precisely where the sun is going to rise/set in a specific location way ahead of actually being there. It can come in handy when creating your itinerary as you can plot out the suns movements across a virtual map. The application is available on desktop, iOS and Android devices so it can be taken on-the-go as well.
When shooting any image it is very important to maximise the amount of detail captured from the lowlights to the highlights. This is especially the case with landscapes due to the difference in the exposure between the land and sky. You can use your eye to judge whether an image is overexposed or not when it is very obvious, but I strongly recommend you use the camera’s histogram to tell the full story. It will allow you to make much smarter decisions when deciding the best exposure for the shot.
You may or may not know that when the highlight details in a scene are overexposed and burned out they are impossible to recover and get back regardless of how good you might be in post-editing. This could mean white blobs in the sky instead of detailed clouds or white mass areas in the sea instead of crashing waves etc.
So how do you avoid it? Well, shoot RAW (to maximise post production flexibility) and then look at your histogram. You want to aim to get the bulk of the histogram information to sit on the right hand side of the scale – this is known as exposing to the right. The most important part of this technique to ensure that the trace of the histogram does not peak right at the end of the right hand side as this would mean the highlights have been lost / burned out. An easy way to adjust this can be to use the Exposure Compensation dial / button found on the camera and decrease the exposure in 1/3EV at a time and then recheck the histogram until it looks perfect.
Don’t panic
Making mistakes is a natural part of learning any skilled craft. Accept that you are going to make mistakes along the way. You may take blurred shots, blow the highlights to kingdom come and delete your favourite image from the memory card by accident, but in the end, with practice, you will be a creative machine that can make beautiful images wherever you are, whatever time of day and with any camera & lens combination. Enjoy the journey and don’t panic, it will happen.
As with any tutorial there is always more that could be said, more tips that could be shared but the idea here is to give you a good starting point which you can grow from. Ask questions with other photographers, search tutorials online, share your images and ask for constructive criticism, look at work from inspirational landscape photographers and most importantly, enjoy photography.
I’m a people photographer normally – portraits, the odd wedding and so on. But on this trip I decided I’d give landscape photography my first serious attempt ever, after 25 years of shooting. Of course, I’d taken landscapes before when I happened to come across something that looked good but this was different: I’d make sure I got to the right place at the right time for the best light even if it meant sleeping (or failing to sleep!) in the car.
Before I went I researched my route using Flickr and Google maps. The latter was especially helpful not just for seeing if a mountain would be lit at dawn or dusk but also to see what other images had been taken nearby. This pointed me towards quite a few fascinating sights that I would never have come across otherwise. In the very bottom right hand corner of a Google maps screen is a double up arrow that reveals scenes you may not otherwise have considered.
Dear reader – I even bought a tripod. Many of you will wonder what the big deal is but it went so against my usual style of shooting that it felt like a jet pilot shopping for a submarine. But as it turned out it proved invaluable.
One last act of preparation – I looked at the absolutely stellar landscape work shown on the fredmiranda.com landscape forum and learned about things like focus stacking and night photography, things I vaguely knew about only in theory. One night before I left I went out and practised the techniques, with terrible results. But that’s how I learn.
Why the Desert?
In 1993 I worked in Somalia during the war there and travelled and lived in the northern desert communities. I fell in love with the open spaces, the peace of the evenings and the huge skies. Since then I’ve visited other deserts, notably on the India-Pakistan border and Arizona. I like the open road, the small communities and the sense that in the desert everyone can just be themselves. It is the polar opposite to the metropolitan posing of modern cities. In England I live in a small village on the doorstep of the Peak District National Park. Manchester is very close but I rarely visit.
I wanted to shoot the road, the space, the ghost towns, the mountains and the night skies, with a detour to Yosemite. There are so many fantastic wilderness parks on the Nevada/California border that going to LA or San Francisco was never an option. One tip though – when they say don’t walk in parts of Death Valley after 10 am they mean it! I once walked out at night and got back to the car at 0845 and it was already so hot. Those pictures of graves aren’t put there for your amusement.
Kit List
For the last several years I have travelled only with a Fujifilm x100 series camera – Hong Kong, New York, Volgograd, Sri Lanka and elsewhere. The x100 series are superb, not only because of the results but also because of their size and weight. But this time I’d need a bit more choice in lenses.
I decided to take the X-T1 and the 14, 23 and 56mm lenses. These are widely recognised as the best primes available (although the new 16 may have usurped the 14, I don’t know for sure yet). The 23mm would be my standard landscape lens, the 56mm would give me the extra reach one sometimes needs to isolate part of the scene and the 14mm would be perfect for night sky photography as it allows a 25 second exposure under the “600 rule” that governs whether stars are rendered as points or streaks.
The 18-55mm was under consideration but although it’s good, these other lenses are fantastic. The difference does really show.
I also took my new Manfrotto 055 tripod, 4 batteries and a remote cable release as well as a charger that allowed the batteries to be recharged while driving. Definitely a bonus for this kind of trip. I also took a big LED video light that allowed me to get set up in the moonless desert night and sometimes to light paint foreground rocks. Backlit dials and controls would be nice but are probably impractical in a small camera.
Technical Notes
Although I shot everything in JPG+RAW, all the final images except the night shots were actually from the in camera JPG’s. I used the Astia setting for all of them – it helped keep the set coherent and provides great colours without the overblown look that Velvia brings. In particular Astia renders skies very well, better (to my taste at least) than any of the other settings.
In general, I shot in Aperture Priority and used the Exposure Compensation Dial to give me the look I wanted. For some shots, especially those shot in the evening or at night I used manual exposure. One morning I rode the shutter dial all the way from 2 minutes to ¼ second as the sun rose over a freezing mountain lake. I was inside an aluminium shelter bag loving every minute of it as the light changed. The shots were terrible, as you’d expect from someone who has never done that kind of shot before. As I say, I’m not a landscape photographer but I’m so glad I saw it.
Some things did work better than expected though. Focus stacking involves sticking your camera on a tripod (weird!) and gradually changing focus so that over the course of a dozen shots or so you have focussed on all parts of the shot. You then combine them automatically (or manually, for the masochists) in Photoshop. The 14mm is absolutely perfect for this as the manual focus “pull clutch” allows you to gradually work the focus through the scene at an optimum aperture for sharpness of f5.6. In combination with the tilt screen and focus peaking (Red High for me) of the X-T1 it really couldn’t be easier, certainly much easier than with the optical viewfinder of a standard DSLR. Because it was a new technique for me, I also took a “safety shot” at f11 in case the intricacies of the procedure were beyond me but actually it is simple and the results were very much better than with the single high depth of field shot. It doesn’t matter how many times you read about it, doing it in the field is the best way to learn it. Here is a focus-stacked shot from Death Valley:
Another technique that worked well was ultra high resolution patchwork shooting with the 56mm, where I’d take perhaps 20 shots of a scene in rows and columns and stitch them together afterwards. I’m not really sure what I’d need a 200 megapixel file for but it’s nice to know it works really well and that you can zoom in one the tiniest detail from miles away. One day I’m sure I’ll find a use for it and now that I’ve done it, it’s a technique in my arsenal. Sometimes though it was more practical to use the sweep panorama feature. In this particular shot I tried both techniques (a 4 shot manual blend and the in-camera panorama) and the in camera stitch was smoother, although lower resolution. At 6400 pixels across, it still has plenty enough for me.
Night photography was fantastic in the desert: there are few lights to begin with and in Death Valley those that exist must be shielded from the sky. This was my first ever attempt at a Milky Way shot (thank you Youtube!) and as laughable as it might be to the more experienced night shooters, I’m rather pleased with it.
Notes on individual shots
This shot was actually taken on Aperture Priority from the driver’s seat with -2 stops exposure compensation dialled in. I was using the 23mm at iso 1600. The extraordinary EVF of the X-T1 let me ensure that there was still some light visible on the ground while at the same time allowing me to make sure the highlights weren’t blowing out. The high dynamic range of the X-T1 kept it all together.
This is a stitch of two horizontal shots taken at Mono Lake. There’s not a stack more to say about it except that a single 14mm shot would have looked quite different. Modern tools make this kind of stitching quite easy, even for a landscape novice and the methods are a simple search away.
This was a ten second shot of my hire car. I had stopped for a sunset but frankly I’ve seen better. I did like the way the car looked though and with the interior light on and a long enough exposure to lighten the sky and ensure passing traffic left pleasing trails and illumination I think the shot works. It was also shot with my 56mm lens, perhaps an odd choice but something I’ll bear in mind to try again next time. I love that lens.
Here’s a very different kind of car shot, a quick snapshot as I crossed the street. This old Mustang matched the sky and worked well with the yellow lines. It is (clearly) a quick grab shot – I was on my way to get a burger after several hours shooting one searingly hot morning – but it is a testament to how quickly the X-T1 will react if necessary. It starts up quickly, focuses quickly and fires without shutter lag. That’s what I want in a camera.
OK, two last shots before I’m told to knock it off! Nevada’s an odd place. But I’d never have found either of these without doing some research before I went.
So in summary – every camera is a compromise. But the X-T1 offers high quality, superb lenses, light weight and bulk, accurate focus, exposure and white balance, a tilting LCD that is way more useful than I thought and a very high chance of getting the right photo on the first shot thanks to the excellent EVF with its exposure preview, focus peaking, colour rendition and other features. I use it for all my more serious work, together with the x100T. But the X-Pro 1 still has a piece of my heart.
As I took the final few steps and reached the peak of the hill, the Himalayas came into full view for the first time, and left me speechless.
But let’s begin the story several hours earlier.
I had been staying in Dharamkot, in the foothills of the Himalayas, for an incredibly relaxing 2 weeks. My days had been spent walking through beautiful forests, reading in a hammock and eating delicious organic food.
A monk walking through the forest in Dharamkot
But before leaving Dharamkot, there was one thing left that I had to do; spend a night on Triund Hill (don’t let the name ‘Hill’ fool you, as for me it seemed more like a small mountain, casting a shadow on the village of Dharamkot and standing at 2,875m high).
On the morning of the trek I left my guesthouse and began the ascent up the hill. The beginning of my trip did not go smoothly. There are 3 things in life which I suck at: singing, playing football and following directions. Somehow, I managed to get exceptionally lost – before I had even found the path which takes you up the hill. The problem began when I came to an intersection along the track which I was following. I glanced in both directions as I tried to remember the directions that the lady at my guesthouse had given me, and then took the path leading to the right. I passed through the garden of a house, and asked a young girl if I was walking in the right direction. She said that I was, and gestured to me to continue walking up the side of the hill (which was essentially a pathless mountain covered in thick, and at times impenetrable vegetation). My instincts told me that this couldn’t be the right way, and I debated turning back and starting again, but as I had already been walking uphill for most of an hour I chose to continue up the side of the mountain.
The bush became thicker and thicker and started cutting at my legs, but stubbornly, I refused to turn back. After a long struggle, I eventually crossed a foot-wide, crumbling flint ridge, which then opened into an area of flat ground which I thought offered some hope in leading me to the top of Triund. I carefully paced back and forth through the labyrinth of plains, but I kept facing dead ends; thick wild bushes that required a machete to pass through. After about 20 minutes of trying to find a walkable route, I decided that this had been one big bad idea, and turned around, attempting to retrace the steps that had led me to this next level of lostness. I walked along the ground on which I thought I had trodden, but to my frustration, I was hit by another dead end. I walked back and tried again and faced another dead end. I began to panic as I remembered those basic tips you hear when doing things like walking up a mountain. Things like “tell someone where you’re going”, “make sure you have a phone” or “make sure you are wearing appropriate clothing”. I hadn’t told anyone where I was going (other than the lady at my guesthouse), I didn’t have a phone and was wearing a pair of old beat up Nikes with barely any tread left.
It was one of the first times when I’ve felt truly scared and alone in the wilderness. I thought about how this is how people probably end up dying on mountains, and became annoyed at myself for getting into this situation. I was frustrated, scared and felt defeated. I decided that as soon as I found my way out, I would check into another guesthouse (as I was too embarrassed to return to the guesthouse where I had been staying – as it was supposed to be an easy trek), spend the night in a bed, and then leave Dharamkot the next day without reaching the top of Triund Hill.
On the left of the image is the path I took. Clearly not the right way.
I knew that I had to remain calm, and took a few moments to recompose myself and look over the way which I thought I had walked. I tried to logically plan a route back to my starting point and to my relief, I eventually came across the narrow flint path which had led me into the labyrinth. From this point, it was easy to return down the side of the mountain and past the house with the garden.
I finally relaxed and felt an extreme sense of relief. My negativity began to lift as I walked towards familiar territory and came across a path which actually looked walkable. I came to the crossing that had been the origin of my nightmare, and after a few meters saw a spray painted sign reading ‘Triund’, with an arrow next to it. After my brief ordeal of getting lost, I finally felt safe again, and made the decision that I would not return to Dharamkot today, but would trek to the top of Triund Hill.
I soon crossed paths with two American girls who were also walking to the top, and shared the journey with them. The trek to the top was a breeze in comparison to my first attempt. The walk took about 3 hours and took us though some incredible scenery. Hand built wooden Tea shacks were dotted along the route where trekkers could rest and stock up on supplies. Occasionally we would have to squeeze to the side of the path as a drove of donkeys passed, hauling supplies to the top of the mountain.
Walking up the mountain. A tea shack in the top left of the frame.Donkeys hauling supplies to the top of the hill.Tea with a view; trekkers rest at a tea shack on their way to the top.
After a few sweaty but exciting hours, I approached and took the final few steps over the peak of the hill, and as I did, the Himalayas came into full view for the first time, and left me speechless.
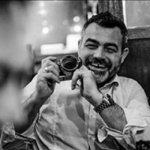
I was extremely satisfied with reaching the top, and after walking along the ridge of the hill taking in the beautiful views, I needed to organise my night’s accommodation as well as get something to eat. I entered one of the few huts at the top that supply tents and food to tired and hungry trekkers. As I rested and ate a snack there was a middle aged man sitting opposite me. He was smoking a cigarette and had an incredibly interesting face. His looked different to most of the Indians I had seen until then, with light eyes and thick skin. My X100s was in my hand and after a few minutes, I began taking photos, firstly of the hut and the area, to allow him to get used to the camera. After a few frames, I gestured to him to ask if I could photograph him. He agreed and continued doing what he was doing, and looked lost in his thoughts. I shared my food with him and then left, as I didn’t want to be intrusive.
The goat herder in the tea tent.
I hired a tent, found a clear spot on the ridge and set it up. My view overlooked a part of the Himalayan mountain range. I was blown away by the beauty.
A room with a view.
The mist that was present as I approached the peak subsided and the golden light of the setting sun began to illuminate the mountain. I became excited as I was basically in landscape heaven and everything I saw looked astonishingly beautiful.
I decided to take advantage of the golden light and explore the length of the ridge. As I passed the other campers and approached the elevated side of the hill, I could hear the bleating of mountain goats in the distance.
I continued walking up the hill and came across the goats. There were lots of them, grazing and playing on the rocks. I enjoyed quite some time taking pics of them. They were very fun and cute to watch and I found their noises very entertaining.
After a few minutes I saw the man from the hut. I now realised that he was tending to the goats, and had taken them to the other side of the ridge to graze. He had made a fire and was drinking chai tea. He had seen me taking photos of the animals and after a while I approached him with a smile. He invited me to sit down and poured me a cup of tea. With few words being spoken we shared each other’s company, and again, he allowed me to take some photos of him. He seemed extremely peaceful.
Sharing tea with a goat herder
The sun was going down behind the mountain and I was excited to carry on shooting. I shortly came across another animal herder, this time a man who was shearing some of the goats.
A herder shearing his animals
After maybe an hour with the goat herders, I walked back down the hill as dusk approached.
On the horizon the reddest moon that I have ever seen began to rise. I watched in astonishment as it peaked over the mountains and into the sky. I chatted to fellow trekkers about the colour of the moon.
The blood red moon rises over the mountains
As night fell, small bonfires lit up the hill to keep the trekkers warm. I joined a group of Indian guys around the fire for food and tea, but decided to get an early night as I knew I wanted to be up before sunrise to take photos.
Trekkers keeping warm around a fire.
After a pretty bad night of rest (due to a lack of warm clothing) I crawled out of my sleeping bag, unzipped my tent and walked into the fresh mountain air. It was still quite dark as the sun had not yet began to reach over the mountain top. I decided to walk to the far end of the ridge that I hadn’t ventured to the day before. I had my mini tripod with me and began taking photos. In a distant tree I saw a huge eagle, which was another first for me. After about 40 minutes, I heard the familiar bleating sound that I had heard the day before coming from behind me. As I turned around, I saw lots of goats (perhaps more than 100) running and jumping towards me. This instantly made me smile and as they ran past me, I climbed onto a rock so they could pass without knocking me down. The goats raced past playfully.
It was around this time when the sun began to appear over the mountain, bathing Triund Hill with glorious golden light, which also brought a warmth to the brisk mountain air.
I followed the herd of goats and whenever possible, climbed upon a rock to get a better view of the scene. There were different goat herders from the previous day, and I followed them along the length of the ridge, snapping away. As the other trekkers were sleeping, I was grateful to be witnessing this unique moment and felt invigorated to be there.
The walk along the length of the ridge took about 30 minutes, and on my part, it was a process of running ahead, stopping, shooting, and then running ahead again. These leap-frog manoeuvres lasted until we reached the elevated end of the ridge.
I gestured to one of the herders with my camera, and he stopped for a moment to allow me to take his photo.
A portrait of a herder.
After reaching the high end of the hill, the herders stopped and allowed their animals to feed. I thanked the herders and returned to the camp feeling extremely grateful and happy with the events that I had just seen.
After some breakfast, I began my descent back down Triund Hill, with extremely high spirits (and an increasingly swollen ankle – which later turned into an infection). My experience on top of the hill was fantastic, and reminded me how nice it is to be surrounded by nature and simplicity. I’m so glad that I didn’t give up on the trek after my bad experience at the start, as Triund Hill proved to be one of the most memorable events of my trip.
—
About Danny
Danny Fernandez is a creative photographer living and working in Barcelona. He likes cycling, records and vegetarian food.
To see more of his work, please visit:
Beautiful locations? Not essential. Golden hour? any time is good. prime lenses? zooms are fine.
Meet X-Photographer, Pete Bridgwood who will make you think again about how you take landscape photographs
For decades, the debate has raged as to whether photography is art. For most, the crux of the argument revolves around the camera itself, some considering that using a machine to capture images is ‘cheating’, while others argue the camera doesn’t create images on its own. Fine art landscape photographer Pete Bridgwood cuts through these years of discussion with incisive clarity: “I think the term ‘art’ is as relevant if a four-year old child produces a piece with crayons as any photograph or grand master painting – it’s still art,” he tells X Magazine. “Some people think it’s stuffy to define your work as art, that you put yourself on a pedestal if you define yourself as an artist, but I define it simply as ‘photographs that I take for me, not for anyone else’. I don’t shoot commercial images, I shoot to make prints that hopefully will sell if people like them.”
CAMERA: X-Pro1 EXPOSURE: 1/2900sec at F8, ISO 200
Pete studied medicine at university and subsequently followed this career path, but photography has always been an important part of his life; and despite a passion for both disciplines, he defines himself as a photographer rather than a doctor. “I was into photography at school and we had this great art teacher who ran a course after school, so I signed up. We’d sit around in a big group and he’d talk about the compositional elements of famous photographs, so from a young age I was looking at photographs in a critical way. “We learned all the wet processes in a traditional darkroom, so I learned the hard way with film. I think that teaches you to be more careful with exposure because if you get it wrong there isn’t the latitude to get it back. I was very lucky to have that grounding.”
CAMERA: X-Pro1 EXPOSURE: 3.2secs at F14, ISO 200
Like many photographers, as the interest grows, the choice of subjects to shoot becomes more refined and when it came to choosing a specialism, Pete’s choice was simple. “Landscape is more controlled, you can take your time. With people photography it’s more reactive and interactional and maybe I’m not that good at interacting,” he jokes. “I tend to exclude people from my landscapes, because I think it’s nice for the viewer to be invited into the image and if it has people in there, the viewer has to share it with someone. There is a counterargument, of course, because featuring people invites others into the image, but I do tend to Photoshop a lot of people out as they always seem to walk into frame wearing bright dayglo clothing!”
CAMERA: X-T1 EXPOSURE: 3.1secs at F8, ISO 200CAMERA: X-Pro1 EXPOSURE: 1.2secs at F11, ISO 200
While some may question Pete’s use of software in the context of his fine art image making, he’s very clear that post-production work is a very important part of creating his images. “It’s changed from film, when all the effort was put in in-camera. Now, I think half the effort comes in the field and half in post-production. Documentary landscape photographers would disagree, but I think you can do a lot in post-processing to create a more emotive result. It depends on the scene,” he explains. “Every photograph is a combination of three things: the photographer, the scene and the viewer. The percentages of those three elements vary from scene to scene and I love to actively play with those ratios. You could completely remove yourself and just take a picture and it will look gorgeous, or you can get a scene that you apply a lot of changes to and alter the feel. The trick is to not make it look that apparent.”
CAMERA: X-Pro1 EXPOSURE: 1/300sec at F5.6, ISO 200CAMERA: X-Pro1 EXPOSURE: 1/450sec at F6.4, ISO 200
Emotional connection is one element that Pete considers crucial in his images. He works hard to convey a sense of place and communicate the essence of the location. This can be done in a variety of ways, but Pete feels much of it is down to exposure choice. “Every image has its own shutter speed that will make the image look quite different. I think it’s important not to just think of that as a panacea,” he explains, “what I’m more about is finding the right exposure, an exposure that matches the emotion of the scene. How much do you want the grass to sway? How much do you want the sky or the water to move? It’s really about controlling the texture rather than simply taking a blasé attitude, which is what I like to get across.” Pete’s pursuit of this emotional connection doesn’t always necessitate him travelling from his home in Nottinghamshire to ‘honeypot’ locations in the UK and abroad, he feels that great landscape images can be captured virtually anywhere. “In some places it’s more difficult than others, but all you have to do is look around. The barn you don’t subconsciously see on the way into work, the single tree on the top of a hill, you should pencil those locations in for revisiting,” he advises.
CAMERA: X-Pro1 EXPOSURE: 3secs at F16, ISO 200
“I feel the same way about light. I love the golden hour and there’s no doubt it’s quite magical, but there’s no reason why you can’t get evocative landscapes in the middle of the day. Or in the pouring rain.” Whatever time of day he’s out, Pete always carries his X-series cameras: “I used to use Canon DSLRs, but I haven’t touched them in months,” he says. “I started with the X100, but the X-Pro1 was a game changer for me and I use both primes and zooms on it. I’ve also recently got an X-T1, which is wonderful. I shoot the vast majority of my images on an XF18-55mm lens. The attraction is obvious: all my Fujifilm gear fits into a small waist pack – camera, lenses, full filter kit – and that’s very liberating.” This latter point is crucial to Pete, X-series cameras help him to communicate an essential part of his creative process.
“The whole essence of fine art photography is freedom,” he tells us. “Freedom to express. Freedom to interpret. Freedom, freedom, freedom.”
Tell us about yourself and what got you into photography? How did you develop your style in photography?
Hey hey, I shoot weddings and travel – I am a creative, contemporary wedding story teller and London is home for the time being.
I became a photographer by accident; I went to university to study economics, it was during this time that I decided to buy a camera instead of a PS3 to kill time. I would hop on my bike for a ride and have the camera along with me to capture the things I saw in my new surroundings.
Even though I have achieve a level of consistency within my body of work, I like to think that I am still training my eyes. It is an ongoing process and I find that I switch things up every two years – not everything, but I have noted that every two years I make a change in one area or another. I guess you can say that how I feel often translates into the approach I take to the work I create, and as someone who is still young and curious about the world, I don’t think that I will ever stop developing my style.
Why did you choose Fujifilm cameras?
Out of curiosity really, and after 2 years and some change, I am happy that I took the risk. They offer a unique and refreshing way of doing things – having to compensate for parallax when using the OVF due to the rangefinder design of the X-Pro 1 & X100s, or the traditional shutter speed dials & aperture values on the lenses, this is a fun way to create images. For some strange reason, the image quality that I get out of these little cameras still amazes me, and the lenses that I have used have all been stunning.
A very important element of the Fujifilm X-Series that maybe doesn’t get enough attention is the community that these cameras have created, I have exchanged emails with people from all over the world about these cameras. I have discovered the work of other amazing photographers who use these cameras and even became friends with a few, like Bradley Hanson (USA), Patrice Michellon (France), Robin Weil (France) and Fred Frognier (Belgium) for example. All these guys were complete strangers at one point.
I would love to network with other official X-Photographers too! I have exchanged words with a few but thats not enough, I am thinking along the lines of a collaboration on project or something.
Do you have a photographic philosophy you live by?
There IsAlways More! I think photography is a lifelong journey without a destination so we have to keep going, keep striving to improve and never settle – There Is Always More!
Key Inspiration- What & Who inspires you?
The What – Life, all aspects of it – the good and the bad. Music, football, culture and the people I meet and exchange stories with on my travels.
The Who – Those who strive to master their craft and set new rules, e.g. Lionel Messi and Nas. In terms of photography, there are so many good photographers out there that it is difficult for me to pick one. I like to draw inspiration even from those that don’t shoot the type of stuff that I shoot.
Do you have any tips or tricks you could share?
Create limitations in a world where is there none, mine was deciding to shoot with just two focal lengths for the majority of my work these last two years and I couldn’t be happier! In fact, deciding to shoot with just prime lenses 5 years ago was probably the best thing I could have done for my portfolio and development as a photographer.
Remain curious about the world, be willing to learn and don’t be afraid to try new things.
Shoot through the tough and uninspiring periods.
What’s next for you?
Um, the X-Pro 2 😉 – haha. I really want to live in various countries & cities around the world in the next couple of years. To explore and experience different cultures etc and even shoot some epic weddings whilst I am out there too – the thought of shooting a Japanese wedding in Tokyo one day really excites me. I will be starting this chapter of my life with a move to Barcelona at some point this year, things haven’t gone as I had hoped but I am determined to make it happen. Then from there, maybe NYC + LA for a year, Cuba too at some point, Japan – who knows. I want to explore as many places as possible and meet as many interesting people as I can.

 Damien Lovegrove left his role as a cameraman and lighting director at the BBC back in 1998 after 14 successful years to create the renowned Lovegrove Weddings partnership with his wife Julie. Together they shot over 400 top weddings for discerning clients worldwide. In 2008 Damien turned his hand to shooting beauty and portraiture and has since amassed a dedicated following for his distinctive art. Damien now divides his time between teaching the next generation of photographers and photographing personal projects. His book Chloe-Jasmine Whichello is highly regarded as a portrait style guide and his website galleries have over 2000 images to browse through among the 30 categories.
 David Cleland is a landscape and reportage photographer based in Belfast, Northern Ireland.
 MacLean Photographic was founded in 1996 and takes its name from owner Jeff Carter’s full name – Jeffrey Stuart MacLean Carter.
 Kevin is pure documentary wedding photographer. He started shooting weddings professionally in 2008 and since then has photographed weddings right across the UK and Europe. Shooting in a documentary style he strives to tell the story of the wedding through photojournalism, rather than “traditional” contrived wedding photography.
 Kerry is an award winning fine art equestrian photographer, shooting commissions across the UK and worldwide. Her work has also been published in a number of UK and international magazines, websites and blogs. Kerry was also the first female UK photographer to be named as a Fuji X-Photographer, joining a group of brand ambassadors worldwide.
 Matt is a black & white street and event Photographer based in Liverpool, England.


