Don’t put your X-series camera into hibernation for the winter, get outside and make the most of the conditions
We may be in the colder and darker months of the year, but there are still photo opportunities. The good news is Fujifilm X-series cameras are ideally equipped to make the most of the season with a range of features that will help you to get the best possible shots in all wintry conditions. As the temperature drops, there are a few extra considerations for your camera gear.
Power
Battery performance can be severely affected by low temperatures, so it’s worth buying an additional cell if you’re going to be out regularly in freezing conditions. Make sure all batteries are fully charged before you leave home and if they do die while you’re out, putting them somewhere warm – next to your body, ideally – can often grab a few extra frames.
Misting up
Going from a warm house or car into cold air will inevitably cause your X-series camera to mist up with condensation so, if possible, you should avoid subjecting your kit to large temperature changes. If it’s safe to do so, put your kit (without batteries) into your car a couple of hours before you go out so it can acclimatise. Similarly, putting your kit in a colder part of the house will help reduce condensation build-up – just don’t forget the batteries before you leave. The same applies when you come back in after a cold shoot. Reverse the process, placing them in a colder part of the house first, then gradually warming them up to room temperature. Sealing kit in a plastic bag with a silica gel pack can help. While you’re out, keep lens changes to a bare minimum or, better still, avoid them altogether. Should you get condensation, avoid the temptation to wipe it away and wait until it clears naturally. Unless you own a weather-proof X-T1, using a camera cover and keeping a chamois leather close to hand is a good way of keeping your kit dry.
And don’t forget to apply all these rules to yourself, too. Layer your clothing to stay warm and dry and be sure to take warm drinks and food to keep your batteries charged!
After some cold snaps? Try these…
Frosty close-ups
This is the perfect subject matter for the XF60mm Macro lens on interchangeable lens X-series cameras or the Macro/Super Macro mode on a fixed lens model. Suitable objects abound so keep an eye out for interesting patterns and subjects that can add a welcome splash of colour.
Snow scenes
For simplicity, select the Snow program setting. For more control, dial in some + exposure compensation – try +2 in sunny conditions – to avoid the snow rendering as grey sludge. Early morning starts are best and use the Velvia Film Simulation mode for vibrant blue skies.
Starry nights
Grab your tripod and head out on a clear night. Consider using the open flash technique to illuminate foreground subjects. Avoid including the moon in the shot and use an exposure of at least 30 seconds to render some stars.
Mist and fog
Look for distinct shapes and try using either the Soft Focus filter setting or increasing the ISO to introduce some grain. Shooting in black & white can be effective, as can fitting a telezoom such as the XF55-200mm to pick out more distant details. Check out this blog for more tips for shooting fog.
Winter portraits
A great option, regardless of the weather. Hats, scarves, big coats and umbrellas all make great props. The XF56mm is the ideal portrait lens and be sure to make the most of that super wide aperture to throw backgrounds out of focus and deliver beautiful bokeh.
I thought I’d put together a blog on how I came about taking this image and the thought process I went through.
It was a grey and gloomy day, not overly inspiring for photography but I thought I’d bring my X100s with the TCL-X100 converter attached with me while I took my dogs out for a walk. Most of the walk was spent either trying to avoid slipping over in the thick, wet mud or turning my body to avoid having a face full of rain. I was shooting with the black and white + red filter preset as it worked well with the gloomy conditions for some moody shots. As I reached the top of the hill I was walking up, I noticed how quickly the clouds were moving across an adjacent hilltop and instantly decided to drive back to this location with my tripod and filters*.
I was imagining the image I want to produce while walking back down with the dogs. There was a strong contrast between the immovable trees and the blustery clouds so I wanted to exaggerate this.
What you can’t make out from this photo is the speed of the clouds moving from right to left. That is because the shutter speed used has frozen the clouds, so there is no sign of movement.
I decided to use the X-T1 and the XF18-135mm lens because it was very versatile and meant I could change my composition with minimal effort! I mounted the camera onto a tripod and attached a filter holder system. I have a collection of square filters, these are very helpful as you can use square filters with a variety of lenses with different filter thread sizes, all you need are different filter adapters. Though the systems are relatively expensive, in the long run they are more economical than circular filters. I also used a remote trigger which means I don’t have to touch the camera and introduce any unnecessary camera shake to take the picture, this is very helpful for long exposures.
If you look at the above photo you can see that I have a filter inserted into the filter holder. I decided to use a gradual neutral density filter as this allowed me to darken the sky while having less/little effect on the ground.
Gradual neutral density
10 stop neutral density
The left filter is a gradual neutral density filter, it isn’t square which means you can adjust how far down you want the gradient to affect your picture. The filter on the right is a neutral density filter, which is constant throughout. This particular one is a 10-stop filter hence why it is so dark as it cuts the amount of light passing through it by ten times, so slowing down shutter speeds drastically.
I put the gradual filter in first and set it up how I wanted it, set focus and then inserted the 10-stop filter. The reason why I set the focus first is the 10-stop filter can make auto-focus very difficult so it is better to have it all set beforehand. On this occasion the 10-stop filter didn’t take the shutter speed below 30 seconds, which means the camera is able to accurately read the exposure required. If a 30 second exposure is still too short once you’ve applied the filter, then you’ll need to refer to a chart that shows the difference.
This was taken with only the gradual filter so the shutter speed was still high enough to freeze the clouds.
Despite the fact that I’ve used a graduated neutral density filter, I’ve deliberately under exposed the picture to keep it dark and moody, hence why the ground is still dark. The slideshow below is a collection of images that used the 10-stop neutral density filter to slow down the shutter speed and as a result capture the cloud motion.
My photos are dominated by the sky – I deliberately kept the horizon low in the picture as the sky was the main subject for me. With the wider shots, I could have moved the horizon up more but the foreground content wasn’t particularly exciting, the sheep weren’t overly inspiring!
I hope this has been helpful and if you have any questions then please don’t hesitate to ask. There is one colour image above, I’d love to know which is your favourite out of the final four. For me it is the portrait orientated shot as I was lucky enough to capture the sun peering through the clouds.
Fujifilm’s new XF16-55mm f/2.8 weather-resistant lens lives up to expectation. With a new type of nano-coating that reduces flare, the optical excellence of the lens matches the supreme quality I have come to rely on in the very best Fujinon lenses.
X-T1 with XF16-55mm @ 55mm. 1/4000th, f/4, ISO800
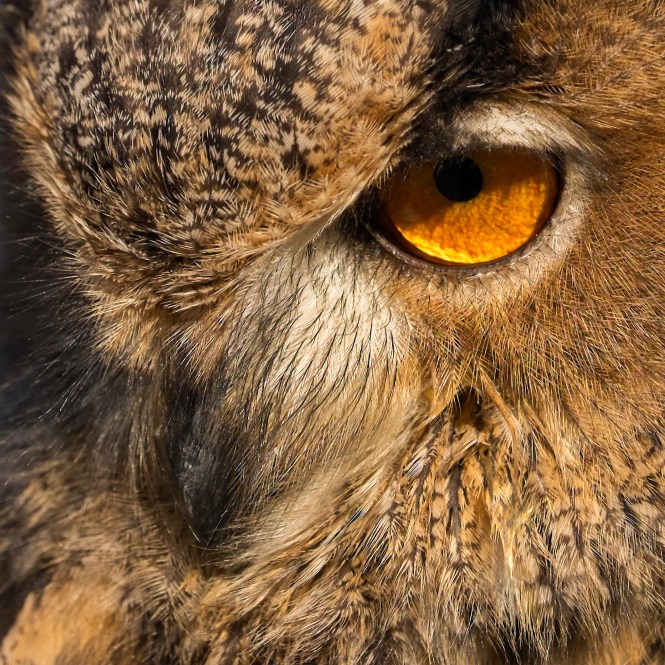
Photographing birds of prey at a local falconry, I was astounded by the depth of detail, sharpness and contrast of the pre-processed images. It feels great in the hand. The aperture and focus rings give me confidence when I need it most while the build quality exceeds my often-exacting need for equipment that can cope with the most extreme and harsh environments.
X-T1 with XF16-55mm @ 55mm. 1/400th, f/5.6, ISO1600
And, even with the fast f/2.8 aperture, it’s still compact enough to travel with. This is a lens that lives up to the Fuji legend.
Winter is a bit of a funny period in the UK, spring is full of life beginning and the promise of summer approaching, summer (when not raining) is probably our favourite time of year to be outside. Autumn has a charm about it as the leaves turn and forests transform into a vast palette of colours before winter takes over. The coldest and darkest season, many of us associate this with dark, damp days other than the Christmas period. For me though, I find that winter has a certain charm about it.
In this blog we’ll be looking at capturing winter in all its glory, from the more accessible sunrises to the magic of colder temperatures. Sunrise is my favourite time of day during the winter months, where the mornings are cold, often frosty and if you’re lucky misty. I prefer sunrise over sunset because generally you’ll have frost/mist to photograph (if the weather is suitable) which might have gone by sunset. The added bonus of winter sunrises is that they’re much more forgiving than other times of the year, an 8am start isn’t too disastrous! A few weeks ago I put together a blog on photographing fog. Check it out for a few hints and tips. As the day progresses and the sun gets higher (if you can see it!) the quality of light drops off somewhat, making wide landscape shots less dramatic. Two fun things to do if you’re out and about is: 1. Slow down – slowing down your shutter speed when doing big landscape shots can make an image really dynamic, even if the light isn’t bright and dramatic. One of the ways to exaggerate the length of your shutter speed is to use a neutral density filter to reduce the amount of light hitting the sensor and so extending your shutter speed. This shot was 125 seconds long. There is no detail left in the mist as it has moved so much in that 125 seconds, making the fog look a bit like a white ribbon. 2. Focus on detail – winter is a great time for capturing the details of nature. From the hard frost on the ground to the last leaves hanging on a tree, detail shots in conjunction with some other, wider shots can really help capture the essence of winter as part of a photoessay. All taken with the X100s + TCL-X100 (in love with this combo). For this walk I limited myself to only this combo so I focused on composing images for that focal length. This is a good way to try and improve creativity and compositional skills. As the day draws to a close then you can begin to take advantage of the “magic hour”. If I have a free afternoon then what I like to do is go on a walk and end up in a nice location for sunset. This is what I recently did in the Peak District, walking a circuit from Hathersage up to Stanage Edge and Higgar Torr before heading back down to Hathersage. This was wonderful, about 6 miles and a great way to spend an afternoon. As I went along I was watching how the light changed as the sun came lower and how this affected the dramatic scenes in front of me. It was very interesting to see how the landscape evolved with the setting sun. Now we have been lucky enough to have had some snow recently, this is wonderful for pictures. Snow can take a landscape that you might see everyday and turn it into something magical. However, snow can be a little difficult to meter. This is where using the EVFs on X-Series cameras can be really beneficial, as you can see exactly how your camera has metered and adjust the exposure compensation accordingly. Finally if you’re brave enough (I haven’t been so far) then you can get out on a cold winters night and try some star photography, especially since so much of the day is now dark. Remember that the most important things are to stay warm, be sensible, check roads and the forecast. Roads can be very dangerous so look after yourself especially if you’re going out in the early hours. I hope this has been interesting and given you a few ideas on how to photograph the great outdoors during the winter months. Why not share with us your results via Fujifilm UK’s Twitter and Facebook pages.
I thought this could be a helpful blog series for individuals looking to invest in equipment with particular interests in mind. This blog series will hopefully cover gear and techniques to help those getting into photography, who want to develop their skill set and knowledge. Because one of my main subject matters is wildlife I thought I’d start off with this genre.
Wildlife photography is a genre that can massively benefit from having suitable equipment, in my eyes more so than many other photography genres (but I’m biased!). To that end it’s good to be prepared with the most suitable gear for the task.
Best Camera – X-T1
The X-T1 has a number of features that make it the most suitable camera for wildlife:
Knowing that my X-T1 and 18-135mm lens set up was weather sealed meant that I could stop worrying about splashes and focus on capturing the dolphins.
First of all it is a weather sealed camera, so when used with a weather sealed lens you have a completely sealed system which is important when outdoors if you’re having to counter water in wet conditions or dust in dry conditions.
Then there is the fast auto focus, which the X-T1 is definitely the best at in the X-Series at this moment in time. The auto focus is very quick in single focus mode with basically every lens available and the continuous focusing mode is also very reliable and quick once focus has locked.
Fast continuous focus and 8 frames per second meant that I could get the composition just right as these terns flew at me on the Farne Islands.
Being able to shoot at 8 frames per second and take advantage of the latest UHS-II SD cards for fast writing speeds means that this camera can cope with quickly evolving situations where you need fast bursts to capture the action and to be quickly ready to repeat the process.
As well as the camera being great, the accessories can be really helpful, namely the battery grip. Often with wildlife photography you are out and about for many hours and the last thing you want to happen is to be stuck changing batteries just as something exciting is happening (this has happened to me far too many times!). The battery grip holds an extra battery so doubles the time before you need to change your batteries.
Finally, the big thing about to come to the X-T1 (black version) is the electronic shutter. Being able to shoot at up to 1/32000 second is great but is generally not necessary for the lenses used with wildlife photography; but what will be very beneficial is the silent shutter. If you’re close to wildlife or in ear shot then even the slightest sound can set off a timid animal. The X-T1 shutter is by no means loud but certain animals have such finely tuned hearing that the mechanical shutter sound can be enough to scare off your subject.
Back up camera – X-E2
Having two cameras is a good idea for wildlife photography. It is often helpful to have two different lenses on the cameras so you can quickly capture images at different focal lengths, going from the close up headshot to the animal in environment shot. If an X-T1 is out of the question, let alone two of them, then the X-E2 is a brilliant compromise. It offers a more affordable option and though it may not have weather sealing and all the bells and whistles I mentioned above it is still a very capable camera. With 7 frames per second and a hybrid AF system that includes contrast and phase detection, this camera is able to capture fast paced action almost as well as the X-T1.
Lenses
The 55-200mm in action.
The 55-200mm is currently the longest lens available for the X-Series until the 140-400mm comes out very soon. Covering a good range with a very useable widest aperture (F3.5-4.8), this lens is a super lightweight option for wildlife photography. The auto focus is fast and accurate plus the lens has OIS (optical image stabilisation) which is great to help you capture sharp shots if you’re handholding.
Moving into the weather sealed lenses, the 18-135mm lens is a brilliant all-in-one wildlife/nature lens to carry around if you’re wanting a one-lens solution. When used on the X-T1 this is a sealed system that has snappy auto focus and OIS to help make sure your shot comes out sharp. If you’re looking to have a more specialist lens(es) then the new 50-140mm is a good place to start, though not as long as the 55-200mm lens it offers a widest constant aperture of F2.8. This is brilliant for photography in darker conditions, such as golden hour at sunrise and sunset. This has been combined with OIS and the world’s first triple linear motor auto focus system to ensure you focus in on your subject quickly and get sharp results. This lens has internal focusing and zoom, helping ensure that no moisture or dust can get into this weather sealed lens.
Wildlife doesn’t always require the longest focal length possible. Often framing your subject within the environment can have a much more powerful effect than the classic headshot close up. The soon to be released 16-55mm lens will be the perfect partner for the 50-140mm lens, providing another weather sealed option with a fast widest aperture of F2.8.
Highland cattle of the Isle of Skye at 18mm. Not the best ‘wild’life photograph but it helps emphasise the point of framing an animal in its environment.
If you’re interested in macro photography then you have two options, the Fujifilm XF60mm F2.4 or the Zeiss 50mm F2.8. I have used the Fujifilm version and love it, though if you want 1:1 scale then the Zeiss is the way to go. These lenses are also great general purpose lenses, the orang utan photo at the top was taken with the XF60mm.
Ants crawl over a vivid red plant in the heart of the rainforest in Borneo.An emerald green beetle’s shell glistens from my off camera flash. The XF60mm is a great lens to cover a wide variety of shots.
I hope this has proved helpful to those of you that are looking to invest in the Fujifilm X-Series for wildlife photography. If you have any questions then please leave a comment below or contact me via:
This blog is going to try and cover the fundamentals of lenses, explaining when to use them and why. If you have any questions after reading this then please get in touch via:
I too took some photos at different focal lengths (see the below slideshow), between 10mm and 135mm, to emphasise how certain focal lengths are generally better than others for portraiture. This topic has brought up lots of comments and I have edited this part a number of times to try and get the best brief explanation, without going off on too big a tangent! To break it down to fundamentals, the thing that affects perspective is distance, the distance between the camera and the subject. The focal length you choose affects the framing of a subject. With the series of photos below, I tried to keep the framing the same for all the focal lengths; the thing that changed was the distance between the subject and me. At 10mm I was a mere few cm’s from the subject’s face (awkward), while at 135mm we were a few metres apart. This longest example (135mm) shows a flattening effect, where the content seems compressed. This occurs because of greater distance between the subject and myself. Making the depth of the face (e.g. from the nose to the ear) proportionally less compared to the distance between the subject and the lens… The opposite is true for the wide-angle photos. Take the 10mm example again; I am so close to the subject that the depth of the face makes up a larger distance than the distance between the lens and the nose, making the perspective exaggerated (also note how you can see the shadow behind the model with the wide-angle shots but you can’t with the telephoto portraits because of the narrower angle of view).
In full frame or 35mm film terminology, 50mm is deemed the ‘standard focal length’, as it is close to our eye’s central angle of view. This means that a 50mm lens produces a perspective very similar to what we see. Because the sensors in Fujifilm X-Series cameras are generally 1.5X smaller than full frame sensors (APS-C sensor size), this standard focal length equates to a 35mm lens, like the XF35mm F1.4 R. This is quite complicated to explain (it could be a whole other blog!)… So much so that I have spent hours editing these paragraphs, but hopefully you get the gist of how different focal lengths affect the perspective of a picture. There are some very informative comments about this topic at the bottom of this blog if you want to find out more.
Wide-angle lenses can create exaggerate perspectives which produce amusing (which is good as it’s engaging) portraits, especially with animals!
Now that we understand how different focal lengths and apertures affect the look of a picture we can look at how to combine the two. First of all lets think about portraits: If you want to isolate a subject generally you are going to want to use a standard or telephoto lens with a low F-stop, such as the XF35mm F1.4 R, XF56mm F1.2 R or the imminent XF50-140mm F2.8 R OIS WR. For the image to the left I wanted to try and isolate the woman from the background as it was very busy and distracting, and while it isn’t entirely clean it is made better as a result of using F1.4 for a shallow depth of field.
If you want to capture an environmental portrait generally you would use a wide-angle lens and depending on how much of the environment you want to make out in the background you’d range the F-stop between F2 and F11.
23mm f2
23mm f11
Both of the pictures above were taken with the X100s (I love using it for these kinds of photos). The left image is at F2 and while you can make out the room the clarity of it is poor. Compare that to the right image where the use of F11 results in the mountain behind the boarder being sharp.
Prime vs. Zoom
This is very much a personal preference, there is no right choice. It depends on lots of factors, from space and weight restrictions to financial limitations. Because prime lenses have a fixed focal length, they tend to be smaller, lighter and have larger minimum apertures (F1.2-2.8) compared to zoom lenses. While zoom lenses have the convenience of effectively including many different prime lenses, generally these have more restricted apertures (F2.8-5.6). For me, it depends on the situation. I prefer prime lenses because of the greater depth of field control. As well as this I believe that the fixed focal length makes you think more about your photography, particularly composition. However, the convenience of zoom lenses in situations that are changing quickly can be invaluable as you don’t have to change lenses as often to obtain a variety of photographs. When conditions are unpleasant this is vital in order to protect the sensor. A point to consider is that the XF18-135mm F3.5-5.6 R LM OIS WR plus the recently released XF50-140mm F2.8 and XF16-55mm F2.8 R WR (hopefully arriving in the first quarter of 2015) are all weather sealed making them ideal partners for the X-T1, creating a weather sealed system.
If I am working in relatively controlled conditions where it is easy for me to change lens regularly then I try to use prime lenses.
But if conditions are not suitable for continuous lens changes or a situation is quickly evolving and I need to be on my toes the zoom lenses are what I grab.
The zoom lens examples above are all wildlife examples (which are often taken in difficult conditions where a situation is quickly changing) were captured with the telephoto half of the XF18-135mm F3.5-5.6 R LM OIS WR. The reason why I chose these examples is because I wanted to show what can be done with F5.6 as the maximum aperture, showing nice bokeh in the images where I’ve tried to keep the attention on the subject. Now imagine what will be possible with the new XF50-140mm F2.8 R OIS WR! Can you tell I’m a bit excited about it…?
What lens for the occasion?
The main reason I first moved to the Fujifilm X-Series was the prioritisation of high quality lenses. With the announcement of the X-Pro1, the first lenses available were the XF18mm F2 R, XF35mm F1.4 R and XF60mm F2.4 R. These are all high quality, lightweight prime lenses that, together, offer a wide focal length range package. From there the lens road map laid out Fujifilm’s intentions to create a strong lens collection covering a wide range of uses.
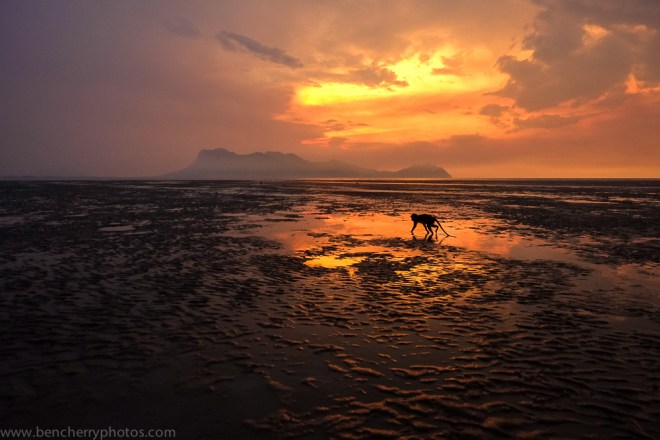
Generally lenses are associated with a particular genre of photography based on their focal length. For example wide lenses such as the XF14mm F2.8 R and XF10-24mm F4 R OIS are intended for landscapes and long lenses like the XF55-200mm F3.5-4.8 R LM OIS are for wildlife and sports. But rules are made to be broken and your lenses don’t necessarily have to be used to fit those stereotypes. The photograph below was taken with the 14mm lens, generally intended for landscape photography, however I used this lens to capture this macaque foraging for stranded marine life amidst a sunset scene.
14mm – Foraging macaque
The important thing to remember with your lens choice is to think “what do I want to convey?” On this occasion I wanted to show the scene as a whole. In the landscape shot below I focused on the distant hills over a bay with the setting sun using the 55-200mm lens, which is usually associated with wildlife and sports. This helped to emphasise the golden glow which wasn’t as prevalent with a wider-angle view.
120mm – Landscape
Conclusion
Hopefully you now understand that lens choice can have a huge impact on your end result. If you understand the principles of focal lengths and apertures then you have a grasp on what lens to use and why. Remember that lenses are tools designed to help fuel your creativity. For me, a lens that I am very much looking forward to is the XF50-140mm F2.8 R OIS WR. This lens offers the versatility of a zoom but with a constant aperture of F2.8 it gives very good depth of field control. A lens such as this has many uses and I’m sure it is going to be a big hit with photographers from all genres.
A good exercise to try would be to force yourself to use one focal length next time you go for a walk. No matter if you’re using a prime or a zoom lens, try and restrict yourself. The purpose of this is to understand what you can capture with certain focal lengths so that in the future you will hopefully be more decisive with what focal length to use in a given situation. Remember that you can change the end picture dramatically through different apertures. Why not give it a go and then share with us the variety of photographs you managed to capture with the same focal length. Or you can change it up and use one aperture but change your focal lengths. Share your results with us and if you have any questions please get in touch via the contact details at the top.


 If you look at the above photo you can see that I have a filter inserted into the filter holder. I decided to use a gradual neutral density filter as this allowed me to darken the sky while having less/little effect on the ground.


 As the day progresses and the sun gets higher (if you can see it!) the quality of light drops off somewhat, making wide landscape shots less dramatic. Two fun things to do if you’re out and about is: 1. Slow down – slowing down your shutter speed when doing big landscape shots can make an image really dynamic, even if the light isn’t bright and dramatic. One of the ways to exaggerate the length of your shutter speed is to use a neutral density filter to reduce the amount of light hitting the sensor and so extending your shutter speed.
  This shot was 125 seconds long. There is no detail left in the mist as it has moved so much in that 125 seconds, making the fog look a bit like a white ribbon. 2. Focus on detail – winter is a great time for capturing the details of nature. From the hard frost on the ground to the last leaves hanging on a tree, detail shots in conjunction with some other, wider shots can really help capture the essence of winter as part of a photoessay.


 All taken with the X100s + TCL-X100 (in love with this combo). For this walk I limited myself to only this combo so I focused on composing images for that focal length. This is a good way to try and improve creativity and compositional skills. As the day draws to a close then you can begin to take advantage of the “magic hour”. If I have a free afternoon then what I like to do is go on a walk and end up in a nice location for sunset. This is what I recently did in the Peak District, walking a circuit from Hathersage up to Stanage Edge and Higgar Torr before heading back down to Hathersage. This was wonderful, about 6 miles and a great way to spend an afternoon.


 As I went along I was watching how the light changed as the sun came lower and how this affected the dramatic scenes in front of me. It was very interesting to see how the landscape evolved with the setting sun. Now we have been lucky enough to have had some snow recently, this is wonderful for pictures. Snow can take a landscape that you might see everyday and turn it into something magical. However, snow can be a little difficult to meter. This is where using the EVFs on X-Series cameras can be really beneficial, as you can see exactly how your camera has metered and adjust the exposure compensation accordingly.


 Finally if you’re brave enough (I haven’t been so far) then you can get out on a cold winters night and try some star photography, especially since so much of the day is now dark. Remember that the most important things are to stay warm, be sensible, check roads and the forecast.
  Roads can be very dangerous so look after yourself especially if you’re going out in the early hours. I hope this has been interesting and given you a few ideas on how to photograph the great outdoors during the winter months. Why not share with us your results via Fujifilm UK’s