Photography

Tutorial: Using Film Simulation modes

Vibrant reproduction ideal for landscape and nature

w360_6415757_tutorialbannerfordotmailerFujifilm knows film. The clue is in the name. And they’ve spent a lot of time and effort bringing classic film traits to life in the current range of digital cameras.
Each Film Simulation mode* has unique properties to help you express your creativity without the need for time-consuming post-production. Varying degrees of Saturation and Tonality are composed with just the right balance to bring each Film Simulation mode to life.

Film Simulation ModesThe camera’s Electronic Viewfinder can show the effects of the selected Film Simulation mode before the shot is taken, and if you shoot RAW, the in-camera RAW processing function allows any of the Film Simulations to be applied post-capture, broadening your shooting options.

Which Film Simulation mode is best for your shot?

I cannot tell you this, but I can recommend certain Film Simulation types that lend themselves to particular photography subjects. However, just treat this like an initial guide and explore for yourself to find your own style.


Portraits

I would recommend Astia or Pro Neg. Std. Astia’s soft tones are perfect for capturing beautiful skin tones. Pro Neg Std. takes the look slightly further by also lowering the colour saturation.

Click on any of the images for a larger view.


Street photography

I recommend Classic Chrome or Monochrome. Photography is often called the “Art of omission”. Classic Chrome and Monochrome settings omit the element of colour in order emphasise the story you want to tell.


Landscapes / Seascapes / Cityscapes

I recommend Velvia. At the opposite end of the scale from Classic Chrome, Velvia uses colour as the main element. It adds more depth and the colours become more vibrant. There are certain emotions that only image colour can deliver and this is where Velvia comes in.


Image comparison

The images below were all created using the X-T1’s in-built RAW file converter and are all JPGs straight out of the camera.

Colour

Mono


Conclusion

All of the Film Simulation profiles have been developed (pun intended) by people with years of experience working with film to allow you to really alter the feel of the image without the need for lots of time-consuming post processing. Try it yourself and let us know how you get on in the comments below.

Bonus Tip!

If you’ve got a big enough memory card, set your camera to save “RAW+JPG” and then use the in-camera RAW File Converter to convert the same image into different Film Simulation modes after the shot has been taken.

* The number of Film Simulation modes available on your camera will vary.

Tutorial: Rule of thirds

w360_6415757_tutorialbannerfordotmailerOne of the most well known and widely used composition techniques is the ‘Rule of Thirds‘. Originally it was used as a guide to help landscape artists in the mid-19th century, but it was quickly discovered as a handy tool for photographers as well.

Why use the ‘Rule of Thirds’?

The idea behind the Rule of Thirds is to stop the photographer putting the subject in the centre of the frame. By doing this it allows the viewer more opportunity to explore the image as a whole rather than be fixed on the central point. For this rule to apply, you simply need to imagine that your frame is divided into nine equal sections with lines crossing the horizontal and vertical areas of the image. Or to make things easier still, go to the FRAMING GUIDELINE option found on your Fujifilm camera and turn the GRID 9 option on.

It is where these lines meet that is important, you should roughly aim to place your subject matter on or near these lines. In this particular example the tree has been placed directly on one of the third lines.

rule of thirds with guides red

Which side?

You may also question where to place the subject in the frame. The left third or the right third of the image?

The right third of the frame is generally considered a better, safer placement of the subject matter (although this is subjective) due to the way a viewer ‘reads’ an image. Just like with books where we read left to right, we approach viewing an image in a similar manner. This means that when a viewer spots the subject of interest, they may stop exploring the rest of the image. Here is the same image simply flipped horizontally to give an idea of this effect.

Knowing the way a viewer ‘reads’ an image it can help you make creative decisions; by placing the subject on the left hand side you can create deliberate tension within your image.

rule of thirds with guides 3-2

Vertical AND horizontal

rule of thirds with guides 2
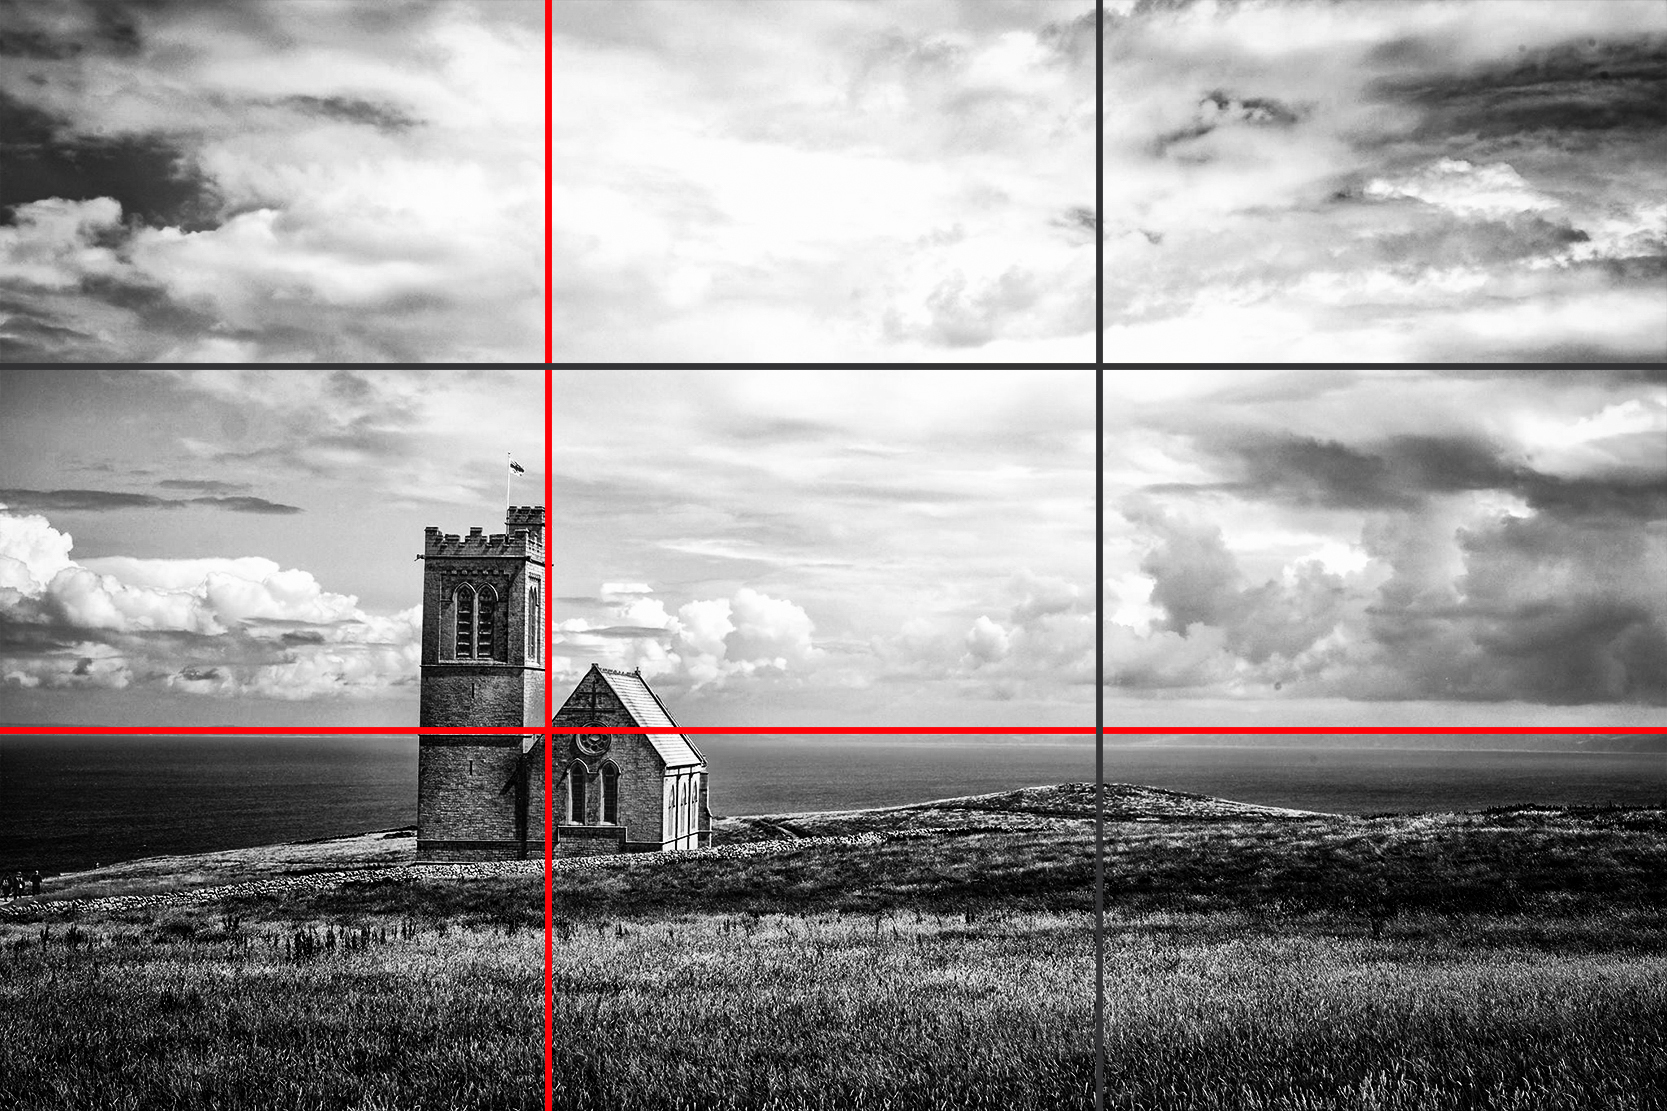
You may also notice that not only the subject matter is placed on a third line but also the horizon line as well. The Rule of Thirds can be very handy at producing consistently good compositions, especially in landscape photography. Our recommendation is to place the horizon on one of the third lines – which one is up to you, but here’s a tip: If the sky is more interesting, let it fill two thirds of the frame and if the ground is more interesting, let that cover two thirds of the frame instead.

10604585_10154697029435534_3613999098326903113_o

2 thirds foregroundSo in this seascape image we have started to combine the elements discussed above; we have horizon placed on a third line, the seaweed sitting on the right third line and because the we wanted the foreground to be more interesting and prominent it takes up two thirds of the frame instead of the sky.


And it’s not all about landscapes either!

This rule can be applied to pretty much any type of photography, here are some examples of how it can be applied to portraiture and even action.


Keep it in mind

Keep these composition ideas in mind when looking at inspirational images – can you see them being applied?
Think consciously about your composition – it may feel unnatural the first time you try it out, but in no time at all you will be getting great results.

Before long, the Rule of Thirds will become part of your photographic toolkit – a solid starting point to let you explore for yourself and find your own style.

Until then, happy snapping! 🙂

Python Close Up – Story Behind the Photo

I have been lucky enough to be using a prototype of the XF16mm F1.4 since March and I have to say it is brilliant. I wasn’t entirely sure what I’d end up using it for, but as it turns out it is an extremely flexible lens and helped to produce some shots that would otherwise have not been possible.

This particular story has a bit of an unusual beginning. The location is the Kinabatangan River, Sabah, Malaysia, I was in this region with another photographer, Christian Loader from Scubazoo who I’m currently doing some work with. I have to thank Christian for some of the photos of me here. One morning, we headed up river briefly as our guide Osmon wanted to show us something he had spotted the previous night. We slowed underneath some low lying branches. Before I knew what had happened we had come across a relatively young python and… it fell in the boat! At which point I almost jumped out, much to the amusement of the other two who have handled snakes extensively before. The snake then decided to snuggle up to my Millican Dave camera bag! They calmly caught it and we relocated it inside the forest on a nice tree branch, in return it kindly sat still allowing us to take some pictures.

Python-2

The close focusing capabilities of this lens really impressed me and allowed me to get some really close wide-angle shots, allowing me to fill the frame with the python and to also capture the environment.

Python-5

Python-3

I used the X-T1 with the XF16mm F1.4 attached as well as a Nissin i40 flash I used a rogue flash bender. But because this would involve getting very close to the snake I decided to put the camera on a monopod and used a wireless trigger set up to keep me working at a safe distance. To stress, the snake was absolutely fine and did not once try and strike the set up. The angled screen on the X-T1 was very helpful here as it meant that I could see exactly what was in the frame, regardless of slight angle changes to composition.

Ben shooting in Sabah - Christian Loader - Scubazoo Images-15
Here is the set up. Please excuse the ‘jungle hat’!

Because I was using the i40 flash in TTL mode, I couldn’t shoot above 1/180sec so I had to stop down to F8 for much of the photos. The location was very dark and flat as the vast majority of the tropical sunlight is absorbed by the canopy above. Thankfully the XF16mm seems to have very quick and accurate autofocus, even in these less than ideal conditions.

Python-4

In an up and coming blog I’ll show the benefit of the F1.4 aperture when photographing Pygmy Elephants.

You can find more of my work via the following links: Website, Facebook, Twitter, Instagram.

X-Series Exploration

My good friend Ismar Badzic and I decided to meet up early one morning and head out to one of my favourite places in the Peak District to put together a little video about me! Ismar and I have worked together for about two years now, from making snowboard films in Switzerland to live music events in Sheffield, our work has seen us cover all sorts of subjects. So it was particularly bizarre for me when Ismar turned his camera on me…

The video is the first of a series of videos that Ismar intends to create on people in and around Sheffield. Though a bizarre experience, it was great fun as I was basically allowed to go about my exploration, snapping away, but just having to remember that I was being filmed; so had to try and look vaguely normal.

Ismar wanted the short film to be about me and my photography, nowadays that means that the Fujifilm system is of course involved, as I no longer own another camera system. The joy of video is that it shows off the gear being used in all its glory, without my written, rambling waffle. Though just a taster, it shows a handful of the helpful features in action, from the wireless control function to the bulb setting. Thankfully though Ismar failed to capture the moment I fell into Padley Gorge, don’t worry, no cameras were injured in the making of this film, only my pride.

I hope that this video portrays the hardiness of the X-Series, on this morning they were tested in cold and wet conditions and passed with flying colours (just as well as X-Pro1 was Fujifilm UK’s and it was drenched!). I wholeheartedly trust this system to work, no matter the conditions, from the tropics of Borneo to freezing temperatures, it has never let me down. Anyway, enough of my intro, see the video below and let me know what you think.

Below the video are a handful of pictures I took during that outing.

The photos were taken with a mixture of the X-T1, X-Pro1 and X100s, using the 10-24mm, 18-135mm and 56mm.

Day of filming-6 Day of filming-8Day of filming-5 Day of filming-12 Day of filming-13 Day of filming-15 Day of filming-17 Day of filming-18 Day of filming-19

Story behind the photo – Sheepish sunrise

This story started out with a glance at the forecast the night before. With heavy fog and cold, mirky conditions on the table I had to at least try and get out in the early hours and capture these often photogenic conditions. Though Curbar Edge is very convenient for me to get to in the Peak District, I was beginning to feel like a one trick pony so decided to head over to a hill called Higgar Tor, which has lots of beautiful rock formations and a great view. Thankfully the main roads were well gritted and there is a car park very close to the hillside so my journey to the top of the hill was pretty straight forward, which is just as well as I arrived just the sun had come up, above the horizon… Funnily enough, there was hardly any fog and the sky was quickly clearing and it was turning into quite a spectacle.

Higgar Tor sheep-15

I was not alone at the top of this seemingly lonely mountain though, there were two other photographer’s who were already there and in the prime positions for the sunrise. To avoid breaking the unwritten code of standing in front of another photographers shot, I had a little think to myself on how to approach the situation. While scouting around I came across a small herd of sheep, which seemed to have adapted well to the wintery conditions, as if their white coats were designed for this all along! As soon as I saw them I decided to use them as my main subjects for the morning.

Higgar Tor sheep

Without a subject, I find it quite difficult to connect with landscape pictures, so having the sheep to focus on helped me focus on how to do the beautifully unravelling situation justice.

Higgar Tor sheep-10

Since I had the Nissin i40 flash in my bag I decided to give it a go in the challenging conditions with the X-T1 and the 18-135mm lens. It quickly turned very bright and made the little flash work hard, which did result in relatively slow refresh times, but this could have been due to some slightly older batteries in it. What I wanted to do was to use the flash to give the sheep a tiny bit of definition in the part shaded from the sun. I deliberately moved so sheep were initially between me and the rising sun.

Higgar Tor sheep-9

Now it may not look like the flash was used here, but if you look closely, particularly at the left front sheep’s eye then you can see a little glint. That was from the flash. I had the exposure compensation down a notch or two to try and retain a bit of the sky, otherwise it would have burnt out, as at that moment in time I wasn’t using any filters. The flash was on 0 exposure compensation and I attached the diffuser. Again, to reiterate I didn’t want the flash to be obvious in this picture, instead I wanted it to just give a little glint, to highlight the eye, which it did. What I liked about back lighting the sheep with the low sun is the wonderful warm glow given to their outlines.

The sheep then headed down the side of the hill to continue their grazing.

Higgar Tor sheep-6

I decided to use the Velvia film simulation for much of the morning as it really gave a punchy finish to the photos, though sometimes the contrast was a little too high so I would sometimes change it to Provia.

Higgar Tor sheep-4

Higgar Tor sheep-17

Though the more I compare the above images, the more I lean towards the Velvia image as it is so attention grabbing. It is great having the options at your finger tips and being able to change the look of the image so easily and I haven’t even mentioned Classic Chrome yet!

As it was slippy under foot, I was very happy to have had the 18-135mm attached to the camera, as it gave me the versatility required to adapt to where I could move to and where the sheep moved! The first shot below was taken at 36.6mm, while the image after was at 135mm.

Higgar Tor sheep-3

Higgar Tor sheep-2

As the sun rose and the intensity of the colour faded I started using Classic Chrome more, to yet again change the look and feel of the pictures.

Higgar Tor sheep-13

Though the sheep were seemingly trying to hide on occasion..

Higgar Tor sheep-12

Using a longer focal length reduced the angle of view, which was helpful for this example as it gives focus on the sheep and the snow covered hill behind.

Higgar Tor sheep-11

Though freezing conditions (literally), the gear performed flawlessly, even if the batteries suffered a little due to the cold. Certainly something to consider if spending a long time in cold conditions, having multiple batteries will save you from frustration.

Leaving the sheep to graze, I decided to test out the i40 flash in another filler situation. Using the 10-24mm and a tripod I set up the exposure compensation to capture the surrounding area how I wanted it to look and then adjusted the TTL function on the i40 to fill in the shaded area of the rocks.

Higgar Tor sheep-18

This was the set up… The i40 looking the piece on top of the X-T1.

Higgar Tor sheep-14

To change up my photos again I decided to use the same techniques as discussed in the previous Story behind the photo blog, using filters for long exposures. On the other side of the adjacent valley was a factory/power station of some description and it looked like it could look pretty cool if slowed down. This was a 28 second exposure.

Higgar Tor sheep-16

What do you think to the photos? I hope it shows that the adaptability of the Fujifilm X-Series. Any questions please leave a comment below.

Until next time, go out, shoot and share your results with us!


Get more from your photography – Live talks with X-Photographers at The Photography Show

The Photography Show is our annual excuse to talk all things camera, and to add to the excitement we have an expert line-up of pro X photographers who will be sharing their hands-on experience with you throughout the show.

Bert Stephani

bert_stephani__headshot_186x280Bert is a professional photographer from Belgium who spends most of his time shooting creative portraits for editorial, commercial and private clients. He believes in sharing knowledge with other photographers by teaching workshops around the world, blogging and producing educational videos.


The Beauty of the Imperfection

Here you will learn tips and tricks for shooting creative portraits with simple camera & lighting equipment. Bert will also talk about the importance of subject interaction.

Date: Tuesday 24 March 2015
Time: 11:30 – 12:00
Stage: Live Stage

Date: Monday 23 March 2015
Time: 11:30 – 12:00
Stage: Live Stage

Twitter: @bertstephani
X-Photographer

Kevin Mullins

kevin_mullins__headshot_webKevin Mullins is a Wiltshire-based award winning wedding photographer who specialises in telling stories, through pictures, of weddings. The style of wedding photography he uses is known as documentary wedding photography, or reportage wedding photography and he is passionate about photographing weddings authentically, sympathetically and responsibly.


Reportage Photography for Weddings

Explore reportage photography from a wedding and social documentary point of view. Learn how to get close to your subjects without disrupting the event and how to look for humour and emotion in a scene.

Date: Monday 23 March 2015
Time: 13:00 – 13:40
Stage: Behind the Lens theatre

Twitter: @kevin_mullins
X-Photographer

Paul Sanders

paul_sanders_headshot_webPaul became a professional photographer in 1984, and moved into newspapers in 1991, eventually becoming Picture Editor of The Times. In 2011 he left The Times to pursue his love of landscape photography and to launch a project for young children to develop visual and creative awareness through photography.

His work conveys the emotional and spiritual responses he has to the landscape in front of him. His journey from news photographer to landscape photography began as a form of therapy to help deal with the stress of his job. Through photography he was able to express himself where words failed him.

Connecting with your Landscape

Learn a mindful approach to landscape photography and how to connect with your subject. Paul will also show you the importance of equipment that doesn’t get in the way of your vision.

Date: Monday 23 March 2015
Time: 17:00-17:40
Stage: Behind the Lens Theatre

Twitter: @wiggys
X-Photographer

Matt Hart

matt_hart__headshot_186x280Matt Hart is a black and white Street and Event Photographer based in Liverpool. He is an official Fujifilm X Photographer; a Formatt Hitech featured Artist and the founder of The Fujiholics Social Media Group.

Matt is passionate about Street Photography, he has developed the skill to observe and be virtually invisible, letting the world carry on around him without affecting the scene. The subject is unaware. Matt keeps the system and process as simple as possible so as not to over complicate the task. This is why he has chosen the Fuji X system for his professional work which helps him to achieve his style.

Street Life

Here you will learn Matt Hart’s modern street style and how to be invisible when shooting street photography. You will also be shown street camera techniques that Matt uses to maximum effect.

Date: Saturday 21 March 2015
Time: 12:00-12:30
Stage: Streetscape

Date: Sunday 22 March 2015
Time: 15:00-15:30
Stage: Streetscape

Twitter: @matt6t6
X-Photographer

All shows listed above are free of charge (as long as you have purchased a Photography Show entry ticket) – the show recommends that you arrive 15 minutes early to ensure a seat.

We look forward to seeing you all there very soon!