There are many photographs which are taken in ‘the moment’ where something happens and if you know your camera well enough you’ll be able to quickly respond and get the shot. However, sometimes you have an image or story in you head that you simply can’t move past.
In this new series we are going to look at some examples, where photographers have to dig deep, problem solve and follow their vision. Hopefully lifting the veil on the phrase “Wow you were so lucky to be there just at the right moment, all of those factors came together”. What I’ve come to realise over the past few years is that if you look at the great photographers of our time, many have one thing loosely in common – time. Time to hone an idea, experiment with a subject, to get under the skin of a location, ultimately to fulfil an idea.
This is Laurel, who was one of my star birds when it came to this project. Notice the mark on the left side of his face, that was one of his unique markings.
I spent the second half of last year working as a scarlet macaw researcher (I’m also a zoologist by training) studying a reintroduced population in a rural part of South-Western Costa Rica. What this gave me, more than any other opportunity so far was that same key factor – time. Quite quickly into the placement I became fascinated with these gorgeous birds, it’s pretty easy to see why.
Away from their clear beauty, I wanted to show these impressive birds flying through the rainforest, how their vivid colours stand out so bright against the green dominated background. But there was one key issue – light. Rainforests are notoriously difficult to photograph any form of action in because they are so dark. The canopy above absorbs the vast majority of the harsh tropical sunlight, leaving it surprisingly gloomy in the undergrowth. Combine that with the humidity that leaves everything with a thin layer of moisture on it (had to put my clothes to rest at the end of the placement, they had gone above and beyond the call of duty!) and you’ve got yourself a hostile environment for camera kit.
A common way to move around this is to use a slow shutter speed (generally your only option) and pan with your subject to capture that sense of movement. This works up to a point but I wanted to freeze the detail so I tried to implement a simple on-camera-flash approach… Again it was progress but not what I wanted to finish with.
Panning only
Flash on camera approach
NOTE – I was cautious with the birds in regards to using flash (as you should always be with wildlife), these were wild birds, but because of my research position I was in relatively close proximity to them. They were not disturbed by the flash while in flight, however I was aware that I needed to keep the number of flashes down as much as possible per encounter.
Here is a video that we produced midway through our placement. Showing the initial results and set up as well as some of the problems.
As the X-Series continues to develop, so does its autofocus capabilities. I’ve recently played with the X-Pro2 and wow, it is a definite improvement over the X-T1, which in itself is so impressive considering where the camera started and where it is now thanks to firmware updates. However, even the best cameras in the world would have really struggled with what I was attempting. Tracking a flying macaw under the rainforest canopy, flying at serious speed from tree to tree! This unfortunately meant that focus tracking was out of the window. But as time went on, I began to understand the routes the birds would fly, this allowed me to prefocus and develop my photo idea further.
Problem 2. Light source
With refocusing there still needs to be a degree of flexibility to keep the subject sharp. After all this is a wild animal and it isn’t on a scalextric track from tree to tree, they would often deviate by metres. To minimise these missed opportunities, I needed to use a relatively high F-Stop (F8-11) to allow me a good percentage of sharp images. However, high apertures need lots of light and to make it even harder I needed to use my flash(es) at 1/8 power output or faster. The reason for this is the relative time the flash fires for between full power aka 1/1 and quarter power (1/4), those flash duration are long enough for there to still be some motion blur as the birds are moving so quickly. 1/8 power freezes the birds in flight ensuring sharp details can be seen. HOWEVER, that is all well and good but when using F8/11, 1/8 flash power output and while trying to just about overpower ambient light, you need more than one regular flashgun to make this happen!
This was a key part of the project, it was initially all about finding a balance between the ambient light and the flash so I could still capture some of the surroundings, making it less of a studio shoot. To make this a reality I just dropped the shutter speed from the max sync speed of 1/180 to between 1/60-1/30. The flash would fire and freeze the details of the macaw but the slower shutter speed would create some motion blur and allow enough light from the background to reach the sensor to register the lush green environment.
Problem 3. Focal Length
I really like using a wider focal length with the macaws, however as the previous image illuminates, it often includes part of the canopy in frame. Light which penetrates the canopy shines down creating these blown out highlight trails. Sometimes these work quite nicely, but often they are difficult to make work, especially if the birds fly in front of a canopy gap, then you get these weird looking highlights cutting through the flapping wings!
Problem 4. Single Shot Flash
Fujifilm launched the update for the X-T1, allowing flashes to be fired in continuous shooting mode the week I left Costa Rica! Unfortunate for me, but it made for an interesting process, certainly a character building one. With ALL the other factors that had to be dealt with, I also only had one chance to take a shot per flyby! As you can imagine this got pretty darn infuriating at times. There were many times where I clicked at the wrong time and missed part of a wing, or got the wings up when I wanted them down etc.
The wings are usually the problem, but the long tail feathers can cause problems too! It is about finding the balance between the subject being too small in the frame and being able to fit it all in!
Steadily making progress…
Quite a strong light on the face that cast a shadow on the wing.
A softer light but less detail in the wings.
Better detail but just snagged the wing!
Then I raised the shutter speed to try and freeze the bird against a darker background. The reason why it is darker is because little of the flash light is aimed at the background (as multiple flashes were involved, all pointing toward the bird from different directions) and the shutter speed was now was 1/180 (max flash sync for X-T1) so it was 3/4 times faster than previous images.
Focusing on freezing the macaw.
Quite a striking, but studio like result.
I like the balance of blur and sharpness in this one.
Zoomed in to get more of an impact image.
All in all this process went on for three/four months. It was a very interesting exercise, and laying the photos out like this you can see how the project steadily developed. Often with projects like this it is all about problem solving, from fixing kit in the middle of nowhere to getting around problems out of your control, such as the flash-camera interaction. Though incredibly frustrating at times, it was a brilliant experience and yielded some good results by the end.
Final image
You may not agree but I like the balance in this image. the bird is clear and crisp while the background is still distinguishable.
Here is a 2 minute something video visually summarising my project and its issues.
Hopefully what you will take from this is that if you have an idea, don’t give up at the first hurdle, break it down bit by bit and steadily you can make progress.
What projects are you working on with your X-Series? Why not let Fujifilm UK know, the community is teeming with talent, ideas and people willing to lend a hand – lets bounce ideas off each other.
A little about Ben
Ben is an environmental photojournalist, zoologist and Fujifilm X-Photographer. His passion is showing the beauty and fragility of the natural world. Find more of his work at:
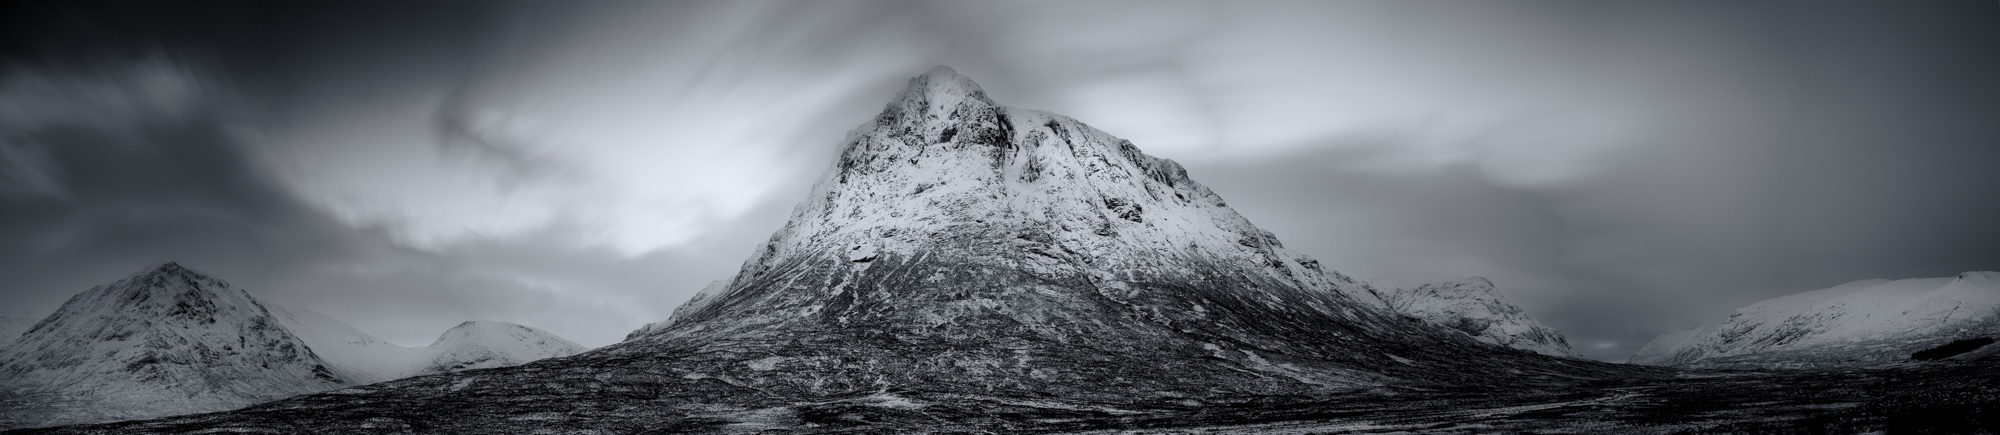
There are many times that using a wide angle or telephoto lens just won’t get the results you want. They’re either too wide or too tight but you know in your heart that your viewpoint is correct.
It’s frustrating and causes many photographers to give up and go home without a shot they’re happy with. However you should persevere and with the introduction of photo-stitching software built into Lightroom and Photoshop you should try the third option which is to shoot a stitched panorama.
By stitching together individual images you can render your scene in greater detail and make extremely large prints without the image breaking up.
For those who want a bit of background early examples of a panorama include the Bayeux Tapestry, at nearly 70 meters in length it’ll take some stitching to get a photograph that will rival that!
I’ve shot panoramas for a number of years and find the discipline fascinating. The normal guidelines of composition do apply, but they also don’t – you have much more area for the viewer to explore, more details being captured and there can be cameo roles for people in the different areas of the image. These all come together to create a story or feeling that literally absorbs the viewer – well that’s the idea anyway!
To shoot your very own panoramic image:
Firstly, if you can – use a tripod
It’ll make stitching the images together far more straightforward. Make sure your tripod is level too – most come with a spirit level but luckily most of the Fuji X series have horizon levels built in. If you press the display/back button on the back of the camera a few times this normally brings it up on screen if it has one. To check that the camera and tripod are level, gently pan the camera from left to right and check the display to see if the level line is straight throughout the motion. When attaching the camera to the tripod – set it so that you are shooting a series of upright images (portrait orientation). You’d be forgiven for thinking that you should shoot three or four landscape images – although you can if you wish, but you will end up with a very strip like image. I have found the upright method to be far more rewarding.
Your focal length is generally a little longer than when shooting conventional landscape images.
For example, I recently shot a panorama in Paris using the XF50-140mm, to get the same result normally I’d have needed to use a XF10-24, but the detail in the bridge and the compression of perspective would have been lost.
In a perfect world you would use a panoramic tripod head and set the nodal point of the lens.
Basically this means the middle of the lens sits over the middle of the tripod – but with good stitching software you can get away without it being set, if you’re careful. The reason for this is that if you have the nodal point set correctly the perspective doesn’t alter as you rotate the camera, but when the lens is off-centre perspective from the lens to the subject distorts ever-so slightly.
Once you have chosen your composition and have panned the camera backwards and forwards a few times to check your image works, you must set your focus and exposure. Once set, do not alter them, otherwise you get very awkward tonal changes between the different images. The same applies to graduated filters – although you can adjust them slightly.
Finally you are ready to shoot!
Start on the left-hand side of your shot and take your first picture. Then turn the camera using a panning motion through about 15 degrees, or using the framing grid on the screen – move it round by 1/3 of the frame – this will give you enough overlap to avoid the distortion caused by turning your camera. Repeat this shooting process until you have completed your full composition.
Once have finished your series – shoot a blank frame so you know where the start and finish is.
You may need to fine tune your shot so always check the image on the back of the camera to make sure you’ve got every aspect of the shot you need.
When you get home the process is very simple.
Load your images into Adobe Lightroom – highlight the pictures that make up your panorama – take your cursor across the top menu bar to the heading ‘Photo’ then scroll down to ‘Photomerge’ and select ‘Panorama’. Lightroom will show you a rough render of the image then simply press OK and a few seconds later you’ll get the stunning panorama you planned.
Occasionally Lightroom doesn’t quite do the job, so if that happens – open the images in Photoshop, use your cursor to navigate through File – Automate – Photomerge – Panorama – the same process will happen only this time you will have a layered Photoshop document to work with.
It will take a little practice to create the perfect image but it’s great fun to try. For more inspiration look at the work of Horst Hamann or Nick Meers
Amid all the deserved hype around the launch of the Fujifilm X-Pro2 it was easy to miss the upgrade to the Fuji X-E2, in the form of the X-E2S. In truth this is really an evolution rather than a revolution but, true to form, Fuji have integrated some very welcome features into this incarnation.
Before I run through these it might be worth explaining Fujifilm’s strategy around their, interchangeable lens, CSC (compact system camera) line up. Fujifilm’s launch into the CSC market came with the introduction of the X-Pro1 4 years ago. This model was styled around the retro rangefinder type cameras. It was an instant success due to the beautiful design and stunning image quality. The X-E1 and X-E2 followed in the same vein but in a smaller form factor. Whilst there are benefits of using a rangefinder for certain types of shooting, especially street, there are many photographers who prefer the typical DSLR style body with a central viewfinder. Enter the Fujifilm X-T1 and subsequently X-T10.
So the thinking is that Fuji can now offer Pro / semi-pro and enthusiast cameras in both rangefinder and DSLR styled bodies. So in essence the X-E2S lines up alongside the X-T10 with a 16.3mp sensor.
My “affair” with Fuji started in 2013 when I bought the X-E1. I had always wanted a small, light rangefinder style camera to use as a carry round camera to be used alongside my Canon DSLR system. I loved that camera and I still do, but whilst the X-T1 with its fantastic features and design is now my favoured body, the X-E1 is always in my bag.
So when Fuji asked me to test the X-E2S I was intrigued to see how it would compare to my own two models. My thoughts here are not meant to be a definitive technical review, there are plenty of other sites that offer that, but more around the user experience which will hopefully help you decide whether this body might be the one for you.
The X-E2S inherits the rangefinder style design and functionality with a series of new or improved features. The X-E2S is the same small size as the X-E1 / X-E2 and weighs in at a meagre 350g (body only) great for discreet, unobtrusive shooting.
The X-E2S boasts improved viewfinder, autofocus system, handling and a more intuitive interface so let’s have a look at these in a little more detail.
One of the key benefits of the recent Fuji viewfinders is the ability to see in real time the exposure that you’re getting. Adjust the exposure or exposure compensation dial and see the screen go brighter or darker and confirm highlight and shadow control with the live histogram. The display is large with a 0.62x magnification and very bright and Fujifilm claim the EVF features the world’s shortest display time lag. The user can tailor the information appearing to their specific needs and this auto rotates when the camera is turned vertically, a really useful feature.
The X-E2S incorporates the superb new Auto Focus system that was introduced to the X-T1 and incorporated in the X-T10 and the new X-Pro2. This adds Zone and Wide Tracking to Single Point for easy capture of moving subjects. The standard single point mode offers 49 points for fast, precise focusing whilst the Zone mode allows users to select from three different sized zones from the 77 point focus area. The wide tracking feature excels at capturing moving subjects whether they are moving up and down, left and right or towards or away from the camera. This combined with Face and Eye detection options makes this a significant improvement over the old system and offers users one of the best and fastest AF systems available.
The addition of a new, silent, electronic shutter is perfect for candid captures or shooting in quiet places and a top speed of 1/32,000 second means that the fast Fujinon lenses can be used wide open outdoors on a sunny day without the need for an ND filter. The interval timer enables shooting up to 999 frames with intervals from one second to 24 hours.
The camera features Fujifilm’s APS-C 16.3 megapixel X trans-CMOS II sensor. This is unique to Fujifilm and the random colour array and lack of low pass filter helps deliver outstanding image quality and low noise.
For those who like to shoot in low light there is an amazing new top ISO of 51200 though I rarely shoot above 3200 ISO where I have no problem with the quality of the files. If you like to shoot video the X-E2S can capture 1080/60p video and offers the latest set of Film Simulation Modes, including the gorgeous Classic Chrome which gives a slightly muted retro feel. In order to make selecting your most used functions quick and simple you can customize the function buttons on the body. My selections are ISO, self timer (usually set to 2 sec for tripod shooting), focus point, AF mode and metering mode. Of course you can also configure the Quick “Q” menu to your own specification. The new model also features an enhanced grip and a new user friendly interface for the menu system.
For those that are new to Fuji or thinking about making the move across there are a few other key points I should highlight.
As with the X-E2 the X-E2S offers the user the opportunity to manage the “exposure triangle” of aperture, shutter speed and ISO together with exposure compensation easily on the camera without the need to dive into endless menu’s. Manual focusing is a breeze when using the focusing aids of digital split image and focus peaking. I find that setting my focus peaking to flash the highlights in red works best. If you shoot JPEGS rather than RAW, or want a very pleasant surprise, the Fuji cameras deliver stunning JPEGS straight from camera. There is a lovely, almost film like feel to them and you can fine tune them in camera to suit your style, they really do have to be seen to be believed.
A final point is that Fujifilm have earned deserved praise for their commitment to users buying into their system to ensure that they are not disadvantaged by the steady stream of technological improvements. In this case existing X-E2 users can update their camera’s firmware at no cost delivering the new AF system updates, performance improvements and the new graphical interface introduced in the X-E2S.
So in summary whilst the X-E2S does not incorporate all the latest technology from Fujifilm it does offer a lightweight, compact rangefinder style body, awesome autofocus system with a proven 16.3mp sensor delivering stunning image quality at a very keen price making this a very attractive proposition indeed.
Today FUJIFILM Europe unveiled its all-new Open Innovation Hub, located at its manufacturing and R&D centre in Tilburg, the Netherlands. In this hub Fujifilm will invite business partners to discuss innovative technologies and to find opportunities for solving technological challenges together. The new facility will join the two existing Open Innovation Hubs of Fujifilm in the USA and Japan. These Open Innovation Hubs are designed to allow business partners to become familiar with Fujifilm’s core technologies and applications, with the aim to create a base together for collaboration opportunities and future co-creation.
Tell us about yourself and what got you into photography?
I had a fairly round about route into becoming a full-time photographer. My background is in theatre and that’s where I worked for 20 years, first as an actor then stage manager. I bought myself a point & shoot digital camera to go on holiday with my wife in 2004 and just wandering around taking photos rekindled the interest I had in photography as a child. My dad had been a keen amateur and I often had a roll of film and an old Zenit 35mm to play with – then it was back home to develop and print the results.
Fast forward to 2005 when I started to take photography seriously again. I bought myself a DSLR and started to take photos around the theatre I was working in. I’ve never been interested in ‘posed’ imagery and a camera seemed an ideal instrument to document the ‘process’ of theatre – rehearsal photographs, technicians at work and actors acting. From there the theatre I was working at started to use some of my photos as marketing materials, the Arts Council UK commissioned me to photograph some things they were doing in schools, and I got some freelance work photographing Ballroom dancing for a couple of publications – all this work came through contacts of people I knew or had met, I didn’t even have a website at this stage!
Why did you choose to shoot with the Fujifilm X series?
I’m interested in documentary photography and telling stories. Once I started playing with the X-Pro1 (in late 2013) I found a camera that let me do this in a really subtle and intimate way. By this stage, I was a full-time photographer photographing mainly weddings and theatre. Walking into a wedding with an X-Pro1 and a 35mm lens was very freeing – I was no longer the person with the biggest kit in the room. People were not intimidated by such a small and interesting looking camera and I found I could be around any situation and get the shot I was looking for without anyone changing their behavior because the ‘official photographer’ was there.
Most of my work is taken in available light and I’ve never really had a problem getting the results I’m looking for from the Fuji X-series cameras. I work with two X-T1s mostly (with a bit of X100T thrown in) and will shoot on fast primes up to 6400iso without blinking – always I’m looking for the best light in any situation then working out how to tell the story in that light.
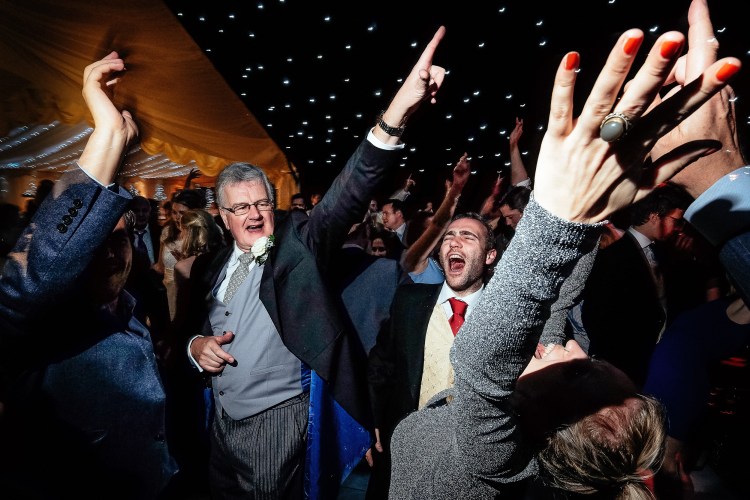
HOWEVER when it comes to the evening of a wedding and everyone is getting down on the dance floor that’s when I break out the flash!
By this stage of the day I figure everyone has relaxed and I can go for a more ‘night clubby’ look with the photos. Dance floors are a dark place, bands or DJs don’t often bring enough light to illuminate them so at this stage I often have to ADD light. But I still want to stay discreet, self contained and mobile. That’s why I choose to use the very tiny Fuji EF-X20 flash on a sync cord attached to my X-T1 (often with the 10-24mm).
With this set up I can get into the middle of the dance floor action, shoot from any angle and no-one cares you’ve got a camera (even when it’s getting ‘messy’ at the end of the night). If I was shooting with ‘Off Camera Flash’ I’d be limited in the look I would get by where my light stands could go – this way I’m a portable studio. Holding the flash in my left hand (usually high above to the side) and the camera in my right but away from my eye. I ‘zone focus’ so the camera is set manually to focus from 4ft to infinity – at f/10 this is really easy and means that I don’t have to worry about AF in low light but just what’s happening in front of my lens.
These are my default setting for Epic Dance Floor shots: ISO 2000, F10, 1/15th, 14mm, get in close and dance your ass off while photographing.
Do you have any tips or tricks you could share with us?
The best thing I could say is to develop your own style and approach to how you photograph. When we start out we all see amazing photographs in a variety of styles and try to copy those in our work – it makes what we do look a little scattergun and inconsistent. Work out what you love photographing, what you are passionate about and a philosophy about how you should approach your photography and then do that. Then do that some more. Then do that better. Then refine it. Do it more. Do it better. Refine it. And on and on it goes.
Every time I pick up a camera I want to create better photographs than I did the last time – better photographs for me equals better photographs for my clients.
What’s next for you?
Put simply – see above. Doing more of what I’m doing but hopefully doing it better.
Contact info
To see more of Andrew’s beautiful photography, please visit his website and social channels:
I was born in Margate, Kent on the south east coast of England on the 5th July 1990. I grew up about 40 minutes south of Margate in a small seaside town called Deal.
Growing up in the south east of England, there isn’t much to do unless you like being outside. Being a teenager, I wanted to either be in front of a TV sleeping the days away or out skateboarding. When I turned 13, my dad brought me my first camera and I took around with me everywhere. I mostly concentrated on the boats, beaches and surrounding farm land.
I moved to London in 2010, where I started working at a magazine as an intern for 3 months. Once my internship had ended I was quite lost as to what to do next. After networking around the city I fell into a PR job which kept me occupied for 3/4 years working with some big names in music, sports, movies & television. At some point I thought this would be a job for life but I slowly grew away from it and followed my dreams in photography and writing. Over the past 2 years, my life and career has had its ups and downs like most people, but things have recently really take a turn for the better with a few different ambitious projects.
So what do I think about the X-A2 for my style of photography?
When I first picked up this camera my instant thoughts were how lightweight and compact it is. Using the XC16-50MM kit lens it has fed me with everything I need.
With my style of photography I like to be as close to my subject as possible and to paint a scene of what’s happening around me. The Fujifilm X-A2 helps me capture those moments.
Broadway, Brooklyn. NY
Once I started learning how to use the settings to their full capability, I found myself shooting at night, which was something I never used to do. The SR+ setting and High ISO settings really help capture what we as humans can see during the darker hours of the day, if not better than what we see. The end results from this camera are so good it is a shame to edit or tweak images.
Doyers Street, Chinatown. NY
During my time thus far with this camera, I have begun to edit less and take more photos that I am proud of. With the 175º tilting screen, shooting buildings and streets at interesting angles has never been easier. The resolution of the screen makes you want to take more and more images.
Myrtle Avenue, Brooklyn. NY
Times Square, NY
Woodland Hills, Los Angeles. CA
This camera is like having a little lightweight best friend around your neck that is never going to disappoint. It maybe even teach you a few things along the way.
Balmaha, Loch Lomond. Scotland
So far I have travelled to Glasgow, New York, London, Los Angeles and have never left the house without my camera. On all of these trips and locations the X-A2 makes me proud to be a photographer and proud to be using a Fuji camera.
Processed with VSCOcam with hb2 preset
Pell Street, Chinatown. NY
To follow Brad’s photographic adventure, please visit his social channels below:



 There are many times that using a wide angle or telephoto lens just won’t get the results you want. They’re either too wide or too tight but you know in your heart that your viewpoint is correct.


 Amid all the deserved hype around the launch of the Fujifilm X-Pro2 it was easy to miss the upgrade to the Fuji X-E2, in the form of the X-E2S. In truth this is really an evolution rather than a revolution but, true to form, Fuji have integrated some very welcome features into this incarnation.


 Today FUJIFILM Europe unveiled its all-new Open Innovation Hub, located at its manufacturing and R&D centre in Tilburg, the Netherlands. In this hub Fujifilm will invite business partners to discuss innovative technologies and to find opportunities for solving technological challenges together. The new facility will join the two existing Open Innovation Hubs of Fujifilm in the USA and Japan. These Open Innovation Hubs are designed to allow business partners to become familiar with Fujifilm’s core technologies and applications, with the aim to create a base together for collaboration opportunities and future co-creation.

 I had a fairly round about route into becoming a full-time photographer. My background is in theatre and that’s where I worked for 20 years, first as an actor then stage manager. I bought myself a point & shoot digital camera to go on holiday with my wife in 2004 and just wandering around taking photos rekindled the interest I had in photography as a child. My dad had been a keen amateur and I often had a roll of film and an old Zenit 35mm to play with – then it was back home to develop and print the results.


 About me


