For music & concert photographers, restrictions have meant it’s become harder and harder over the years to get those great shots. So seeing the Fujifilm XF100-400mm lens come into the fold is a very welcome addition to the Fujifilm lenses lineup.
Along with bad photography contracts thrust upon us as we collect our photo passes, and image right grabs on the pictures we capture, we’re now being forced further and further back within a venue, which restricts what we can actually capture due to the distance we’re expected to shoot at. This makes the XF100-400mm essential to achieving good results.
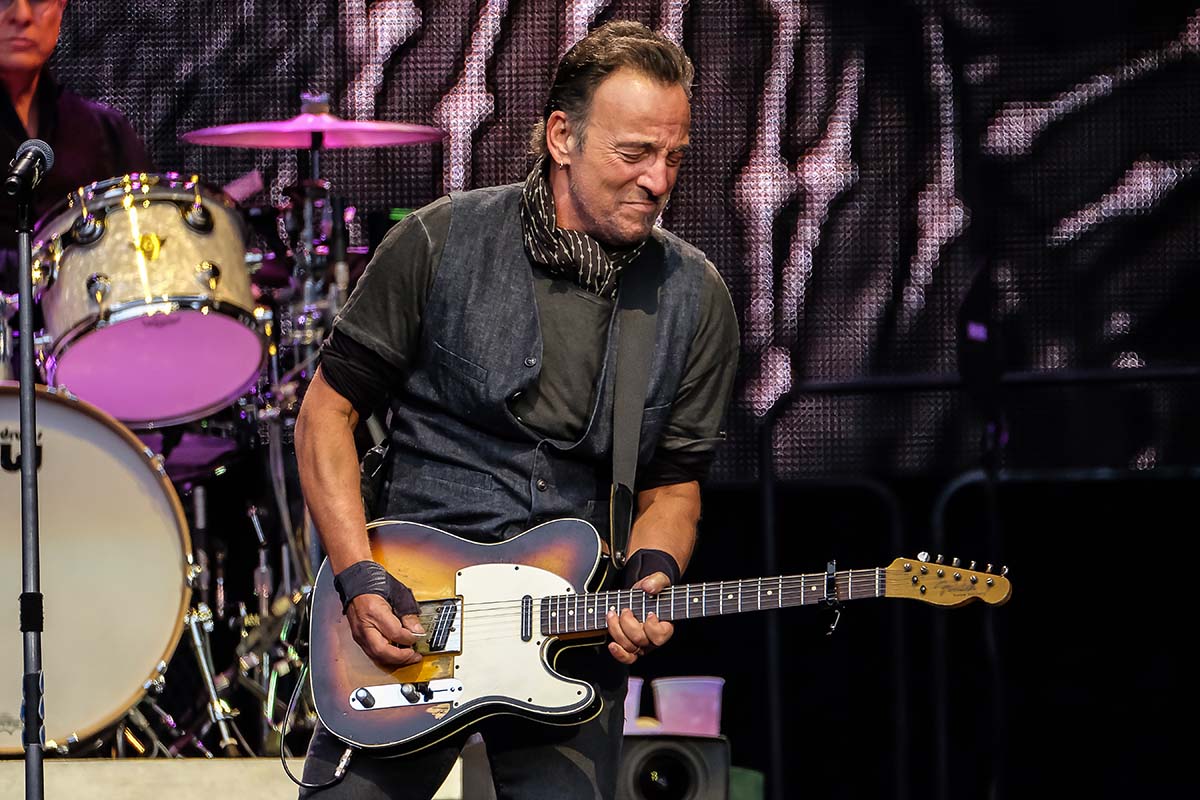
Bruce Springsteen – Manchester
With Bruce Springsteen performing in Manchester, I looked forward to using Fuji’s new beast of a lens the 100-400mm. Even though we were expected to shoot from the ‘Golden Circle’ barrier at around 50 meters (164 feet) from the stage, it’s still quite a distance.
The size & weight of this new lens was inline with all the Fuji X series cameras/lenses, well made, light in weight and weather sealed.
The one thing that did concern me though as I arrived at the City of Manchester stadium was the weather…… It was absolutely pouring down. I knew this would be a good test for both this new lens and my Fuji X-T1 camera!
Once in position, I had 3 songs in which to capture images from the ‘Golden Circle’ barrier. Even from here it was difficult to gain a vantage point above the sea of waving arms, mobile phones and homemade signs that swam through the crowd as Springsteen performed.
Even though it is a larger lens than other Fuji lenses in their range, in comparison to Full Frame it’s still relatively light and having to shoot without a mono pod (as I was constantly moving to dodge the arms blocking my shot) I was able to do this and keep my camera steady without much shake.
The camera and lens handled the heavy rain perfectly, no problems there, and I also found that the lens focuses very quickly and especially when Bruce was standing directly in front of the big video screen (which can be challenging for cameras).
Once home and after a bit of time spent editing the pictures, I was extremely happy with how the 100-400mm lens performed.
It helped me capture some great moments in the allotted 3 songs slot I was given to shoot in, and the distance the lens covers from 100mm to 400mm was a massive plus as right at the end of the third song Springsteen stepped onto the lower stage and I was able to capture that moment too!
As a landscape photographer, I venture out to shoot – a lot. Much of my work is reliant on timing and interesting light. I’m based in Michigan, which isn’t conventionally known as a photo wonderland, so I am constantly exploring, scouting locations, and biding my time for that special segment of time where the light is just right and I can realize my vision. Most of the time, this involves me running out the door and into my car at the start of golden hour, and my Fujifilm bag (a unique co-branded creation) is perfect for those spontaneous moments.
Admittedly, I’m a bag snob, and I struggled with settling with any camera bag for my minimal kit until now. I could never find one that was just right for what I needed. When I heard that Fujifilm and Domke were partnering to create a never-before-seen version of several Domke classics, I was definitely interested. If the same attention to detail and capability that Fujifilm puts into their products went into the bags, I was going to be in for a treat. Long story short, the camera bag does not disappoint. The FUJIFILM X Series Domke F-803 has just the right amount of storage for me to take my X-Pro2, XF10-24mmF4 R OIS, XF56mmF1.2 R, and X100T – my perfect minimal setup. Even with the kit, the bag still has plenty of room left over for the accessories and extras, like my 10-stop ND filter, polarizers, solar-powered battery backup, and even my lightweight Vanguard VEO 235AB tripod, rendering me completely handsfree.
One problem that I usually have with messenger bags is that they end up being too bulky and uncomfortable, which is not the case with the FUJIFILM X Series F-803. It has a very low profile and feels perfect when it is slung across your body, all while looking super sexy (yep, I said it). The combination of sand canvas and brown leather make for a really classic look. It pairs so well with the aesthetic of the X Series cameras – you know, for people who care about that sort of thing. On the run and chasing light, I’ll be suited up with my new favorite premium X accessory.
–
Learn more about X Series Domke co-branded bags here!
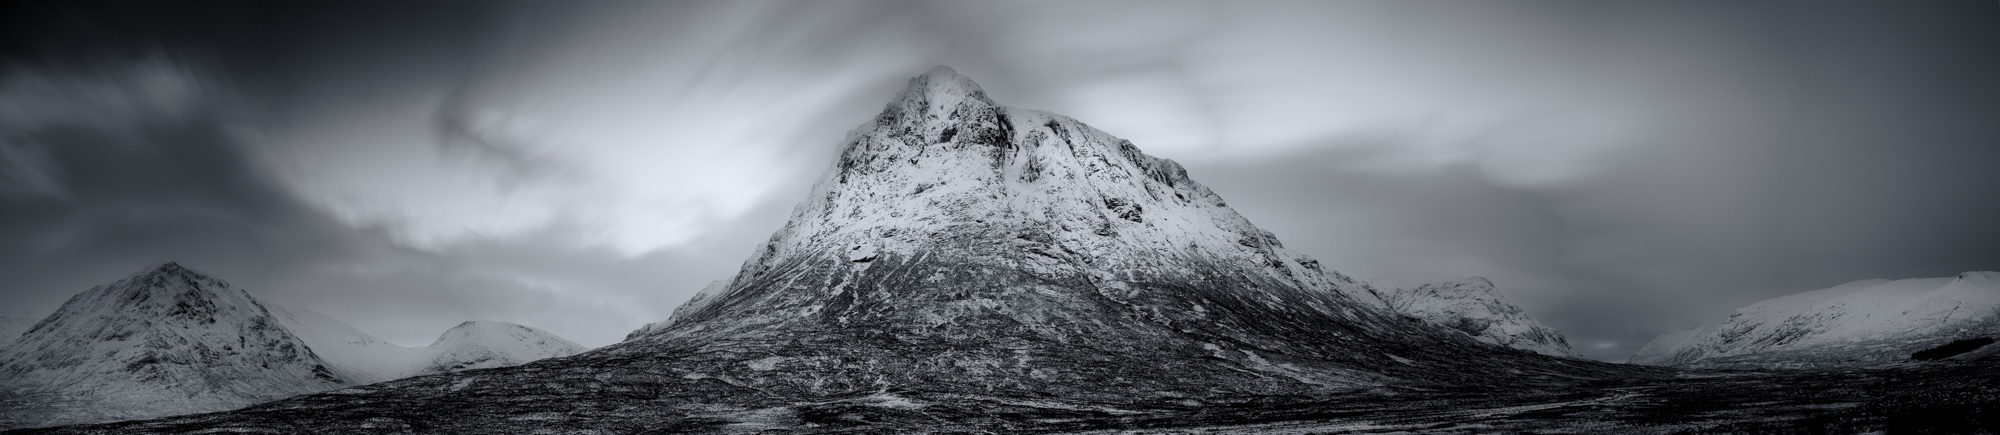
There are many times that using a wide angle or telephoto lens just won’t get the results you want. They’re either too wide or too tight but you know in your heart that your viewpoint is correct.
It’s frustrating and causes many photographers to give up and go home without a shot they’re happy with. However you should persevere and with the introduction of photo-stitching software built into Lightroom and Photoshop you should try the third option which is to shoot a stitched panorama.
By stitching together individual images you can render your scene in greater detail and make extremely large prints without the image breaking up.
For those who want a bit of background early examples of a panorama include the Bayeux Tapestry, at nearly 70 meters in length it’ll take some stitching to get a photograph that will rival that!
I’ve shot panoramas for a number of years and find the discipline fascinating. The normal guidelines of composition do apply, but they also don’t – you have much more area for the viewer to explore, more details being captured and there can be cameo roles for people in the different areas of the image. These all come together to create a story or feeling that literally absorbs the viewer – well that’s the idea anyway!
To shoot your very own panoramic image:
Firstly, if you can – use a tripod
It’ll make stitching the images together far more straightforward. Make sure your tripod is level too – most come with a spirit level but luckily most of the Fuji X series have horizon levels built in. If you press the display/back button on the back of the camera a few times this normally brings it up on screen if it has one. To check that the camera and tripod are level, gently pan the camera from left to right and check the display to see if the level line is straight throughout the motion. When attaching the camera to the tripod – set it so that you are shooting a series of upright images (portrait orientation). You’d be forgiven for thinking that you should shoot three or four landscape images – although you can if you wish, but you will end up with a very strip like image. I have found the upright method to be far more rewarding.
Your focal length is generally a little longer than when shooting conventional landscape images.
For example, I recently shot a panorama in Paris using the XF50-140mm, to get the same result normally I’d have needed to use a XF10-24, but the detail in the bridge and the compression of perspective would have been lost.
In a perfect world you would use a panoramic tripod head and set the nodal point of the lens.
Basically this means the middle of the lens sits over the middle of the tripod – but with good stitching software you can get away without it being set, if you’re careful. The reason for this is that if you have the nodal point set correctly the perspective doesn’t alter as you rotate the camera, but when the lens is off-centre perspective from the lens to the subject distorts ever-so slightly.
Once you have chosen your composition and have panned the camera backwards and forwards a few times to check your image works, you must set your focus and exposure. Once set, do not alter them, otherwise you get very awkward tonal changes between the different images. The same applies to graduated filters – although you can adjust them slightly.
Finally you are ready to shoot!
Start on the left-hand side of your shot and take your first picture. Then turn the camera using a panning motion through about 15 degrees, or using the framing grid on the screen – move it round by 1/3 of the frame – this will give you enough overlap to avoid the distortion caused by turning your camera. Repeat this shooting process until you have completed your full composition.
Once have finished your series – shoot a blank frame so you know where the start and finish is.
You may need to fine tune your shot so always check the image on the back of the camera to make sure you’ve got every aspect of the shot you need.
When you get home the process is very simple.
Load your images into Adobe Lightroom – highlight the pictures that make up your panorama – take your cursor across the top menu bar to the heading ‘Photo’ then scroll down to ‘Photomerge’ and select ‘Panorama’. Lightroom will show you a rough render of the image then simply press OK and a few seconds later you’ll get the stunning panorama you planned.
Occasionally Lightroom doesn’t quite do the job, so if that happens – open the images in Photoshop, use your cursor to navigate through File – Automate – Photomerge – Panorama – the same process will happen only this time you will have a layered Photoshop document to work with.
It will take a little practice to create the perfect image but it’s great fun to try. For more inspiration look at the work of Horst Hamann or Nick Meers
Amid all the deserved hype around the launch of the Fujifilm X-Pro2 it was easy to miss the upgrade to the Fuji X-E2, in the form of the X-E2S. In truth this is really an evolution rather than a revolution but, true to form, Fuji have integrated some very welcome features into this incarnation.
Before I run through these it might be worth explaining Fujifilm’s strategy around their, interchangeable lens, CSC (compact system camera) line up. Fujifilm’s launch into the CSC market came with the introduction of the X-Pro1 4 years ago. This model was styled around the retro rangefinder type cameras. It was an instant success due to the beautiful design and stunning image quality. The X-E1 and X-E2 followed in the same vein but in a smaller form factor. Whilst there are benefits of using a rangefinder for certain types of shooting, especially street, there are many photographers who prefer the typical DSLR style body with a central viewfinder. Enter the Fujifilm X-T1 and subsequently X-T10.
So the thinking is that Fuji can now offer Pro / semi-pro and enthusiast cameras in both rangefinder and DSLR styled bodies. So in essence the X-E2S lines up alongside the X-T10 with a 16.3mp sensor.
My “affair” with Fuji started in 2013 when I bought the X-E1. I had always wanted a small, light rangefinder style camera to use as a carry round camera to be used alongside my Canon DSLR system. I loved that camera and I still do, but whilst the X-T1 with its fantastic features and design is now my favoured body, the X-E1 is always in my bag.
So when Fuji asked me to test the X-E2S I was intrigued to see how it would compare to my own two models. My thoughts here are not meant to be a definitive technical review, there are plenty of other sites that offer that, but more around the user experience which will hopefully help you decide whether this body might be the one for you.
The X-E2S inherits the rangefinder style design and functionality with a series of new or improved features. The X-E2S is the same small size as the X-E1 / X-E2 and weighs in at a meagre 350g (body only) great for discreet, unobtrusive shooting.
The X-E2S boasts improved viewfinder, autofocus system, handling and a more intuitive interface so let’s have a look at these in a little more detail.
One of the key benefits of the recent Fuji viewfinders is the ability to see in real time the exposure that you’re getting. Adjust the exposure or exposure compensation dial and see the screen go brighter or darker and confirm highlight and shadow control with the live histogram. The display is large with a 0.62x magnification and very bright and Fujifilm claim the EVF features the world’s shortest display time lag. The user can tailor the information appearing to their specific needs and this auto rotates when the camera is turned vertically, a really useful feature.
The X-E2S incorporates the superb new Auto Focus system that was introduced to the X-T1 and incorporated in the X-T10 and the new X-Pro2. This adds Zone and Wide Tracking to Single Point for easy capture of moving subjects. The standard single point mode offers 49 points for fast, precise focusing whilst the Zone mode allows users to select from three different sized zones from the 77 point focus area. The wide tracking feature excels at capturing moving subjects whether they are moving up and down, left and right or towards or away from the camera. This combined with Face and Eye detection options makes this a significant improvement over the old system and offers users one of the best and fastest AF systems available.
The addition of a new, silent, electronic shutter is perfect for candid captures or shooting in quiet places and a top speed of 1/32,000 second means that the fast Fujinon lenses can be used wide open outdoors on a sunny day without the need for an ND filter. The interval timer enables shooting up to 999 frames with intervals from one second to 24 hours.
The camera features Fujifilm’s APS-C 16.3 megapixel X trans-CMOS II sensor. This is unique to Fujifilm and the random colour array and lack of low pass filter helps deliver outstanding image quality and low noise.
For those who like to shoot in low light there is an amazing new top ISO of 51200 though I rarely shoot above 3200 ISO where I have no problem with the quality of the files. If you like to shoot video the X-E2S can capture 1080/60p video and offers the latest set of Film Simulation Modes, including the gorgeous Classic Chrome which gives a slightly muted retro feel. In order to make selecting your most used functions quick and simple you can customize the function buttons on the body. My selections are ISO, self timer (usually set to 2 sec for tripod shooting), focus point, AF mode and metering mode. Of course you can also configure the Quick “Q” menu to your own specification. The new model also features an enhanced grip and a new user friendly interface for the menu system.
For those that are new to Fuji or thinking about making the move across there are a few other key points I should highlight.
As with the X-E2 the X-E2S offers the user the opportunity to manage the “exposure triangle” of aperture, shutter speed and ISO together with exposure compensation easily on the camera without the need to dive into endless menu’s. Manual focusing is a breeze when using the focusing aids of digital split image and focus peaking. I find that setting my focus peaking to flash the highlights in red works best. If you shoot JPEGS rather than RAW, or want a very pleasant surprise, the Fuji cameras deliver stunning JPEGS straight from camera. There is a lovely, almost film like feel to them and you can fine tune them in camera to suit your style, they really do have to be seen to be believed.
A final point is that Fujifilm have earned deserved praise for their commitment to users buying into their system to ensure that they are not disadvantaged by the steady stream of technological improvements. In this case existing X-E2 users can update their camera’s firmware at no cost delivering the new AF system updates, performance improvements and the new graphical interface introduced in the X-E2S.
So in summary whilst the X-E2S does not incorporate all the latest technology from Fujifilm it does offer a lightweight, compact rangefinder style body, awesome autofocus system with a proven 16.3mp sensor delivering stunning image quality at a very keen price making this a very attractive proposition indeed.
If you buy an X-Pro2 and register the warranty on our website before the 8th April 2016, you could win a place on one of our fantastic workshops.
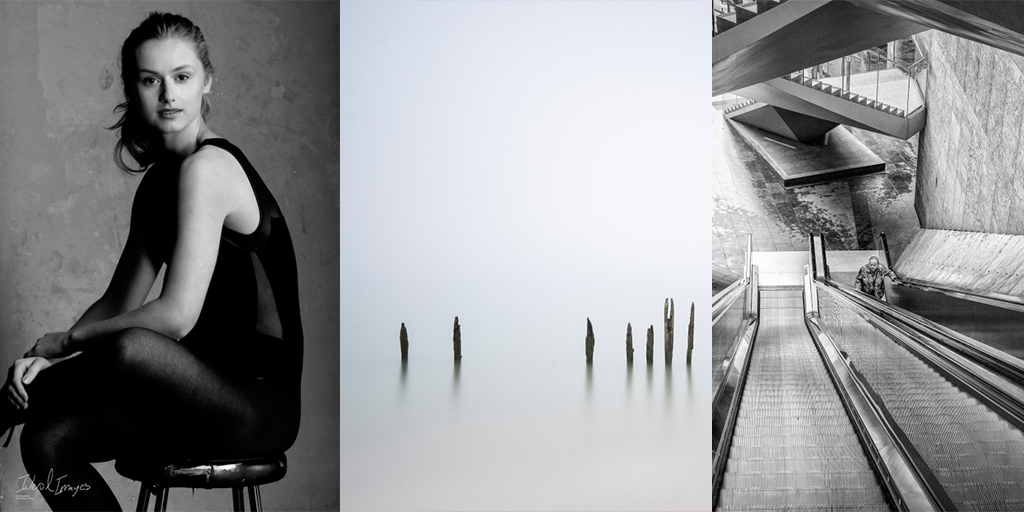
1st May – Portrait workshop with Dave Kai Piper – (4 delegates)
Location: Amersham Studios
Being a photography lecturer, Adobe Community Pro and Fujifilm X-Photographer, Dave Kai-Piper will take you on an exciting journey into portrait photography.
His workshop starts off with a conversation with each participant discussing individual goals for the day alongside a group objective. As part of the morning set-up you will have a look at some iconic images from influential photographers. Then he will break down what makes those images work & talk about how different lighting types can create moods and styles. You will learn how to build on simple lighting styles like Butterfly lighting, Split lighting and Rembrandt lighting and then put them into practice using live demonstrations with a stunning model.
Once your objectives are set, you will jump into the studio full of the newest WiFi controllable Broncolor lighting to put your new Fujifilm X-Pro 2 through its paces. You will look at ways to shape, control and create that perfect image. Within this workshop you will also learn the best way to communicate and pose your subject to get the best from your model.
Whether you have spent a lot of time in the studio using lighting or have never used additive / flash lighting in your photography before, each attendee will leave the workshop with a broader knowledge of various techniques from lighting your subject, creating a scene and directing your model.
4th May – Street workshop with Matt Hart – (4 delegates)
Location: Liverpool
Spend the day with Street, Event and X-Photographer Matt Hart in this candid street photography workshop. It is here that Matt will give you an insight into the way he works and how to shoot his style of street photography.
He will show you how to anticipate and capture decisive moments, how to be invisible in public spaces to get the best images and how to to develop confidence shooting street photography. He will show you the best places in Liverpool to capture great street images – so in the future you can come back and have another go!
Matt’s workshops are always fun, informative and relaxed whilst at the same time challenging and have been designed to stretch your imagination.
7th May – Landscape workshop with Paul Sanders – (4 delegates)
Location: Dungeoness and surrounding areas
Your day will be spent with Fujifilm X photographer and landscape artist Paul Sanders, he will help you develop your own way of seeing the landscape to create images that resonate with how you feel about the location.
Paul’s specialty is long exposure photography, he will take through a natural and easy to follow workflow that enables you to get to grips with the technical side of this style of photography. He will have some Neutral Density filters and graduated filters for you to use on the day. Filtration is one of the key aspects of landscape photography, it allows you to control contrast, mood and exposure time. Paul will explain all of the pros and cons of using filters and the different types of filters available.
The day will be split into two sessions – one at Dungeness and the other at Winchelsea beach.
Dungeness is the only classified desert area in the UK, its flat bleak landscape has inspired photographers, artist, writers and filmmakers for many years. The beach is a detritus of fishing boats and fleet. The decaying hulls of boats are left on the shingle, nets, huts and machinery make this a photographers dream location. Paul will explain that landscape photography isn’t always about the big vista but also lies within the details and the abstract he will guide you around the area so that you don’t miss anything.
Winchelsea Beach is a long exposure dream, lines of decaying groynes stretch along the beach. These make the perfect subjects for getting to grips with the minimalist style that long exposure work generates. Paul will also pay special attention to composition and exposure time to create beautifully minimal images.
Not many people realise it, but before I started travelling and shooting Motorsport, photographing pets was a major part of my business. I would shoot a lot of equine and dog portraits with the odd cat, snake or rat thrown in now and then. I still run Pawfolio, but it’s now more a project of love, or reserved for when people who know me as ‘the pet photographer’ really want me to shoot their most beloved….. not the kids, yep it’s always the dog!
I see a lot of people posting photos of their pets on instagram lately, with some pets even having their own pages. So I thought I would put a few tips together that might be fun to try out if you want to get a great shot of your own pooch…. some of the tips might even work on pictures of the kids too!
For my doggy model, I’m going to use Bria aka ‘The Beast’, my beautiful Sprocker Spaniel. These shots all involve natural light as I wanted this article to be of use to everyone. As long as you have a camera and a lens you can get stunning shots of your beast without expensive lighting.
Preparation
In my ‘Pawfolio’ bag. Don’t panic! You don’t need all of this! this is just some of the equipment I use on various shoots… If you have only one lens and a camera you’ll be fine 🙂
Camera: XPro1, XT1, XT10
Lenses: 18mm F2, 35mm F1.4, 10-24 F4, 90mm F2, 50-140mm F2.8
Lighting: Ambient/Natural Light
Extras: Dog, lead, willing assistant (wife, kid, person you met on a dog walk?), dog treats / squeaky toy / bouncy ball / whistle, silly voice, insurance (if you want to shoot other peoples dogs!), mobile phone
Top Tip! Things become massively easy in life once a dog knows how to sit, stay, and look at food!! this is where all that training pays off! You will need a few basics such as;
Sit, Paw, Down/Sleep, Stay, Come…
(We had to learn some of these commands in polish once for a clients dog we photographed.)
A food-orientated dog is perfect, if this isn’t working then it’s down to the favourite toy, bouncy ball or failing that, making stupid noises…..dogs love this! The right noise will get a dog to tilt it’s head in a way that looks cute but whilst saying ‘what are you doing, human?’
Play with your beast first;
this builds a little trust between the dog and yourself.
It’s fun for both of you,
it burns off the dog’s energy reserve
A few minutes playing around the kit isn’t a bad thing either, it lets the dog know that the camera is nothing to be worried about and not something strange and dangerous…
Around the house – Your own dog
Ideal for practice and often the easiest of images to shoot are where the dog is relaxed in their own surroundings or favourite spot. I normally wait for ‘Beast’ to find somewhere nice to settle or I encourage her to sit roughly in the right place. Quite often I’ll pap her as she drifts off to sleep. These are candid based shots but can turn into gorgeous intimate photos.
I use any of the following 18mm f2, 35mm f1.4 and the 90mm F2 mostly to achieve the shallow depth of field for this type of shot. The XF35mm f2, XF16, XF23 and XF56mm would be amazing also. Any lens at F1.2 – F2 will make a stunning image. I often use the X-Pro1 and X-T1. The OVF on the X-Pro1 can be really useful in hybrid mode during low light if the EVF wont preview the shot.
#Tip – You can put the Fuji camera to silent mode if the dog is too distracted by the shutter sound. Beast used to hear the shutter then pounce on me because she thought the sound meant that the shoot was over.
The candid shots I usually try to get for every dog shoot are:
Nose
That big snuffler is amazing. Shot at 1.2 or on a Macro it makes a stunning detailed image.
Paws
The texture of the pads or the hairy paw is beautiful. If it’s your dog, hold the paw and capture a paw & hand selfie #TooCute
Face
Poor beast with the collar of shame“What’s going on down there?”
Like any face or portrait I shoot, I always focus on the eye closest to me. If you shoot the furthest one and the closer one is blurred, the image just looks wrong – please don’t do it!!
#Tip – Try shooting the dog from ‘a dogs view’ or from below the dog looking up. Crawling around in the dirt is just an everyday thing for me, but I think it’s really worth getting the unusual perspective. This is also now where the flip out screen is genius and the X-T1 or X-T10 becomes king.
That said, don’t rule out the standing up traditional viewpoint. Sometimes if you stand right over the dog looking down, you get that ‘puppy face’ beaming back up at you, and there is nothing cuter.
Outdoors
For outdoor shots, choose a nice spot your dog is going to love and that has some features or atmosphere about it. The beach is an awesome place for dogs, and one of our favourites, with lots of space, great light, and lots of zooming. For this a 90mm, 50-140 or the new 100-400 is ideal because the animal can move around freely but you can still fill the frame. This situation is ideal for the X-T1 or X-T10 because of their high frame rate. I would probably go for the X-T1 more to help keep the sand, salt and spray out of the camera. I would also recommend the weather resistant lenses for this type of shoot. A rogue wave splash or a shake down from the Beast can spray your gear from a surprising distance.
You won’t believe the range on this thing!
Rivers are great too, but always check the current is safe. Look for a spot on the bank with space and great moody lighting, perhaps between some trees. You should make sure your beast can get in and out easily, and I always have someone with me to throw a ball or something safe for the dog to chase, or I sometimes just sit and watch the animal play and have fun on their own.
Before river
After river
My favourite lens for outdoor dog shoots has to be the 50-140 F2.8. With good flexibility and a shallow depth of field at F2.8 there’s always gorgeous bokeh in the background. I try to keep the shutter up between 2000th and 4000th of a second to keep the motion frozen. If the light is changing or the dog is running through light and dark patches, try ‘auto ISO’.
Set the the auto ISO range function to work between ISO 200 and 6400. To control the aperture, try to stay in the range of F2.8 – F4/5.6 or if you want some amazing textural shots and there is loads of light, dial in F8 – F11. Again get low… I have the tilt screen for this, or just get in the dirt and sand and the shots will be amazing.
You could also try the 16-55 F2.8 if you want the shot to be a little more environmental, shoot wide and get more of the landscape in your photos. When you print this type of shot they look great printed large.
If you want to get really creative try ‘panning’ the dog. This is a technique we use on the track to shoot cars at the races. Select a shutter speed between 1/8th (very creative) up to 1/200th (suggest you start there and work your way down to 1/8th), and rotate your body at the hips following and tracking your dog as it runs past. You want to work your shots at slower and slower shutter speeds to create a wonderful action arty shot…
Doggy pan
More about the author
John + Beast
John Rourke has been shooting professionally for 15 years and is the owner of Adrenal Media, the Official Photography Agency for the FIA WEC (World Endurance Championship), and the ELMS (European Le Mans Series) including the world famous ‘Le Mans 24hr’. He shoots all of his professional and personal work on Fujifilm X series cameras.
 For music & concert photographers, restrictions have meant it’s become harder and harder over the years to get those great shots. So seeing the Fujifilm XF100-400mm lens come into the fold is a very welcome addition to the Fujifilm lenses lineup.


 There are many times that using a wide angle or telephoto lens just won’t get the results you want. They’re either too wide or too tight but you know in your heart that your viewpoint is correct.


 Amid all the deserved hype around the launch of the Fujifilm X-Pro2 it was easy to miss the upgrade to the Fuji X-E2, in the form of the X-E2S. In truth this is really an evolution rather than a revolution but, true to form, Fuji have integrated some very welcome features into this incarnation.


 By
By 


