After reading all about it, the first thing we wanted to do was go out and try it out ourselves. Marc and I were able to get hold of a pre-production X-T10 for the day so we made this little video for you.
Here’s a few more sample images shot on the day using the setup described. Keep in mind that this is a pre-production model so the final results may vary. All images are straight out of camera.
X-T10 with XF18-55mm lens – ISO200 – f/5.6 – 1/600X-T10 with XF18-55mm lens – ISO200 – f/5.6 – 1/350X-T10 with XF18-55mm lens – ISO400 – f/5.6 – 1/500X-T10 with XF18-55mm lens – ISO400 – f/5.6 – 1/500X-T10 with XF18-55mm lens – ISO500 – f/5.6 – 1/500X-T10 with XF18-55mm lens – ISO500 – f6.4 – 1/500
Want a small, powerful camera that has features you actually want to use? The XQ1 might just be what you’re looking for.
Like many of you, I have my main camera (X-E2) that I use day in, day out. I know it like the back of my hand and could use it with my eyes closed – if you get my drift. The problem is, sometimes I just don’t want to carry a bag around – no matter how small it is. I want a pocket sized camera that I can forget about until the need takes me. Here’s the catch though, I don’t want a pocket sized camera that offers no control and is very noisy in low-light. This is where I think the XQ1 really shines, it just seems to tick all those boxes:
Pocket-sized
Manual control
High quality images, even at high ISO.
Being so used to my X-E2, I thought it would be a good challenge to use the little XQ1 for my day out to London. Not only that, but I could rid myself of the bag that I’m always carrying about, which was super!
So, like you do when you love photography & adventure, I starting taking pictures. I took the usual suspects at first; trains, train station & people randomly wandering about their business.
One of the first reasons I would class this as a photographers compact camera is simply that you can change the focus point manually. This is something I do ALL the time on my X-E2 to aid with my composition. With other compact cameras I have used, you either cannot set it or it’s not easy to access.
For our day out we headed to the Natural History Museum, this was a great location to test the ISO performance. Looking back at the photos there is clearly some noise & grain, but it has a very film-like quality to it that I think adds to the atmosphere of the shots.
Another point to make about this camera as I discovered on the day, was how quick it turned on. Now this may not seem life changing, but when you are with a bunch of friends that don’t do photography and want to move on to the next exhibit, speed is everything. It made many shots possible that may have otherwise been lost. This also translates well into styles like street photography – you see someone or something interesting and you need the camera to be ready immediately to capture it.
QUICK TIP: For ease of access, I kept the camera inside my inner jacket pocket (blazer style). With that, I pretty much never missed an opportunity to shoot what I wanted – no fumbling in bags, jean pockets etc.
Due to the size of this camera, it really is super discrete. I could get those moments that I may not have been brave enough to shoot with other cameras, with even my X-E2.
And when all is said and done, it takes a great dinner party picture!
I think for many photographers using DSLR’s or Mirrorless cameras, you get very accustomed with a level of quality to expect and because of this, many wouldn’t dream of downsizing to a compact camera. But, as hopefully shown in this blog, the XQ1 makes an exception to this. It shows that you can still be creative, still get excellent quality images and at at a size that literally allows you to take it anywhere with ease.
Any questions? Drop us a comment below – and yes, I cannot wait to try out the latest model, the XQ2 🙂 [WATCH THIS SPACE…]
Nissin kindly sent me one of their much talked-about flashes – the i40 – to test out. I plan to write a full review of the flash in mid-February but before then I just wanted to share my initial thoughts. This is only going to be brief as I wanted to get this up as soon as possible as I know a lot of people are interested in this Flash for the X-Series.
Unboxing
Straight out of the box it is very nicely presented, coming with a great little case, a stand and even a diffuser (not always the case with other manufacturers).
Usage
So what else is there to do when you get a new flash and live seemingly in the middle of nowhere…. Selfies obviously! I set up the X100s with the TCL-X100 attached on a tripod and had the i40 flash on a light stand with a little softbox attached. The camera and flash were connected by a TTL (through the lens metering) cable so allowing TTL. I moved the flash around a little bit and I’m pretty impressed with the flash (the same can’t be said for the model, what’s up with the constant smirk!).
The first image was taken with the camera exposure compensation set at 0ev. With the flash to the left of the camera and slightly higher.
The next two images were taken with the camera exposure compensation set at -1ev. You can see that the background is much darker compared to the above images.
For this image the flash was moved closer to the camera and a little higher so the flash was falling straight down onto my face.
Conclusion
As mentioned before, I will put together a more comprehensive review of the flash in mid-February once I am back from Romania, where I will be putting this little flash through it’s paces, photographing an Ice Hotel for Untravelled Paths.
Until then I have to say that I am very happy with this small but powerful flash. It looks a great addition to the X-Series with the flash balancing well with the cameras.
As the head of design for the Fujifilm X-series we have a lot to thank Masasumi Imai for.
He’s overseen the design development of all models including the original X100, the X-E2 and, his own personal favourite, the X-T1. During the very busy photokina 2014 show we were able to grab 15 minutes with Imai-san to ask him about his inspiration, the current range and what we can hope to see in the future.
On a day-to-day basis what does your job involve?
Every day I think about design. I am in charge of the exterior design team, comprising five product designers and three GUI designers.
When an X-series camera is designed, what comes first, the interior design or the exterior?
Normally, designers will start by sketching the design of a camera, but Fujifilm is completely different to other companies. All three teams will meet; the brand team, the design team and the development team and all aspects of the camera are discussed all the way through the process. All aspects of the camera complement each other.
How long before a model comes to market would you start talking about it?
That depends on the model, but typically one year. An upgrade will be quicker – from the X100 to the X100S, for example – but that’s only because a great deal of time was spent on the original concept.
Is the design of the X-series what is making it so popular?
I think so. Although I am the design manager, many people decided that we should go for this traditional design style. It has always been a team effort.
Where did your original inspiration come from?
My father had a film camera and he used to tell me not to touch it. He would say: ‘This is very important and very expensive.’ But I wanted to touch it and this helped me realise the importance of creating a camera that users wanted to pick up and use. When I discussed this with my colleagues, they confirmed similar experiences. This wasn’t purely my Japanese colleagues, but also those in the USA, the UK and many other countries. They all said the same thing. I thought this was a great reason to create a camera that evoked these feelings.
Where do you get your ideas now?
Everywhere! I love to listen to music, drive cars, drink, eat and go to the movies – all these things give me ideas that can be put into camera design.
Do you have a favourite X-series camera?
That is a difficult question, but I think I like the X-T1 Graphite Silver edition the most.
One of very few criticisms of the X-T1’s design was that the buttons on the rear quadrant were too recessed. How do you feel about those comments?
When the X-T1 was designed we were aware that, due to the small size of the camera body, it was possible to press the buttons accidentally, so we made them more convex to prevent this. This is the reason for them being more recessed into the body. We didn’t change the design on the Graphite Silver version, but we did improve the operability of the buttons, making them easier to press. We are always looking to optimise and improve our manufacturing processes in this way.
One thing that Fujifilm does very well is listen to customers. How does that process of listening and then implementing the ideas work?
We get lots of feedback from customers. We split all the opinions into different categories, such as operation, image quality and design so we can consider each set individually. It’s very important to do this as customers sometimes suggest changes that we have either dismissed or not considered. The grip we launched for the X100 series is a good example. We didn’t think it was needed, we initially felt it would make the camera too much like a digital SLR and not like a rangefinder. But many people asked for this so we went ahead and produced it.
How will X-series cameras develop in the future?
There are many possibilities. One option would be to modernise the existing camera styles, another would be to go for an even more traditional style. Internally, we are going to concentrate on our APS-C X-Trans sensor and make sure there are many lenses and accessories that complement it. There could be a full-frame model in the future, I don’t know, but we started as a film company and this means we’re used to working with different formats.
Viewfinder resolution will undoubtedly increase going forward, as well as the speed – the current scanning frame rate is 54 frames per scan, but we want it to be over 100. This will help it look even more like an optical viewfinder and, in fact, exceed it.
We do intend to keep producing models at the current rate, so there will be plenty more to come from Fujifilm – our teams are very busy!
This blog is going to try and cover the fundamentals of lenses, explaining when to use them and why. If you have any questions after reading this then please get in touch via:
I too took some photos at different focal lengths (see the below slideshow), between 10mm and 135mm, to emphasise how certain focal lengths are generally better than others for portraiture. This topic has brought up lots of comments and I have edited this part a number of times to try and get the best brief explanation, without going off on too big a tangent! To break it down to fundamentals, the thing that affects perspective is distance, the distance between the camera and the subject. The focal length you choose affects the framing of a subject. With the series of photos below, I tried to keep the framing the same for all the focal lengths; the thing that changed was the distance between the subject and me. At 10mm I was a mere few cm’s from the subject’s face (awkward), while at 135mm we were a few metres apart. This longest example (135mm) shows a flattening effect, where the content seems compressed. This occurs because of greater distance between the subject and myself. Making the depth of the face (e.g. from the nose to the ear) proportionally less compared to the distance between the subject and the lens… The opposite is true for the wide-angle photos. Take the 10mm example again; I am so close to the subject that the depth of the face makes up a larger distance than the distance between the lens and the nose, making the perspective exaggerated (also note how you can see the shadow behind the model with the wide-angle shots but you can’t with the telephoto portraits because of the narrower angle of view).
In full frame or 35mm film terminology, 50mm is deemed the ‘standard focal length’, as it is close to our eye’s central angle of view. This means that a 50mm lens produces a perspective very similar to what we see. Because the sensors in Fujifilm X-Series cameras are generally 1.5X smaller than full frame sensors (APS-C sensor size), this standard focal length equates to a 35mm lens, like the XF35mm F1.4 R. This is quite complicated to explain (it could be a whole other blog!)… So much so that I have spent hours editing these paragraphs, but hopefully you get the gist of how different focal lengths affect the perspective of a picture. There are some very informative comments about this topic at the bottom of this blog if you want to find out more.
Wide-angle lenses can create exaggerate perspectives which produce amusing (which is good as it’s engaging) portraits, especially with animals!
Now that we understand how different focal lengths and apertures affect the look of a picture we can look at how to combine the two. First of all lets think about portraits: If you want to isolate a subject generally you are going to want to use a standard or telephoto lens with a low F-stop, such as the XF35mm F1.4 R, XF56mm F1.2 R or the imminent XF50-140mm F2.8 R OIS WR. For the image to the left I wanted to try and isolate the woman from the background as it was very busy and distracting, and while it isn’t entirely clean it is made better as a result of using F1.4 for a shallow depth of field.
If you want to capture an environmental portrait generally you would use a wide-angle lens and depending on how much of the environment you want to make out in the background you’d range the F-stop between F2 and F11.
23mm f2
23mm f11
Both of the pictures above were taken with the X100s (I love using it for these kinds of photos). The left image is at F2 and while you can make out the room the clarity of it is poor. Compare that to the right image where the use of F11 results in the mountain behind the boarder being sharp.
Prime vs. Zoom
This is very much a personal preference, there is no right choice. It depends on lots of factors, from space and weight restrictions to financial limitations. Because prime lenses have a fixed focal length, they tend to be smaller, lighter and have larger minimum apertures (F1.2-2.8) compared to zoom lenses. While zoom lenses have the convenience of effectively including many different prime lenses, generally these have more restricted apertures (F2.8-5.6). For me, it depends on the situation. I prefer prime lenses because of the greater depth of field control. As well as this I believe that the fixed focal length makes you think more about your photography, particularly composition. However, the convenience of zoom lenses in situations that are changing quickly can be invaluable as you don’t have to change lenses as often to obtain a variety of photographs. When conditions are unpleasant this is vital in order to protect the sensor. A point to consider is that the XF18-135mm F3.5-5.6 R LM OIS WR plus the recently released XF50-140mm F2.8 and XF16-55mm F2.8 R WR (hopefully arriving in the first quarter of 2015) are all weather sealed making them ideal partners for the X-T1, creating a weather sealed system.
If I am working in relatively controlled conditions where it is easy for me to change lens regularly then I try to use prime lenses.
But if conditions are not suitable for continuous lens changes or a situation is quickly evolving and I need to be on my toes the zoom lenses are what I grab.
The zoom lens examples above are all wildlife examples (which are often taken in difficult conditions where a situation is quickly changing) were captured with the telephoto half of the XF18-135mm F3.5-5.6 R LM OIS WR. The reason why I chose these examples is because I wanted to show what can be done with F5.6 as the maximum aperture, showing nice bokeh in the images where I’ve tried to keep the attention on the subject. Now imagine what will be possible with the new XF50-140mm F2.8 R OIS WR! Can you tell I’m a bit excited about it…?
What lens for the occasion?
The main reason I first moved to the Fujifilm X-Series was the prioritisation of high quality lenses. With the announcement of the X-Pro1, the first lenses available were the XF18mm F2 R, XF35mm F1.4 R and XF60mm F2.4 R. These are all high quality, lightweight prime lenses that, together, offer a wide focal length range package. From there the lens road map laid out Fujifilm’s intentions to create a strong lens collection covering a wide range of uses.
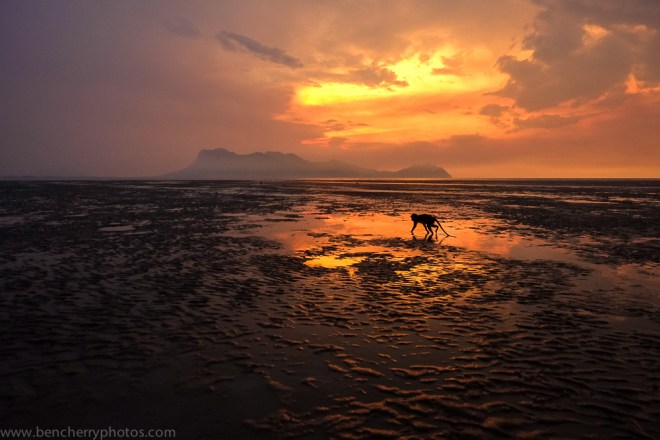
Generally lenses are associated with a particular genre of photography based on their focal length. For example wide lenses such as the XF14mm F2.8 R and XF10-24mm F4 R OIS are intended for landscapes and long lenses like the XF55-200mm F3.5-4.8 R LM OIS are for wildlife and sports. But rules are made to be broken and your lenses don’t necessarily have to be used to fit those stereotypes. The photograph below was taken with the 14mm lens, generally intended for landscape photography, however I used this lens to capture this macaque foraging for stranded marine life amidst a sunset scene.
14mm – Foraging macaque
The important thing to remember with your lens choice is to think “what do I want to convey?” On this occasion I wanted to show the scene as a whole. In the landscape shot below I focused on the distant hills over a bay with the setting sun using the 55-200mm lens, which is usually associated with wildlife and sports. This helped to emphasise the golden glow which wasn’t as prevalent with a wider-angle view.
120mm – Landscape
Conclusion
Hopefully you now understand that lens choice can have a huge impact on your end result. If you understand the principles of focal lengths and apertures then you have a grasp on what lens to use and why. Remember that lenses are tools designed to help fuel your creativity. For me, a lens that I am very much looking forward to is the XF50-140mm F2.8 R OIS WR. This lens offers the versatility of a zoom but with a constant aperture of F2.8 it gives very good depth of field control. A lens such as this has many uses and I’m sure it is going to be a big hit with photographers from all genres.
A good exercise to try would be to force yourself to use one focal length next time you go for a walk. No matter if you’re using a prime or a zoom lens, try and restrict yourself. The purpose of this is to understand what you can capture with certain focal lengths so that in the future you will hopefully be more decisive with what focal length to use in a given situation. Remember that you can change the end picture dramatically through different apertures. Why not give it a go and then share with us the variety of photographs you managed to capture with the same focal length. Or you can change it up and use one aperture but change your focal lengths. Share your results with us and if you have any questions please get in touch via the contact details at the top.


 Issue 8 of the Fujifilm X Magazine is now available to


 What to shoot
 Exhibition
 Master the X-series