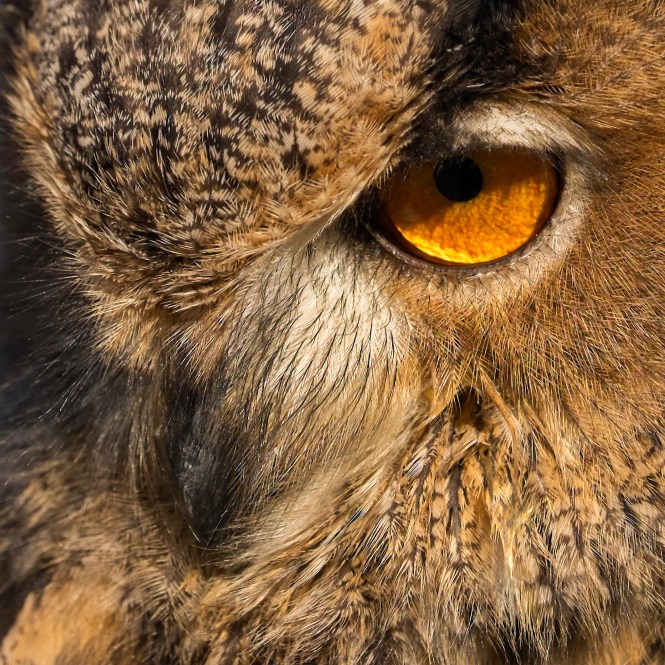
Fujifilm’s new XF16-55mm f/2.8 weather-resistant lens lives up to expectation. With a new type of nano-coating that reduces flare, the optical excellence of the lens matches the supreme quality I have come to rely on in the very best Fujinon lenses.
X-T1 with XF16-55mm @ 55mm. 1/4000th, f/4, ISO800
Photographing birds of prey at a local falconry, I was astounded by the depth of detail, sharpness and contrast of the pre-processed images. It feels great in the hand. The aperture and focus rings give me confidence when I need it most while the build quality exceeds my often-exacting need for equipment that can cope with the most extreme and harsh environments.
X-T1 with XF16-55mm @ 55mm. 1/400th, f/5.6, ISO1600
And, even with the fast f/2.8 aperture, it’s still compact enough to travel with. This is a lens that lives up to the Fuji legend.
The shoot with Jimmy White came about through a long running association I have with a media company in Liverpool that specialises in sport personalities biographies – basically I shoot the book covers for them. It’s a collaborative thing on some of the shoots we both think of ideas/concepts etc ideas for the shoot and book cover and how it should look.
Kit used and settings?
This shoot was slightly different as I was out on tour with The 1975 at the time, so my car was packed full of equipment. My Fuji bag was packed full as I took everything with me on tour! But the main lenses I used on the shoot with Jimmy were my trusted 23mm & 56mm lenses, combined with my XT1 bodies. I love both of these prime lenses.
How much time did you have?
For this shoot, I had a couple of hours. Unfortunately things never go to plan and although I left Glasgow at 5:45am to drive to Liverpool for 9:00am, I hit major road works just outside Liverpool town centre, which made me half an hour late.
Luckily for me, Jimmy was late too.
The worse thing I can find as a photographer is rushing to set up while the client is waiting for me to start shooting. It’s my pet hate if I’m honest. I like to be ready and waiting as the subject walks in, with all my lighting tests done.
How accommodating was he?
Jimmy was fantastic. A really nice guy, he went along with all the ideas that we asked him to do.
Did you use any additional lighting?
I have to set up my portable studio whenever I shoot a book cover like this, so I carry everything with me. Backdrop stands, backdrops (white and black) light modifiers and finally my lights, which I carry up to 4 Bowens heads with me.
I’m like a pack horse!!!
How much interaction do you have in a situation like this with the subject?
There was a lot of interaction with Jimmy on the day. He was totally up for the ideas that I asked him to pose for. He was truly a great guy!
Would you do anything different next time?
Yes, I’d make sure to get there earlier and set up before the subject arrives haha. Even look at the traffic reports!
Any tips for amateurs trying to get this style of shot?
Make sure your lighting ideas work! It’s no good changing your mind on the day when your subject arrives. Also, do your research; try replicating lighting techniques that you have seen on other models shoots online or in magazines.
About Tony
Tony has shot some of the biggest rock bands on the planet today – Foo Fighters, Red Hot Chilli Peppers and The 1975, with over 20 years photographic experience.
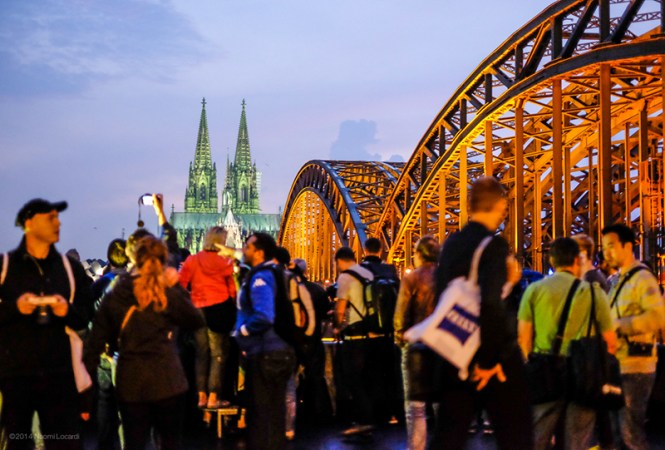
Last week we were at photokina, the world’s largest imaging fair, from Tuesday 16th to Sunday 21st September. It’s been a complete blast and this post will hopefully highlight the bits you missed if you couldn’t make it to Cologne this year.
Our booth was big. It was made up with lots of different sections covering many different areas of our business, all with the same common goal – helping people with photography.
—
The X-Photographers Gallery
We had images from many different photographers displayed how they were always meant to be seen – printed.
X-Photographers Gallery
Print of a shot by Ken Kaminesky
Paul Schlemmer asking “what do I do with my hands?” in front of his print
Some were printed on FUJIFLEX Crystal Archive Printing Material and others on Fujicolor Crystal Archive Digital Paper but they were all amazingly good to look at. We’ve combined our X series cameras with many years’ experience of printing and finally the creativity of real users of our cameras to create a truly awe inspiring array of beautiful prints. Many visitors to the stand told us that they thought these were the best prints on display at the show.
X-Photographers Gallery
—
The X-Photographers Stage
For me the stage was the real star of the show.
Bert Stephani Studio Demo
We had 23 photographers from all over the world talking about a wide range of subjects. Some were very inspirational, other educational, but all were very interesting. We will post another blog post shortly with more detail on each of the photographers and what their talk was like. Sign up at the top-right of the page to receive notifications when it is published.
Large crowds came to listen to what our photographers had to say
Martin Hülle from Germany talking about some of his images
Zack Arias on stage
—
“Touch and Try” section
On the stand we had the new X100T and X30 cameras and the new XF50-140mm F2.8 and XF56mm APD lenses available in our “Touch and Try” section for people to use. We also made sure there was something beautiful to shoot in the way of a BMW i8 and some lovely models so everyone had something to shoot.
One of our lovely models and our lovely car
Staff on hand to explain how the cameras work
Visitor testing out the X-T1
Putting on the big lens
The X100T is an evolution from the X100 and X100S with the main upgrades being a 1/32000th electronic shutter, digital rangefinder and new Classic Chrome film simulation.
Image by Kevin Mullins using the X100T at f/2 and 1/32000th using Classic Chrome film simulation
The X30 takes the popular X20 and gives it a new high-resolution Electronic Viewfinder, tilting LCD, new control ring, lots of new customisable Function buttons and the same awesome Classic Chrome Film Simulation as sported by the X100T.
Image by Alex Lambrechts using the X30 with new Classic Chrome film simulation
The XF50-140mm is our first weather resistant constant aperture lens. It boasts f/2.8 throughout its focal length range and contains a lot of amazing technology to make sure the results are comparable to prime lens quality
The XF56mm APD is a fast, sharp prime lens that contains an Apodisation filter that helps produce an even smoother bokeh affect than the standard XF56mm.
The final new product people could get their hands on was the new X-T1 Graphite Silver Edition pictured below.
The XF50-140mm lens on an X-T1 Graphite Silver
The XF56mm APD on an X-T1 Graphite Silver
The full X line-up
Additionally, behind a glass cabinet we had the entire range lined up (click the image below for a larger display)
Full X series lineup. Click to enlarge
Notable products were:
FUJINON XF16mmF1.4
FUJINON XF16-55mmF2.8 zoom lens
FUJINON XF90mmF2
FUJINON XF140-400mm (actual focal length and aperture still TBC)
The XF16mmF1.4 has the same focus ring as the XF14 and XF23 with focus distance and depth of field guide on the barrel itself.
The XF16-55mmF2.8 appears to have OIS dropped from its name suggesting that the final lens will not have OIS, but instead aim for absolute optimal image quality. This is still to be confirmed though.
The XF90mmF2 looks like it’s going to be a big bit of glass. Similar in length to the XF56mm but a bit thicker.
Finally, previously known as the Super Tele-Photo Zoom Lens on the roadmap, a lens with no label underneath. However, it had an inscription bearing the specifications “XF 140-400mmF4-5.6 R LM OIS WR”. I’d like to point out that these are not 100% final specifications. They just needed to put something on the front of the mock-up lens to give a better idea of what the final lens would look like. Either way this gives us a guide as to what sort of spec the final lens is likely to be, and also how big it will be.
—
Free maintenance and camera loan service
We offered a FREE maintenance service and a FREE camera loan service for the six days of photokina, In total we were able to service 510 cameras and loaned 433 cameras and lenses combined.
—
Technologies
We showcased a few of our technologies – some current and some in development
Film simulation
Film is our heritage and therefore we spend a lot of time developing (pun not intended) our film simulation modes for our digital cameras. The latest film simulation mode we have released is Classic Chrome and it is available on the new X100T, X30 and will be made available via a firmware update for the X-T1 later this year.
Remote “Multi-shooting” application Here’s a new app we’re currently working on that allows you to wirelessly control and shoot up to three cameras at one time using the same tablet computer.
Applications for this could be for recording video, creating 3D imagery or shooting event photography.
Since the launch of the X-T1 we have seen some amazingly creative uses people have found for the existing remote shooting app so we hope that this will allow people to be even more creative with their photography.
—
The Cologne photokina Photowalk
On Saturday night we held a photowalk with X-Photographers Elia Locardi and Ken Kaminesky. 213 people showed up, despite the threat for heavy rain beforehand. Most people brought their own equipment to shoot with and Fujifilm X-T1s and lenses were available for people to borrow if they wished.
We met at the Dom and then walked as a very large group around the cathedral and then across the river to watch the sunset from the East bank. It was a great event and we’re sure everyone enjoyed themselves and made a few new friends that share their love of photography.
These guys even won some prizes by having their names drawn at random:
FROM LEFT TO RIGHT: Fabiano Dallmeyer , Richard Powazynski, Jens Fricke, Ken Kaminesky, Carl Nasman, Patrick Mayon, Elia Locardi, Florin Lucian Patras and Michael Magner
Participants shooting padlocks on the bridge (image by Naomi Locardi)After-dark (image by Naomi Locardi)And finally me, being unwittingly mocked by Justin from Fujifilm USA… (image also by Naomi Locardi)
For more photos from the whole photokina event, and to keep up to date in real time with future events like this, please check out our Social Media accounts:
Here’s a quick, hopefully informative snippet as to why you might choose one focal length over another, and why.
The idea for this blog came about when I was asked recently “Why don’t you just zoom-out to get the person in the frame?”. This is a very good question and I felt it needed a mini demonstration to really help answer it. All one needs to conduct this experiment is the following:
A willing volunteer – I had a Marc
A zoom lens of any kind – In my case, the XF18-135mm lens
Oh, and a camera!
The experiment is simple; frame your subject (Marc) the same each time and take a picture at different focal lengths. I chose four focal lengths along the barrel of the lens to best demonstrate. With this, we had the ever-helpful Terry to hand with a camera to capture the experiment from the third person perspective.
Focal Length: 18mm
Focal Length: 36.6mm
Focal Length: 135mm
Focal Length 18mm
Focal Length 36.6mm
Focal Length 135mm
Hopefully what you will notice is that the wider the angle, (18mm) the more clutter there is in the image whereas at the 135mm setting, pretty much all clutter has ‘disappeared’.
Why does this happen?
Without going into huge mathematical detail (that I don’t even fully understand) it is because wide angle shots will achieve a larger angle of view and long zooms won’t. This is how much ‘fits’ into the shot – peripheral vision if you like.
As a rule of thumb, wider angle lenses work great for landscape photography and indoors (where you don’t have a lot of room to manoeuvre) as they can fit more in. Wider angles, however, are not great for portrait shots as they will pull the centre of the frame forwards creating distortion in perspective – example image below.
Longer zooms on the other hand work great for de-cluttering a frame to create stunning portraits. This is because the angle of view is smaller, and more importantly, they have a compressing effect. In essence, a long zoom pulls the background closer to the foreground and can give a more natural, slim looking head shape whilst also helping aid the bokeh effect – increasing the focal length of a lens decreases the depth of field.
Here are two example shots I took that hopefully help demonstrate the difference:
The image on the left (135mm) shows Marc’s head in proper perspective. However, the right shot (18mm) shows the nose being ‘pulled’ forward towards the lens and his head being turned into a rugby ball! You will also notice there is more of Marc’s surroundings in the wider angle shot – this diverts some attention away from his face, which, in a portrait shot we don’t want to do.
Focal Length: 135mm
Focal Length: 18mm
I hope this post gets you thinking more about which focal length to use rather than just zooming in and out for convenience.
Having a zoom lens is incredibly helpful at times, but it would best to think of your zoom lens as a series of prime lenses. Most photographers, if not all, use specific focal lengths for specific purposes; this is due to the individual optical effects each focal length provides. It really does make a difference to the end result – as (hopefully) shown above 😉
If you can, please go and try this yourself to get a real feel for it. It will help with your own understanding as to what focal length you might want to use, and for which subjects
A friend and I decided to go camping in Wales, which perfectly coincided with the passing of the ex-hurricane Bertha! To many this is a bizarre time to choose to go camping, but from a landscape photography perspective, angry weather equals exciting weather.
At the moment I am trying to train myself to only use prime lenses as Fujifilm offers such a wide variety covering lots of helpful focal lengths (the announcement of the XF90mm f2 R and XF16mm f1.4 R being added to the lens roadmap is very exciting). The reason for this is that to me they inspire creativity, using the fixed focal length makes me think more about composition and simply take more time with each picture. However, the thought of changing lenses in high winds and heavy rain atop a cliff wasn’t particularly appealing so the ever-camera-bag-present XF18-135mm came into its own. Having previously used a prototype version of the lens on the Farne Islands (see my initial impressions here) this was the first time I had really put the production version through its paces and I have to say it passed with flying colours.
Because I was generally taking landscape photographs I didn’t miss the wonderful wide aperture capabilities of prime lenses. The other bonus of using the XF18-135mm was the fast auto focus and probably, more importantly, the weather sealing. Once mounted to the X-T1 the weather resistance system left me with one less thing to think about while battling the hazardous conditions.
I wasn’t the only thing out enjoying the powerful winds though, a few fulmar were flying around the cliffs, putting on a very impressive aerial display. This was a great opportunity to try the continuous focus in mirky conditions with a very fast moving subject. Once locked on the keeper rate was very high.
Enjoying the conditions
Target ahead
Cliff flyby
Fulmar in the scene
The other very helpful feature of the XF18-135mm lens is the 5-stop image stabilisation which proved very helpful in countering the blustery and often dark conditions.
Setting Welsh sun
Going further against my plan to use only prime lenses, the other lens used extensively was the XF10-24mm R OIS on the X-Pro1. Again I went with the practicality and versatility offered by this wide angle zoom lens. Despite this being a zoom, I loved using it at the ultra wide 10mm end to capture as much of the impressive scenes in front of me as possible.
Incoming shower
Boisterous waves
Overall it was a great few days for photography, but before you go off camping in inclement weather, make sure you check with others you drag along, as the X-T1 – XF18-135mm set up is weather resistant and ready for anything, but they might not be so obliging.
Good day everyone, I will have to call this a mini-blog as normally I ramble on for ages and bombard you with images – who knows, maybe I still will 😉
As you may or may not know I’m an amateur photographer who loves to try out new types of photography – I’m sure this is not to different from many of you out there. When I first started out with photography I was educated that the more zoom you had the better. So when I was given the X100 for the first time I was quite baffled as to how to work a fixed prime lens. I felt restricted and puzzled as to why I would want one. Of course once I looked at the pictures from it, I was sold and this opened my eyes to the real aspects of what makes a great camera. The images were crisp, clear and full of vibrant colour, all I had to get used to was zooming without a telephoto lens – AKA the Hokey Cokey. Once I got this down though, there was no stopping me, I was out with my original X-E1 and 35mm prime lens and I loved every minute of it!
This leads me to the XF18-135mm. This time I had the promise of excellent image quality but with that lovely versatility of a zoom lens. When I first clicked it into position on the camera body and fired up the camera I was taken back by just how much I could see or not see depending on the focal length. It was something that took me back to the olde days of me using a camera, I was VERY excited to get out and use this new kit.
I decided upon a location in the local area that always seems to make a good picture, this being the Stevington Windmill. I looked at when the sun was going to set and got there about 50 minutes earlier to allow time for running across fields, fumbling with tripods and such like. Once I got a good position near to the windmill I shot this image.
Focal Length: 49mm – f/5.6 – ISO200
I shot this image at the slightly wider-side of the lens to open up the landscape a bit – this to me gives a very peaceful feel to the shot. Compositionally (is that really a word?) I have dedicated two thirds of the frame to the sky as it is a sunset after all, and I think this really helps the landscape silhouette ‘POP-OUT’ from the skyline.
This next shot I really wanted to focus on the windmill and give a more intense feel. To do this I have used the lens at a longer focal length as this has a very clever effect on the composition. The more you zoom towards a subject, the more the background and foreground are compressed together. So this in turn pulls the Sun closer to the windmill and vice-versa. Not only that, but it also reduces the angle of view – cutting out all the peripheral stuff we perhaps don’t want in our shot.
As a side note – To get the composition I wanted using more zoom, I did have to move further back to accommodate the extra focal length. Basically this means I had to run like crazy across a field and keep checking to see if the composition was right as every moment I wasted meant the sun was getting lower and would soon disappear behind the hillside.
Focal Length: 98.6mm – f/7.1 – ISO200
These next two shots show this compression effect quite well I feel. It really brings the background closer to the foreground making for a more intense composition that would not have been possible with my 35mm prime lens.
And in case you were wondering, this is my better-half with her camera at her side relaxing whilst I’m running about like a madman saying things like “That’s great, just don’t move. Pretend I’m not here..” which was all great fun. Photography should be fun and if you can get your friends and family involved, so much the better.
Here’s a playful shot of some hot air balloons in the distance. I framed it up so that they sat on the furthest third of the frame to sweep your eyes across the beauty of the landscape. Because of the compression effect (pulling the background and foreground together) I could give the hot air balloons a bit more presence in the shot, especially when you consider the real distance between the main tree and the hot air balloons.
I really hope this inspires you to go out and have a play with your camera, shoot a sunset, bring a friend, mix up your compositions and most of all have fun. When you do all that great pictures will naturally follow.
P.S: Seems I managed to get a good ramble and bombardment of images in after all 😉


 Although it’s pretty hard to see in this photo, here we demonstrate the lens coating on the new XF50-140. It has a special coating applied to reduce the amount of light that is reflected away.
 Here’s a new app we’re currently working on that allows you to wirelessly control and shoot up to three cameras at one time using the same tablet computer.


 Here’s a quick, hopefully informative snippet as to why you might choose one focal length over another, and why.


 As you may or may not know I’m an amateur photographer who loves to try out new types of photography – I’m sure this is not to different from many of you out there. When I first started out with photography I was educated that the more zoom you had the better. So when I was given the X100 for the first time I was quite baffled as to how to work a fixed prime lens. I felt restricted and puzzled as to why I would want one. Of course once I looked at the pictures from it, I was sold and this opened my eyes to the real aspects of what makes a great camera. The images were crisp, clear and full of vibrant colour, all I had to get used to was zooming without a telephoto lens – AKA the Hokey Cokey. Once I got this down though, there was no stopping me, I was out with my original X-E1 and 35mm prime lens and I loved every minute of it!


