It’s almost Halloween, and you’re probably itching to get creative with your home decorations. Well, here’s a spooktacular DIY design that’s so easy it’s scary! Sophiagaleriashared a great idea for a unique Halloween photo jar which you can make in no time just with your INSTAX mini Link Printer and some simple items.
What will you need?
a screw-top jar;
tangerines;
a black waterproof pen;
mini fairy lights (LED);
INSTAX mini Link Printer;
wooden sticks.
Step 1. Draw spooky faces
First, get your tangerines ready. Take your black waterproof pen and let your creativity run wild drawing funny or scary Halloween faces on the tangerines. It may be classic jack-o’-lanterns, sinister smiles, or even spooky ghosts. Feel free to experiment!
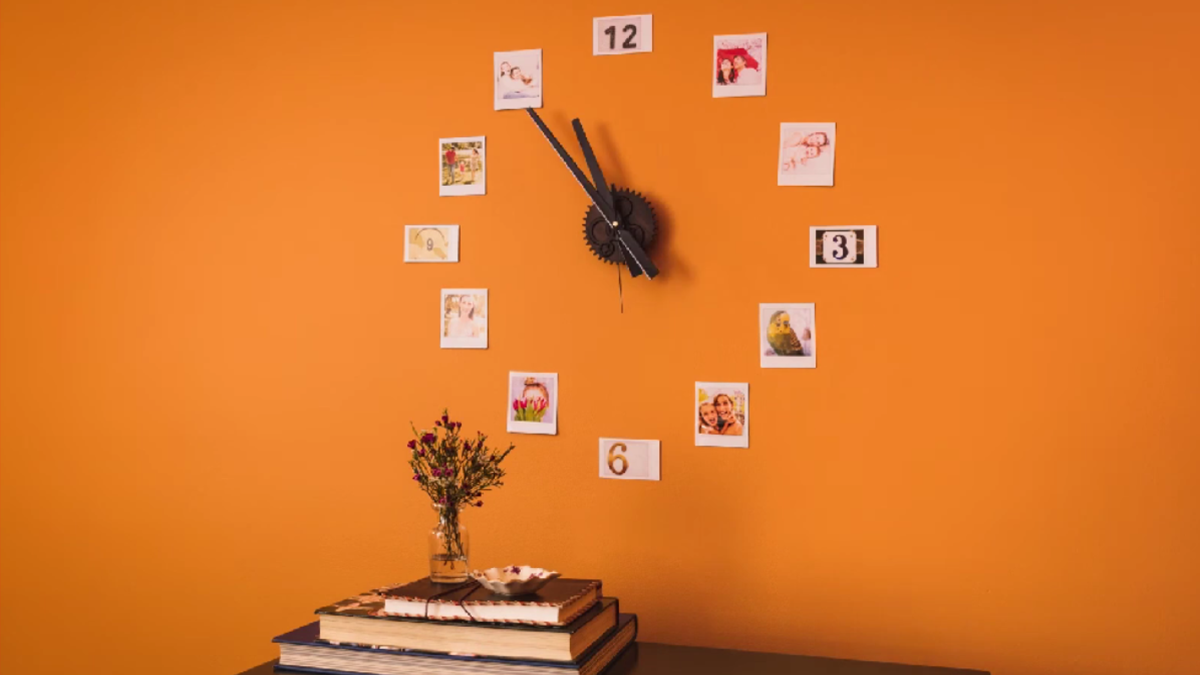
Memory is transformative. It has an enigmatic power of bringing people to other places and times. Pull a string – and you’re in your grandma’s kitchen, biting that very first tender crust of her plum pie, catching sun rays jumping on the table. Pull one more – here’s your toddler with its very first self-made all-in-one breakfast, smiling at a complete mess left behind. The first touch of a loved one’s hand, that special trip you went to with your dad… Each moment is so precious, so why not celebrate it?
With INSTAX, it’s easy! Let us show you how to transform an ordinary wall clock into a personal time machine with your favourite INSTAX photos.
Only 24 days let until it is Christmastime again! Today, we show you how you can quickly create a unique Christmas decoration with your favorite photos.
For this you will need:
1 glass
Water
Water beads
Mini Christmas decoration
1 floating candle
Your favorite Christmas photo
Transparent tape if needed
First, put the water beads in a bowl with water and let them swell overnight.
The next day you can print out your Christmas motive with your INSTAX-Square Smartphone Printer like here, or you shoot a new one with your INSTAX camera. If you want to protect it from water, you can try wrapping it in clear tape.
Now take your jar and alternate filling it with a little of the decoration and the water beads. In the middle you put the INSTAX instant picture. When the glass is almost full, fill it up with water – and all at once the water pearls disappear!
Now your INSTAX photo floats in the middle of your great Christmas decoration! You can round off your DIY now, in which you put a floating candle in your glass, so you have conjured up a double eye-catcher.
A few tips: it’s best not to use real candy canes, because they dissolve quickly. Please note that it is possible that the INSTAX instant picture may change if it is in the water for a longer time.
Sunday is Mother’s Day, and although it’s on the second Sunday of May every year, it often comes earlier than you think, doesn’t it? Thanks to our last-minute photo gift DIY for your mum, you can make a great present in no time.
Spring is here, and Easter is just around the corner: the perfect time to decorate your home with an Easter DIY. These homemade Easter flower wreaths are fabulous for setting the scene for your favorite Easter photos and making your Easter decorations stand out.
Many thanks to instax UK for the inspiration and the shots! Check out their instax Blog to get even more inspirational instax DIY ideas.
Some Halloween traditions may look different this year, but it can still be a lot of fun. Celebrate the spookiest time of year safely with your family at home and make sure the only thing to be scared of is the costumes. Make it safe, keep it fun! Here are some quick and easy tips to add a fun, creative edge using instax prints! Take the chance for you and the members of your household to get creative, and maybe even invent some new traditions for your family!
Toffee Apple Treat Tags
What you need:
6 apples
350g sugar (golden caster sugar or brown sugar)
100ml water
35g butter
2tsp white vinegar
2tbsp golden syrup
Baking paper
Wooden toffee apple sticks/lollipop sticks
Clear film or bagsSugar thermometer (optional)
Ribbon
Scissors
Hole punch
How to create:
Clean your apples and dry them thoroughly. Twist off each stalk and push a wooden stick into the stalk end of each apple. Cut a piece of baking paper big enough for all the apples with generous space between them. Put the sugar and water into a pan on a medium heat. Cook until the sugar has dissolved and then stir in the butter, vinegar and golden syrup. TIP: If you have a sugar thermometer boil to around 120°C, or test the toffee by spooning a small amount into a bowl of cold water. If it’s ready it will ball up and harden; if it’s not, it will break up. When it’s ready, turn off the heat.
Now you need to work quickly. Dip each apple into the toffee. Make sure it’s covered before taking it out – let any excess toffee drip off back into the pan. Place it on the baking paper to dry. The apples should take around 15 minutes to fully dry, then it’s time to get wrapping and gift tagging.
Turn on your instax Printer and connect your camera using the instax SHARE app. Select a picture to print, click edit and rotate the image 180° so it looks upside down. This is so when you punch a hole in the top of the print, the gift tag hangs so the picture is the right way up (Important – never punch a hole into undeveloped film as the chemicals sit inside the wide white part of the film and will be harmful to your skin!). If you don’t want to punch a hole, you can print as normal and stick the instax print to a piece of card and punch the hole in the card instead. Wrap your toffee apple with film or place it in a film bag (stick upwards), thread your ribbon through the hole in the print, then wrap it around the film and tie it in a bow.
Photo Piñata
Buy a spooky-themed piñata for your party. Fill it with sweets and instax pictures so it will be even more of a surprise when the winner smashes it open.
Pumpkin Carving
This is one Halloween tradition that is as safe and fun as ever – apart from carving injuries! So as always, please be careful with the knife! Create some scary pumpkin faces and make it an unforgettable event with your family by taking some snaps with your instax camera. TIP: Roast the pumpkin’s seeds for a healthy snack!
Ghoulish Goodie Bags
So no sweets and snacks get left behind, create personalised gift bags for your friends and surprise them. Choose some pictures from last year’s Halloween parties which have great memories for you and your friends, stick them to the goodie bags and decorate in Halloween bits. Hand out the candy bags by placing them in front of their door. So this is a way to still feel connected to your friends, even during COVID and by keeping distance.