Advanced

Ready to learn more and get creative? Here you can find hints+tips and guides to help you roll your sleeves up and get stuck in

Shooting street fashion portraits with Alex Lambrechts

“Join me as I walk you through my photographic expedition into the world of street fashion photography with the masterful” – Alex Lambrechts.

TFST0017

In this ‘episode’, Marc and I were given an excellent opportunity to join the exciting Fashion X Street workshop with Alex Lambrechts. The aim of the workshop was to get photographers using the system in-the-wild, on the fly and to build upon an individual’s confidence in a shooting style, which is to my mind, full of adrenaline, passion and presence.

The group met inside a beautiful coffee/pizzeria house located in the heart of Soho, and it was here that Alex began to explain his craft and the general structure of the day. As part of the ‘FujiGuys UK’ we took along some of our new Fuji toys for the group to have a play with. These included the X100T, XF18-135mm lens and the pocket-rocket X30. After a coffee and a chat, we set out to the streets of Soho armed with our Fuji cameras in hand!

TFST0098


Alex led us to our first destination; a small, dark and empty alleyway – sounds ominous so far I know, but bear with me 😉 Alex showed us how the light between two buildings gave the perfect softbox lighting effect, and that this would prove excellent for the style we were going for.

He gave the client’s brief, which was what he wanted to see in our shots and practical suggestions as to how to achieve exactly that. The brief immediately grabbed my photographic appetite and I couldn’t wait to see what I could achieve.

The fictitious brief was this (not a word for word quote):

“Because the subject is a musician and a model. I want to see you capture and explore the human element within the shots, not just the standard model expressions but ‘who’ our client is.  And as this is to be published in a fashion magazine, I want to see shots off-angle, gritty and real.”

You can probably see why I was excited; it was something completely new to me and just wanted to get as much experience out of it as possible.

This is where Alex’s stunning wife & professional model Jasmin Lambrechts came in, and what a combination! As they worked side by side, Alex explained things in an informal, yet very informative style. He gave some seriously useful tips on how to direct your model, how to set the camera and how to achieve the perfect lighting on the subjects face.

We started with some slow shutter speeds ‘1/30 to 1/60’ of a second panning shots, this was to capture movement and a unique style, only really achieved in this manner. I think we all found this a pretty tricky technique, but it was probably the most rewarding when you actually got a “YES, I got a good one!”.

TFST0070
X-E2 – XF35mm – 1/40 – ISO 200 – f4.5

As the workshop progressed, we started giving some direction to Jasmin, it was bits and pieces at first, and I’m sure this was down to some of us never having shot a model before. It did however, become more and more natural as we built a rapport with Jasmin and as we found what camera settings worked best.

TFST0134

One of the most helpful tips Alex gave in my opinion was regarding lighting. He really wanted to focus our attention to the exposure of the shot, to ensure we were exposing for the highlights of her face. It may seem an obvious piece of information, but I found really focusing on it turned images from delete to keep. It ensured all the detail was kept on the face, especially when dealing in this ‘contrasty’ environment.

TFST0159

The shot above is one of my favourites from the day. I asked Jasmin if she would throw her hair back so I could try and capture it in full swing. Here I used a fast shutter speed of 1/3000, a generally accepted no-no of ISO6400 (because I needed the fast shutter speed) and had the camera set to manual focusing to make the shot ‘instant’ when the shutter was depressed – and yes, this was not the first attempt, maybe more like the fifth to get it right! The ISO performance on the X-E2 is SO good.

This was another great tip from Alex in regards to action and street photography. He said if you pre-focus on an area where your subject is going to walk and then switch to manual focus, you know every single time that your image is going to be in focus when the subject / model hits that spot. This is particularly useful in street photography, it allows the photographer to frame up a shot and then simply wait for the subject to walk into that frame.

Here are other shots I took that ‘made-the-grade’, at least in my book anyway 😉

TFST0147 TFST0165 TFST0138 TFST0126 TFST0127

Alex had great presence when talking us through ideas as we shot in this environment, throwing us suggestions, checking our shots on the go and even highlighting some great shots our fellow photographers were getting whilst there. This all helped spur me on to try and get the best results I could.

Once we had shot this location from every possible angle, other than hanging off the side of the building (which I would have tried if I could have found a way!), Alex talked us through the next stage in this exciting photography voyage.

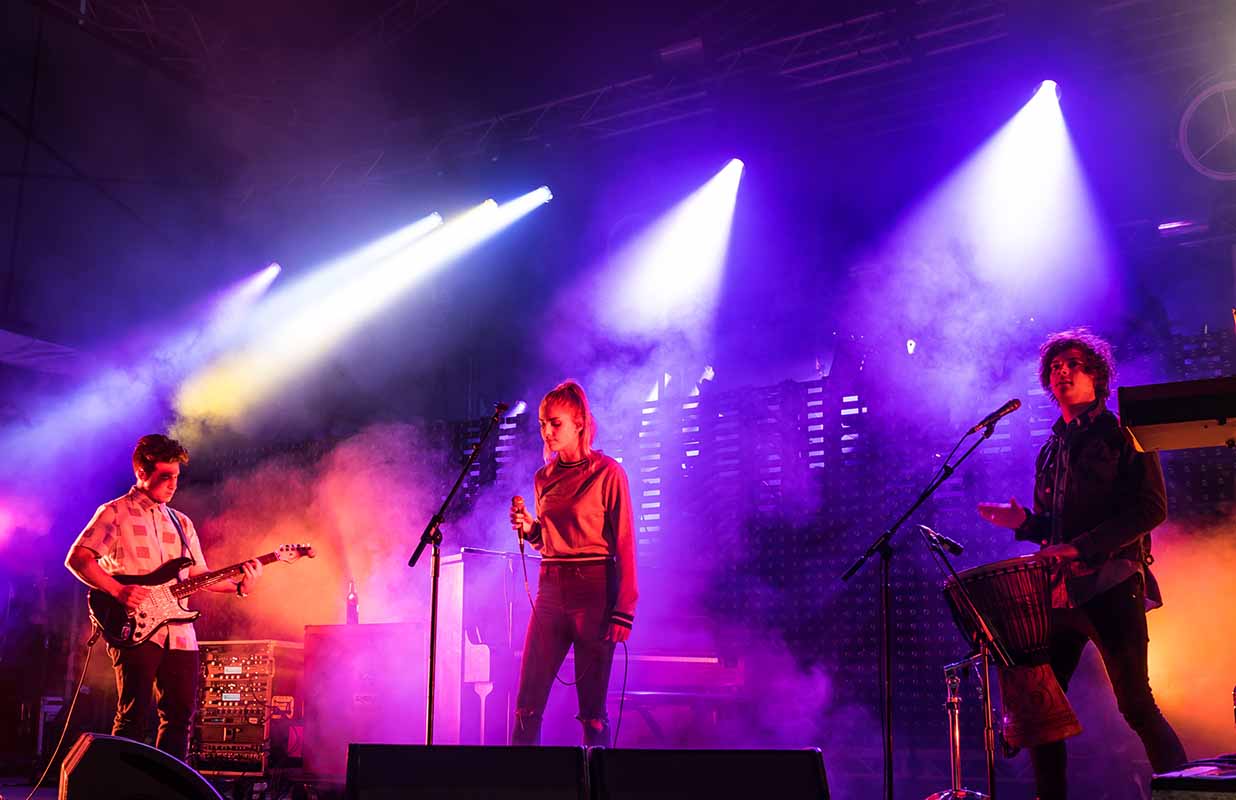
Basically, we were going to be on the move, shooting fashion in the streets of Soho amongst the general public. This was where my adrenaline levels went from 7 to 15 (out of ten!) in less than a second.  Alex explained how he wanted us to capture the more human element in this environment, the ‘circus’ as he put it, and it really was just that.

Jasmin stepped into the busy, bustling streets of London and we needed to be ready. We were advised to keep ahead of Jasmin to ensure we could scope out the best framing, best angles and to be more aware of great photographic, candid moments. For me, this involved running like mad to stay ahead, trying not to get run over by cars, bikes or pedestrians, not photobombing other photographers shots and still find a good angle myself with the correct exposure! All in all, super exciting, very challenging and incredibly fun!

TFST0171

The reason it was such a circus is because we looked like the Paparazzi. Imagine 12 -14 photographers chasing a beautiful model down the street, all trying to get the perfect shot will certainly draw some attention. People were taking pictures on their mobiles, just-in-case she was famous, asking who she was & who we were – what a buzz I can tell you!

TFST0221TFST0185

We even had a local restaurateur take to the street stage to grace us with his surprisingly good singing voice. These were the kind of quick paced moments you needed to really know your camera settings, luckily I was just about ready to capture this one below.

TFST0206

After the crazy, brilliant and thrilling roller coaster ride, it was nothing short of perfect to get back to the pizzeria for a beer, pizza and have a chat. The group mingled beautifully, each sharing our successes, failures and our ‘what we would try next times‘. Alex wrapped the day up nicely by highlighting things we did well, things we could improve upon and again, going through individual’s images to give personal feedback – this was a nice touch.

For me, I compare this experience to that warm fuzzy feeling you get at Christmas. I had been given the experience to meet our lovely photographers face-to-face, develop my skills as a photographer and share this experience with like-minded individuals.

10712395_10152550311853579_9169321068005723950_o
The Gang

If you get the chance I highly, highly recommend going on this course and any other that gives you the chance to learn your photography with others. It not only is a great sociable experience, but most importantly, you get to learn how others see shots that you, yourself may have missed.

If you have any thoughts, questions or comments, please do drop us a line below and we will try and assist where we can.

Click here to see images taken by other members of the group (Log into Facebook required to view).

Thanks for reading

Dale


Why lens choice is important?

Use of different focal lengths

This blog is going to try and cover the fundamentals of lenses, explaining when to use them and why. If you have any questions after reading this then please get in touch via:

If you haven’t already seen Dale Young’s great blog on “What focal length I should use and why?” Then check it out here.

I too took some photos at different focal lengths (see the below slideshow), between 10mm and 135mm, to emphasise how certain focal lengths are generally better than others for portraiture. This topic has brought up lots of comments and I have edited this part a number of times to try and get the best brief explanation, without going off on too big a tangent! To break it down to fundamentals, the thing that affects perspective is distance, the distance between the camera and the subject. The focal length you choose affects the framing of a subject. With the series of photos below, I tried to keep the framing the same for all the focal lengths; the thing that changed was the distance between the subject and me. At 10mm I was a mere few cm’s from the subject’s face (awkward), while at 135mm we were a few metres apart. This longest example (135mm) shows a flattening effect, where the content seems compressed. This occurs because of greater distance between the subject and myself. Making the depth of the face (e.g. from the nose to the ear) proportionally less compared to the distance between the subject and the lens… The opposite is true for the wide-angle photos. Take the 10mm example again; I am so close to the subject that the depth of the face makes up a larger distance than the distance between the lens and the nose, making the perspective exaggerated (also note how you can see the shadow behind the model with the wide-angle shots but you can’t with the telephoto portraits because of the narrower angle of view).

In full frame or 35mm film terminology, 50mm is deemed the ‘standard focal length’, as it is close to our eye’s central angle of view. This means that a 50mm lens produces a perspective very similar to what we see. Because the sensors in Fujifilm X-Series cameras are generally 1.5X smaller than full frame sensors (APS-C sensor size), this standard focal length equates to a 35mm lens, like the XF35mm F1.4 R. This is quite complicated to explain (it could be a whole other blog!)… So much so that I have spent hours editing these paragraphs, but hopefully you get the gist of how different focal lengths affect the perspective of a picture. There are some very informative comments about this topic at the bottom of this blog if you want to find out more.

Wide-angle lenses can create exaggerate perspectives which produce amusing (which is good as it’s engaging) portraits, especially with animals!


Apertures

Before we go any further, lets just check you understand the fundamentals of using apertures. If not then check out my previous blog that helps to explain how different apertures affect a picture (plus there are cute labrador puppies!).


Putting both together

35mm f1.4
35mm f1.4

Now that we understand how different focal lengths and apertures affect the look of a picture we can look at how to combine the two. First of all lets think about portraits: If you want to isolate a subject generally you are going to want to use a standard or telephoto lens with a low F-stop, such as the XF35mm F1.4 RXF56mm F1.2 R or the imminent XF50-140mm F2.8 R OIS WR. For the image to the left I wanted to try and isolate the woman from the background as it was very busy and distracting, and while it isn’t entirely clean it is made better as a result of using F1.4 for a shallow depth of field.

If you want to capture an environmental portrait generally you would use a wide-angle lens and depending on how much of the environment you want to make out in the background you’d range the F-stop between F2 and F11.

Both of the pictures above were taken with the X100s (I love using it for these kinds of photos). The left image is at F2 and while you can make out the room the clarity of it is poor. Compare that to the right image where the use of F11 results in the mountain behind the boarder being sharp.


Prime vs. Zoom

This is very much a personal preference, there is no right choice. It depends on lots of factors, from space and weight restrictions to financial limitations. Because prime lenses have a fixed focal length, they tend to be smaller, lighter and have larger minimum apertures (F1.2-2.8) compared to zoom lenses. While zoom lenses have the convenience of effectively including many different prime lenses, generally these have more restricted apertures (F2.8-5.6). For me, it depends on the situation. I prefer prime lenses because of the greater depth of field control. As well as this I believe that the fixed focal length makes you think more about your photography, particularly composition. However, the convenience of zoom lenses in situations that are changing quickly can be invaluable as you don’t have to change lenses as often to obtain a variety of photographs. When conditions are unpleasant this is vital in order to protect the sensor. A point to consider is that the XF18-135mm F3.5-5.6 R LM OIS WR plus the recently released XF50-140mm F2.8 and XF16-55mm F2.8 R WR (hopefully arriving in the first quarter of 2015) are all weather sealed making them ideal partners for the X-T1, creating a weather sealed system.

If I am working in relatively controlled conditions where it is easy for me to change lens regularly then I try to use prime lenses.

But if conditions are not suitable for continuous lens changes or a situation is quickly evolving and I need to be on my toes the zoom lenses are what I grab.

The zoom lens examples above are all wildlife examples (which are often taken in difficult conditions where a situation is quickly changing) were captured with the telephoto half of the XF18-135mm F3.5-5.6 R LM OIS WR. The reason why I chose these examples is because I wanted to show what can be done with F5.6 as the maximum aperture, showing nice bokeh in the images where I’ve tried to keep the attention on the subject. Now imagine what will be possible with the new XF50-140mm F2.8 R OIS WR! Can you tell I’m a bit excited about it…?


What lens for the occasion?

The main reason I first moved to the Fujifilm X-Series was the prioritisation of high quality lenses. With the announcement of the X-Pro1, the first lenses available were the XF18mm F2 R, XF35mm F1.4 R and XF60mm F2.4 R. These are all high quality, lightweight prime lenses that, together, offer a wide focal length range package. From there the lens road map laid out Fujifilm’s intentions to create a strong lens collection covering a wide range of uses.

Generally lenses are associated with a particular genre of photography based on their focal length. For example wide lenses such as the XF14mm F2.8 R and XF10-24mm F4 R OIS are intended for landscapes and long lenses like the XF55-200mm F3.5-4.8 R LM OIS are for wildlife and sports. But rules are made to be broken and your lenses don’t necessarily have to be used to fit those stereotypes. The photograph below was taken with the 14mm lens, generally intended for landscape photography, however I used this lens to capture this macaque foraging for stranded marine life amidst a sunset scene.

14mm - Foraging macaque
14mm – Foraging macaque

The important thing to remember with your lens choice is to think “what do I want to convey?” On this occasion I wanted to show the scene as a whole. In the landscape shot below I focused on the distant hills over a bay with the setting sun using the 55-200mm lens, which is usually associated with wildlife and sports. This helped to emphasise the golden glow which wasn’t as prevalent with a wider-angle view.

120mm - Landscape
120mm – Landscape

Conclusion

Hopefully you now understand that lens choice can have a huge impact on your end result. If you understand the principles of focal lengths and apertures then you have a grasp on what lens to use and why. Remember that lenses are tools designed to help fuel your creativity. For me, a lens that I am very much looking forward to is the XF50-140mm F2.8 R OIS WR. This lens offers the versatility of a zoom but with a constant aperture of F2.8 it gives very good depth of field control. A lens such as this has many uses and I’m sure it is going to be a big hit with photographers from all genres.

A good exercise to try would be to force yourself to use one focal length next time you go for a walk. No matter if you’re using a prime or a zoom lens, try and restrict yourself. The purpose of this is to understand what you can capture with certain focal lengths so that in the future you will hopefully be more decisive with what focal length to use in a given situation. Remember that you can change the end picture dramatically through different apertures. Why not give it a go and then share with us the variety of photographs you managed to capture with the same focal length. Or you can change it up and use one aperture but change your focal lengths. Share your results with us and if you have any questions please get in touch via the contact details at the top.

Until next time, happy Shooting!

Ben Cherry

Shoot like a pro, with a pro – win the chance to shoot a band live with one of the biggest names in live music photography

We’re offering you the opportunity to learn from and shoot with one of the UK’s best music photographers, Tony Woolliscroft, and to win a Fujifilm X-T1 and XF10-24mm.

Fujifilm and Tony have created an amazing opportunity for one lucky person. What you’ll win:

  • One-to-one mentoring from one of the biggest names in live music photography during a gig with a world famous band.
  • Learn what it’s like to be on the road with a band.
  • Learn how to shoot with the X-T1 and XF lenses and understand from Tony why he’s moved over to the Fujifilm X system, the best techniques, the optimum settings and some of Tony’s best kept secrets.
  • Meet the band, shoot the sound check and crew and understand what can be improved / worked on before the live gig.
  • Shoot the fans waiting to get into the gig.
  • Shoot the headline gig – shoot the first three songs in the photo pit with Tony.
  • After the first three songs you can enjoy the remainder of the gig.
  • Post-show feedback. After the gig, the winner will sit down with Tony and you can talk about the whole experience and a summary of what you’ve learnt.
  • On top of all this, you’ll be using your brand spanking new Fujifilm X-T1 and 10-24mm, the same kit which Tony uses.

About Tony

Tony has shot some of the biggest rock bands on the planet today – Foo Fighters, Red Hot Chilli Peppers and The 1975, with over 20 years photographic experience the winner will be in safe hands.
Click here to check out his website

The Fujifilm X-T1 and XF10-24mm

The X-T1 features evolved SLR-style handling, mechanical dials and weather-resistance, together with all the benefits of an X-Series camera, such as compact size, excellent mobility and high-speed performance. What’s more, its newly developed electronic viewfinder is almost indistinguishable from an optical viewfinder thanks to its ultra fast display speed. The XF10-24mm is ultra wide to standard focal length capabilities make it the perfect choice for shooting dynamic, high impact images with excellent detail from the foreground to the far distance.
Click here to learn more about the Fujifilm X-T1

Event details

Date of event: September 29th
Time: Mid afternoon onwards
Location: Wolverhampton Civic Hall

How to enter

Send an email to competitions@fujifilm.co.uk that contains a link to your portfolio and a short explanation as to why you want to win the prize. Tony Woolliscroft will then make his selection.

The deadline for entries is 17:00 BST on Monday 15th September 2014 and the winner will be notified by 17:00 BST on Friday 19th September 2014.

Good luck!

Terms and conditions

1. Entry is open to residents of the UK
2. The entrant must be aged 18 or over.
3. Proof of identity and age may be required.
4. Use of a false name or address will result in disqualification.
5. All entries must be made directly by the person entering the competition.
6. No responsibility can be accepted for entries lost, delayed or corrupted, or due to computer error in transit.
7. The prizes are as stated, are not transferable to another individual and no cash or other alternatives will be offered.
8. The winner is responsible for expenses and arrangements not specifically included in the prizes, including any necessary travel arrangements
9. In the event of a prize being unavailable, the promoter reserves the right to offer an alternative prize of equal or greater value.
10. The winner agrees to the use of their name, photograph and disclosure of county of residence and will co-operate with any other reasonable requests by Fujifilm UK Ltd relating to any post-winning publicity.
11. Reasonable efforts will be made to contact the winner. If the winner cannot be contacted, or are unable to comply with these terms and conditions, Fujifilm reserves the right to offer the prize to the next eligible entrant drawn at random, or in the event that the promotion is being judged Fujifilm reserves the right to offer the prize to the runner-up selected by the same judges.
12. Confirmation of the prize will also be made in writing to the winner.
13. Failure to respond and/or provide an address for delivery, or failure to meet the eligibility requirements may result in forfeiture of the prize.
14. The decision of the judge is final and no correspondence will be entered into over this decision.

All images in this post are © Tony Woolliscroft and taken on a Fujifilm X-T1

Alex Lambrechts and Fujifilm Fashion X Street workshop

Date: Sat 3rd May
Time: Arrival at 10.00 and continue shooting for six hours.
Venue: Sanderson Hotel , 50 Berners Street, London, W1T 3NG
Limited to 6 attendees only.

2_800

Format of the day

This hands-on Fashion X Street workshop will focus on the various techniques and ideas Alex frequently uses when shooting an ‘On-Street’ Fashion, Press or Portrait, shooting with both daylight and flash for varied environmental and lighting effects. During this free 6 hour course, you’ll be learning/testing loads of tips, tricks and secrets. Suitable for all levels of photographers, you’ll be receiving personal hands-on tuition, tailored to your experience level, especially exciting for those still on the fence about switching to the X-Series from traditional DSLR, rangefinders and/or other formats.

You will receive hands-on coaching to achieve the results which have helped Alex become a very sought after UK fashion photographer.

The street shoot portion will be followed by an hour of post processing, Q&A and optional portfolio review

3_800

What you’ll learn

We’ll be shooting a professional international Fashion Model you’ll will be taken right the way through the process, from set up to directing your model for maximum results, learning the following along the way:

  • In-depth manual control and familiarisation of the various features unique to the X-Series, as well as basic manual photography.
  • Accurately & confidently selecting and using the new Fujifilm Fujinon lenses, in both Auto & Manual focus modes, with a variety of focusing techniques for different lighting and environmental situations.
  • Knowing how and when to switch between the various view options of the Hybrid viewfinder and LCD to get the most out of these great tools in every situation.
  • Looking for, identifying and creating dynamic compositions on the go, for that ‘reportage look’ whilst avoiding the typically boring/posed images.
  • How to shoot in the ‘real world’ and ‘on the fly’ with varying lighting conditions and moving subjects on the Streets of Soho.
  • How to use your flash in various ways, for either fill or creative lighting, as well as incorporating existing or external light sources, to enhance your creations.

The final part of this day will then be spent post processing and editing your new images using Lightroom, to prepare them for your portfolio as well as going over any aspects you might want to revisit or discuss again.

4_800

Equipment needed

Simply bring your camera, desired lenses and flashes.
Fujifilm will be providing a selection of X cameras on the day for you to use – including the brand new X-T1 and X100S.
Those wanting to post process your own images on the day will need to bring your own laptop (with the latest version of Lightroom already installed)

T + C’s

No additional, further or other costs or expenses are included in any prize unless stated. For example, the costs of transport to and from the event are not included.
There is no cash alternative

Where do I sign up?

The competition is now closed and congratulations to the winners. Details of the day will be shown on here and on Facebook after the weekend!

About Alex Lambrechts

Alex_800

Professional photographer Alex Lambrechts has already exhibited in London and New York and currently shoots commercially for magazines, brands, companies, music and fashion labels, travelling internationally.
Whilst he is well recognised for his ‘Quirky, often Edgy’ Children’s campaigns, and incorporating a ‘raw/street documentary’ style to his fashion editorials, Alex is forever closely studying the Masters of past & present, and is MOST passionate about the genres of ‘Social Documentary and Street Photography’ of which he is tirelessly working on personal projects. Alex’s most recent published works can be found in GQ Japan, Vogue Italia, 3 regional Elle and 2 L’Officiel mags and Nylon to name only a few, all these shoots were executed using Fujifilm X-Series cameras.

For more information on Alex, visit his website here

Master Focus Peaking

Fujifilm X-series cameras have autofocusing systems that are among the fastest in the world, but there may well be a time when you want to switch over to manual focus. In such situations, it’s worth using the focus peaking function to help you get accurate focus on every shot. This very handy function allows you to see exactly what is in and out of focus either on the rear LCD or the viewfinder by superimposing a ‘halo’ over the in-focus part of the shot. It’s available as a standard feature on the X-E2, X-M1, X-A1, X100S, X20 and the XQ1, plus can be added to the X-Pro1, X-E1 and X100 via a firmware upgrade. Here’s how it works:

Step 1 For this demonstration, we’re using the X-Pro1. The first step is to switch over to manual focusing via the switch on the front of the camera body.

Peaking (2 of 7)

Step 2 On the back of the camera, press the ‘Menu’ button and then scroll down to the fifth menu of camera functions. From here, select the ‘MF Assist’ option.

Peaking (3 of 7)

Step 3 In the next menu, choose the Focus Peaking option and then choose either High or Low, which indicates the prominence of the halo around the in-focus object. We went for High.

Peaking (4 of 7)

Step 4 In the first instance, we chose to focus on the X100 in the foreground. As you can see the halo around the subject translates to a nice sharp camera (main image).

Peaking (5 of 7)

Step 5 With a twist of the focus ring, the halo moves to the X-S1 in the background, which is, in turn, sharply focused. Focus peaking also changes when you alter the lens aperture so not only can you check sharp focus, you can assess depth-of-field too.

Simple.

Guest post: Fujifilm X Series with flash Part 3 – Multiple flashes with radio triggers

By Derek Clark

14

In this third and final part of The Fuji X Series With Flash I’ll be looking at using multiple flash guns and radio triggers with the X Series cameras. You can use any make of flash for this as the radio triggers are only telling the flash to fire. There’s no information about exposure or anything else, it simply triggers the flash.

15

There are many different radio triggers available, but by far the most popular are the Pocket Wizards. I came from a Nikon flash setup and worked with the SU800 Commander unit, and because of this I never owned any radio triggers. But after buying into the Fuji X System I realised that my trusty SU800 would not be usable. The Pocket Wizard Plus III’s had just came out, but were expensive for a multiple flash setup. Pocket Wizard’s also don’t have hotshoes for mounting the guns directly on to them. Instead the work with cables. My older SB800’s have sync ports, but my newer SB700’s don’t (I replaced my SB900’s with SB700’s due to the overheating problem and so glad I did). In the end I decided to go for the Flashwave III system because they were reasonably priced, had both sync and Pocket Wizard size ports and most importantly the receivers have hotshoes. They come with a great verity of cables and adaptors that so far have coped with everything. The receivers have a tripod mount on the bottom, but also come with adaptors to change them into hotshoe mountable. So the flash mounts on top of the receiver and the receiver to the shoe on the light stand.

The transmitter’s are tiny and even look small on the X-M1. They include a test fire button and have a choice of 16 channels via small dip switches on both transmitters and receivers. An X-E1 or X-E2 can also be fired remotely by attaching a Flashwave III receiver to the microphone input on the side of the camera and triggering it using the test button on the transmitter. I’ve used this setup when doing long exposures instead of a cable release.

Lighting doesn’t come any more basic than a radio trigger setup. Lights are all set to manual and you adjust power settings on each one individually. I use anything from one light to six lights, but I only have four receivers. If I need more than four lights I set the extra guns to slave mode. The radio triggers fire one set and the extra guns are triggered by the flashes.

19

I wanted to shoot some fresh portraits for this post and I’ve been meaning to do some up to date shots of my kids. So excuse the self indulgence, but if you’re from a modeling agency…they are available:o). I shot these using Nikon Flashguns and Flashwave III radio Triggers. As you can see from the photo above, I used a Lastolite Hilite background. The Hilite works well with two flash guns inside, tilting upward and back to blow the background to pure white. I also use the Lastolite Superwhite Vinyl Train and a piece of thick toughened glass for a reflection. For this shoot I used a Lastolite Hotrod Strip Softbox which is a fantastic modifier for the money. Some of these shots were with one light, some are with three. I used the X-Pro1 and the X-E1 with the 35mm f1.4 and the 60mm f2.4.

Thank you for reading this series and I really hope you found it useful. Flash with the X cameras seems to be a mystery to a lot of people that are moving over from DSLR’s, so I thought this series of posts would help to clear up a few of the common questions.

About Derek

Derek Clark is an award winning Documentary Photographer and a member of The Kage Collective, an international group of documentary photographers that are committed to telling stories with a camera. To see more of his work you can follow him on Facebook or Twitter or you can  follow his blog.
This blog post was taken, with permission, from Derek’s blog. You can see the original post here.