Don’t put your X-series camera into hibernation for the winter, get outside and make the most of the conditions
We may be in the colder and darker months of the year, but there are still photo opportunities. The good news is Fujifilm X-series cameras are ideally equipped to make the most of the season with a range of features that will help you to get the best possible shots in all wintry conditions. As the temperature drops, there are a few extra considerations for your camera gear.
Power
Battery performance can be severely affected by low temperatures, so it’s worth buying an additional cell if you’re going to be out regularly in freezing conditions. Make sure all batteries are fully charged before you leave home and if they do die while you’re out, putting them somewhere warm – next to your body, ideally – can often grab a few extra frames.
Misting up
Going from a warm house or car into cold air will inevitably cause your X-series camera to mist up with condensation so, if possible, you should avoid subjecting your kit to large temperature changes. If it’s safe to do so, put your kit (without batteries) into your car a couple of hours before you go out so it can acclimatise. Similarly, putting your kit in a colder part of the house will help reduce condensation build-up – just don’t forget the batteries before you leave. The same applies when you come back in after a cold shoot. Reverse the process, placing them in a colder part of the house first, then gradually warming them up to room temperature. Sealing kit in a plastic bag with a silica gel pack can help. While you’re out, keep lens changes to a bare minimum or, better still, avoid them altogether. Should you get condensation, avoid the temptation to wipe it away and wait until it clears naturally. Unless you own a weather-proof X-T1, using a camera cover and keeping a chamois leather close to hand is a good way of keeping your kit dry.
And don’t forget to apply all these rules to yourself, too. Layer your clothing to stay warm and dry and be sure to take warm drinks and food to keep your batteries charged!
After some cold snaps? Try these…
Frosty close-ups
This is the perfect subject matter for the XF60mm Macro lens on interchangeable lens X-series cameras or the Macro/Super Macro mode on a fixed lens model. Suitable objects abound so keep an eye out for interesting patterns and subjects that can add a welcome splash of colour.
Snow scenes
For simplicity, select the Snow program setting. For more control, dial in some + exposure compensation – try +2 in sunny conditions – to avoid the snow rendering as grey sludge. Early morning starts are best and use the Velvia Film Simulation mode for vibrant blue skies.
Starry nights
Grab your tripod and head out on a clear night. Consider using the open flash technique to illuminate foreground subjects. Avoid including the moon in the shot and use an exposure of at least 30 seconds to render some stars.
Mist and fog
Look for distinct shapes and try using either the Soft Focus filter setting or increasing the ISO to introduce some grain. Shooting in black & white can be effective, as can fitting a telezoom such as the XF55-200mm to pick out more distant details. Check out this blog for more tips for shooting fog.
Winter portraits
A great option, regardless of the weather. Hats, scarves, big coats and umbrellas all make great props. The XF56mm is the ideal portrait lens and be sure to make the most of that super wide aperture to throw backgrounds out of focus and deliver beautiful bokeh.
At the start of a new year I often find myself looking back over the shoots from the preceding 12 months and in 2014 one in particular stands out: Les Voiles de Saint Tropez.
Les Voiles – literally “The Sails” – take place from April to October across the French riviera. Each race brings together some of the most beautiful traditional wooden yachts alongside the most extraordinary modern sailing boats for a week long regatta in beautiful ports such as Antibes and Saint-Tropez.
My good friend and fellow Fuji user Serge Krougikoff who runs Create-Away, a photography workshop company based in the south of France, has been talking about running a trip based around the regattas for some time and when he suggested we get together try it out I didn’t hesitate to say yes! We first teamed up with professional skipper Francois in Antibes in June and the trip was such a success that we agreed to do a second test-trip in Saint-Tropez in October.
Nestled between Cannes and Marseille the picturesque medieval port of Saint-Tropez would be stunning even without the boats. When you add some of the worlds finest vintage and classic yachts it becomes a feast of varnish and brass.
On shore there is a party atmosphere throughout the regatta but out on the water is where the action happens and where the photographic excitement begins. Picture this: The south of France in the autumn sunshine, racing across the bay of Saint-Tropez in the shadow of Elena under full sail – trust me – life doesn’t get much better than this!
The original Elena, built in 1910 and winner of the Trans-Atlantic Race in 1928, was one of the greatest racing yachts of her time and this stunning replica, built in 2009 is one of the largest yachts in the regatta with a length of 41.6m (136′) and a crew of 30 – some of whom clearly have nerves of steel…
Under full sail she is quite simply magnificent – a true queen of the seas.
But it is when you are close to her you really feel the power and the majesty of a great racing yacht.
These black & white images are taken with my infrared modified Fuji X-E1IR and the XF14mm lens – infrared really brings out the drama in some of these shots, especially when the clouds form interesting patterns that compliment the sails.
All the colour images are taken with Fuji’s brilliant X-T1 and their weather resistant, optically stabilised XF18-135mm lens. This was the perfect choice for shooting from a RIB where most of the time you are being bounced around and covered in sea spray – it was certainly a good test for the camera’s weather proofing and it didn’t let me down. The OIS in this lens is staggeringly good allowing sharp shots almost regardless of how fast the RIB was going, and the wide range of focal lengths is perfect for a shooting situation where changing lenses is simply not an option…
Technically, this kind of shooting is really challenging. The light changes all the time, depending on whether you are shooting towards or away from the sun, and I found the live histogram in the viewfinder of both cameras invaluable in ensuring that highlight details were properly captured – both in the sails and the sky. Some of my favourite images place the sun shining through the sails bringing out tremendous detail in the canvas and rigging.
Most of the time I was shooting in shutter priority mode, keeping the shutter speed at around 1/350sec – fast enough to allow sharp images even with the RIBs motion. Focus was left to the camera with continuous tracking AF working flawlessly on the X-T1 even at 8 frames per second – no mean feat when the acton was changing so fast.
Amidst the excitement of this shoot it is all too easy to forget composition and just hit the shutter in the heat of the moment but it is really important to take the time to plan and conceive a shot before it happens. Our skipper Francois is hugely experienced and was able to position the RIB exactly where we asked him to get a specific shot, but always with the skill and safety of a professional captain, mindful of the fact that we were shooting in the middle of a race…
In calmer moments we were able to capture details and abstract images of the yachts – shape, form, colour and line producing patterns and textures that tell a story of their own.
And occasionally when the wind just didn’t blow the crews had a chance to rest as well…
At the end of the day, exhausted and exhilarated we return back to Saint-Tropez as the light faded and the evenings celebrations began…
For details of the two “Les Voiles” workshops Serge and I are running in 2015 follow these links:
and for more about the other workshops run by Create-Away visit their website at http://www.create-away.com
About Simon
Fujifilm X-Photographer Simon Weir specialises in photographing live performance (particularly classical music), contextual portraiture and nature. To see more of his work, check out his website http://www.simonweir.com/
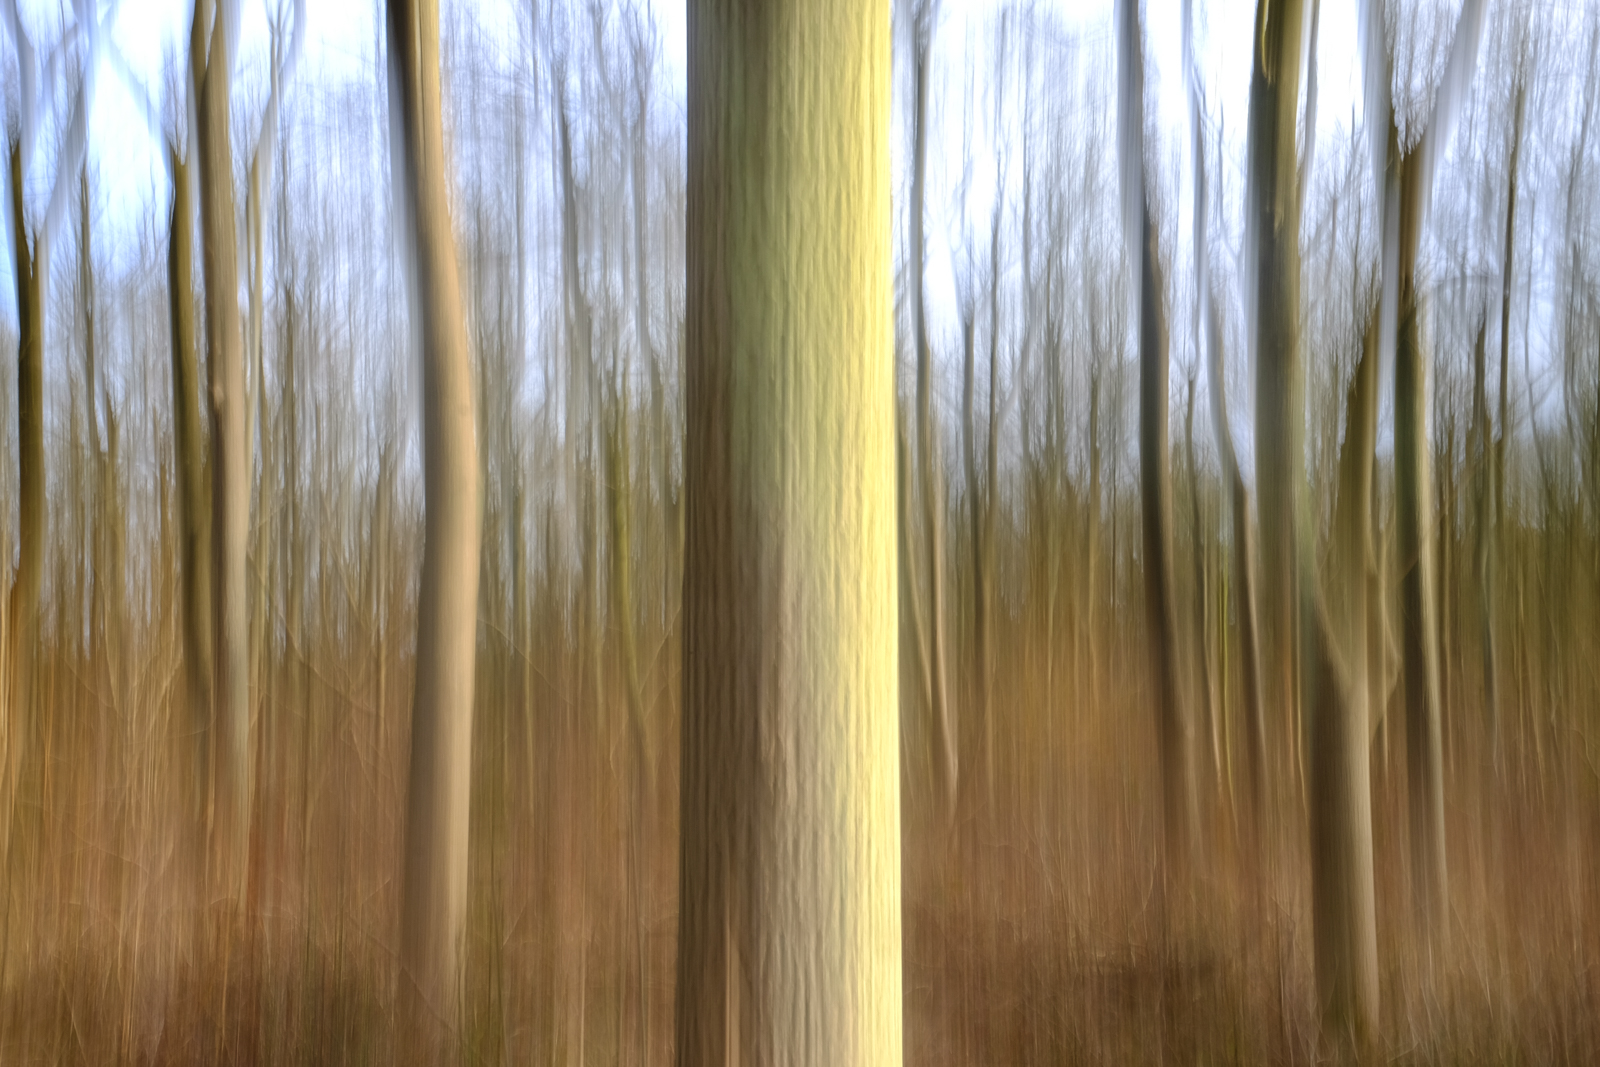
This is my favourite version – the sun had come out so the shutter speed increased to 1/4sec, but I still got some decent movement
Fujifilm spend a lot of money developing systems to help reduce the chance of camera shake from spoiling our shots. Very effective they are, too. But sometimes, moving the camera during the exposure can be beneficial to your shots. The most obvious example is panning, where you track a moving subject, but there are other techniques that come under the banner of intentional camera movement (ICM) and it’s these that we’re going to explore here.
Pretty much any subject can be used for ICM, but it’s often best to loosely match the shape of your subjects to the movement you intend to make. Trees, for example, are ideal for vertical movement, whereas a landscape is good if you choose to move the camera horizontally. You can also twist the camera from side to side, which can induce a dizzy feeling in the viewer, so this works well if you’re looking up at a tall building or trees.
The actual movement part of the process can be done with your camera hand-held, but you’ll get far more consistent results if you mount your camera on a tripod. Even so, make sure you’ve got a fully charged battery and a card with plenty of space on it as you’ll inevitably get more misses than hits at first. As you’re going to be using a long(ish) shutter speed, also consider taking a polariser or neutral density filter with you, particularly if it’s a sunny day. Right, let’s head to the woods…
1 Here’s my set up; an X-T1 with XF 18-55mm zoom, mounted on a sturdy tripod. The eagle-eyed among you will notice that I left OIS turned on for this quick shot, but I switched it off before I started taking images, and you should too. This avoids electronics trying to take over and reduce the movement.
2 Next, I selected the X-T1’s lowest ISO, the 18-55mm’s smallest aperture (f/22) and the two-second self-timer option. I then switched to the Manual exposure mode and took a meter reading from the scene, which gave me a shutter speed of 1/2sec. Ideally, you should be working with a shutter speed between two seconds and 1/4sec, so this was perfect and didn’t require the help of filters.
3 Finally, I locked off all the movements on the tripod head with the exception of tilt, pressed the shutter release and then quickly moved the head backwards and forwards. These movements should be as smooth as possible and the two-second delay gives just enough time to get into rhythm. If you find this isn’t enough time, use the ten second delay.
Once you’ve got used to the actual picture taking technique, try a range of different compositions. I like to have a tree prominent in the front of the shot, but you may opt for a more uniform. Take a look at the images below to see what I got.
The original scene
This is my favourite version – the sun had come out so the shutter speed increased to 1/4sec, but I still got some decent movement
This was a mistake, but I like it! I forgot to lock off the panning movement on the tripod head so this is a moving pan and tilt.
The first shot, taken before the sun came out. Good movement, but the colours are a little flat, despite using the Velvia film simulation mode
This is a more general scene, which I think works well in black & white. I boosted the contrast and added grain, which I think looks like a charcoal effect
ICM on the computer There may be times when you want to have a go at ICM, but don’t have a tripod with you. On these occasions, you can rely on Photoshop. These two shots were done simply by using the Motion Blur filter.
The coast is a great place for ICM, this was done on the computer, but it’s just as easy to do it while you’re there!
It won’t be too long before rapeseed starts appearing. Here the ICM looks like I was driving past in a car
To do it, open the image in Photoshop, then select Filter-Blur-Motion Blur. In the dialogue box that opens, you can choose the angle of blur (I left these of 0°), then simply move the pixel slider until you get the effect you’re after. Simple.
If you found this tutorial useful, do let me know. I’m happy to take suggestions for techniques you’d like to see, so just add your own views and comments below.
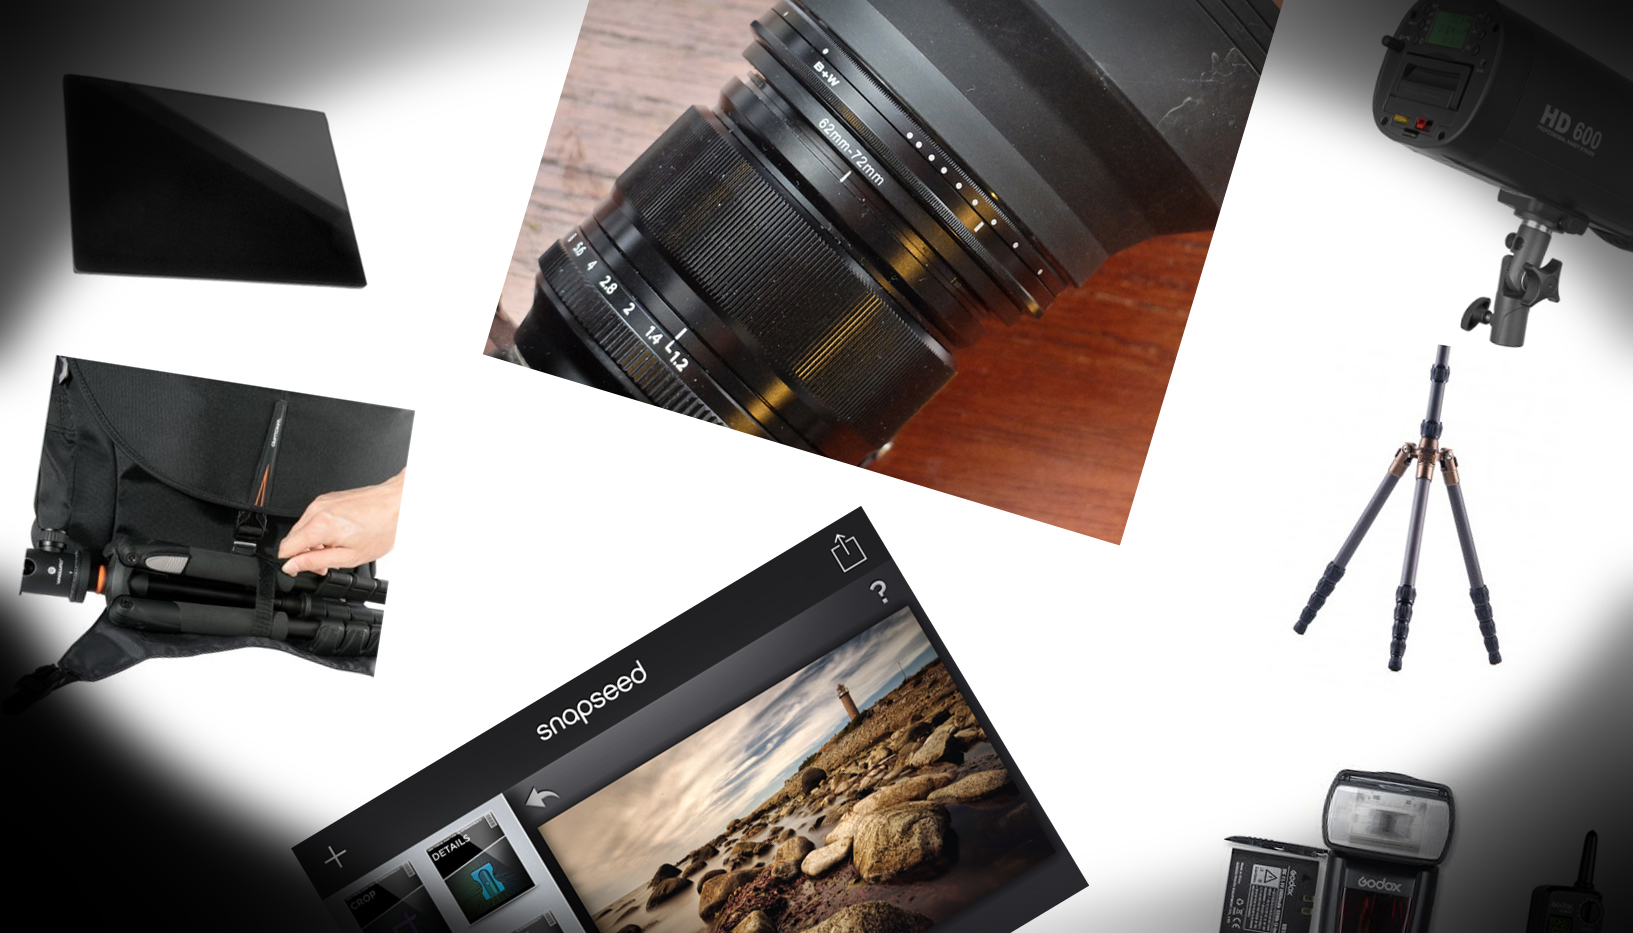
For my travel photography, I now work entirely with the X-system. I like the fact that it’s lighter, smaller and manages to look great yet unobtrusive and produce great looking images at the same time. I love the direct feedback of the manual controls, dials and aperture rings. I use two X-T1’s, a X100s and a slew of Fujifilm lenses. One of the advantages of using a smaller and lighter system is that it frees up some space (and weight) in your camera bag for other accessories that can help you create better shots. In this two-part series, I’ll have a look at my top-ten favorite accessories for Fujifilm cameras – from a travelling point of view. You can read Part 1 by clicking here. Here are my final 6 – 10 accessories.
6 – Lightroom
Much has been written about how good or bad Lightroom is for Developing Fujifilm .RAF files. I have to admit that at first, it was really bad but in my opinion, although probably not the best, Lightroom is good enough for my needs. Whatever 10 percent that Lightoom might lack in terms of pure image quality, it makes up for by its workflow advantages and the fact that I can go from capture to export and even publish websites and create printed photo books all from within the same application.
Lightroom is more than a raw converter: it’s an image database and it even allows you to quickly publish your images, be it to a printer, the internet or in a photo book.
On top of that, I don’t want to change my workflow every time a new, supposedly even better raw converter is the ‘buzz du jour’ on the internet. I do find that I have to use higher than default capture sharpening but that’s easily fixed by setting a new camera raw default. I teach you how to do that (and much much more) in my 300+ page Lightroom 5 Unmasked eBook.
Another thing I love about Lightroom is that it has simulations (found in the Camera Calibration Panel) for the Fujifilm film styles like Provia or Astia. That way, you can closely match the look of the raw file to the jpg and still benefit from the larger post-processing leeway that raw files offer.Use code FUJISAVINGS to shave 30% off the $20 cover price of my 300+ page PDF eBook Lightroom 5 Unmasked until the Feb 28th, 2015.
7 – Eyefi Card for tethered shooting
With the Eyefi Mobi card you can wirelessly transfer images to a computer or tablet, even if you have an X-Pro 1, X-E1 or X-100(s) that doesn’t have WIFI.
On some occasions like studio shoots or when I’m doing demos, I would like to have the images show up on my monitor or projector. However, up until now, my X-T1 does not allow me to shoot tethered into Lightroom, nor to any other app, for that matter. I could use the Camera Remote software but that would be cumbersome because I would have to transfer each photo individually from my camera to my phone or tablet and then on to my computer. There’s a great workaround, though and it involves using an Eyefi Mobi card. That’s an SD card that has a built-in WIFI transmitter. It saves the images to the card but also – by means of the Eyefi Mobi desktop App that you install on your Mac or Windows machine, to a folder of your choosing on your computer. You can then set up that folder as a so-called Watched Folder in Lightroom and have the images that the Eyefi card wirelessly pushes to your computer, show up there (the full lowdown is also discussed in Lightroom 5 Unmasked). The only limitation is that, at least for the European Eyefi cards, you can only transfer JPG files. So, does this mean that if you start editing those JPGs and then at the end of the day you import your raws from the SD card itself, you have to start all over again?
Well, not necessarily, because you could use John Beardsworth’s Syncomatic Lightroom plug-in: this cool plug-in allows you to automatically copy the edits you made to a JPG and then apply those edits to the raw files that have, bar the extension, the same name. Just make sure that you set the raw files up with the same Film Simulation (you can do that in the Camera Calibration menu) that you assigned to the JPGs in the camera.
8 – Remote control
This remote control was originally for Canon cameras, but it also works on the X-T1
Anytime you’re on a tripod and you’re using longer shutter speeds, it’s best not to physically depress the shutter button to make a photograph: doing so can introduce blur in your image. If your Fuji has WIFI, you can use the Camera Remote App. If it doesn’t, or if you want to work with exposures over 30 seconds (the limit for the Camera Remote App), a dedicated remote might be a good idea. On my X-T1, I use this model. It’s actually designed for Canon, but it also works with some Fujis like the X-T1. On top of enabling shutter speeds beyond 30 seconds, it allows you to program interval shooting and delays beyond the default choices of 2 or 10 seconds.
This exposure of 125 seconds was shot using the above-mentioned remote control.
9 – Really Right Stuff L Bracket
The Really Right Stuff L Bracket allows you to quickly mount the camera horizontally AND vertically on a tripod.
The Vertical Grip for the Fuji X-T1
This is an accessory which I haven’t used myself yet, but a couple of fellow Fuji shooters such as Matt Brandon use it to their satisfaction and therefore bumped it high on my wishlist: the Really Right Stuff L Bracket. This bracket allows you to quickly mount your camera either horizontally or vertically to your tripod. The L Bracket is designed in a way that it can stay on your camera and you still get to access the battery door and card slot. Some photographers like it just because it adds some extra bulk and grip to the camera. Although, if that’s all you want, you might just spring for Fujifilm’s own vertical grip for the X-T1, which has the added benefit of storing an extra battery.
10 – Fujifilm Instax Printer
I’ve saved the best for last. Really. I’ve started giving out instant prints to the people I photographed along my journeys as early as 2009. At the time, I used a Polaroid Pogo. Handing out prints allowed me to not only take a photo but give something back in return. And by doing it on the spot rather than on my return back home, it saved me the trouble of trying to decrypt hastily written addresses or trying to remember which photo I should send to which person. But what I hadn’t expected at first, was that handing out prints to people was also the perfect door-opener to photograph… even more people. More than once have I had the experience that someone did not want to have their photo taken, only to ask me to take their photo just minutes later after they had seen me give a print to someone else.
Matt Brandon, organizer of the 2015 Rajasthan Photo Workshop, with the Fujifilm Instax Printer. Read his review about the printer here.
The Pogo did have its disadvantages, though: the battery lasted for only 10 shots and color fidelity was clearly not high on the specs list. So for a moment I dabbled with the idea of bringing a Fujifilm Instax camera, but then Fujifilm announced the Instax Share SP-1 Printer. If you get only one of the accessories that I have listed in this overview, make it that little printer. Especially in remote areas where people don’t have ready access to photography, you’ll spread joy with every Instax print you hand out. And, as a sign of good Karma, you’ll be rewarded with more great photo opportunities, too. And you don’t have to take my word for it: check out the praise of Matt Brandon or Zack Arias in their reviews of the SP-1.
The Instax Printer helps to break the ice and is a great way to give something back to the people you photograph.
Bonus accessory – kind of…
I’d like to wrap up this overview with the smallest, lightest and cheapest accessory of them all: a pack of Sugru. Sugru is self-setting rubber and if I’m not mistaking, it’s invented in the UK. You open a small sachet, tear of as much as you need (the rest will dry out, unfortunately), you model it into shape, affix it to wherever you need to and then let it dry for 24 hours and it adheses perfectly to the surface you stuck it on. Now what do Sugru and my X-T1 have in common… Well, as much as I love that camera, there’s one thing I like less than on my old X-E2: apparently because of weather sealing, the 4 way control buttons around the central Menu/OK button are too flush with the rest of the camera, at least to my taste.
Sugru allowed me to raise the profile of my X-T1 4 way controller buttons which makes it easier to find them with my thumb while keeping my eye at that gorgeous viewfinder.
Now I love the fact that there are 49 AF points on the Fuji cameras and that – contrary to DSLRs – they are literally everywhere across the image. Howver, my right thumb often has trouble finding the buttons without taking my eye of the EVF (tip-within-the-tip: all these buttons are programmable, so I’ve programmed them all to change the AF-field). I used Sugru to raise the profile of the buttons just enough so that I can find them, even in the dark. It’s a small mod but it makes a gigantic difference in my workflow.
About Piet Van den Eynde
Piet Van den Eynde is a Belgian freelance travel photographer, author and trainer. He’s a Fujifilm Ambassador and has published over 10 books and eBooks on digital photography and postprocessing with Adobe Lightroom. He also organizes two travel photo workshops each year in India with X-Photographer Matt Brandon from www.thedigitaltrekker.com. Next one up is the beautiful Indian state of Rajasthan and has only two spots left. His English eBooks such as his bestselling Lightroom 5 Unmasked are published by Craft & Vision. Discount code FUJISAVINGS will save you 30% on any of his Craft & Vision eBooks and his Photoshop for Photographers video training until end of February 2015. Piet’s own blog can be found here: http://www.morethanwords.be/blog
For my travel photography, I now work entirely with the X-system. I like the fact that it’s lighter, smaller and manages to look great yet unobtrusive and produce great looking images at the same time. I love the direct feedback of the manual controls, dials and aperture rings. I use two X-T1’s, a X100s and a slew of Fujifilm lenses. One of the advantages of using a smaller and lighter system is that it frees up some space (and weight) in your camera bag for other accessories that can help you create better shots. In this two-part series, I’ll have a look at my top-ten favorite accessories for Fujifilm cameras – from a travelling point of view. Here are my first 1 – 5 accessories.
1 – Flash and modifier
I love using flash while traveling. In fact, I wrote two eBooks on the subject: Making Light 1 and Making Light 2, available on http://www.craftandvision.com. Generally, I like to use my flash off-camera, but on those rare occasions where I use it on-camera, I will often bounce it to my side or my back in order to diffuse the light as much as I can. When I’m moving around and bouncing an on-camera flash, I prefer to work in TTL because the flash-to-subject distance (and hence the required flash output) varies continuously. TTL will automatically calculate and adjust that power for me. For those instances, Fujifilm’s own EF-42 flash is just perfect because it’s fairly powerful and it has TTL.
When I use the flash off-camera however, I prefer to work in manual mode but I do like the ability to wirelessly trigger my remote flash and set its power. For off-camera use, I really like the Godox V850 flashes: they’re powerful, affordable, built like a tank and thanks to the optional radio FT-16s triggering system, I can change the power remotely. But best of all, the V850 is powered by a rechargeable Li-ion battery that lasts up to 600 full power flashes. No more fussing around with AA batteries! One of the few dislikes I have about the Godox flashes is that the receiver comes off way too easily. Therefore, I’ve stuck some Velcro and gaffer tape to it.
From left to right: The Godox V850 manual flash with its handy Li-ion battery, the trigger to put on the hotshoe of the camera and the receiver which clips on the side of the flash.
For the 2015 Rajasthan Photo Workshop (a 2 week workshop in India hosted by fellow X-Photographer Matt Brandon and myself which attracts a lot of Fujifilm shooters and for which at the time of writing were only 2 spots left), I have my eyes set on another, bigger flash: the HD600 II, a 600 Ws (that’s about the lighting power equivalent of 6 to 10 small hotshoe flashes) portable system by Jinbei.
The Jinbei HD600 II packs 600 Ws of power (that’s about 6 to 10 regular speedlights) in a relatively lightweight 2.4 kg package, battery included.
Now if you go through the trouble of bringing a flash, there’s one accessory that’s almost as important as the flash itself, and that’s something to diffuse it: by itself, a flash is a very small light source and therefore it will create harsh shadows. That’s where modifiers like softboxes and umbrellas kick in: they increase the size of the light source (at the expense of some flash power) and throw softer shadows, especially if you use them close enough to your subject. Although I generally prefer the increased control that softboxes offer, while I’m travelling I have three big constraints: my modifier must be easy to set up, light enough to carry and small enough to put into my camera bag. That’s why I love the Lastolite Trifold umbrellas. As a bonus, they’re cheap, too. A flash and umbrella add some 800 grams to your camera kit, but they also add a wealth of opportunities.
To paraphrase Capa: ‘If your pictures aren’t good enough, your clothes aren’t dirty enough’. In this case, I’m holding my Godox flashes and Lastolite Trifold umbrella while participants of the Rajasthan Photo Workshop are practicing their off-camera flash skills on these great characters we rounded up at a small tea-stall.And the resulting image…I call this my two lights for the price of one technique: I will often put my subject between the sun and my flash. The sun acts as a rim light (look at how beautifully it backlights the water coming out of the pump) and the flash will fill in the shadows. By positioning my flash to the left, I created a so-called Rembrandt look. Using an umbrella made for softer shadows and created big catchlights in her eyes.In this case, I lay down and handheld the flash and my umbrella in my left hand. I used the sun as a natural rim light, exposed for the sky and then brought my underexposed foreground up with flash. On moments like these when you’re handholding a flash and umbrella in one hand, it’s not difficult to appreciate the light weight of the XT-1 and a prime lens you’re holding in the other.
When I’m not using my Brian tripod (see tip #3) to hold the flash for me, I’ll either handhold it myself (a lot easier to do when you have to hold less than one kilogram of camera equipment in your other hand) or have someone hold it for me.
I use flash mainly to increase the quality of my light, rather than the quantity. That’s why the sunnier my destination, the more likely I am to bring a flash with me!
In this shot, I could have pushed the ISO to 3200 and make an available light shot. But it would have been a flat, poorly lit available light shot with a washed-out sky as well. By adding an umbrella’d flash coming from the left, I was able to bring out the texture in these goat’s skin and give more dimension to the woman’s face.
2 – Camera bags
Ah. Camera bags. If only the perfect camera bag existed. The be-all-end-all camera bag. But I haven’t found The One yet. Instead, I pick one depending on my shooting plans for the day. So I want to give you my top-three of camera bags.
The Vanguard Heralder 38
The Vanguard Heralder 38 won’t win any beauty awards, but it’s a highly efficient bag that can also help you carry a tripod without bumping in to everything and everybody.
I love this bag for its versatility: it can hold a lot of gear (in fact, it can probably hold all of the other accessories in this top-10) and has a separate laptop compartment. It has a big zipper at the top for quick access and the bright orange interior is more than a fashion whim: it makes your mostly black camera gear easier to find. Now, there are a gazillion other bags that are similar to this one (including a couple of smaller editions of the Heralder), but what the Heralder 38 has that few others have is a secret latch that can hold my tripod (see tip 3). The only downside is that, compared to the stylishness of my Fujis, it just pales.
Think Tank Speedracer
The Speed Racer by ThinkTank nicely distributes the weight between your shoulders and your back. I also like the fact that you can add extra modular pouches to the waist belt. This lets you pack as light or as heavy as you need.
Although the Fujis themselves are light enough and a lot lighter than my fullframe DSLRs and lenses are, when you add enough lenses, accessories, flashes and a tripod to the mix, the weight can start to add up again. A bag that only hangs from your shoulder can become hard to carry all day. And I don’t like backpacks. I find them good to transport gear from A to B, but not to walk around in A or B. So, if I want to go easy on my back, I use the Think Tank Speed Racer. This bag has a shoulder belt but also a waist belt that you can tuck away if you don’t need it. The waist belt helps to divide the weight between your shoulder and your waist and lets you attach extra modular pouches to it. It’s a great system and my partner-in-crime on the Rajasthan workshops Matt Brandon (www.thedigitaltrekker.com) uses the smaller Speed Freak much the same way. I just wished they looked better. The bags, not Matt Brandon. He looks fine. For his age, at least J.
Ona Astoria
The Astoria is Ona’s biggest bag. If you carry less gear than I typically do, you might want to check out their gorgeous but slightly heavy full leather Brixton.
So, this brings me to the last in this round-up. When style does matter, the classical black nylon camera bags just won’t cut it. In those cases I turn to the Ona Astoria. This mixed canvas and leather bag holds a laptop, two bodies, a couple of lenses and even a flash. It’s not the cheapest bag in this overview nor is it the biggest or the most practical, but it makes up for all of that by its stunning looks. Visually, it is a perfect match for my Fujis. In fact, the bag looks so good that putting a regular DSLR in it would be a crime! In the same league, I recently discovered the Roamographer by Holdfast Gear. This leather bag opens like a doctor’s bag and also has a strap for a tripod. The only thing holding me back is forking out another $500 on a bag and the fact that it weighs almost 6 pounds. Empty.
3 – Tripod
The Brian by 3 Legged Thing. It doubles as a light stand, too!
The smart way to go about the weight savings that switching to a mirrorless system offers, is to pass those savings on to your back: it will thank you later. However, I decided to ‘reinvest’ some of those economies into more gear that would allow me to do things that I previously could not do. One of those extra items I now bring with me a lot more than when I was lugging DSLRs is a tripod. I use the Brian, by British manufacturer Three Legged Thing. I specifically chose this model because it’s the only one I know that extends to over 2 meters. Not that I’d want to put a camera that high, but I’ll often use my tripod as a makeshift light stand as well.
The Brian in use: I thought the daylight (left) was too flattering and soft for the drama I wanted to add to this shot of this memorial stone at the German war cemetery of Langemark in Belgium. So I put up my tripod and used it as a light stand for my Godox V850. A grid (by Honl Photo) helped to concentrate the light even further.
At GBP 359, it’s not the cheapest tripod around, but if I’ve learnt one thing, it’s that with tripods cheaper often means compromising, which in turn makes me leave it at home. My first tripod only cost me $100. But it was big, bulky and didn’t extend high enough for what I wanted. As a consequence, I’ve used it twice and now it’s collecting dust. So it cost me $50 per shoot. My Brian’s only one year old and it’s already averaging a lot better than that!
Although 1.2 kilograms is very light for a tripod as versatile as the Brian, sometimes even that is too much to carry. In those cases, I’ll almost invariably bring an alternative solution: the Joby Gorillapod. It exists in a heavy and quite bulky DSLR version, but for my Fujis, I chose the much more convenient (and affordable) Hybrid version. That’s just one more advantage of a smaller and lighter system like the X-system: not only your camera and lenses are smaller: your accessories (like filters, or in this case tripods) can be lighter and often cheaper, too.
For this night shot of a cruise ship in Stockholm, I needed a five second exposure. Too much even for the OIS of my 18-55 lens. Luckily, I had brought my Gorillapod with me. I simply attached it to a metal fence to my right. There’s even a small hotshoe accessory available that allows you turn it into a light stand or should I say light ‘hanger’…
4 – Filters
I use Formatt Hitech’s graduated filters when I need to balance out a sky and foreground beyond what Lightroom’s Highlights and Shadows recovery can do. Alternatively, I might make a series of bracketed shots and merge them into an HDR. I’ve recently started to experiment with long exposure photography.
This picture was taken during the highly recommended London by Night and Low Light workshop by Doug Chinnery. Doug is also a Fujifilm user.
For my long exposure photography, I use the Formatt Hitech ProStop 10 stops IRND filter – I like that it’s relatively neutral compared to other brands – and I can’t wait to use their new Firecrest 16 stop ND filter. That’s 16 stops of Neutral Density in one filter! No need to stack multiple filters and run the risk of vignetting or other image degradations. To give you an idea: a 16 stop ND filter will do: it will turn an exposure time of 1/250th of a second into 4 minutes so you can use it for long exposure photography at noon!
As mentioned higher-up, I also use a lot of flash. Because the Fuji has a sync speed of 1/180th, this means that during the day, in sunny conditions, even at my lowest ISO of 200, I’ll be stuck with apertures of f/11 to f/16. But what if I want to shoot my fancy 56 f/1.2 at f/1.2? I might need a shutter speed of 1/4000th or even beyond that. Which is way beyond the sync speed of my flash. The solution lies… again… in neutral density filters. A neutral density filter allows me to use flash in bright daylight (e.g. for fill flash) with a wide open lens and still keep my shutter speed at or below the 1/180th sync speed. But on the other hand, when using ND’s for flash, I don’t want to use a fixed ND, because the lighting conditions can often change quickly by a couple of stops. So, suppose I’d need a fixed 6 stop ND in one outdoor location, 30 meters further the light might be 3 stops less intense. With the same filter, I would suddenly be at 1/25th of a second, which becomes dangerous to handhold. And I don’t want to have to continuously change filters. So, the solution I came up with is the following: I use a 6 stop ND and a variable 1-5 stop ND. Depending on whether I stack them or not, that gives me between 1 and 11 stops of sun-stopping power without having to change filters too much.
This setup may look complex but you get used to it pretty quickly. By combining a fixed and a variable ND, I can use my 56 1.2 and the other fast Fujinon primes wide open in bright sun and still keep the shutter speed at or below the 1/180th sync speed, so I can use flash if I want.
And the beauty is that, if there’s enough sun (and I wouldn’t use them if there wasn’t), my X-T1 still manages to focus through 10 stops of ND! Brilliant, isn’t it? Oh, and by the way, that lens hood you see is a collapsible one by Caruba: I needed a lens hood with a wider diameter because instead of buying separate circular NDs for each lens diameter, I bought them to suit my biggest lens (the 10-24) and I use step-up rings.
The image to the left was made with flash, but I did not have any filters handy. As a result, I had to use an aperture of f/11, which made the entire background too much in focus for my taste. The image to the right was shot a year later with a three stop ND filter. This allowed me to open up the aperture to f/4, giving a softer background.
5 – My iPhone
An iPhone (or any smartphone, for that matter) is a great travel photo accessory. First of all, by means of the Camera Remote App (iOS link, Android link), I can remotely trigger my X-T1. That’s not only helpful when doing longer exposures, but it also helps me if I want to take photos inconspicuously. Mind you, I generally ask permission (with the flash setup that I often use, it’s hard not to, anyway) but every once in a while there are scenes where raising the camera to my eye would probably kill the scene. In those cases, I use the Camera Remote App and frame the shot from my iPhone. I can even tap the screen to choose my focus point! I also have the free Snapseed editor – it’s so good at improving your images that on the last Rajasthan Photo Trek, we’ve come to call it ‘Snapcheat’! (iOS link, Android link).
If you have an iOS or Android smartphone or tablet, you just have to pick up a copy of Snapseed. Don’t let the price deter you: it’s free, which saves you some money for the other goodies in this overview!
Other essential apps are the instax SHARE App (iOS link, Android link) which – while waiting for the firmware update that allows for direct printing from my X-T1 to the portable Instax Share printer (see tip 9) – lets me print images that I saved from my X-T1 and processed in Snapseed to that little wonder of a mobile printer.
The Instax Share App. You can even add some text to the photos you print (not shown).
Finally, I also like to use the Camera Remote app for bracketing for HDR. For reasons unknown to me, the bracketing in the Fuji cameras is limited to 3 shots with only 1 stop difference between them. For capturing scenes with extreme contrast, that’s often not enough, as shown below. While I could use the EV compensation wheel on the camera, that causes me to physically touch it and even the smallest displacement can lead to alignment issues and ugly artifacts afterwards.
A super tip for HDR-lovers: use the exposure compensation on your Camare Remote App to get up to 7 bracketed shots, one stop apart, without touching your camera!The end result: I often convert my HDR images to Black and White.
Other than that, my iPhone comes in handy because it allows me to geotag my photos using the same Camera Remote App. However, because that requires me to set up a connection each time I want to geotag, I generally use a dedicated geotagging App (I use Geotagphotos Pro) (iOS link, Android link) and then sync the App’s tracklog with my photos in Lightroom. Finally, I also have a Depth of Field calculator app.
The Geotag Photos Pro app creates a GPS tracklog which you can then sync up with your images in Lightroom.
Piet Van den Eynde is a Belgian freelance travel photographer, author and trainer. He’s a Fujifilm Ambassador and has published over 10 books and eBooks on digital photography and postprocessing with Adobe Lightroom. He also organizes two travel photo workshops each year in India with X-Photographer Matt Brandon from www.thedigitaltrekker.com. Next one up is the beautiful Indian state of Rajasthan and has only two spots left. His English eBooks such as his bestselling Lightroom 5 Unmasked are published by Craft & Vision. Discount code FUJISAVINGS will save you 30% on any of his Craft & Vision eBooks and his Photoshop for Photographers video training until end of February 2015. Piet’s own blog can be found here: http://www.morethanwords.be/blog
My wedding workflow for the past few years whilst shooting with Nikon DSLR’s has consisted purely of shooting RAW and processing the files initially in Lightroom and with some additional tweaks in Photoshop with Nik and OnOne software plugins. The aim is to produce a set of colour and exposure corrected JPEGS for supply to our clients. Since switching to Fuji for most of our wedding work I wanted to compare the film simulations in ‘real life’ shooting situations. Just to clarify, this is not about shooting JPEG only which I know some photographers do but this is part of a bigger picture in exploring the possibilities of producing ‘in camera’ JPEGS from the RAW files for supply direct to the client with little or no external processing after the wedding.
The original RAW files were transferred back to a memory card and then processed in camera. All other settings eg colour. shadow,etc. were 0. The images are in the same order from top to bottom L-R as the film simulation selections in the camera’s menu, starting with the unprocessed RAW file then Provia, Velvia, Astia, Pro Neg Hi, Pro Neg Standard, BW, BW Yellow, BW Red, BW Green, Sepia.
Bridal portraits
X-T1 / 18 -55 F2.8-4 F4 @ 1/250 1250 ISO +0.33 Exp comp. Auto WB
The first set of images (above) are some Bridal portraits taken in the reception room as we were rained off for outside shooting.
There was a large expanse of windows with natural, overcast daylight behind me.
Of the colour versions I don’t think it will come as any great surprise that Velvia is just a bit too saturated for this type of image and personally I find Pro Neg Standard to ‘flat’. That leaves Provia, Astia and Pro Neg Hi. Of these Astia has produced the warmest image, closely followed by Provia and then Pro Neg Hi. Astia will be my first choice for similar lighting / subject in the future.
So far as the black and white versions, my choice here for skin tone would be the Red filter but the overall contrast has reduced with Green producing the darkest lips. I think I might be wary in using the green filter as a ‘redder’ skin tone could cause the skin to darken more than I would wish.
X-T1 / 18-55 F2.8-4 F4 @ 1/150 3200 ISO +0.33 Exp comp Auto WB
This was at Bride’s home before the wedding (above). There was a window to camera right but it was quite dull outside and it provided very little light so we set up our Lupolux LED650 with a showercap diffuser to camera right.
Once again the winner for me is ‘Astia’, however they are all acceptable, even ‘Velvia’ hasn’t gone too far with a nice boost to the flowers. Of the black and whites, ‘Red’ has given the lightest skin tones and ‘Green’ the greatest contrast. Yes, you guessed – still a thumbs down for ‘Sepia’.
Wedding Couple
X-T1 / 18-55 F2.8-4 F4 @ 1/640 400 ISO Auto WB
The lighting was gorgeous here, with the sun low and diffused slightly through clouds to camera left. (Above)
Would be quite happy to use ‘Velvia’ here. It hasn’t affected skin tones too much – and wow! – those Fuji greens! I was a bit surprised at the very little difference with the black and white filters. Understandably the ‘green’ filter has produced the lightest image with ‘red’ providing the most contrast – just. Still wouldn’t use ‘sepia’
Classic Chrome
Whilst putting this test together it became possible via an update to apply ‘Classic Chrome’ to existing X-T1 RAW files using Lightroom (5.7). Below are the 3 files with this mode.
For me ‘classic chrome’ is just a little on the ‘grungy’ side and I’m not quite sure yet where it might fit in with our current style of wedding shooting / editing. However, I can’t wait to use this in lots of other genres, especially ‘street’ and some ‘urban portraits’.
Conclusions
As mentioned at the beginning of the post, the aim here was to find out how usable the film simulations are straight out of camera in ‘real life’ wedding shooting. I am working on switching film simulation modes during the wedding to suit particular lighting and subject matter and then using the resultant JPEGS as part of our workflow to supply direct to our clients with no further post processing. DR settings are also going to play a big part in this, especially when shooting high contrast scenes. We will continue to shoot both RAW and fine JPEG and will of course use the RAW files as needed for post processing if the need arises.
To be honest I’m knocked out by the quality of JPEGS produced in camera, the noise reduction is also truly amazing. I would prefer a stronger filter effect with the black and whites as there isn’t a great deal of difference between them all.
For me the Sepia simulation is very limited for our particular requirements and I don’t envisage using it at all.
For full resolution image examples, please click here.