As someone who has traveled 50,000 miles in the past couple of years, I’ve come to realize you don’t have to go far to have fun and make great photos. Truth is, no matter where you live, all you have to do is step outside your back door. I guarantee that if you slow down and look closely at what’s around you, you’ll find many interesting subjects. Whether it’s literally in your backyard, in the nearest park, or an adorable pet —these things are right there under your nose just waiting to be noticed.While visiting Louisiana, I headed out with my weather-resistant FUJIFILM X-Pro2. Within just a few yards I found leaves, flowers, insects, frogs, and my beloved pooch Emma. Admittedly, I wasn’t feeling very inspired in the beginning. At first glance, there was nothing particularly interesting about my environment. I walked out my door, down a paved road and stumbled upon a nondescript nature path. I had to force myself to slow down and peer into places I would otherwise have overlooked. By the end of the shoot, I was having a blast.I recommend keeping it simple and just grabbing your camera and one or two lenses (tripod optional).I chose my FUJINON XF56mmF1.2 R APD prime lens known for its sharpness, clarity and beautiful bokeh effects. The FUJINON lens lineup pairs perfectly with – and optimizes – the X Series camera system. This APD prime is the only lens I’ve ever used that ships with its own apodization filter (think ND filter) which creates smooth bokeh outlines and enhances the three dimensional feel of an image. To maximize the bokeh capabilities and create a macro-lens aesthetic, I opened the lens up all the way to f/1.2 and manually set the focus to its closest distance. Then I just explored and moved the camera in and out on various objects. When I found something I liked, I framed up an interesting composition and further refined the focal point.
**Lighting tip: look for subjects in the open shade or go out on an overcast day. This will ensure your light is soft, your colors are enhanced and your exposure values are under control.The other lens was the venerable XF50-140mmF2.8 R LM OIS WR which is one of the best lenses available today for image quality and stabilization. I find this lens to be excellent all around and I’ve always enjoyed shooting portraits in this focal range. Enter my beloved brindle boxer — Emma. She emerged in a bed of flowers and I instantly had a muse!I found close to a dozen pictures in under an hour while I was just meandering around. It really pays to take your time (and your camera) and absorb whichever features happen to be around you. You will see the beauty and details in everyday life. I guarantee you’ll find something interesting.
From the moment I truly began to pursue photography, I strived to distinguish my work from the millions of images flooding digital media across the world. In doing so, I’ve always been an advocate of doing whatever it takes to get the shot. Whether that means hiking a treacherous mountainside all night to capture the beauty of first light from an unseen perspective, or hanging from an abandoned bridge 2,000 feet above the ground, capturing timeless moments are what I live for. Through my experiences, I have learned that photography is a key factor in the difference between being alive, and actually living. Abiding by this principle, I set out on road trip from Los Angeles to Seattle accompanied by two talented friends and an arsenal of Fujifilm X Series gear.We left LA for Oregon on a Tuesday afternoon, and after a brutal sleepless 16-hour road trip, we made it to our first destination – Abiqua Falls. Fortunately our car for the trip was a 4WD Jeep, and allowed us to take the mile long off-road path to the trailhead for the falls. With tattered sneakers accompanied by a light rainfall, I ventured through Oregon’s lush landscape for my first time. The abundance of massive trees and greenery were like nothing I had ever seen before. The hike down to the river was pretty intimidating, and required you to scale down a lengthy and steep hillside that was only accessible by a rope tied to an old tree at the top. I went first, and discovered that the last hundred meters of the slippery, muddy terrain had no support rope. After my first step I went down with no control, and slid for about a hundred feet, ruining my clothes and scratching up my hands in the process. Nevertheless, we all made it down eventually and hiked alongside the river to our destination. I had never seen Abiqua Falls, so when we turned the corner that revealed it’s jaw-dropping beauty I was in awe.The picturesque landscape was surreal, and I immediately began planning out the perspectives I wanted to capture in order to do it justice. What I didn’t realize was how difficult the blistering backwash from the water crashing to the surface made it to snap a photograph without drenching the camera lens. The remarkable durability and weather-resistance of the X-T1 matched by the speed, precision, and quality of the XF10-24mmF4 R OIS conquered the conditions, and allowed me to capture my experience before the backwash fogged up the lens. From Abiqua, we drove through the countryside to two of Oregon’s most iconic waterfalls, Multnomah and Latourell. These two were conveniently located very close to one another, and neither required a difficult hike to get to. Their overwhelming size was a humbling reminder of the power of Mother Nature, and gave me a challenge to capture them true to scale. Running on no sleep in almost 48 hours, we left the falls and enjoyed the hospitality of a friend and Oregon local, who took us to a famous Portland brewery before getting a couple hours of rest to continue on our photographic journey.Several hours of sleep, a warm shower, and a cup of coffee later we were on the road again… this time headed towards Washington. We got up before sunrise to capture first light from the Rowena Crest. The dynamic range on the X-T1 did Rowena justice by capturing all the tones and colors of the current season. After a brief session at Rowena, we drove straight to Olympic National Park. We encountered wildlife along the way, including a bear and bison. It was my first time seeing such large animals up close, and thanks to compact size of the X-T1 I was able to take it out of my pocket in time to capture the moment. Olympic National Park had otherworldly nature-filled roads whose cinematic foregrounds looked like something out of Planet of the Apes. With the help of the XF16mmF1.4 R WR lens, I was able to capture the detail of the nature before me.After exploring through Olympic, we returned to the hospitality of a friend’s home in Seattle, anxious for the adventures that were to come the next day. After a few more hours of sleep we set off to catch the infamous abandoned railroad known as Vance Creek Bridge for sunrise. Vance Creek is very dangerous if you’re not careful, and trespassers of the area are given a hefty fine if caught by authorities. This didn’t stop us; we were determined to get to the bridge and get our shots as quickly as possible. Running on minimal sleep, the excitement of visiting Vance eliminated any sense of fatigue and gave us motivation to get through the hike to find one of the most amazing abandoned locations I had ever seen. I cautiously maneuvered all the way across the bridge, and after documenting every angle I could, I hung my body off the edge of the bridge to capture the vertigo-induced lookdown perspective that is seen throughout most of my travels.This image gives me a sense of conquering that location, and I strategically waited until I was done shooting to make my mark with the widest lens of my kit, the XF10-24mm. After leaving Vance Creek without any issues, we headed back to Seattle to take on the skies of the city in an R44 helicopter with Classic Helicopters. While I’ve had helicopter shoots across several cities in many different conditions, it was my first time shooting in harsh light, and in an unfamiliar city. Nevertheless the X-T1 and XF10-24mm combo proved their worth, showcasing the very impressive speed and accuracy of the auto-focus feature. About an hour after the flight concluded, the sun had set, signifying the end to an amazing few days spent with friends shooting in new environments with an awesome camera system. We returned to our friend’s house to catch some sleep before we set off on a 20 hour road trip back to Los Angeles.
In addition to my Pacific Northwest road trip, I also had the pleasure of shooting with Fujifilm X Series gear this past December in the winter wonderland that is Alberta, Canada. The camera withstood unbearably low temperatures, snow, and everything in between. I even hung my body out of the car at 100kmh in -20 degree weather to capture a symmetrical road shot during sunset on the way home from our final day, which consisted of a trip to Yoho National Park to capture a direct vantage point of an endless blue river. Although my winter hat flew of my head and my face turned bright red from the extreme temperature and heavy wind, the camera gear had no issues withstanding the harsh conditions and delivering excellent quality images.
In conclusion, the most valuable aspect of traveling for me has always been capturing my experiences. In doing so, I’m able to make my memories timeless and share them with the world. With the help of Fujifilm’s cutting edge X-T1 system and expansive Fujinon XF lens lineup, I was able to document my recent travels throughout Alberta, Canada and the Pacific Northwest. The durability of this mirrorless camera is incredible. The compact size and endless internal capabilities of the X-T1 also set it apart from any camera I’ve used before. One of my favorite design aspects is the moveable LCD; this made it much easier to shoot reflections and difficult perspectives that cannot be seen through a viewfinder. The XF lenses are also very impressive. Their power and design compliment the body by providing lightning-fast images of excellent quality, color and sharpness. The auto-focus feature is also remarkably consistent and accurate across all subjects, and allowed me to make the most of every rare photo opportunity Mother Nature presented along these two trips. I’m very grateful for the opportunity to work with Fujifilm’s X Series gear, and I highly recommend it to all photographers looking to take their work to the next level with a conveniently sized, sleekly designed system.
I used to love the magic of the dark room, the processing of the film, the image appearing on the paper in the chemistry. I have never found that magic with Capture One or any form of RAW processing.
Transparency film that was always a magic experience, dropping the film at the lab and wait the hour ( back in the day ) and there would be the magic object in your hand.
I cut my teeth on E6 ( Tranny ). E6 taught me how to expose and the importance of understanding what a 3rd of a stop can do to an image.
Using my old school knowledge, I now put it to work by getting the final image straight out of camera (SOOC) with my Fujifilm digital system.
There is a walk near my house which is a 3 hour loop that I intend to walk regularly. I’m intending to revisit the same locations as the seasons change. This particular walk is a kind of recce… once I have walked it a few times I will know the places I wish revisit again and again.
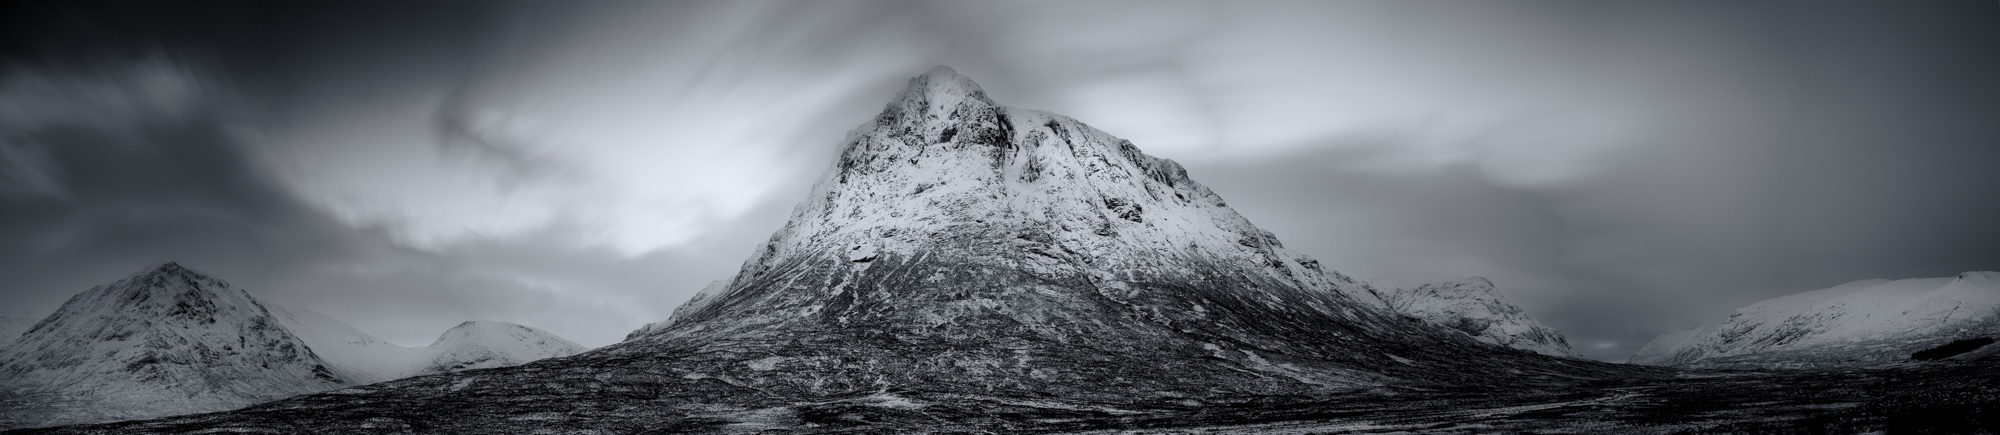
“This day in March was not a dynamic day in terms of light… it was overcast, fog and cloud coming in, the smell on impending snow and that blank white-box sky”
For the walk I explored the B&W + R film simulation mode as I didn’t want colours distracting from the shapes & forms.
I set the camera to sharp +1,highlight +2,shadow +2and on the compensation dial -1/3rd; an old E6 habit that still holds true with jpegs and my approach to photography.
Maybe I’m lazy, perhaps impatient… but my spot metering days are long gone with my old Leica, I now shoot with a Matrix exposure instead.
Using a 3rd of a stop pull with the compensation dial is normally enough to hit the ‘correct’ exposure, but the 3rd of a stop bracket makes for 3 very different ‘moods’ of image
LEFT – 0 compensation
MIDDLE – minus 1/3rd compensation
RIGHT – minus 2/3rds compensation
This means the image on the left is actually the cameras “correct” exposure. I’m bracketing everything under the ‘correct ‘ exposure….
For me, none of the images are wrong in terms of exposure, it’s all subjective and each has a very different mood and feel.
Left – The cameras ‘correct’ exposure feels very ethereal in the mist, probably a more commercial image than the other two, but the image is not as strong in terms of forms.
Middle – My ‘correct’ exposure is good with the foreground detail, plenty of details in the shadow.. but I’m leaning towards the one on the right
Right – This image is full of shadow, details in the trees are being lost… there is however more texture in the middle greys, the middle distance. The tree trunks in the middle ground bring out the vertical lines.
“Image right is the finished image… no processing required.”
This was my approach with the entire walk – looking for textures, strong lines, old roads and man made marks in nature.
Most of my work now is in 1:1 or 16:9. The square goes way back to Bronica and Hasselblad days, the 16:9 has only been a year or so, I’m still training my eye to see in that view ratio.
I love the freedom of going between the two formats. As we all know, the X100T is fixed focal length, but with the use of 1:1 and 16:9 I am in effect using two focal length lens ( kind of ).
Because of the crop, the square is giving me a kind of 50mm feel ( if not focal distance, that’s what my feet are for, moving back and forth )
The 16:9 feels wider than 35mm and has that very cinematic feel to it.
Somehow the two aspect ratios work better together as a body of work than squares and 3 :2 ( traditional 35mm )
I did the walk one week later using colour, and in that walk I used ISO bracketing instead …. but that’s a whole other blog..
Classic Chrome, -1/3 of a stop, sharp +1 highlight +2 shadow +2
After my bathtub antics last time round – you can read that here if you missed it – I’d got the taste for creating studio quality results on the cheap. I spotted my chance when my wife bought some colourful tulips into the house and within seconds of them being put in a vase, I snaffled them to get shooting.
Aside from the flowers themselves, I used two sheets of white A3 paper, which I taped to a north-facing window. I used two sheets as a single sheet tends to show the pulp in the paper when lit from behind and then put a couple of paper clips on the bottom just to hold the sheets together and add a little weight. A couple of bulldog clips would be just as effective. With my X-E2S mounted to a tripod with the XF60mm macro lens attached, I started my shoot by selecting a custom white-balance setting; effectively to tell the camera the white point in my set-up to guarantee accurate colour reproduction. This was done by choosing White Balance in the menu, then one of the custom options before following the simple on-screen instructions. With that done, the flowers were placed in front of the paper and I got this.
It’s hardly inspiring, is it? Composition aside, the biggest problem is the fact that the white paper has gone grey. This is because metering systems are calibrated to 18% grey. This is not a problem when shooting most standard scenes, but when you have white (or black) subjects they need a helping hand. I tried two options. First, I switched to spot metering and took a reading from the shadow area of the central yellow bloom. The result was better, but was starting to bleach the highlights, so I dialed in +1.3 stops of exposure compensation instead. Better.
Spot metering
Exposure compensation
The fact remained that the collection of tulips weren’t really working together, so I started trying individual flowers, placed in a toothbrush holder and held in place with a piece of scrunched up paper – no expense spared! I moved the focusing point to the flower head and tried a range of framing options.
If you’ve ever used the XF60mm Macro, you’ll know that it’s optically superb, and as the lens focused I found myself liking the abstract-like shapes in the out-of-focus bloom areas. So I switched to manual focusing, deliberately defocused and then took a range of images varying the aperture from F2.4 to F11, which altered the amount that was sharp. This one at F3.6 suited me best.
F3.6 suited me best
I swapped to another flower and did the same, shooting some in sharp focus and some defocused. This was repeated on the third bloom with which I also tried a few Film Simulation modes, including basic Black & White and Classic Chrome.
Provia
Provia defocused
Black & white
Provia
Provid defocused
Classic Chrome
Shooting done, when I came to edit the images, I really liked the defocused shots and thought they could create a piece of abstract art if I created a triptych, which was easy enough to do in Photoshop. I simply created a black background, then dropped the images on in turn before shuffling them around until I got the position right.
What do you think? I rather like the look. My wife, however, was a little less impressed. Turns out tulips don’t like being man-handled a great deal and the ones I’d photographed individually soon wilted.
There are many photographs which are taken in ‘the moment’ where something happens and if you know your camera well enough you’ll be able to quickly respond and get the shot. However, sometimes you have an image or story in you head that you simply can’t move past.
In this new series we are going to look at some examples, where photographers have to dig deep, problem solve and follow their vision. Hopefully lifting the veil on the phrase “Wow you were so lucky to be there just at the right moment, all of those factors came together”. What I’ve come to realise over the past few years is that if you look at the great photographers of our time, many have one thing loosely in common – time. Time to hone an idea, experiment with a subject, to get under the skin of a location, ultimately to fulfil an idea.
This is Laurel, who was one of my star birds when it came to this project. Notice the mark on the left side of his face, that was one of his unique markings.
I spent the second half of last year working as a scarlet macaw researcher (I’m also a zoologist by training) studying a reintroduced population in a rural part of South-Western Costa Rica. What this gave me, more than any other opportunity so far was that same key factor – time. Quite quickly into the placement I became fascinated with these gorgeous birds, it’s pretty easy to see why.
Away from their clear beauty, I wanted to show these impressive birds flying through the rainforest, how their vivid colours stand out so bright against the green dominated background. But there was one key issue – light. Rainforests are notoriously difficult to photograph any form of action in because they are so dark. The canopy above absorbs the vast majority of the harsh tropical sunlight, leaving it surprisingly gloomy in the undergrowth. Combine that with the humidity that leaves everything with a thin layer of moisture on it (had to put my clothes to rest at the end of the placement, they had gone above and beyond the call of duty!) and you’ve got yourself a hostile environment for camera kit.
A common way to move around this is to use a slow shutter speed (generally your only option) and pan with your subject to capture that sense of movement. This works up to a point but I wanted to freeze the detail so I tried to implement a simple on-camera-flash approach… Again it was progress but not what I wanted to finish with.
Panning only
Flash on camera approach
NOTE – I was cautious with the birds in regards to using flash (as you should always be with wildlife), these were wild birds, but because of my research position I was in relatively close proximity to them. They were not disturbed by the flash while in flight, however I was aware that I needed to keep the number of flashes down as much as possible per encounter.
Here is a video that we produced midway through our placement. Showing the initial results and set up as well as some of the problems.
As the X-Series continues to develop, so does its autofocus capabilities. I’ve recently played with the X-Pro2 and wow, it is a definite improvement over the X-T1, which in itself is so impressive considering where the camera started and where it is now thanks to firmware updates. However, even the best cameras in the world would have really struggled with what I was attempting. Tracking a flying macaw under the rainforest canopy, flying at serious speed from tree to tree! This unfortunately meant that focus tracking was out of the window. But as time went on, I began to understand the routes the birds would fly, this allowed me to prefocus and develop my photo idea further.
Problem 2. Light source
With refocusing there still needs to be a degree of flexibility to keep the subject sharp. After all this is a wild animal and it isn’t on a scalextric track from tree to tree, they would often deviate by metres. To minimise these missed opportunities, I needed to use a relatively high F-Stop (F8-11) to allow me a good percentage of sharp images. However, high apertures need lots of light and to make it even harder I needed to use my flash(es) at 1/8 power output or faster. The reason for this is the relative time the flash fires for between full power aka 1/1 and quarter power (1/4), those flash duration are long enough for there to still be some motion blur as the birds are moving so quickly. 1/8 power freezes the birds in flight ensuring sharp details can be seen. HOWEVER, that is all well and good but when using F8/11, 1/8 flash power output and while trying to just about overpower ambient light, you need more than one regular flashgun to make this happen!
This was a key part of the project, it was initially all about finding a balance between the ambient light and the flash so I could still capture some of the surroundings, making it less of a studio shoot. To make this a reality I just dropped the shutter speed from the max sync speed of 1/180 to between 1/60-1/30. The flash would fire and freeze the details of the macaw but the slower shutter speed would create some motion blur and allow enough light from the background to reach the sensor to register the lush green environment.
Problem 3. Focal Length
I really like using a wider focal length with the macaws, however as the previous image illuminates, it often includes part of the canopy in frame. Light which penetrates the canopy shines down creating these blown out highlight trails. Sometimes these work quite nicely, but often they are difficult to make work, especially if the birds fly in front of a canopy gap, then you get these weird looking highlights cutting through the flapping wings!
Problem 4. Single Shot Flash
Fujifilm launched the update for the X-T1, allowing flashes to be fired in continuous shooting mode the week I left Costa Rica! Unfortunate for me, but it made for an interesting process, certainly a character building one. With ALL the other factors that had to be dealt with, I also only had one chance to take a shot per flyby! As you can imagine this got pretty darn infuriating at times. There were many times where I clicked at the wrong time and missed part of a wing, or got the wings up when I wanted them down etc.
The wings are usually the problem, but the long tail feathers can cause problems too! It is about finding the balance between the subject being too small in the frame and being able to fit it all in!
Steadily making progress…
Quite a strong light on the face that cast a shadow on the wing.
A softer light but less detail in the wings.
Better detail but just snagged the wing!
Then I raised the shutter speed to try and freeze the bird against a darker background. The reason why it is darker is because little of the flash light is aimed at the background (as multiple flashes were involved, all pointing toward the bird from different directions) and the shutter speed was now was 1/180 (max flash sync for X-T1) so it was 3/4 times faster than previous images.
Focusing on freezing the macaw.
Quite a striking, but studio like result.
I like the balance of blur and sharpness in this one.
Zoomed in to get more of an impact image.
All in all this process went on for three/four months. It was a very interesting exercise, and laying the photos out like this you can see how the project steadily developed. Often with projects like this it is all about problem solving, from fixing kit in the middle of nowhere to getting around problems out of your control, such as the flash-camera interaction. Though incredibly frustrating at times, it was a brilliant experience and yielded some good results by the end.
Final image
You may not agree but I like the balance in this image. the bird is clear and crisp while the background is still distinguishable.
Here is a 2 minute something video visually summarising my project and its issues.
Hopefully what you will take from this is that if you have an idea, don’t give up at the first hurdle, break it down bit by bit and steadily you can make progress.
What projects are you working on with your X-Series? Why not let Fujifilm UK know, the community is teeming with talent, ideas and people willing to lend a hand – lets bounce ideas off each other.
A little about Ben
Ben is an environmental photojournalist, zoologist and Fujifilm X-Photographer. His passion is showing the beauty and fragility of the natural world. Find more of his work at:
There are many times that using a wide angle or telephoto lens just won’t get the results you want. They’re either too wide or too tight but you know in your heart that your viewpoint is correct.
It’s frustrating and causes many photographers to give up and go home without a shot they’re happy with. However you should persevere and with the introduction of photo-stitching software built into Lightroom and Photoshop you should try the third option which is to shoot a stitched panorama.
By stitching together individual images you can render your scene in greater detail and make extremely large prints without the image breaking up.
For those who want a bit of background early examples of a panorama include the Bayeux Tapestry, at nearly 70 meters in length it’ll take some stitching to get a photograph that will rival that!
I’ve shot panoramas for a number of years and find the discipline fascinating. The normal guidelines of composition do apply, but they also don’t – you have much more area for the viewer to explore, more details being captured and there can be cameo roles for people in the different areas of the image. These all come together to create a story or feeling that literally absorbs the viewer – well that’s the idea anyway!
To shoot your very own panoramic image:
Firstly, if you can – use a tripod
It’ll make stitching the images together far more straightforward. Make sure your tripod is level too – most come with a spirit level but luckily most of the Fuji X series have horizon levels built in. If you press the display/back button on the back of the camera a few times this normally brings it up on screen if it has one. To check that the camera and tripod are level, gently pan the camera from left to right and check the display to see if the level line is straight throughout the motion. When attaching the camera to the tripod – set it so that you are shooting a series of upright images (portrait orientation). You’d be forgiven for thinking that you should shoot three or four landscape images – although you can if you wish, but you will end up with a very strip like image. I have found the upright method to be far more rewarding.
Your focal length is generally a little longer than when shooting conventional landscape images.
For example, I recently shot a panorama in Paris using the XF50-140mm, to get the same result normally I’d have needed to use a XF10-24, but the detail in the bridge and the compression of perspective would have been lost.
In a perfect world you would use a panoramic tripod head and set the nodal point of the lens.
Basically this means the middle of the lens sits over the middle of the tripod – but with good stitching software you can get away without it being set, if you’re careful. The reason for this is that if you have the nodal point set correctly the perspective doesn’t alter as you rotate the camera, but when the lens is off-centre perspective from the lens to the subject distorts ever-so slightly.
Once you have chosen your composition and have panned the camera backwards and forwards a few times to check your image works, you must set your focus and exposure. Once set, do not alter them, otherwise you get very awkward tonal changes between the different images. The same applies to graduated filters – although you can adjust them slightly.
Finally you are ready to shoot!
Start on the left-hand side of your shot and take your first picture. Then turn the camera using a panning motion through about 15 degrees, or using the framing grid on the screen – move it round by 1/3 of the frame – this will give you enough overlap to avoid the distortion caused by turning your camera. Repeat this shooting process until you have completed your full composition.
Once have finished your series – shoot a blank frame so you know where the start and finish is.
You may need to fine tune your shot so always check the image on the back of the camera to make sure you’ve got every aspect of the shot you need.
When you get home the process is very simple.
Load your images into Adobe Lightroom – highlight the pictures that make up your panorama – take your cursor across the top menu bar to the heading ‘Photo’ then scroll down to ‘Photomerge’ and select ‘Panorama’. Lightroom will show you a rough render of the image then simply press OK and a few seconds later you’ll get the stunning panorama you planned.
Occasionally Lightroom doesn’t quite do the job, so if that happens – open the images in Photoshop, use your cursor to navigate through File – Automate – Photomerge – Panorama – the same process will happen only this time you will have a layered Photoshop document to work with.
It will take a little practice to create the perfect image but it’s great fun to try. For more inspiration look at the work of Horst Hamann or Nick Meers

 While visiting Louisiana, I headed out with my weather-resistant FUJIFILM X-Pro2. Within just a few yards I found leaves, flowers, insects, frogs, and my beloved pooch Emma. Admittedly, I wasn’t feeling very inspired in the beginning. At first glance, there was nothing particularly interesting about my environment. I walked out my door, down a paved road and stumbled upon a nondescript nature path. I had to force myself to slow down and peer into places I would otherwise have overlooked. By the end of the shoot, I was having a blast.
 I recommend keeping it simple and just grabbing your camera and one or two lenses (tripod optional).
 I chose my FUJINON XF56mmF1.2 R APD prime lens known for its sharpness, clarity and beautiful bokeh effects. The FUJINON lens lineup pairs perfectly with – and optimizes – the X Series camera system. This APD prime is the only lens I’ve ever used that ships with its own apodization filter (think ND filter) which creates smooth bokeh outlines and enhances the three dimensional feel of an image. To maximize the bokeh capabilities and create a macro-lens aesthetic, I opened the lens up all the way to f/1.2 and manually set the focus to its closest distance. Then I just explored and moved the camera in and out on various objects. When I found something I liked, I framed up an interesting composition and further refined the focal point.
 The other lens was the venerable XF50-140mmF2.8 R LM OIS WR which is one of the best lenses available today for image quality and stabilization. I find this lens to be excellent all around and I’ve always enjoyed shooting portraits in this focal range. Enter my beloved brindle boxer — Emma. She emerged in a bed of flowers and I instantly had a muse!
 I found close to a dozen pictures in under an hour while I was just meandering around. It really pays to take your time (and your camera) and absorb whichever features happen to be around you. You will see the beauty and details in everyday life. I guarantee you’ll find something interesting.

 We left LA for Oregon on a Tuesday afternoon, and after a brutal sleepless 16-hour road trip, we made it to our first destination – Abiqua Falls. Fortunately our car for the trip was a 4WD Jeep, and allowed us to take the mile long off-road path to the trailhead for the falls. With tattered sneakers accompanied by a light rainfall, I ventured through Oregon’s lush landscape for my first time. The abundance of massive trees and greenery were like nothing I had ever seen before. The hike down to the river was pretty intimidating, and required you to scale down a lengthy and steep hillside that was only accessible by a rope tied to an old tree at the top. I went first, and discovered that the last hundred meters of the slippery, muddy terrain had no support rope. After my first step I went down with no control, and slid for about a hundred feet, ruining my clothes and scratching up my hands in the process. Nevertheless, we all made it down eventually and hiked alongside the river to our destination. I had never seen Abiqua Falls, so when we turned the corner that revealed it’s jaw-dropping beauty I was in awe.
 Several hours of sleep, a warm shower, and a cup of coffee later we were on the road again… this time headed towards Washington. We got up before sunrise to capture first light from the Rowena Crest. The dynamic range on the X-T1 did Rowena justice by capturing all the tones and colors of the current season. After a brief session at Rowena, we drove straight to Olympic National Park. We encountered wildlife along the way, including a bear and bison. It was my first time seeing such large animals up close, and thanks to compact size of the X-T1 I was able to take it out of my pocket in time to capture the moment. Olympic National Park had otherworldly nature-filled roads whose cinematic foregrounds looked like something out of Planet of the Apes. With the help of the XF16mmF1.4 R WR lens, I was able to capture the detail of the nature before me.


 There are many times that using a wide angle or telephoto lens just won’t get the results you want. They’re either too wide or too tight but you know in your heart that your viewpoint is correct.
