

 In this tutorial I wanted to give you some of my favourite tips to get you started with landscape photography from the more obvious tips to some of the lesser known ones. I have not listed them in order of importance as I believe this is subjective, more so the order in which they came to mind.
Remember, you don’t have to apply any or all of these ideas to take a great landscape picture, but it may just help you on your way.
Shoot Raw
Although Fujifilm JPEGs are renowned for their quality, when shooting landscapes I strongly recommend that you shoot RAW. This is because more image ‘information’ is retained in the image than from a JPEG and this will allow more flexibility when correcting exposure, enhancing colours and boosting tones. RAW files can be processed & converted with the camera specific bundled software or you can use popular programs like Adobe Lightroom, Capture One etc.

Essential accessories you may have overlooked
When you’re going to be standing in the dark on a misty morning up to your kneecaps in mud there is nothing worse than not having the right gear to keep you warm and comfortable; after all, you may be out for a few hours in these conditions. Here are some accessories that you might have overlooked taking with you:
- Wellies – May be obvious for wearing in marshland environments but also extremely helpful on the beach (where you might normally associate wearing sandals)
- Headtorch – When going out to shoot a sunrise, finding the perfect location can be really hard if you cannot see where you are going. Make sure that it is a headtorch rather than standard torch to keep your hands free for more important things.
- Strong windproof umbrella – When shooting long exposures it is vital to keep the camera as still as possible. A tripod is a must-have accessory but I’d also recommend using an umbrella to keep strong winds from hitting the tripod & camera during these long exposures. As an obvious bonus it will also keep you dry, which is particularly important if you need to switch lens.
- Waterproof jacket with zip-lock pockets – Not just to keep you dry, but more importantly to keep useful camera accessories close to hand. Things like spare batteries, remote release cable, cleaning cloth etc. Whether dawn or dusk, when the sun rises or sets it happens very quickly and this is exactly when you want all accessories within easy reach.
A further tip is to keep as much gear in your car boot at all times. That way in your daily travels if you see a beautiful landscape, you can just jump out whatever the weather, walk cross-country across muddy terrain and have a much more enjoyable experience.

Think about composition even when you don’t have a camera with you!
Training your eye to ‘see‘ the best possible shot is probably the most important skill you could hone. The key point here is to imagine the frame of your camera whenever you see something beautiful. Think about all aspects of the shot; where would you stand to take the picture? Where would you position the tree/boat/sun in the frame? What lens would you choose and why? What aperture might you select to impact on the depth of field?
The more you ask yourself these questions, the quicker you answer them too. This means when you actually go to take a picture, you might just get it perfect first time round.
You should also check out my rule of thirds tutorial.

Try different perspectives
When you find a nice landscape location, try every conceivable angle you can think of until you get ‘that shot’ that brings a huge smile to your face. If that means getting down on your hands and knees, let it happen. After all, the picture you take could end up being your favourite of the day, month or even the year. And don’t be afraid to try an angle, look back at the image and think ‘That was no good’ because it is all about learning what works and what doesn’t.
Remember, the more you experiment, the more ‘mistakes‘ you make, the quicker you will find your own style and know what works for you. Here’s a shot I took that ruined my jeans and shoes, but to me, it was worth it!

Use ND grad filters
You may have heard the term ‘ND grad filter’ or ‘Graduated neutral density filter’ but not necessarily known what it means. Think of an ND grad filter as a pair of gradient sunglasses (the ones that go from dark to transparent) for your camera lens. Its job is to stop a specific amount of light from reaching the sensor of your camera – but why would you want to do this?
Well, when you look at a sunset with the human eye, you can see all the detail in the lights of the sky and shadows of land without any problem. Unfortunately, even the best cameras cannot do this as well as the human eye can. Therefore to try and get the best reproduction of what the eye can see the camera is going to need a little help.
This is where the ND grad filter comes in. By choosing the right strength ND grad filter and positioning it correctly in the frame, you can perfectly balance the exposure above and below the horizon to give a stunning image that is colourful, full of tonal detail and a much truer representation as to how you saw it with your own eyes.
Your next question may be which ones should I buy? Or how exactly do I use them? My recommendation is to read forums, ask other photographers and watch videos on YouTube to get a good understanding of the best practices to ensure great results.

Check the weather
Even within small regions the weather can vary quite a bit. You may find that location A is raining in the morning but location B is not. Use this information to your advantage, amend your itinerary to get the very best out of your day. There are lots of free weather apps for smartphones out there so have a look around to find one that suits you best.

Prepare an itinerary
When you go away on a specific landscape photography trip, take the time to plot out the locations you want to visit, what times you want to visit them and how long you will spend at each location. Although this sounds very regimented it will help to keep your trip on track. Of course, if you find one of the locations particularly beautiful stay there longer, enjoy the experience. Simply think of the itinerary as a check list or a guide to get the most out of your trip as possible.

Find the sweet spot for your lens
Getting the best out of your lens is important, especially in landscape images. Now if you are looking to get as much in focus as possible in your photo, simply set your lens to the smallest aperture available (which is the largest number) for example: f/16 or f/22. But if you are looking for the sweet spot of your lens (where it performs best in terms of clarity and sharpness), this is usually around 2-3 stops from the maximum aperture of the lens (which is the smallest number) for example: if you are using the XF14mmF2.8 lens then you expect to see the sweet spot at around f/8 as this is 3 stops from f/2.8.
Here are some other examples:
| Lens | Maximum Aperture | +1 stop | +2 stops | +3 stops |
| XF14mm | f/2.8 | f/4 | f/5.6 | f/8 |
| XF10-24mm | f/4 | f/5.6 | f/8 | f/11 |
| XF18-55mm | f/2.8* | f/4* | f/5.6* | f/8* |
* at 18mm
It doesn’t mean that you have to abide by this rule of thumb but it can help you find the best quality from your lens quickly. If you find some spare time, I would recommend setting the camera on a tripod, take the same picture on a few different apertures with the same lens and then look back at the results – find an aperture that gives you the perfect balance between depth of field, sharpness and image quality. Once you know what it is, use it as a starting point when out and about taking shots.

Is there a ‘right’ hour to shoot landscapes?
One of the first tips to help capture better landscape images is to shoot at the ‘right‘ time of day. The golden hour is widely considered as the ‘best‘ time of day to take a landscape image. It is the hour in which the sun is rising or setting. This is due to a number of reasons but the main ones being the rich warm colours in the sky and the long trailing shadows that are created.
Don’t think that the only time you can take great pictures is at golden hour however, so many stunning images have been created at all times of day. Just think of it as a good starting point.
Extra tip: The time just before a sunrise or after a sunset is a great opportunity to take pictures too. This is known as the Blue Hour, it is called this because the indirect sunlight creates a blue hue in the sky and can help produce some of the most beautifully natural subdued tones.

The Photographer’s Ephemeris (TPE)
This is one of the most useful tools in a landscape photographer’s bag of tricks. It is a third party application map-centric sun/moon calculator that shows how the light falls on the land. This allows you to know precisely where the sun is going to rise/set in a specific location way ahead of actually being there. It can come in handy when creating your itinerary as you can plot out the suns movements across a virtual map. The application is available on desktop, iOS and Android devices so it can be taken on-the-go as well.
Find out more here.

Use the Histogram
When shooting any image it is very important to maximise the amount of detail captured from the lowlights to the highlights. This is especially the case with landscapes due to the difference in the exposure between the land and sky. You can use your eye to judge whether an image is overexposed or not when it is very obvious, but I strongly recommend you use the camera’s histogram to tell the full story. It will allow you to make much smarter decisions when deciding the best exposure for the shot.
You may or may not know that when the highlight details in a scene are overexposed and burned out they are impossible to recover and get back regardless of how good you might be in post-editing. This could mean white blobs in the sky instead of detailed clouds or white mass areas in the sea instead of crashing waves etc.
So how do you avoid it? Well, shoot RAW (to maximise post production flexibility) and then look at your histogram. You want to aim to get the bulk of the histogram information to sit on the right hand side of the scale – this is known as exposing to the right. The most important part of this technique to ensure that the trace of the histogram does not peak right at the end of the right hand side as this would mean the highlights have been lost / burned out. An easy way to adjust this can be to use the Exposure Compensation dial / button found on the camera and decrease the exposure in 1/3EV at a time and then recheck the histogram until it looks perfect.

Don’t panic
Making mistakes is a natural part of learning any skilled craft. Accept that you are going to make mistakes along the way. You may take blurred shots, blow the highlights to kingdom come and delete your favourite image from the memory card by accident, but in the end, with practice, you will be a creative machine that can make beautiful images wherever you are, whatever time of day and with any camera & lens combination. Enjoy the journey and don’t panic, it will happen.

As with any tutorial there is always more that could be said, more tips that could be shared but the idea here is to give you a good starting point which you can grow from. Ask questions with other photographers, search tutorials online, share your images and ask for constructive criticism, look at work from inspirational landscape photographers and most importantly, enjoy photography.
Happy snapping!
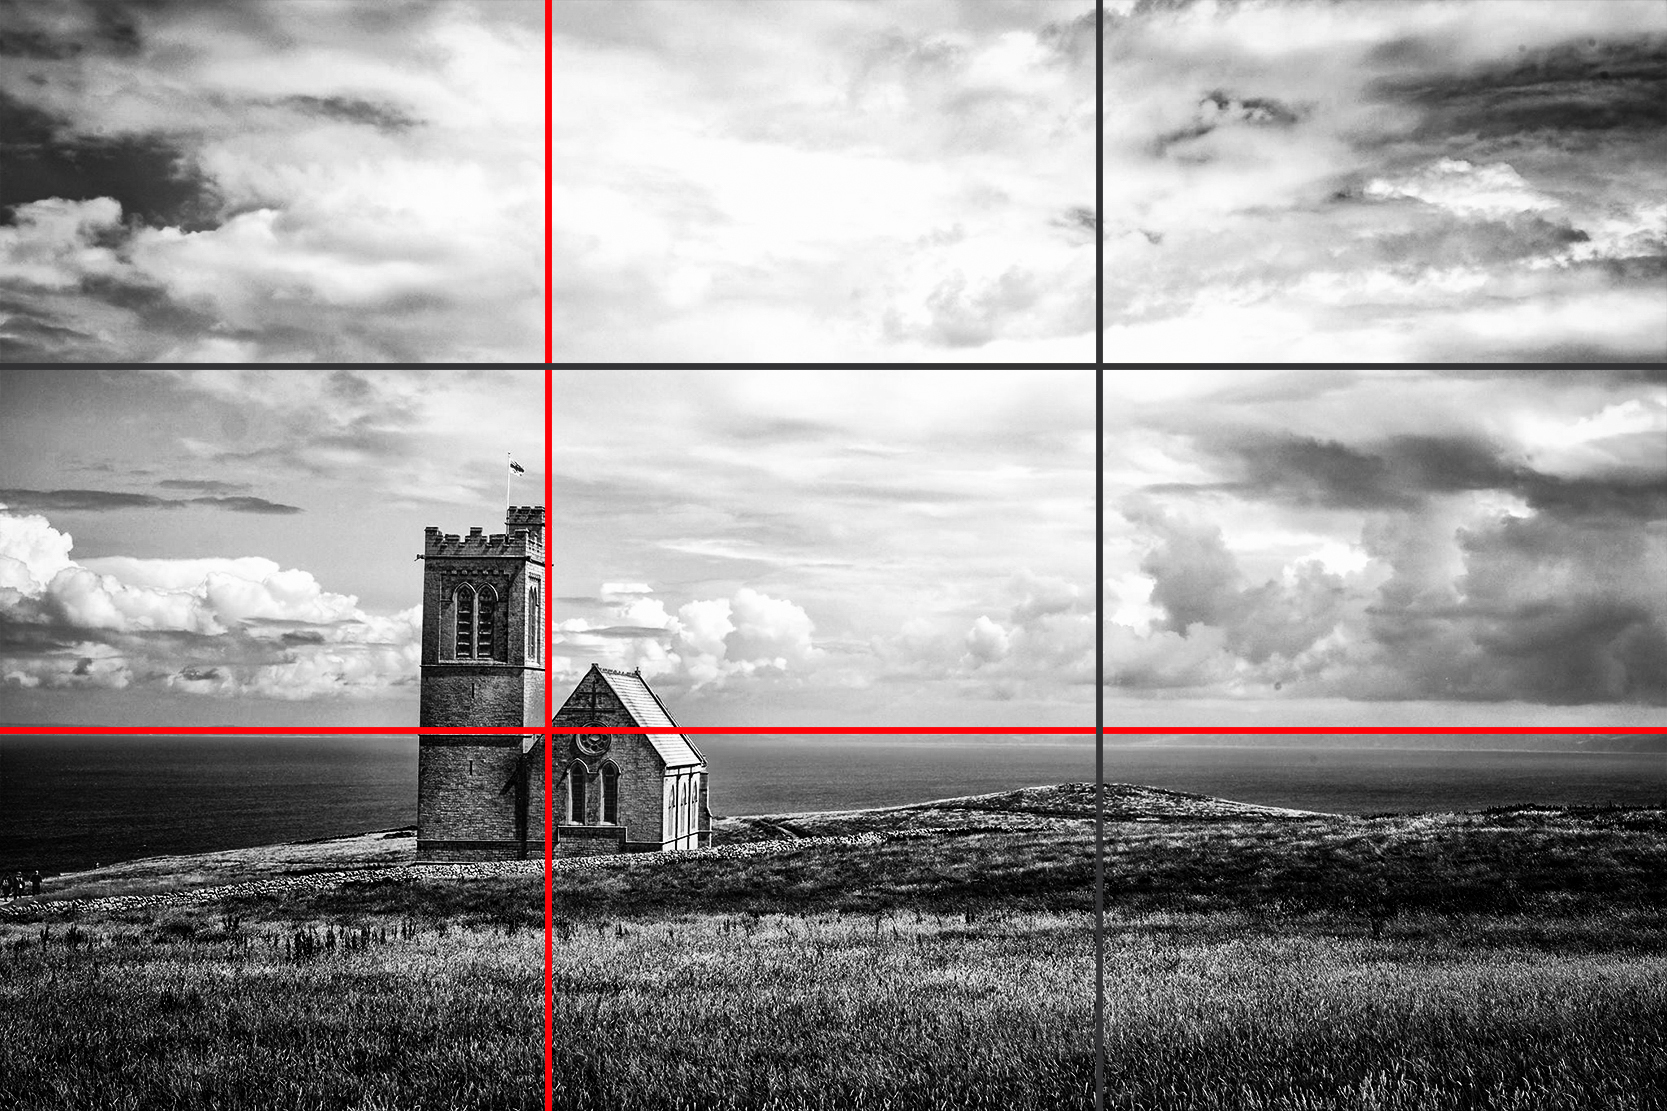


 You may also notice that not only the subject matter is placed on a third line but also the horizon line as well. The Rule of Thirds can be very handy at producing consistently good compositions, especially in landscape photography. Our recommendation is to place the horizon on one of the third lines – which one is up to you, but here’s a tip: If the sky is more interesting, let it fill two thirds of the frame and if the ground is more interesting, let that cover two thirds of the frame instead.
 So in this seascape image we have started to combine the elements discussed above; we have horizon placed on a third line, the seaweed sitting on the right third line and because the we wanted the foreground to be more interesting and prominent it takes up two thirds of the frame instead of the sky.


