Month: June 2015

Interview with Mr. Takashi Ueno from FUJIFILM Tokyo – “Why do FUJIFILM not make full frame D-SLRs?”

Excellent colour reproduction is the charm of the X series by FUJIFILM, a company with its
roots as a film manufacturer. With beautiful images and sophisticated design, the number of X series users are on the rise in recent years. You may wonder “how does the X series achieve such high image quality in APS-C format? Are they going change for full frame to achieve even higher image quality?”

Amazon Japan met with Optical Device & Electronic Imaging Products Manager Takashi Ueno to follow up a previous interview, and talked about the reason why the X series will not go for the full frame format.

Who is Ueno-san?

ueno-sanTakashi Ueno worked for the Professional Film Photography Division from 1996 to 2011 as a manager as well as a lecturer of workshops and galleries to promote the fun of shooting with film. He now works as a product planner for the X Series of digital cameras. He has been taking photographs since the age of 7 and is a certified photo master expert.

Chapter 1: “X series” – compact and lightweight cameras that excel in image quality

Amazon: It has been a year since the last interview, and X series fans have significantly increased. We can see that the Fujifilm X fanbase is expanding, and as a result, we’re starting to hear comments like:

“FUJIFILM is well regarded for its color and image quality, but why are the FUJIFILM cameras APS-C mirrorless instead of full frame DSLR?”

Generally speaking, when we hear the words “high image quality”, we tend to think of full frame D-SLRs, but why are the X series interchangeable cameras APS-C mirrorless?

Mr. Ueno: First of all, when the company started developing its own interchangeable cameras, there was nothing that we had to drag from the film days. For example, SLR manufacturers kept the same lens mount when they shifted from film to digital in order to make their already existing lenses compatible for both formats. FUJIFILM had already withdrawn from the 35mm film SLRs in the early 80s, so we were able to start everything from scratch. This was a huge advantage.

Amazon: Starting from scratch was a huge advantage. Why so?

Mr. Ueno: Building an interchangeable lens camera from scratch meant that we could choose any sensor size from full frame, APS-C, to Micro Four Thirds. We gave a lot of thought to this, and reached our conclusion that APS-C is the best format for the optimum balance of body size and image quality.

Amazon: Generally speaking, I think many people believe that the bigger sized full frame sensors capture more light and therefore can achieve higher image quality. But why did you choose APS-C?

Mr.Ueno: Yes, higher image quality can be achieved with full frame sensors, but in order to maximize the use of the sensor size, the lens will be very bulky and heavy.

As you know, the size of full frame sensor, 24x36mm is exactly the same as the size of 35mm format analog film. But how they each receive light onto the imaging surface is completely different.

x-mount

Firstly, the angle of light that film and imaging sensors can receive differ from each other. Film can receive light at the slanted angle of up to 45 degrees without any problem, but in case of the digital camera, the light needs to be as perpendicular to the sensor as possible. Slanted angle light causes mixed colors and therefore the real colors sometimes cannot be reproduced. In order to receive the light perpendicular to the sensor, it is important to make the rear glass element on each lens as big as possible to put the light beams parallel from the outlet of the light to the sensor. Finally, the back-focus distance should be shortened as much as possible to eliminate the degradation in image quality.

In case of SLRs, there is also the mirror box, it is very difficult to design an ideal lens especially for wide-angle and standard focal length lens. It is physically impossible to shorten the back-focus distance. As a result, many of the high image quality lenses for SLR bodies are designed with extended forefront and are of the larger diameter. You can see that by looking at the SLRs lens lineup.

Amazon: Yes, I see. The lenses are bigger for brighter and high performance lenses. It also is a burden for users to use larger sensors and lenses.

Mr. Ueno: Yes, if you attach the large and heavy high performance lens to the full frame DSLR, then you will certainly get high image quality. The combination will maximize the potential of the full frame, but if you have to carry the bulky lens everywhere to achieve the high image quality, then this is not what FUJIFILM is aiming for.

With the X series, we wanted to create a camera system, like the 35mm format in the analog era, that combined the elements of high enough image quality, portability and photo expression, and that are best suited in the field of snap shooting and portraiture, or reportage and documentary for the professionals.

We aimed for the system with the optimum balance of high image quality and compact lightweight body  that professionals can use. With that idea in mind, we came to the conclusion that the APS-C mirrorless system is the way to go as opposed to full frame D-SLR.

Amazon: OK, Smaller and lightweight body can be achieved with APS-C but how about the “High image quality” part?

Mr. Ueno: The technology of the FUJINON lens has a lot to do with that. With the power of FUJINON lens, we can achieve the full frame image quality with the APS-C sensor. We have the technology at the FUJIFILM. FUJINON lenses are widely known within the industry for their TV and Cine lenses and they are even used for satellites. They were already well regarded as high quality lenses in different fields. APS-C is certainly smaller than full frame. We learned that the disadvantage can be recovered with the lens performance through various simulations.

Amazon: The technology of FUJINON lens is that great.

Mr. Ueno: Here is an example. It is generally believed that the lens performs at its best with 1 to 2 stop down from the maximum aperture. We tried to break the norm. Because if there is such belief, then the lens is very unlikely to perform at its best from corner to corner with the aperture wide open. But if we can break the norm, then we will achieve bokeh and sharpness that is equivalent to that of a full frame with 1 to 2 stop down. We can achieve the image quality that is equivalent to that of full frame.

Which is better? An f/1.4 lens on a full frame sensor and then used 1 stop down to prevent degradation in the image quality in the corner or an f/1.4 lens on an APS-C that see no degration in the image quality at its maximum aperture value?

You cannot really see the difference in bokeh between the APS-C wide open and the full frame one stop down. However, if the APS-C is wide open, then the shutter speed will be twice as fast as the full frame resulting in be less blur caused by hand shake or subject movement. If the picture becomes blurry, then the high image quality becomes meaningless.

Amazon: I see. The Image quality of large and heavy “Full frame body + High performance lens” can be achieved with “Small APS-C body + High performance lens”. This is very unique to FUJIFILM.

Mr. Ueno: Yes, we can only do this with the FUJINON technology. Some may think that the system stands at halfway between of everything, but we believe it has the best balance of everything. And this is why we chose the APS-C format. Of course, this is not only achieved solely by the FUJINON technology. We cared about the lens, so we had to consider about the sensor and processor carefully, too.

Chapter 2 :Expanding the lens lineup that meets the performance of “X-Trans sensor”

Amazon: FUJIFILM also looked into the sensor.

x-trans

Mr. Ueno: Yes. The first X100 used the bayer patterned sensor. Later, when we were in the process of creating a new interchangeable lens camera, we planned on using the “16M X-Trans” sensor that had a unique color filter array, as opposed to the 12M bayer sensor that the original X100 had. Through various simulation, we learned that the 16M X-Trans sensor had the potential to rival the resolution of a 24M bayer sensor.

The combination of FUJIFILM color reproduction, the X-Trans sensor, and the FUJINON lens technology, allowed us to create an interchangeable lens camera that could rival the image quality of full frame D-SLR in the APS-C format.

Amazon: We can see the advanced technological level of FUJIFILM not only by the lens, but also by learning the process of developing its own sensor. How do the X-Trans sensor and lens performance relate to each other?

Mr. Ueno: If we make a cheap low performing lens, then the degradation in image quality is more apparent for the X-Trans sensor than a typical sensor. X-Trans sensor requires high performance lens.

When we made our first kit lens with the X-E1, the image quality that this lens created was completely different from the other ordinary kit lens.

x-e1
Fujifilm X-E1 with XF18-55mm “kit” lens

Amazon: X-E1 kit lens – you mean the first zoom lens of the XF lens XF18-55mm?

Mr. Ueno: Yes. The maximum aperture of XF18-55mm is F2.8 at wide and F4 at telephoto. A typical kit lens is F3.5-5.6, but that wouldn’t create enough bokeh nor photographic expression for an APS-C sized sensor.

We made it f/2.8 to achieve both brightness and high image quality. Consequently the cost would be higher, so there was the problem with the price even though we wanted a wider range of people to use our product. This is why we then created the XC lens “XC16-50mm” and “XC50-230mm” as the beginners’ model. The only difference is the material used for the lens exterior. The inside is the same optical design and technology as the XF lens.

Amazon: I see. The XF lens lineup is further expanding now, especially for the zoom lenses.

Mr. Ueno: Yes. During the first three years since our launch of the first interchangeable lens camera in 2012, we mainly targeted the first year on the short prime lenses that are best matched with X-Pro1 which had optical viewfinder. The second year, we focused on the practical lenses that allowed users to expand the focal range. And the third year we developed high spec lenses for the professionals and enthusiasts.
The result are the XF50-140mmF2.8mm in September 2014 and XF16-55mmF2.8mm in February 2015. I think we have a lineup now that covers a complete typical shooting range.

XT1_front_left_50-140mm_VerticalGrip
XF50-140mm mounted to a Fujifilm X-T1 with Optional Vertical Battery Grip

Amazon: The XF50-140mmF2.8mm and XF16-55mmF2.8mm are your “red badge” series?

Mr. Ueno: Yes, the red badge series are the zoom lenses intended for the professionals.

Amazon: Where does the XF18-135mmF3.5-5.6 R lie? It is a kit lens for the X-T1 that many professionals use.

Mr. Ueno: The versatility is the first priority for XF18-135mmF3.5-5.6 R. We understand that the image quality is not quite the same as the f/2.8 constants, but still good enough so that the user doesn’t need to change the lens while shooting. We design each XF lens to have highest image quality possible for its presumed usage and purpose.

Another example of this is the minimum working distance of 70cm on the XF56mmF1.2, We sometimes hear customers demand a shorter working distance such as 40cm. As you know, the image quality in the peripheral parts are reduced when the distance gets shorter. The XF56mmF1.2 is a lens designed for portrait and snap shooting, so we believed that  shortest distance of 70cm would be enough.

If the minimum working distance had been 40cm with the compromise on the image quality on the peripheral parts, then we had to extend the focus lens movable range. And as a result, the lens will be bigger and autofocus speed will be slower.

Our priority was to create a lens that has high resolution from corner to corner and that has adequately fast autofocus, so the minimum working distance became 70cm, which is enough for portrait photography – its presumed purpose.

If you want to get closer, then we have the XF60mmF2.4 Macro, which is another great lens. We make it so that beautiful description of each subject will be delivered to the maximum potential.

This is the fundamental idea of X series.

Amazon: I understand well now. Which lens do you recommend for those that want to get into using the
X series?

Mr. Ueno: I would recommend the XF18-55mmF2.8-4 as the gateway to the X series. As I said earlier, although the lens is a kit lens for starting out, it doesn’t mean that the image quality has been compromised. You can actually experience the high image quality of the XF lens and it covers the standard shooting range. We would recommend to use the lens, and then search for other lenses that satisfies your need 100%.

The start is easy, and the goal is endless. This is the charm of the XF lens.


This interview was originally conducted in Japanese and published on Amazon Japan’s website. It was translated into English by Fujifilm Japan for use here.

What you’ve all been waiting for – X-T1 firmware version 4.00 is now available!

X-T1 Part IV – Rise of the tracking autofocus

Well it finally arrived. The firmware update we’ve all been looking forward to for the Fujifilm X-T1 digital camera.

So what does it actually change?

Glad you asked! Here’s a video by Billy from The Fuji Guys where he demonstrates all of the new improvements found in the update.

The new Firmware Update features an advanced autofocus system for incredible performance when shooting moving subjects and exciting action scenes. Users will also experience improved auto focus accuracy for still images and video, Eye Detection, enhanced shutter speed dial operation (1/3 stop increments!), Exposure Compensation control in Manual mode (using Auto-ISO), and finer framing grid lines for enhanced visibility and image composition.

But what does this mean in REAL terms?

Another great question. Thanks for keeping up. Well I’ve been using it myself for a while and really like it. I could chew your ear off about what I think about it but I’m not an actual working professional photographer, so I’m not going to see it in the same way as you might. Coupled with the fact that I work for Fujifilm, you’d expect me to simply tell you that it’s great.

So instead, here’s a selection of working professional photographers that have tried the Firmware in their own shooting environments and posted their respective findings.

Damien Lovegrove

damien2bDamien is a professional portrait photographer from the UK. He left his role as a cameraman and lighting director at the BBC back in 1998 after 14 successful years to create the renowned Lovegrove Weddings partnership with his wife Julie. Together they shot over 400 top weddings for discerning clients worldwide. In 2008 Damien turned his hand to shooting beauty and portraiture and has since amassed a dedicated following for his distinctive art. Damien now divides his time between teaching the next generation of photographers and photographing personal projects.

After a day shooting with with one X-T1 running 3.11, and one running 4.00, here are his findings and an extensive review of the new X-T1 firmware V4 including tips on some real gems of features that have not made the headlines.

© Damien Lovegrove
© Damien Lovegrove

quote-icon-e1433520302291

When I was asked for my opinions on version 4 of the X-T1 firmware I was a little scared and excited in equal measure. Excited because the opportunity to shoot in a more dynamic style is quite appealing. Scary because relearning shooting procedures is never easy. quote-icon2-e1433520259777I’ve never been one to shy away from innovation and I’m certainly not a luddite when it comes to tech so I jumped at the chance. Here are my findings.

Click here to read Damien’s review

———

Jeff Carter

JCarter_Portrait-200x300British motorsport photographer Jeff Carter has been using Fujifilm cameras for his work for over 20 years, going right back to the wonderfully lightweight and versatile GA645 medium format film cameras, but it was the X100 that he bought in 2012 that changed the way he worked. Here was a small, discreet camera that allowed him to take the images he needed for his work in and around the paddock.

He took an X-T1 with FW4 to the recent Le Mans 24 Hours event and here is his account.

2.Pic2_20150610LeMansFP_XT1F-1682
© Jeff Carter

quote-icon-e1433520302291

Firmware 4.0 has transformed the X-T1. I recently tested the new autofocus at the 24 Hours of Le Mans, the world’s greatest endurance race and the biggest challenge for man and machine. quote-icon2-e1433520259777This proved to be the perfect test ground for the X-T1’s new AF system and it wasn’t found wanting.

Click here to read Jeff’s review

———

Eivind Røhne

CNRDZYkw
Eivind is a professional photographer from Norway. He’s been a commercial and editorial photographer since the mid ninetees. He loves people so mostly shoots fashion, lifestyle, commercial and editorial portraits, people at work etc. and he also love lines, shapes and man-made structures, so he likes to shoot industrial subjects, architecture and interiors for commercial and editorial use.

quote-icon-e1433520302291

This time around the Fujifilm firmware buzz really hit the roof, with claims of an all new autofocus system that would practically give existing X-T1 owners a brand new camera. Bold claims indeed. quote-icon2-e1433520259777Claims not only made by those saying they had gotten hold of rogue and secret beta versions of the firmware, but also claims made by Fujifilm themselves in their marketing teasers.

© Eivind Røhne
© Eivind Røhne

Click here to read Eivind’s review

———

If you already own an X-T1, I’m sure by the time you get to this point your camera will already have version 4 installed and ready to go. Hopefully you will find it as good as these guys did.

If you don’t already own an X-T1, hopefully these photographer’s reviews will be that final push to persuade you to take the plunge and try it for yourself. Hoping to welcome you to the Fuji family soon!

Tutorial: Understanding Depth of Field

w360_6415757_tutorialbannerfordotmailerWhat is “Depth of field”?

Simply put, Depth of Field refers to the area in front of your camera that is in focus.

If your camera is set to focus one metre from the lens, Depth of Field refers to the area in front of, and behind one metre from the camera where subjects are still sharp enough to be considered in focus.

Along with Exposure and Composition, Depth of Field is one of the most important aspects of photography.

How do you control it?

Less is more

The main way to affect the Depth of Field is by adjusting the value of the Aperture

The bigger you set the aperture size (smaller number), the smaller your depth of field will be. The smaller you set the aperture size (bigger number), the bigger the depth of field will be. I know that sounds confusing but hopefully this diagram will help to explain it.

The yellow area shows the area in front of and behind the focal plane (the point when the camera is focused) that is in focus. It’s just a guide with no actual scale.

dof

The Depth of Field is actually also affected by the focal length of the lens, and also the distance of the subject from the camera (which is why there is more in-focus area behind the subject than in front of it), however for the benefit of just getting you started, in this post I’ll only talk about the aperture value.

Aperture Priority mode

X30 (top) and X100S (bottom) set to Aperture Priority mode
X30 (top) and my well-lived X100S (bottom) set to Aperture Priority mode

The best way to get started with adjusting the Aperture value is to set your camera to Aperture Priority mode. In this mode, you can control the Aperture value and the camera will still adjust the shutter speed and ISO value in order to correctly expose the image.

If you have a camera with a “M / A / S / P” dial on the top, switch it to “A” (for Aperture). If your camera doesn’t have this dial, just change the value on the Aperture ring to anything other than “A” (which in this case stands for Automatic) and set your shutter dial to “A” (Automatic). Your camera is now in Aperture Priority.

How does it affect my images?

Less is more

Using the largest aperture possible (smallest number) allows you to isolate your subject within a shallow depth of field and effectively make the foreground and background far less prominent. These example pictures were shot at f/1.4 using an X-T1 with XF35mm lens. They show foreground and background areas out of focus, allowing you, the viewer, to focus on the subjects.

More is more

Using a smaller aperture (larger number) increases the depth of field and allows you to include more, or all of your image, clear and in focus.

In this image, I wanted to get the tree in the foreground in focus, but still include the background as a prominent part of my image. Using a very wide lens with the Aperture set to f/8.0 allowed me to take this.

Aperture Priority at a glance

1. Activate Aperture-Priority
2. Generally shoot “wide open” – the lowest value Aperture your lens can shoot at. This means that your images will all draw the viewer into the part that you want them to look at – the part in focus.
3. “Stop down” your aperture (increase the value number) to get more of the shot in focus – great for group shots or landscapes / cityscapes

Conclusion

The amount of light captured in a shot is governed by three aspects – Shutter Speed, ISO value and Aperture value. You generally want as fast a shutter speed as possible (unless you are trying to capture motion within your image). You always want the ISO to be as low as possible to maximise the image quality and reduce noise.

However, there is no “you always” rule for Aperture as it is the one thing that affects your final image more than the others. Your decision to include all, or just a certain part of the image within the in-focus area is where you add your own creative touch to your image and direct the viewer’s eyes to the part of the image you want them to look at.

Desert Road Trip – California and Nevada

by Ian Boys

I’m a people photographer normally – portraits, the odd wedding and so on. But on this trip I decided I’d give landscape photography my first serious attempt ever, after 25 years of shooting. Of course, I’d taken landscapes before when I happened to come across something that looked good but this was different: I’d make sure I got to the right place at the right time for the best light even if it meant sleeping (or failing to sleep!) in the car.

Before I went I researched my route using Flickr and Google maps. The latter was especially helpful not just for seeing if a mountain would be lit at dawn or dusk but also to see what other images had been taken nearby. This pointed me towards quite a few fascinating sights that I would never have come across otherwise. In the very bottom right hand corner of a Google maps screen is a double up arrow that reveals scenes you may not otherwise have considered.

A08

Dear reader – I even bought a tripod. Many of you will wonder what the big deal is but it went so against my usual style of shooting that it felt like a jet pilot shopping for a submarine. But as it turned out it proved invaluable.

One last act of preparation – I looked at the absolutely stellar landscape work shown on the fredmiranda.com landscape forum and learned about things like focus stacking and night photography, things I vaguely knew about only in theory. One night before I left I went out and practised the techniques, with terrible results. But that’s how I learn.

Why the Desert?

In 1993 I worked in Somalia during the war there and travelled and lived in the northern desert communities. I fell in love with the open spaces, the peace of the evenings and the huge skies. Since then I’ve visited other deserts, notably on the India-Pakistan border and Arizona. I like the open road, the small communities and the sense that in the desert everyone can just be themselves. It is the polar opposite to the metropolitan posing of modern cities. In England I live in a small village on the doorstep of the Peak District National Park. Manchester is very close but I rarely visit.

I wanted to shoot the road, the space, the ghost towns, the mountains and the night skies, with a detour to Yosemite. There are so many fantastic wilderness parks on the Nevada/California border that going to LA or San Francisco was never an option. One tip though – when they say don’t walk in parts of Death Valley after 10 am they mean it! I once walked out at night and got back to the car at 0845 and it was already so hot. Those pictures of graves aren’t put there for your amusement.

A05

Kit List

For the last several years I have travelled only with a Fujifilm x100 series camera – Hong Kong, New York, Volgograd, Sri Lanka and elsewhere. The x100 series are superb, not only because of the results but also because of their size and weight. But this time I’d need a bit more choice in lenses.

I decided to take the X-T1 and the 14, 23 and 56mm lenses. These are widely recognised as the best primes available (although the new 16 may have usurped the 14, I don’t know for sure yet). The 23mm would be my standard landscape lens, the 56mm would give me the extra reach one sometimes needs to isolate part of the scene and the 14mm would be perfect for night sky photography as it allows a 25 second exposure under the “600 rule” that governs whether stars are rendered as points or streaks.

The 18-55mm was under consideration but although it’s good, these other lenses are fantastic. The difference does really show.

I also took my new Manfrotto 055 tripod, 4 batteries and a remote cable release as well as a charger that allowed the batteries to be recharged while driving. Definitely a bonus for this kind of trip. I also took a big LED video light that allowed me to get set up in the moonless desert night and sometimes to light paint foreground rocks. Backlit dials and controls would be nice but are probably impractical in a small camera.

Technical Notes

Although I shot everything in JPG+RAW, all the final images except the night shots were actually from the in camera JPG’s. I used the Astia setting for all of them – it helped keep the set coherent and provides great colours without the overblown look that Velvia brings. In particular Astia renders skies very well, better (to my taste at least) than any of the other settings.

A15

In general, I shot in Aperture Priority and used the Exposure Compensation Dial to give me the look I wanted. For some shots, especially those shot in the evening or at night I used manual exposure. One morning I rode the shutter dial all the way from 2 minutes to ¼ second as the sun rose over a freezing mountain lake. I was inside an aluminium shelter bag loving every minute of it as the light changed. The shots were terrible, as you’d expect from someone who has never done that kind of shot before. As I say, I’m not a landscape photographer but I’m so glad I saw it.

Some things did work better than expected though. Focus stacking involves sticking your camera on a tripod (weird!) and gradually changing focus so that over the course of a dozen shots or so you have focussed on all parts of the shot. You then combine them automatically (or manually, for the masochists) in Photoshop. The 14mm is absolutely perfect for this as the manual focus “pull clutch” allows you to gradually work the focus through the scene at an optimum aperture for sharpness of f5.6. In combination with the tilt screen and focus peaking (Red High for me) of the X-T1 it really couldn’t be easier, certainly much easier than with the optical viewfinder of a standard DSLR. Because it was a new technique for me, I also took a “safety shot” at f11 in case the intricacies of the procedure were beyond me but actually it is simple and the results were very much better than with the single high depth of field shot. It doesn’t matter how many times you read about it, doing it in the field is the best way to learn it. Here is a focus-stacked shot from Death Valley:

A06

Another technique that worked well was ultra high resolution patchwork shooting with the 56mm, where I’d take perhaps 20 shots of a scene in rows and columns and stitch them together afterwards. I’m not really sure what I’d need a 200 megapixel file for but it’s nice to know it works really well and that you can zoom in one the tiniest detail from miles away. One day I’m sure I’ll find a use for it and now that I’ve done it, it’s a technique in my arsenal. Sometimes though it was more practical to use the sweep panorama feature. In this particular shot I tried both techniques (a 4 shot manual blend and the in-camera panorama) and the in camera stitch was smoother, although lower resolution. At 6400 pixels across, it still has plenty enough for me.

A13

Night photography was fantastic in the desert: there are few lights to begin with and in Death Valley those that exist must be shielded from the sky. This was my first ever attempt at a Milky Way shot (thank you Youtube!) and as laughable as it might be to the more experienced night shooters, I’m rather pleased with it.

A02

Notes on individual shots

This shot was actually taken on Aperture Priority from the driver’s seat with -2 stops exposure compensation dialled in. I was using the 23mm at iso 1600. The extraordinary EVF of the X-T1 let me ensure that there was still some light visible on the ground while at the same time allowing me to make sure the highlights weren’t blowing out. The high dynamic range of the X-T1 kept it all together.

A09

This is a stitch of two horizontal shots taken at Mono Lake. There’s not a stack more to say about it except that a single 14mm shot would have looked quite different. Modern tools make this kind of stitching quite easy, even for a landscape novice and the methods are a simple search away.

A26

This was a ten second shot of my hire car. I had stopped for a sunset but frankly I’ve seen better. I did like the way the car looked though and with the interior light on and a long enough exposure to lighten the sky and ensure passing traffic left pleasing trails and illumination I think the shot works. It was also shot with my 56mm lens, perhaps an odd choice but something I’ll bear in mind to try again next time. I love that lens.

A19

Here’s a very different kind of car shot, a quick snapshot as I crossed the street. This old Mustang matched the sky and worked well with the yellow lines. It is (clearly) a quick grab shot – I was on my way to get a burger after several hours shooting one searingly hot morning – but it is a testament to how quickly the X-T1 will react if necessary. It starts up quickly, focuses quickly and fires without shutter lag. That’s what I want in a camera.

A24

OK, two last shots before I’m told to knock it off! Nevada’s an odd place. But I’d never have found either of these without doing some research before I went.

A20

A27

So in summary – every camera is a compromise. But the X-T1 offers high quality, superb lenses, light weight and bulk, accurate focus, exposure and white balance, a tilting LCD that is way more useful than I thought and a very high chance of getting the right photo on the first shot thanks to the excellent EVF with its exposure preview, focus peaking, colour rendition and other features. I use it for all my more serious work, together with the x100T. But the X-Pro 1 still has a piece of my heart.

You can see more of Ian’s images on his Flickr page here.

Tutorial: Using Film Simulation modes

Vibrant reproduction ideal for landscape and nature

w360_6415757_tutorialbannerfordotmailerFujifilm knows film. The clue is in the name. And they’ve spent a lot of time and effort bringing classic film traits to life in the current range of digital cameras.
Each Film Simulation mode* has unique properties to help you express your creativity without the need for time-consuming post-production. Varying degrees of Saturation and Tonality are composed with just the right balance to bring each Film Simulation mode to life.

Film Simulation ModesThe camera’s Electronic Viewfinder can show the effects of the selected Film Simulation mode before the shot is taken, and if you shoot RAW, the in-camera RAW processing function allows any of the Film Simulations to be applied post-capture, broadening your shooting options.

Which Film Simulation mode is best for your shot?

I cannot tell you this, but I can recommend certain Film Simulation types that lend themselves to particular photography subjects. However, just treat this like an initial guide and explore for yourself to find your own style.


Portraits

I would recommend Astia or Pro Neg. Std. Astia’s soft tones are perfect for capturing beautiful skin tones. Pro Neg Std. takes the look slightly further by also lowering the colour saturation.

Click on any of the images for a larger view.


Street photography

I recommend Classic Chrome or Monochrome. Photography is often called the “Art of omission”. Classic Chrome and Monochrome settings omit the element of colour in order emphasise the story you want to tell.


Landscapes / Seascapes / Cityscapes

I recommend Velvia. At the opposite end of the scale from Classic Chrome, Velvia uses colour as the main element. It adds more depth and the colours become more vibrant. There are certain emotions that only image colour can deliver and this is where Velvia comes in.


Image comparison

The images below were all created using the X-T1’s in-built RAW file converter and are all JPGs straight out of the camera.

Colour

Mono


Conclusion

All of the Film Simulation profiles have been developed (pun intended) by people with years of experience working with film to allow you to really alter the feel of the image without the need for lots of time-consuming post processing. Try it yourself and let us know how you get on in the comments below.

Bonus Tip!

If you’ve got a big enough memory card, set your camera to save “RAW+JPG” and then use the in-camera RAW File Converter to convert the same image into different Film Simulation modes after the shot has been taken.

* The number of Film Simulation modes available on your camera will vary.

Tutorial: Rule of thirds

w360_6415757_tutorialbannerfordotmailerOne of the most well known and widely used composition techniques is the ‘Rule of Thirds‘. Originally it was used as a guide to help landscape artists in the mid-19th century, but it was quickly discovered as a handy tool for photographers as well.

Why use the ‘Rule of Thirds’?

The idea behind the Rule of Thirds is to stop the photographer putting the subject in the centre of the frame. By doing this it allows the viewer more opportunity to explore the image as a whole rather than be fixed on the central point. For this rule to apply, you simply need to imagine that your frame is divided into nine equal sections with lines crossing the horizontal and vertical areas of the image. Or to make things easier still, go to the FRAMING GUIDELINE option found on your Fujifilm camera and turn the GRID 9 option on.

It is where these lines meet that is important, you should roughly aim to place your subject matter on or near these lines. In this particular example the tree has been placed directly on one of the third lines.

rule of thirds with guides red

Which side?

You may also question where to place the subject in the frame. The left third or the right third of the image?

The right third of the frame is generally considered a better, safer placement of the subject matter (although this is subjective) due to the way a viewer ‘reads’ an image. Just like with books where we read left to right, we approach viewing an image in a similar manner. This means that when a viewer spots the subject of interest, they may stop exploring the rest of the image. Here is the same image simply flipped horizontally to give an idea of this effect.

Knowing the way a viewer ‘reads’ an image it can help you make creative decisions; by placing the subject on the left hand side you can create deliberate tension within your image.

rule of thirds with guides 3-2

Vertical AND horizontal

rule of thirds with guides 2
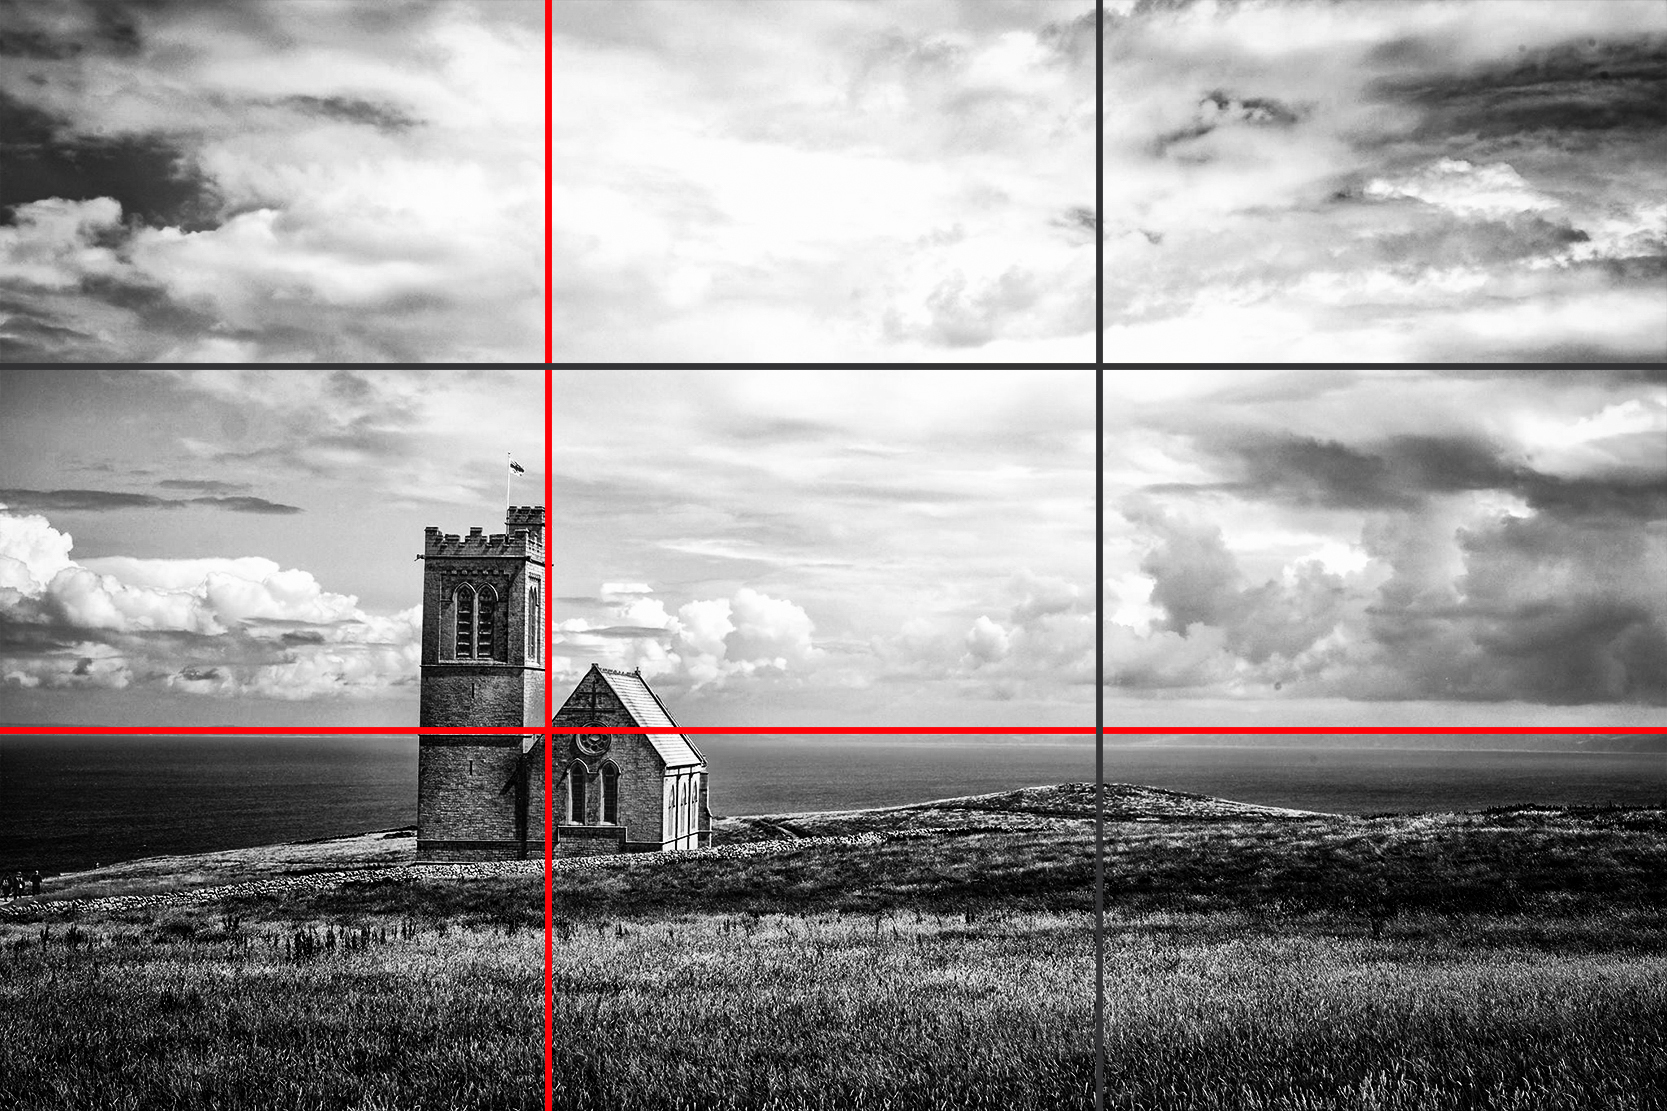
You may also notice that not only the subject matter is placed on a third line but also the horizon line as well. The Rule of Thirds can be very handy at producing consistently good compositions, especially in landscape photography. Our recommendation is to place the horizon on one of the third lines – which one is up to you, but here’s a tip: If the sky is more interesting, let it fill two thirds of the frame and if the ground is more interesting, let that cover two thirds of the frame instead.

10604585_10154697029435534_3613999098326903113_o

2 thirds foregroundSo in this seascape image we have started to combine the elements discussed above; we have horizon placed on a third line, the seaweed sitting on the right third line and because the we wanted the foreground to be more interesting and prominent it takes up two thirds of the frame instead of the sky.


And it’s not all about landscapes either!

This rule can be applied to pretty much any type of photography, here are some examples of how it can be applied to portraiture and even action.


Keep it in mind

Keep these composition ideas in mind when looking at inspirational images – can you see them being applied?
Think consciously about your composition – it may feel unnatural the first time you try it out, but in no time at all you will be getting great results.

Before long, the Rule of Thirds will become part of your photographic toolkit – a solid starting point to let you explore for yourself and find your own style.

Until then, happy snapping! 🙂