Great question, glad you asked! There are so many ways to take better pictures, but I would say the easiest way to improve is to read tutorials, watch tutorials and try all the techniques you see to develop your skills. Think of every tutorial as a new recipe that you can add to a larger collection, then when you need a certain flavour of image, you just choose the relevant recipe. It not only means you will feel more confident when shooting, but you’ll also start producing consistently good, consistently your-style images, which is very important.
And don’t worry if you don’t quite get a technique straight away, because you will, and when you do, embrace it. Use it over and over until it becomes part of your very own photography recipe book.
So with this in mind, I want to introduce you to a new recipe to add to that book. This is a simple mnemonic that I want you to memorise, and then try out as soon as you can.
S: Search – E: Evaluate – E:Emphasise
S : Search
Being a budding photographer, I can assume that you are always looking for an interesting subject to take pictures of and this is what this step is all about. Search for the perfect photo any time you have a camera handy ( which of course, you always do 😉 ) because an interesting shot can find its way to you very quickly in almost all circumstances. Whether you are doing street photography and suddenly a flash mob arrives, or maybe it’s some landscape photography and you notice a small glint of the sun peeking through some trees. Be mindful of these possibilities and be ready.
Now, here’s the important part – when you find an interesting subject, don’t just shoot a picture of it and move on. This is a habit of many photographers, and it doesn’t mean that they will take bad pictures, on the contrary, they could be good photos. But, to take great photos, consistently, look to the next step..
E: Evaluate
So you have found something to take a picture of? That’s great! Now ask yourself this very simple question:
Why do I want to take a picture of it?
Think about what makes this subject special? Is it the colour of the ladies hair? Is it the shape formed from the shadow of that building? Maybe it’s the emotion that you want to capture? Or could it be the sharp stylish lines in the car? If you cannot answer this question, it probably isn’t worth taking a photograph. But, if you can answer it, take that knowledge to the next step.
E: Emphasise
So now you have a potential shot in mind, and very importantly, you know what makes it interesting. So this last step is to emphasise that point. Here are some ideas and examples to this way of thinking:
The red haired girl
Let’s say you’re taking an image of a red haired girl, if the reason you chose her as your subject is because of her beautiful hair colour, don’t shoot her in black and white – consider complimentary colours in the background (greens usually work well) to help her stand out from the background. You could even increase the saturation ever so slightly to boost the colour further.
Tip: Your eye is always drawn to the warmer colour palette first in an image followed by cooler tones (blues).
The aggressively styled car
If it is a car you’re shooting, and the reason that you chose it is because it looks mean and aggressive, getting down low to the ground, close to the car and shooting upwards can really add to the drama, especially if you add a little dutch tilt as well.
Tip: Using a wide-angle lens like the XF10-24mm or XF14mm can really increase the mood further as it pulls the centre of the frame forward, towards the viewer.
The modern city building
If it’s an interesting bit of modern architecture you’re shooting, and the reason that you chose it is because of its modern lines and edges. Consider following one of these lines of the building from one edge of the frame to the other. Look at capturing the symmetry of the building, try it in black and white and also look at increasing the contrast to make the building ‘pop out’ from the image.
Tip: Try shooting in the 1:1 ratio (square crop) to enhance the symmetry and pattern-like nature of the image.
Why S.E.E. can help you
If you don’t go through these steps every time you go to take a picture, there is a high chance that you will only ever take good photos, not great ones.
This process is there to remind you to squeeze out every last drop of special into every photograph you take. After a while you will know this recipe off by heart and it will become second nature, very much like the difference between learning to drive and being able to drive – it just happens naturally with a little repetition.
At some point during 2013 it dawned on me that I hadn’t had an adventure for a number of years. Bored with my job and in the need of a change, I began looking at voluntary positions in India. A year later I boarded a flight to Delhi with high hopes of adventure, new experiences and great photo opportunities. Luckily, all of these wishes were granted.
6 weeks of my time were spent volunteering in a small village called Nagwa, just outside the intense city of Varanasi. My job was to teach young people from the local area how to use cameras. The students of the charity (named ‘Fairmail’) then take photos which are in turn made into greeting cards, and sold throughout the world. The students receive money from sales, which pays for their education/health/housing costs etc.
During my time teaching there, I became good friends with the students. One student had previously mentioned that his brother takes part in Kushti, an ancient tradition of Indian wrestling which still thrives in Varanasi.
He told me that we could go to the the temple where they train to meet and possibly photograph the wrestlers. I was super excited at this prospect as if it happened, it would allow me a glimpse into the mostly unseen world of Kushti wrestling.
We arrived to the temple a little before 7am and were met with some suspicious eyes from the wrestlers (foreigners are not normally allowed into the training grounds, especially those with cameras). My student spoke to the wrestlers while myself and a few other students (each with their cameras) held back. I was nervous and felt out of place, especially as I had brought a small lighting kit with me (which I imagined made the wrestlers think I was shooting for professional/commercial reasons). After a few minutes one of the wrestlers came over and my student introduced us; he told us that it was ok for us to take photos and I was incredibly relieved. I felt like a National Geographic photographer on his first assignment, with feelings of intimidation and self doubt. Was I ready for this? What if I screwed it up?
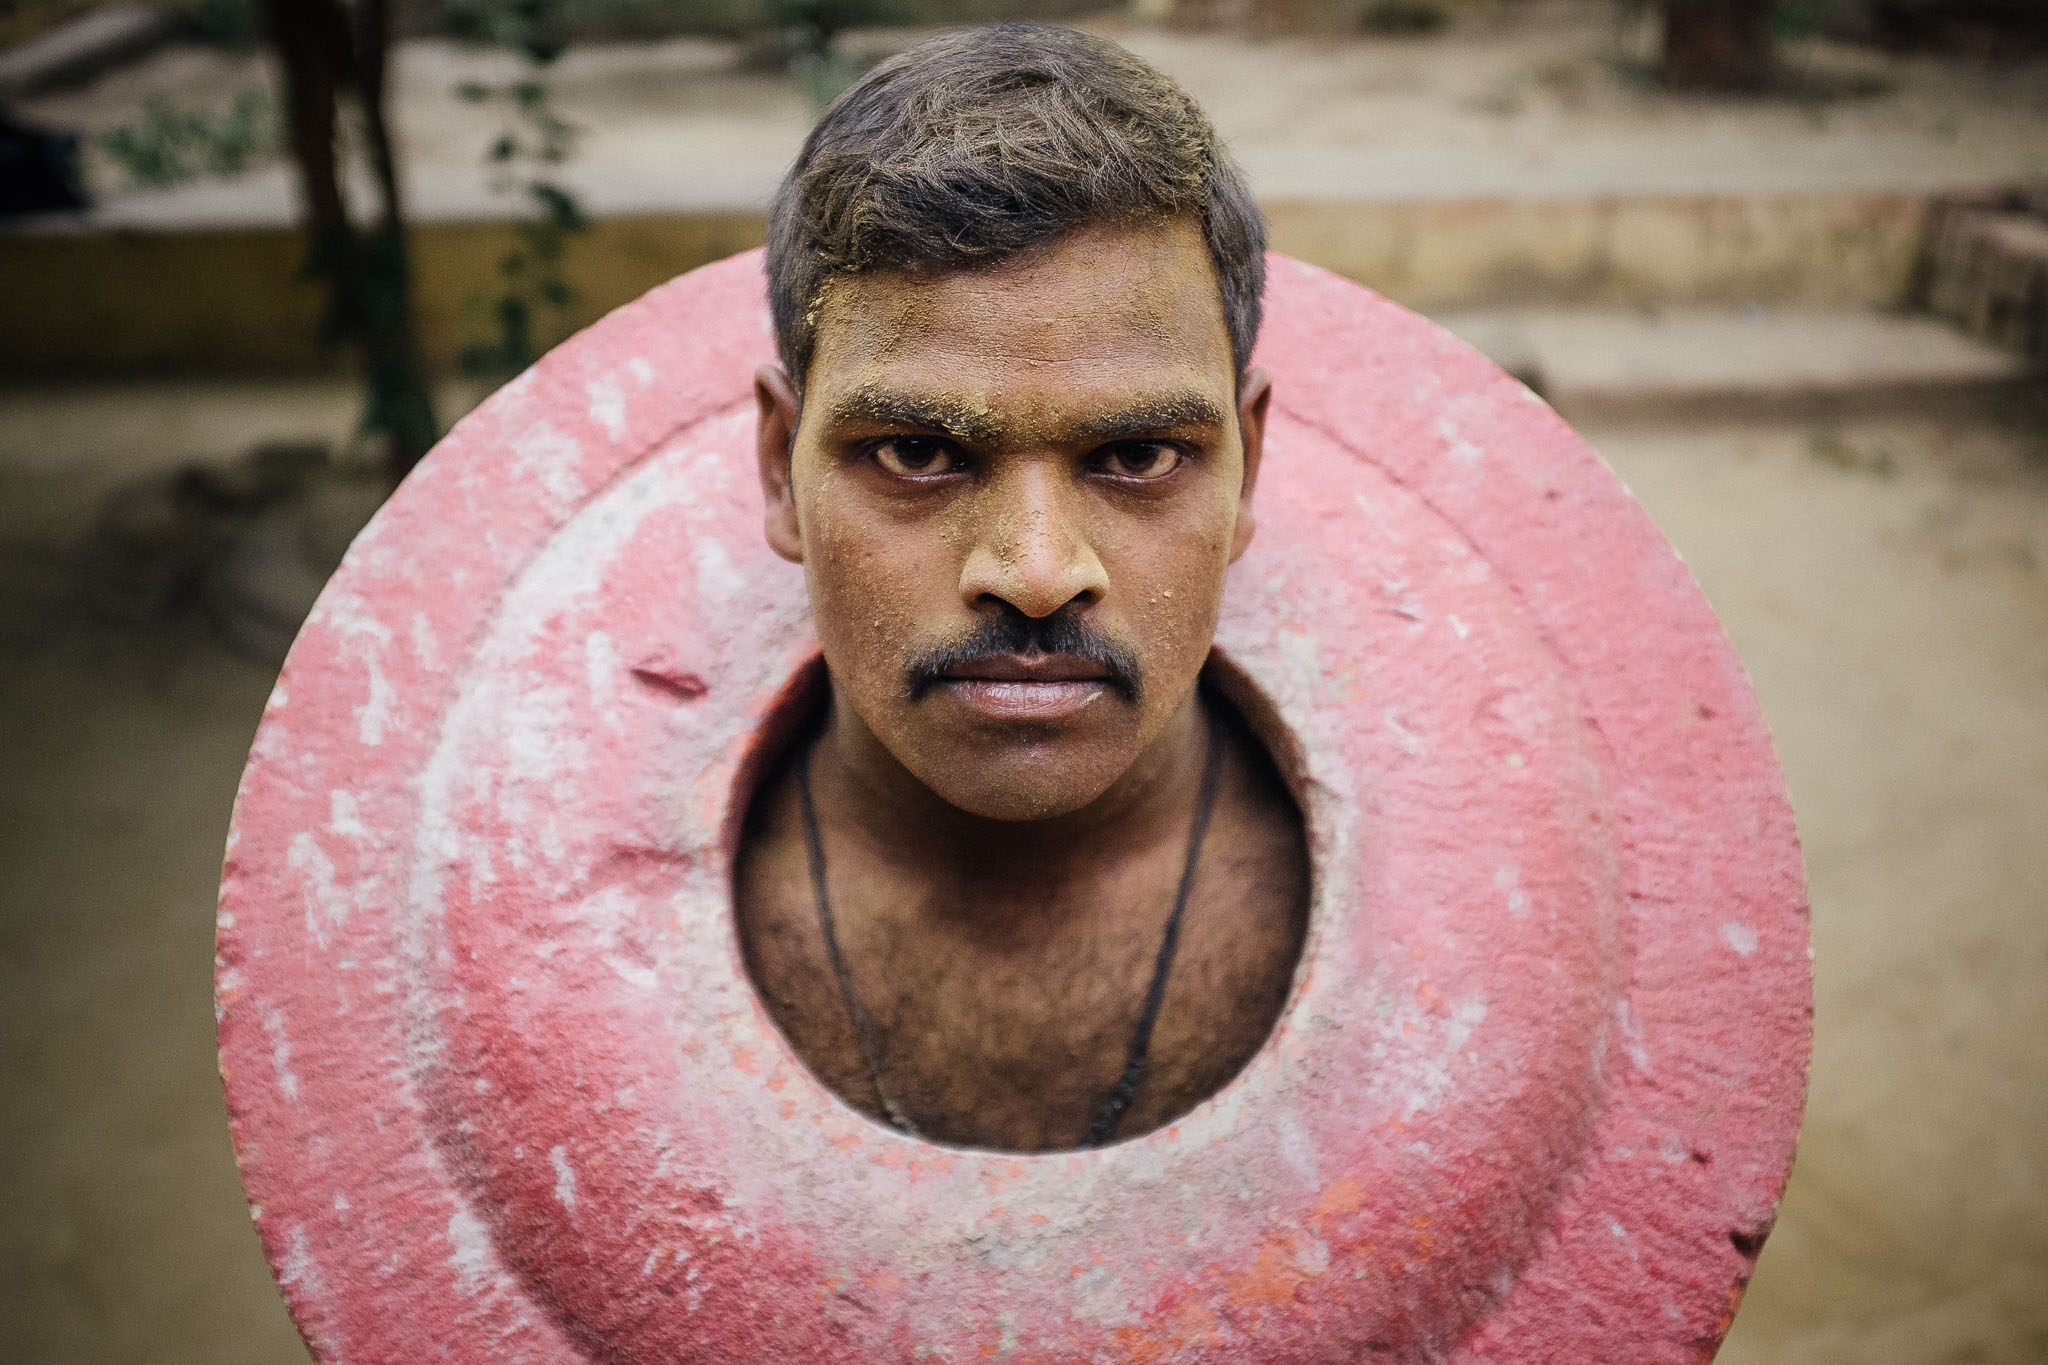
The training grounds were basic, but very serene. The ring reminded me of a temple, and there was a beautiful tree in the middle of the grounds. The various weights and equipment were made in traditional, and primitive, ways. Examples included solid wooden bats which are swung around your head, and a 50kg circular weight which you wear around your neck.
The training began with the wrestlers entering the ring to pray. I couldn’t understand the words, but the feeling transcended language barriers. As with many other moments in Varanasi, there was a momentary sense of peace. These moments always took me by surprise, as Varanasi is the most chaotic place I have ever experienced. It was refreshing to see religion and tradition still deeply rooted in a land that often idealises the West.
My work began slowly, taking a more documentary style approach, allowing the wrestlers to get used to me being there. I kept a distance and began documenting their training and their gym. After a while (and after I put down my camera and began training with the wrestlers), they welcomed me to come closer to photograph them.
Despite my initial intimidation, the wrestlers were very friendly, and after they had warmed up to the camera, I felt like they began to show off. At times I had different wrestlers asking me to take photos of them as them attempted heavier weights and more difficult exercises. You could tell that they were proud to be continuing the Kushti tradition, and wanted it to be recorded.
There are two things that I think helped me in this situation – firstly, I was a volunteer, working with the local youth, so they knew my intentions were pure. Secondly, I had been growing an awesome Indian style moustache that they all found hilarious (this actually helped me out in many situations during my travel!).
The highlight for me was when the wrestling began. Usually witnessing a fight makes me feel uneasy, but when I watched Kushti, I could appreciate the skill and dedication of their art. Perhaps it was the beauty of the surroundings, or the inner peace that seemed to radiate from the wrestlers, but I sensed absolutely no aggression on a personal level between the wrestlers. They seemed like a band of brothers.
Towards the end of the training when I was taking group shots, they insisted that I was included in the photos. The also insisted that I took my top off so that we were all the same. I felt like they had accepted me; somebody who has lead a completely different, and completely privileged life in comparison to theirs, but at that moment when we shirtless, bare footed and stripped of our normal identity, we were equal.
In total I was lucky enough to spend 2 mornings with the wrestlers, and I felt extremely privileged to have seen this beautiful art form in action.
Upon leaving Varanasi, I regrettably didn’t have time to visit the wrestlers to say good bye, but I left my student with prints which they gave to the wrestlers. Apparently they loved them.
Tell us about yourself and what got you into photography?
When I was about 15 years old, I lived in Boston. Unfortunately, not the colourful, vibrant city in the United States but the quiet market town in Lincolnshire, England – historically linked to its American namesake but a place best known for its Dutch-like landscape and the agricultural prowess of its inhabitants. What I am trying to say is, I grew up in a part of England that required much of one’s imagination.
At school one day, I was asked to select my preferred employer for a 2-week work placement. The options weren’t good. Potato planting, bulb cleaning or strawberry picking were three of the more attractive options, as I recall. Seeing my inner turmoil, in a way only dads can, my father asked me what I wanted to do for a career. Without hesitation I replied, “I want to be a photojournalist”.
From where that statement came, I have no idea. Not a clue. I mean, I remember wanting to be (at various stages and in no particular order) a fireman, a policeman, a jet pilot, a train driver, a ski jumper and, of all things, an accountant … but a photojournalist? That was a new one. Even so, at my father’s behest and with the blessing of a somewhat perplexed headmaster, I began my first ever assignment.
How did you develop your style in photography?
While I was on an assignment, about a year after I turned professional, I had a light bulb moment. I was in Tanzania photographing the annual wildebeest migration, as it passed across the Grumeti River. It was a slow day and photographic opportunities were few and far between. I don’t know if you’ve ever paid a lot of attention to wildebeest but they’re not Africa’s most alluring creatures. African’s describe them as, “The animal God created out of the leftover parts of other animals”. Don’t get me wrong, I like wildebeest but they don’t do much. Their day consists of walking in a wide circle eating grass. And that’s about it. Two days into a three-week long project, I was struggling for ideas. How do you continually photograph what amounts to a large brown antelope grazing in a big brown field?
And then it struck me. I started to think about migration and what it really is. Migration is the movement of animals from point A to point B. Movement. Migration is movement and that not wildebeest was the real story. I started to make photographs that captured the story of the migration – wildebeest moving, individually, in a line, in large herds. Suddenly, my photography had purpose and it has been guided by the light from that bulb ever since. We’re not just photographers we’re storytellers. In place of a pen we have a camera but irrespective of the tool our aim is the same: to amuse, emote, inform, educate, and entertain. I believe that inside all of us is a story that is aching to be told, tales that make photography a unique and intensely personal experience.
Why did you choose Fujifilm cameras?
For the past couple of years, I have been advocating that the next major shift in camera design will be the exit of the mirror. The mirror is perhaps the single most-limiting factor in an SLR camera, which is rather surprising given that it has been the mainstay of camera design for nearly 80 years.
First of all, the mirror causes cameras to be far bigger and heavier than necessary. Secondly, to accommodate the mirror, the lens needs to be pushed further forward, increasing the distance between the rear lens element and the sensor (or film) plane, which diminishes the quality of the light transmitted by the lens.
Thirdly, the mirror slapping up against the chamber introduces vibration that, when combined with relatively slow shutter speeds, softens edge detail, reducing image quality further. This is particularly true when using ultra-high resolution DSLR cameras. Finally, mirrors are noisy. The constant slap-slap-slap cuts through the silence of dawn and dusk, echoing across open savannahs and bouncing off woodland trees, startling anxious wildlife into panic.
So, when Fuji announced the launch of the X-T1 mirror-less camera, I was intrigued enough to contact Fujifilm UK. My main question to Fuji was: Is the X-T1 up to the rigors of professional wildlife photography? They answered my question with a question: loaning me an X-T1 body and a couple of lenses they said, “You tell us!” I’ve been using the X-T1 ever since and my investment in Fujifilm products continues to grow.
Do you have a photographic philosophy you live by?
For me, a photograph begins with a caption. That may sound a little back-to-front but if you think about it, really it isn’t. For example, imagine trying to build a house with no architectural drawings. Where would you start? How would you even know what materials you needed? Nobody would approach house building this way, yet the idea that fully formed, well-composed photographs just happen seems to be accepted as the exception to the rule. It’s not. Photographs are designed and crafting an image begins with having something interesting you want to say.
Knowing what to say comes from knowing your subject. The better you know your subject, the more stories you have to tell. I became a wildlife photographer because I’m fascinated by the natural world. How it works, how it fits together and how everything is connected. I often find myself intrigued by inane questions like, “Why are zebras black-and-white striped when they live in a yellow savannah?”
It’s by asking questions and finding answers that I’m able to hit upon new ideas for images, find ways of making interesting photographs of ordinary subjects or different ways to photograph the same subject over and over. It’s how I learn about the natural world and develop a better understanding of wildlife and nature and, to some extent, my part in it all. And knowing yourself, how you feel about things and how things move you is as important a part of the process as the technical aspects of photography.
Key inspirations – What & who inspires you?
Perhaps intriguingly, I’m more inspired by people and events outside of photography. In photographic circles, I admire the work of Michael Nichols, particularly, and, in the very early days, I learned a lot of the basics from Art Wolfe. However, today, science (especially quantum mechanics) and extraordinary people and thinkers, such as astronaut Chris Hadfield, author Yuval Noah Harari and physicist Brian Cox inspire me.
Do you have any tips or tricks you could share with us?
There are so many thoughts, ideas and techniques that have led me to where I am that it’s hard to narrow them down to a few. So, instead, how about I offer Fujifilm readers a completely free e-book titled Nature Photography: Insider Secrets. To get a free copy simply click on this link: Top Wildlife Tips
What’s next for you?
I’m on an amazing personal journey of discovery, looking at how creativity through photography can inspire how we live, as individuals and within communities and society as a whole. It’s a story that I want to share with the world and I’m currently talking to Fujifilm about how we can make that happen. Watch this space!
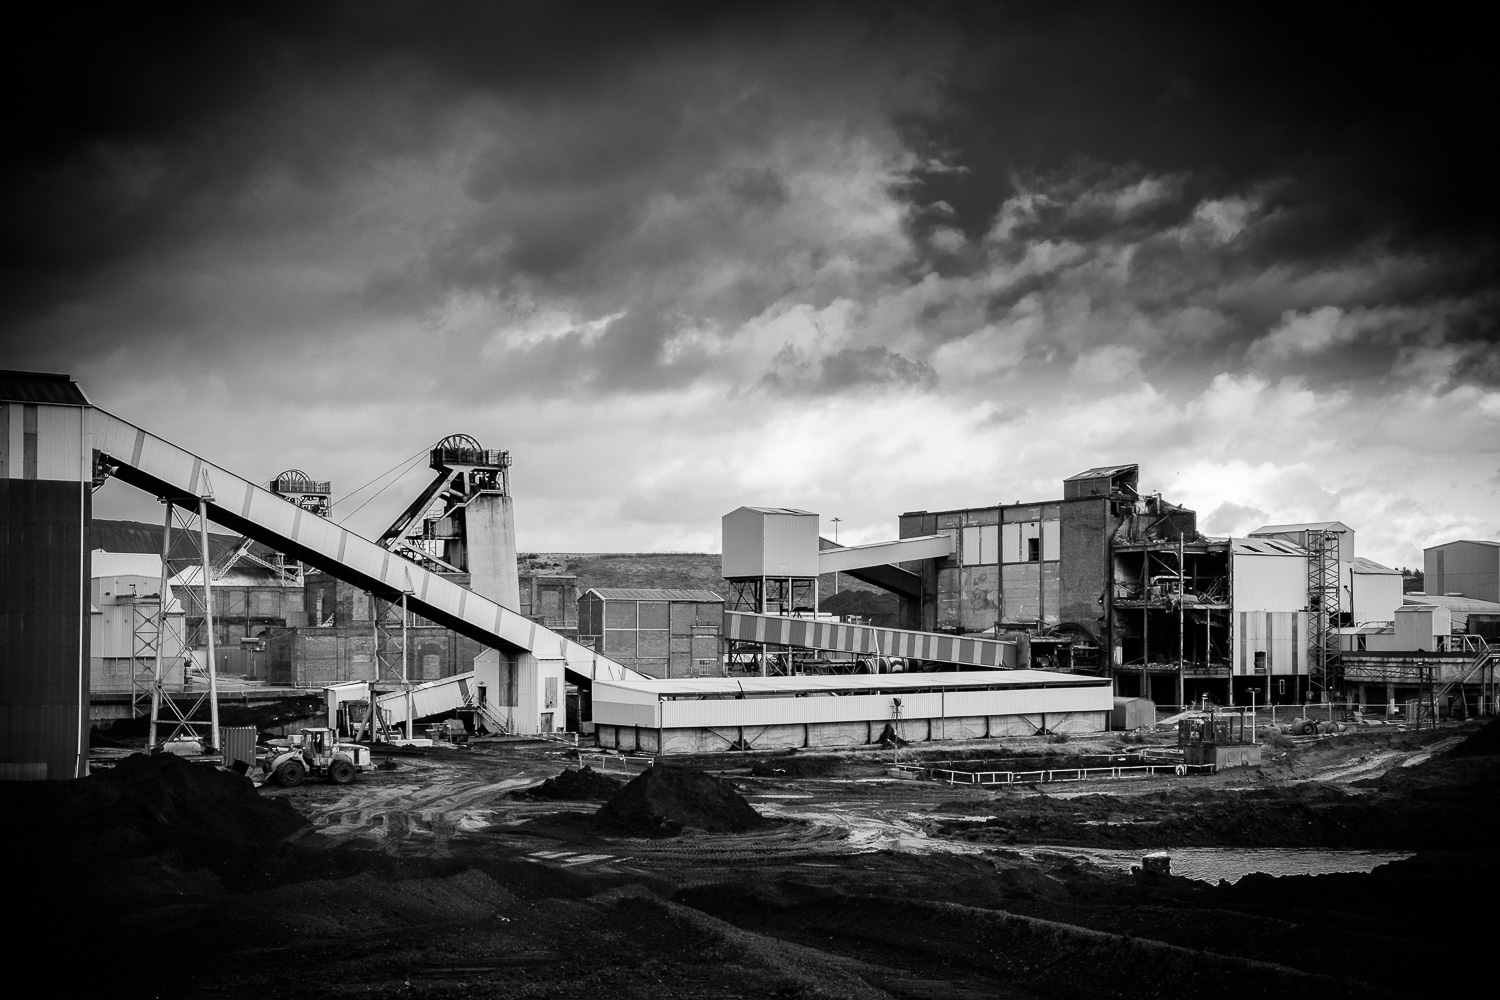
The 10th July 2015 was a landmark date in the history of Nottinghamshire. When the last shift at Thoresby Colliery finished on that day not only did it mark the end of 90 years of mining in the village of Edwinstowe but it signals the end of mining in Nottinghamshire.
The pit opened in 1925 and over the years has employed tens of thousands of local people. It was one of 46 coalmines in Nottinghamshire, which supplied more than 14 million tonnes of coal per year at their peak in the early 1960s.
The first two shafts were sunk to 690m in 1925 and subsequently deepened in the 1950s to the current pit bottom at around 900m depth.
Thoresby Colliery was the first to have fully mechanised coal production and also the first to achieve an annual saleable output of more than a million tons, it became a star performer in the British coal mining industry.
In the late 1980s it raised output to exceed 2 million tons, regularly smashing it’s production records, and the colliery became known as the Jewel in the crown of Nottinghamshire mines. A crown sits proudly on the headstocks in recognition of this achievement.
When the coal industry was nationalised in 1947 it employed a million men at 1,503 pits; prior to the miners’ strike in 1984, there were 180,000 miners at 170 pits. Today there are just two deep mines left, employing about 5,000 men, at Thoresby and Kellingley in Yorkshire. Kellingley will suffer the same fate as Thoresby and closes in the autumn.
UK Coal say market pressures have led to the closure of Thoresby Colliery. Coal generates more than a third of Britain’s electricity, but it is cheaper to import coal from countries such as Russia, South Africa and Colombia than to mine it in the UK.
For the past few months I have been recording the colliery, it’s buildings, plant and people for posterity. It was my aim to create a comprehensive record of the pit at a specific point in time immediately prior to its closure.
It was a chance conversation after giving a camera club lecture that started the ball rolling. A chap in the audience worked at Thoresby and was unfortunately in the first wave of redundancies. He asked if I would be interested in visiting the colliery to take a few pictures. It was a fantastic opportunity and I jumped at the chance. He put me in touch with the Health and Safety manager, I explained what I would like to do and we were off and running. It was at this point, after I had gained their agreement to document the colliery, that the full extent of the task dawned on me.
Starting the project
I visited the colliery on seven occasions, at different times of day, in different lighting conditions, including dawn and dusk. I planned each shoot but found that an outline plan whilst retaining a degree of flexibility to react to opportunities worked best.
At the outset I just toured the site to give me an understanding of the buildings, the machinery, the operation and the people. I took snaps to create a digital scrapbook to help me plan my approach. Essentially I was imbibing the atmosphere much as I would do when visiting a foreign destination for the first time. I wanted to get a real feeling for the place before I started the photography in earnest.
Health & Safety manager Grant was so supportive of my visits giving me more time than I could have wished for. Even coming in at 3.30am for a dawn shoot and returning to work late in the evening to get “the best of the light” didn’t diminish his enthusiasm. In fact he joked that, after watching me, he would now be able to take the best holiday snaps ever! I hope he does.
Gear used
All of the images were shot on a Fujifilm X-T1 or X-E1 camera using a selection of Fujifilm XF lenses including the 10-24, 18-55 and 55-200 zoom lenses and 14, 23, 35 and 56mm primes. I also used a Nissin i40 flash for some shots, though preferred to use natural light wherever possible.
For my portraits, the unobtrusive Fuji equipment allowed me to concentrate on building a rapport with my subjects rather than intimidate them with a large DSLR and f2.8 lens combination. Miners might be tough guy’s and supermodels they certainly are not but they seemed to relax pretty quickly in front of my Fuji lenses.
There were several challenges to overcome not least the light levels that were typically pretty low in all of the buildings. Because of the poor light I used a tripod fitted with a ball and socket head for as many shots as possible. My cameras are fitted with arca swiss type plates so that I can switch from landscape format to portrait very easily and without having to waste time readjusting the tripod.
The mix of different light sources from tungsten, to fluorescent and natural meant it was difficult to assess the ideal colour temperature. However the decision early on to convert all the images to black & white certainly helped counter that problem!
In a coal mine dust was another inevitable and unavoidable issue. As the miners told me it’s not only the dust you can see that is the problem and I was very careful when changing lenses and using two bodies certainly helped. Thankfully the in camera sensor cleaning worked well and I was pleasantly surprised at the minimum amount of dust spotting required.
Working on a project
As my photography has progressed I have found that I prefer to look at a series of images that tell a story rather than seeing individual impactful pictures. Whilst I have adopted this storytelling approach in my travel and landscape photography this project was a whole different ballgame. This wasn’t going to be a six or ten image set but a large body of work that had to be planned and created in a certain style. I found this experience fascinating, though at first it was pretty daunting. However after a couple of visits I had captured some shots I was very pleased with and the plan started to fall into place. I think the discipline required in a project such as this has helped me to improve my photography and it felt good to be succeeding in this new genre of social documentary photography.
In an attempt to capture the “feel” of the colliery, and to bring completeness to the project, I also recorded various sounds around the pit and organised a series of interviews with miners past and present. I will be producing mini AV’s including these sounds and using the miner’s comments in my presentations.
Stretch yourself
It is very easy to stick to what we know in photography and limit yourself to a particular genre. Whilst my experience as a travel photographer, where you are required to be adept at many different genres, undoubtedly helped me there were aspects of this project that were not so familiar. As a result I feel I have grown as a photographer and I would urge you to move out of your comfort zone and try something new. There will be similar opportunities in your area, seek and ye shall find!
Capturing a piece of history
As I progressed through the project I realised that I was not only taking pictures for myself but that I was actually recording a piece of history, an enduring record of a place that, in just a few months time, would be gone forever. With that came a feeling of responsibility, not only to do myself justice but also to represent the life and work of the mining community. Apart from my family photographs, this project is the most important and worthwhile piece of work that I have ever created. Whilst there is clearly interest in the work now, what will its importance be in another 10 or 20 years?
A personal perspective
This project has been a fantastic experience. It has improved my photography, taken me into a different genre and enlightened my knowledge of an otherwise mysterious industry.
It has been a pleasure to work with the team at Thoresby, without whom I would not have been able to produce this body of work. Whilst the colliery may not draw its workers from the immediate village area, as in years gone by, their camaraderie, team spirit, hard work and no nonsense attitude in this tough and uncompromising industry epitomise the best of British workers. The closure of Thoresby truly is the end of an era.
What next?
I feel it is important to showcase my images to as wide an audience as possible, especially in the local area. Therefore, after securing feature in the local and national press, I will be staging a major exhibition in Nottinghamshire and am planning to produce a book – more details to follow.
To see more Thoresby images and to keep updated on the project developments please visit my website www.chrisuptonphotography.com
So here’s some exciting news, the official X-Photographers website has been updated!
Six of our UK X-Photographer’s have seen further images added to their current galleries to bring even more beauty to the site. So relax, grab a cuppa and take a moment to discover some stunning new works of art within the Fuji realms.
Damien Lovegrove
Damien Lovegrove left his role as a cameraman and lighting director at the BBC back in 1998 after 14 successful years to create the renowned Lovegrove Weddings partnership with his wife Julie. Together they shot over 400 top weddings for discerning clients worldwide. In 2008 Damien turned his hand to shooting beauty and portraiture and has since amassed a dedicated following for his distinctive art. Damien now divides his time between teaching the next generation of photographers and photographing personal projects. His book Chloe-Jasmine Whichello is highly regarded as a portrait style guide and his website galleries have over 2000 images to browse through among the 30 categories.
Described as a living legend, Damien is on a roll with the best of his work yet to come.
David Cleland is a landscape and reportage photographer based in Belfast, Northern Ireland.
He is best known for his landscape and documentary photography which has featured in a number of photographic exhibitions. His solo exhibition, an exploration of the decay of a 400-year evacuated mill received critical acclaim. David also teaches film and animation applying the rules of still photography to the art of moving image.
David’s work has been accepted by Getty Images and been published in a number of national publications and used in numerous book covers.
David has written for a number of publications on the importance of photography in education and also produced tutorials and papers on a range of photography techniques.
MacLean Photographic was founded in 1996 and takes its name from owner Jeff Carter’s full name – Jeffrey Stuart MacLean Carter.
With over 20 years experience in several fields, including commercial, sport, landscape, travel and photo-journalism, Jeff Carter is based in Dunbar, near Edinburgh in Scotland. However he travels the world with his work in the motorsport and automotive industry and is constantly on the lookout for that next great image to capture.
As well as providing photographic services to editorial and commercial clients, MacLean Photographic runs a number of Photographic Workshops and Tours for individual or small groups of photographers of all abilities in and around East Lothian.
Kevin is pure documentary wedding photographer. He started shooting weddings professionally in 2008 and since then has photographed weddings right across the UK and Europe. Shooting in a documentary style he strives to tell the story of the wedding through photojournalism, rather than “traditional” contrived wedding photography.
Kerry is an award winning fine art equestrian photographer, shooting commissions across the UK and worldwide. Her work has also been published in a number of UK and international magazines, websites and blogs. Kerry was also the first female UK photographer to be named as a Fuji X-Photographer, joining a group of brand ambassadors worldwide.
Matt is a black & white street and event Photographer based in Liverpool, England.
His journey through photography has been over 40 years mostly using film. He still shoots film, but most recently he prefers the freedom and flexibility of the digital medium striving to retain the integrity of the original image.
Annual projects have helped him to focus on his personal development within the industry, constantly challenging his own ideas and concepts and forcing him to learn new skills. In 2013 he carried out a Year of Black and White project, this made him rethink his whole style and camera system.
Matt’s stock images have been used in advertising all over the world, his work has also been published in many books and magazines, including many photography magazines.
Matt runs Street Photography workshops and courses around Liverpool and other UK cities passing on his tricks and techniques in Street Photography and processing in black and white.
In this tutorial I wanted to give you some of my favourite tips to get you started with landscape photography from the more obvious tips to some of the lesser known ones. I have not listed them in order of importance as I believe this is subjective, more so the order in which they came to mind.
Remember, you don’t have to apply any or all of these ideas to take a great landscape picture, but it may just help you on your way.
Shoot Raw
Although Fujifilm JPEGs are renowned for their quality, when shooting landscapes I strongly recommend that you shoot RAW. This is because more image ‘information’ is retained in the image than from a JPEG and this will allow more flexibility when correcting exposure, enhancing colours and boosting tones. RAW files can be processed & converted with the camera specific bundled software or you can use popular programs like Adobe Lightroom, Capture One etc.
Essential accessories you may have overlooked
When you’re going to be standing in the dark on a misty morning up to your kneecaps in mud there is nothing worse than not having the right gear to keep you warm and comfortable; after all, you may be out for a few hours in these conditions. Here are some accessories that you might have overlooked taking with you:
Wellies – May be obvious for wearing in marshland environments but also extremely helpful on the beach (where you might normally associate wearing sandals)
Headtorch – When going out to shoot a sunrise, finding the perfect location can be really hard if you cannot see where you are going. Make sure that it is a headtorch rather than standard torch to keep your hands free for more important things.
Strong windproof umbrella – When shooting long exposures it is vital to keep the camera as still as possible. A tripod is a must-have accessory but I’d also recommend using an umbrella to keep strong winds from hitting the tripod & camera during these long exposures. As an obvious bonus it will also keep you dry, which is particularly important if you need to switch lens.
Waterproof jacket with zip-lock pockets – Not just to keep you dry, but more importantly to keep useful camera accessories close to hand. Things like spare batteries, remote release cable, cleaning cloth etc. Whether dawn or dusk, when the sun rises or sets it happens very quickly and this is exactly when you want all accessories within easy reach.
A further tip is to keep as much gear in your car boot at all times. That way in your daily travels if you see a beautiful landscape, you can just jump out whatever the weather, walk cross-country across muddy terrain and have a much more enjoyable experience.
Think about composition even when you don’t have a camera with you!
Training your eye to ‘see‘ the best possible shot is probably the most important skill you could hone. The key point here is to imagine the frame of your camera whenever you see something beautiful. Think about all aspects of the shot; where would you stand to take the picture? Where would you position the tree/boat/sun in the frame? What lens would you choose and why? What aperture might you select to impact on the depth of field?
The more you ask yourself these questions, the quicker you answer them too. This means when you actually go to take a picture, you might just get it perfect first time round.
When you find a nice landscape location, try every conceivable angle you can think of until you get ‘that shot’ that brings a huge smile to your face. If that means getting down on your hands and knees, let it happen. After all, the picture you take could end up being your favourite of the day, month or even the year. And don’t be afraid to try an angle, look back at the image and think ‘That was no good’ because it is all about learning what works and what doesn’t.
Remember, the more you experiment, the more ‘mistakes‘ you make, the quicker you will find your own style and know what works for you. Here’s a shot I took that ruined my jeans and shoes, but to me, it was worth it!
Use ND grad filters
You may have heard the term ‘ND grad filter’ or ‘Graduated neutral density filter’ but not necessarily known what it means. Think of an ND grad filter as a pair of gradient sunglasses (the ones that go from dark to transparent) for your camera lens. Its job is to stop a specific amount of light from reaching the sensor of your camera – but why would you want to do this?
Well, when you look at a sunset with the human eye, you can see all the detail in the lights of the sky and shadows of land without any problem. Unfortunately, even the best cameras cannot do this as well as the human eye can. Therefore to try and get the best reproduction of what the eye can see the camera is going to need a little help.
This is where the ND grad filter comes in. By choosing the right strength ND grad filter and positioning it correctly in the frame, you can perfectly balance the exposure above and below the horizon to give a stunning image that is colourful, full of tonal detail and a much truer representation as to how you saw it with your own eyes.
Your next question may be which ones should I buy? Or how exactly do I use them? My recommendation is to read forums, ask other photographers and watch videos on YouTube to get a good understanding of the best practices to ensure great results.
Check the weather
Even within small regions the weather can vary quite a bit. You may find that location A is raining in the morning but location B is not. Use this information to your advantage, amend your itinerary to get the very best out of your day. There are lots of free weather apps for smartphones out there so have a look around to find one that suits you best.
Prepare an itinerary
When you go away on a specific landscape photography trip, take the time to plot out the locations you want to visit, what times you want to visit them and how long you will spend at each location. Although this sounds very regimented it will help to keep your trip on track. Of course, if you find one of the locations particularly beautiful stay there longer, enjoy the experience. Simply think of the itinerary as a check list or a guide to get the most out of your trip as possible.
Find the sweet spot for your lens
Getting the best out of your lens is important, especially in landscape images. Now if you are looking to get as much in focus as possible in your photo, simply set your lens to the smallest aperture available (which is the largest number) for example: f/16 or f/22. But if you are looking for the sweet spot of your lens (where it performs best in terms of clarity and sharpness), this is usually around 2-3 stops from the maximum aperture of the lens (which is the smallest number) for example: if you are using the XF14mmF2.8 lens then you expect to see the sweet spot at around f/8 as this is 3 stops from f/2.8.
Here are some other examples:
Lens
Maximum Aperture
+1 stop
+2 stops
+3 stops
XF14mm
f/2.8
f/4
f/5.6
f/8
XF10-24mm
f/4
f/5.6
f/8
f/11
XF18-55mm
f/2.8*
f/4*
f/5.6*
f/8*
* at 18mm
It doesn’t mean that you have to abide by this rule of thumb but it can help you find the best quality from your lens quickly. If you find some spare time, I would recommend setting the camera on a tripod, take the same picture on a few different apertures with the same lens and then look back at the results – find an aperture that gives you the perfect balance between depth of field, sharpness and image quality. Once you know what it is, use it as a starting point when out and about taking shots.
Is there a ‘right’ hour to shoot landscapes?
One of the first tips to help capture better landscape images is to shoot at the ‘right‘ time of day. The golden hour is widely considered as the ‘best‘ time of day to take a landscape image. It is the hour in which the sun is rising or setting. This is due to a number of reasons but the main ones being the rich warm colours in the sky and the long trailing shadows that are created.
Don’t think that the only time you can take great pictures is at golden hour however, so many stunning images have been created at all times of day. Just think of it as a good starting point.
Extra tip: The time just before a sunrise or after a sunset is a great opportunity to take pictures too. This is known as the Blue Hour, it is called this because the indirect sunlight creates a blue hue in the sky and can help produce some of the most beautifully natural subdued tones.
Example image of the blue hour
The Photographer’s Ephemeris (TPE)
This is one of the most useful tools in a landscape photographer’s bag of tricks. It is a third party application map-centric sun/moon calculator that shows how the light falls on the land. This allows you to know precisely where the sun is going to rise/set in a specific location way ahead of actually being there. It can come in handy when creating your itinerary as you can plot out the suns movements across a virtual map. The application is available on desktop, iOS and Android devices so it can be taken on-the-go as well.
When shooting any image it is very important to maximise the amount of detail captured from the lowlights to the highlights. This is especially the case with landscapes due to the difference in the exposure between the land and sky. You can use your eye to judge whether an image is overexposed or not when it is very obvious, but I strongly recommend you use the camera’s histogram to tell the full story. It will allow you to make much smarter decisions when deciding the best exposure for the shot.
You may or may not know that when the highlight details in a scene are overexposed and burned out they are impossible to recover and get back regardless of how good you might be in post-editing. This could mean white blobs in the sky instead of detailed clouds or white mass areas in the sea instead of crashing waves etc.
So how do you avoid it? Well, shoot RAW (to maximise post production flexibility) and then look at your histogram. You want to aim to get the bulk of the histogram information to sit on the right hand side of the scale – this is known as exposing to the right. The most important part of this technique to ensure that the trace of the histogram does not peak right at the end of the right hand side as this would mean the highlights have been lost / burned out. An easy way to adjust this can be to use the Exposure Compensation dial / button found on the camera and decrease the exposure in 1/3EV at a time and then recheck the histogram until it looks perfect.
Don’t panic
Making mistakes is a natural part of learning any skilled craft. Accept that you are going to make mistakes along the way. You may take blurred shots, blow the highlights to kingdom come and delete your favourite image from the memory card by accident, but in the end, with practice, you will be a creative machine that can make beautiful images wherever you are, whatever time of day and with any camera & lens combination. Enjoy the journey and don’t panic, it will happen.
As with any tutorial there is always more that could be said, more tips that could be shared but the idea here is to give you a good starting point which you can grow from. Ask questions with other photographers, search tutorials online, share your images and ask for constructive criticism, look at work from inspirational landscape photographers and most importantly, enjoy photography.

 So how do I take better pictures?


 When I was about 15 years old, I lived in Boston. Unfortunately, not the colourful, vibrant city in the United States but the quiet market town in Lincolnshire, England – historically linked to its American namesake but a place best known for its Dutch-like landscape and the agricultural prowess of its inhabitants. What I am trying to say is, I grew up in a part of England that required much of one’s imagination.


 The 10th July 2015 was a landmark date in the history of Nottinghamshire. When the last shift at Thoresby Colliery finished on that day not only did it mark the end of 90 years of mining in the village of Edwinstowe but it signals the end of mining in Nottinghamshire.


 Damien Lovegrove left his role as a cameraman and lighting director at the BBC back in 1998 after 14 successful years to create the renowned Lovegrove Weddings partnership with his wife Julie. Together they shot over 400 top weddings for discerning clients worldwide. In 2008 Damien turned his hand to shooting beauty and portraiture and has since amassed a dedicated following for his distinctive art. Damien now divides his time between teaching the next generation of photographers and photographing personal projects. His book
 David Cleland is a landscape and reportage photographer based in Belfast, Northern Ireland.
 MacLean Photographic was founded in 1996 and takes its name from owner Jeff Carter’s full name – Jeffrey Stuart MacLean Carter.
 Kevin is pure documentary wedding photographer. He started shooting weddings professionally in 2008 and since then has photographed weddings right across the UK and Europe. Shooting in a documentary style he strives to tell the story of the wedding through photojournalism, rather than “traditional” contrived wedding photography.
 Kerry is an award winning fine art equestrian photographer, shooting commissions across the UK and worldwide. Her work has also been published in a number of UK and international magazines, websites and blogs. Kerry was also the first female UK photographer to be named as a Fuji X-Photographer, joining a group of brand ambassadors worldwide.
 Matt is a black & white street and event Photographer based in Liverpool, England.


