Recap – My name is Ben Cherry, I’m a Fujifilm X-Photographer focusing on environmental photojournalism. Currently I am part of the WWT Flight of the Swans conservation project, where Sacha Dench is flying from Arctic Russia back to the UK; following the declining Bewick’s swan as they migrate to overwinter in warmer climates.
Well we eventually got out of Russia, after a 19 hour border crossing. Estonia was instantly different. It had a significantly different feel to it, from seemingly greener, richer forest to just a different culture. It was all quite refreshing!
I broke off from the core team to focus on finding Read More
At Christmas it’s almost compulsory to take photographs and when you add a newborn baby into the equation it’s the perfect opportunity to create something extra special.
Whether you’re a fan of full-on Christmas decor, or prefer just a subtle nod to the season I hope this fills you with hints, tips and a sprinkle of festive inspiration.
If you are new to photographing babies you can keep it simple and natural, have baby lying on the back and photograph them awake and relaxed. Newborn babies can’t focus their eyes well, so I wait for them to stare into the distance and then move my camera into their line of sight, it can take a bit of patience but is usually worth it.
For this shot, I dressed the baby in a soft white romper and a berry headband which sets the season without needing a santa hat.
1/100s, f/2.8, iso 100, X-T2, XF16-55
Another simple image to capture is baby toes, they can be awake or asleep for this, though for wrigglers I’m grateful for the fast focusing of the X-T2. In the first shot you can see the out of focus fairy lights which add an interest to the composition, and for the second shot I used a berry coloured wrap to create a warm festive feel. In the second shot I was actually gently holding the baby’s toes in place underneath the fabric to keep them at the angle I wanted. The tilt screen on the X-T2 was handy here as I could both hold her feet and shoot one handed comfortably.
1/100s, f/2.8, iso 100, X-T2, XF16-551/100s, f/2.8, iso 200, X-T2, XF16-55
Overhead shots are also easy shots to get whilst keeping baby safely lying down on fabric. The wreath I used is mainly fabric so is quite soft and not prickly, and I padded the middle out with a furry cushion cover so that she was well supported at all times.
If a baby isn’t the most settled then I will swaddle them with a wrap so they feel secure, and more often than not they fall asleep when wrapped. For all these shots I stand over the baby, using a camera strap, and then use live view on the tilt screen of my X-T2 to compose the image.
1/160s, f/2.8, iso 200, X-T2, XF16-551/125s, f/2.8, iso 200, X-T2, XF16-551/125s, f/2.8, iso 200, X-T2, XF16-55
This shot is a more typical newborn baby pose, but using a seasonal coloured wrap keeps the image simple whilst adding a slight festive touch.
1/100s, f/2.8, iso 100, X-T2, XF16-55
Christmas is a great excuse to pull out some of my favourite props too, so here are a few where I’ve tried to recreate some of the magic of the holiday. All of these images were taken with a spotter, which means I had someone on hand (usually a parent) to stay very close to the baby with the sole purpose of holding them if they start to move or roll. Spotters are either just outside the frame but still within reach of the baby, or I edit them out in Photoshop.
To make it a bit more interesting I wanted to include some lights within these set-ups too, one having a candle lit effect lantern and the other incorporating some fairly lights. Each of these meant I had to work out the best way to capture the lights whilst not overpowering them with flash. I needed to shoot fairly wide open to be able to record as much of the ambient light as possible, yet I still needed to light the subject too with my flash. I had the ISO at 100 (or Low) and my aperture at 2.8 on the 16-55mm, if I shot at 1/250s I overpowered the fairly lights and you couldn’t really see any light from them at all, when I slowed down to 1/125s they were visible but quite small and hard. I couldn’t shoot any wider unless I swapped lenses, so the next option was to reduce the shutter speed further. As my baby model was asleep, as long as I held the camera steady, I was able to shoot at 1/15s which enabled the flash to still perfectly light my model without overpowering the ambient so I captured the nice effect of the lights too. Again using the tilt screen was invaluable as I could sit down and hold the camera steady without having to lie on the floor to see.
1/15s, f/2.8, iso 100, X-T2, XF16-55
With the lantern shot the candlelight wasn’t giving any spread at all as it was just so low powered, so I photoshopped the glow in afterwards. I thought including both images will show you the different ways of achieving the same kind of end result. Where possible I do prefer to get it right in camera, but I’m not opposed to editing small things if it helps create the right feel either.
1/125s, f/2.2, iso 100, XT2, XF56,
And finally a slight twist on a more advanced newborn pose known as The Potato Sack, I wanted to give a bit of a snowman feel so added a hat and then in photoshop I added some snow, just for the fun of it. This pose is usually done with baby being supported and then the hand edited out afterwards.
1/125, f/2.8, iso 200, XT2, XF16-55
All images were shot with the X-T2 and lit with a single Elinchrom d-lite1 and a 1m² softbox. I almost always position the light so that it flows down the baby’s face to give either a butterfly shadow under their nose or a loop shadow at the side of their nose.
And finally I few tips for you to help get your newborn model to sleep:
1. Heat – A toasty warm room and a fan heater near baby, I find it’s the warm breeze that helps settle them 2. Milk – A ‘milky drunk’ baby, I always ensure they have a full feed before we start so they are nice and full 3. White noise – Background noise helps send most babies to sleep and masks any noise you might make whilst working 4. Blankets – I use a blanket from home to hold them in whilst getting them to sleep as it smells familiar to them 5. Dummy – I always ask if they have one at all, you can pose the baby with their dummy and then just remove it for the individual shots 6. Patience – sometimes it takes a while for them to drop off to sleep but having all the above in place can make it much easier.
I hope you all have a great Christmas and I’d love to hear how you get on with your festive baby photographs!
One of the most common questions I receive from new photographers is which lens to use when photographing food. When choosing gear there is never a correct choice; it all boils down to the type and size of the food, your workspace and setup, the style you hope to achieve, along with how you want your final image will look. Each lens will have advantages, and even disadvantages, depending on your setup. Here is a list of a variety of lenses, along with why you might choose each type of lens for food photography.
Macro
FUJIFILM X-T2 with XF60mmF2.4 R MACRO Lens at 1/7 sec at F4, ISO 200
A macro lens is an obvious choice for photographing food. You can get really close to the food to highlight certain elements, and also easily photograph and fill the frame with small items, like berries or tiny bites of food. Depending on the camera you use, macro lenses come in different ranges of focal lengths.
Keep in mind that a macro lens is not always necessary to photograph food. With full-frame cameras it is sometimes necessary to use a macro-capable lens in order to get close enough and fill the frame. And, in some cases, getting too close to your dish may not be the best way to photograph it. With crop-frame cameras, such as with the FUJIFILM X-T2 used for this photo, a macro lens is not always a requirement. Because of the crop factor there is the perception that the camera is closer to the subject, and so a macro lens is only a real necessity when you want to get really close and fill the frame with small items.
Wide-Angle (12–24mm)
FUJIFILM X-T2 with XF18-55mmF2.8-4 R LM OIS Lens at 1/4 sec at F6.4, ISO 200
In most cases a wide lens will be best for overhead setups. The space I use to photograph food in my home is too small for a wide-angle lens to be used without including other elements, such as the window or reflectors. Instead I reserve the wider focal lengths for overhead shots.
Mid-Range (35–75mm)
FUJIFILM X-T2 with XF35mmF1.4 R Lens at 1/20 sec at F2.8, ISO 200
A mid-range lens, especially one that has a close focusing distance, can be a good option for food in any environment. I like to use this type of lens when I know I will want to photograph my dinner while traveling (for example). It is long enough to compress and blur the background, but narrow enough to not include too wide of an angle of view. I can also still sit quite close to the food; with a longer lens I need to move back a few feet, which can be difficult when sitting at a dinner table.
Medium Telephoto (90–120mm)
FUJIFILM X-T2 with XF90mmF2 R LM WR Lens at 1/9 sec at F4, ISO 200
The medium telephoto lens, also known as a good range for portraits, is also a great focal length range for food photographs. One of my favorites is the FUJINON XF90mmF2 R LM WR; I can get in close to the subject, and also compress and blur the background quite well.
Telephoto (140mm+)
FUJIFILM X-T2 with XF50-140mmF2.8 R LM OIS WR Lens at 1/10 sec at F4, ISO 200
When you have a lot of space to work in and really want to compress and blur your background, then a telephoto lens might be a good option for you. This type of lens will typically work well with crop-frame cameras, which is great news for Fujifilm users! On full-frame cameras, however, you may find that the focal length will not allow you to get close enough to the subject to get it in focus. However even with this setup (a small item of food) I was unable to get a tight shot of the bruschetta with my FUJIFILM X-T2 because of the limited focusing distance, but with a larger dish this lens might work well.
Think about it, it’s your dream job. You’re a Liverpool season ticket holder and supporter and as a professional photographer you are asked if you’re interested in photographing the portraits of a number of former and famous Liverpool FC captains for an upcoming book.
Of course I jumped at the chance!
My brief was pretty simple, make all the captains look good, but the harder part of the brief was to make all the pictures look like they had been shot in the same session at the same time ……. Of course this would mean shooting on location in ten different locations!
The first captain on our list was perhaps the hardest logistically to set up as when we arrived at Ron Yates’ home there was simply nowhere to set up my studio and Ron’s wife was not too pleased at the thought of moving everything around in her living room!
But we soon persuaded her that it was ok to shoot with a simple one-light set up and so photographed Ron on his sofa right there in the front room.
“One of the great advantages of shooting with my Fujifilm X-T1 camera system is that the camera is not overwhelming in size and this makes it easier to communicate with your client.”
Ron Yates
I was not given a lot of time to take Ron’s portrait as he sadly suffers with Alzheimer’s so I needed to work quite quickly. This meant going for my trusty XF16-55mm f2.8 lens. This lens is amazing at times like these – it’s versatile in focal length from wide angle to zoom, sharp and very fast to focus.
From here I worked quickly, taking as many different portraits as I could in as short amount of time possible.
Over the next few captains that I photographed I was given more time and space to get what I had in mind for the book.
Robbie Fowler
One location I was given was to shoot in was Jamie Redknapp’s garage at his home! It was a big space to set all my studio backdrop and lights in, plus I received refreshments from Jamie’s lovely wife Louise!
Jamie Redknapp
Also having the luxury of more time and a bigger working space is that I got to use my different Fujifilm prime lenses. And let’s not forget that with each different portrait sitting you have to come up with a variety of posed shots, I tend to shoot a full length sitting down shot, a ¾ length standing up shot and then a selection of close-up headshots. The lenses I use in my shoots are the XF16-55mm f2.8, XF23mm f1.4 and my XF56mm f1.2.
“I really love the 56mm as it’s pin sharp, fast to focus and gets a great headshot in a limited space.”
And the locations where quite varied too – from conference suites in Southampton Airport (amazing what access you can get in these places dropping Graeme Souness’ name) to removing furniture from Ronnie Whelan’s dining room so I could set my studio in there (Massive table and chairs out!).
Graeme Souness
There was also the time aspect to all this as each Captain was giving their time for free, so I was very conscious that my photoshoots didn’t drag on.
In my experience with these types of shoot I’ve come to know and trust the equipment that I use. From my portable studio set up to my Fujifilm camera and lenses, I know I’ll get great results each time.
Paul Ince
One of the most common questions I get asked is which Captain was the most difficult to shoot.
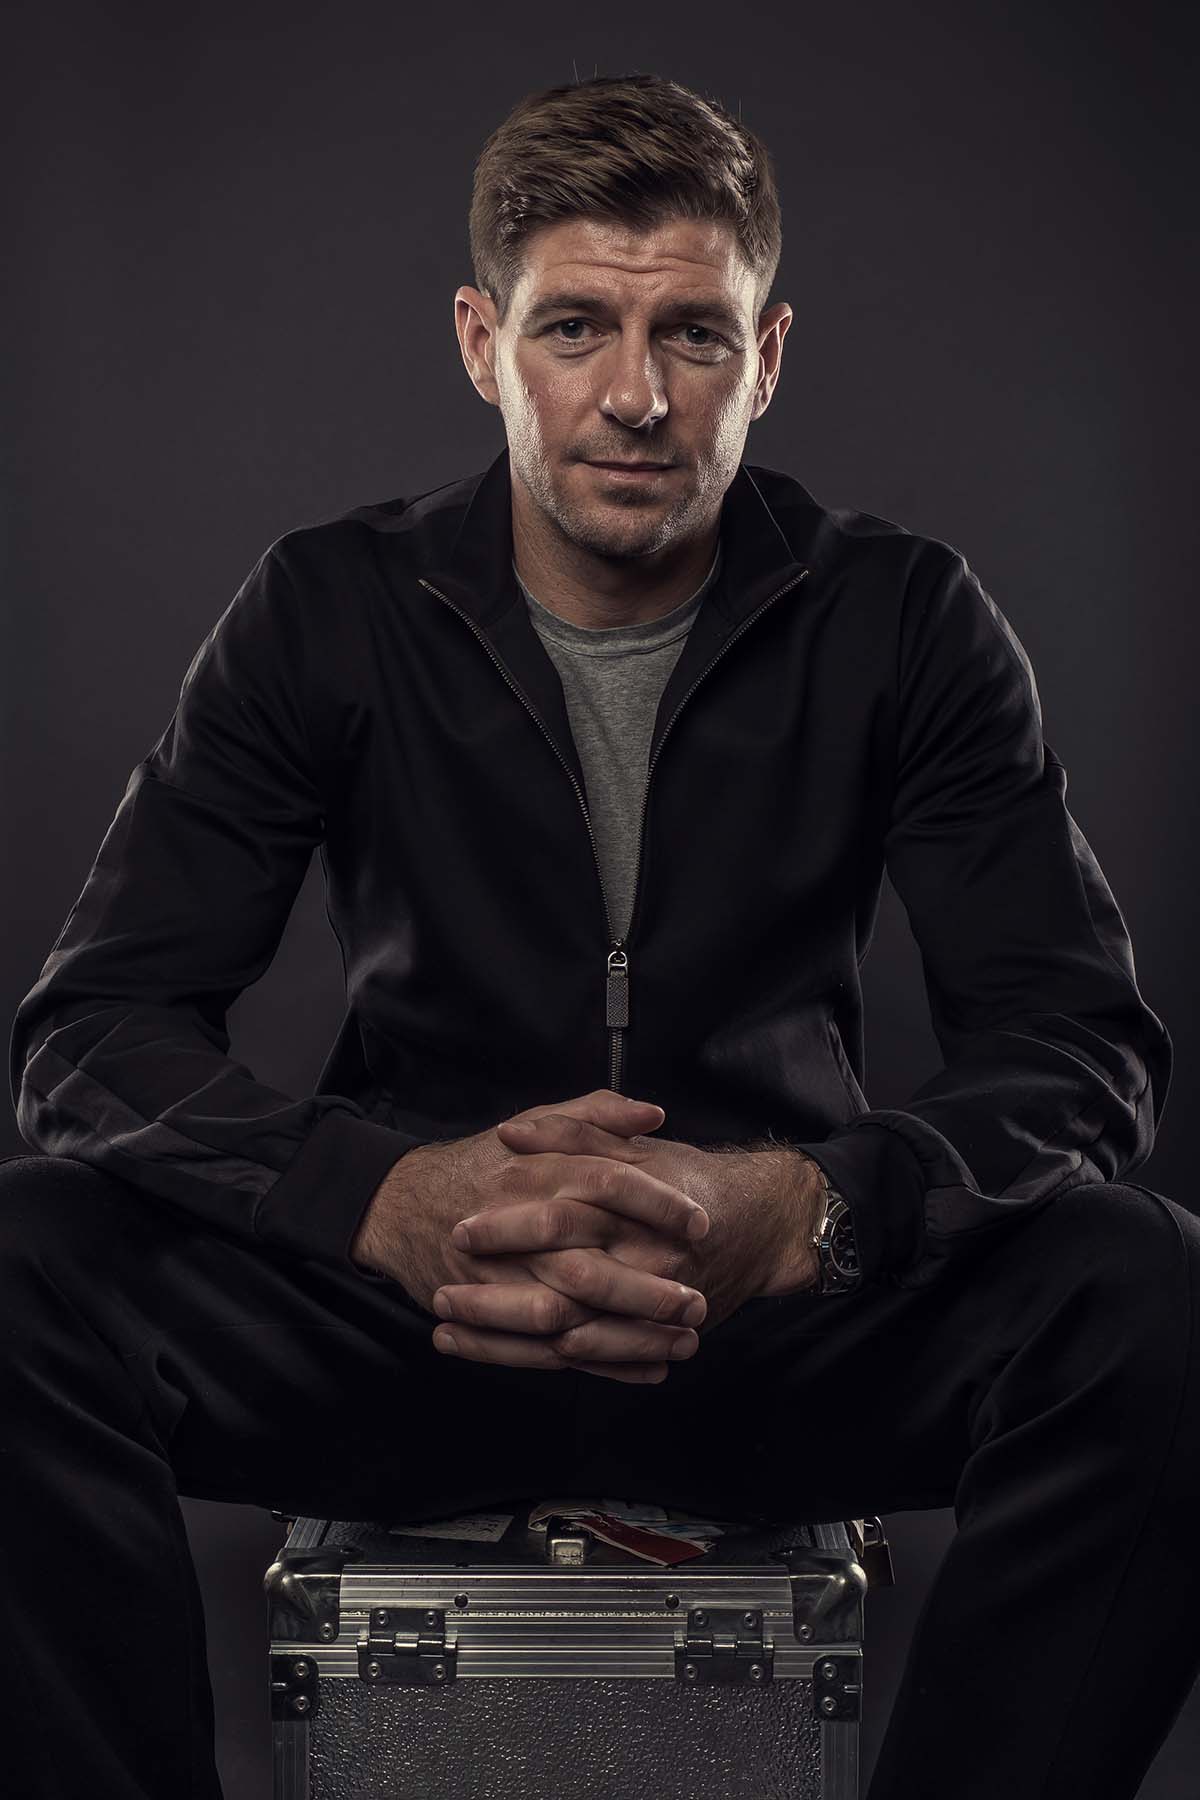
It’s an easy answer really – Steven Gerrard.
On the day of the shoot Steven was very pushed for time as he had a big appointment in Milton Keynes for Adidas. To compound matters further the interview for the book ran over as well…… So in the end I was given just 60 seconds to get as many portraits out of the shoot as possible.
Lucky I had just enough time to set my studio up and was ready as he walked in. I used my Fujifilm X-T1 camera alongside my XF16-55mm lens to create the shot.
As I said before, in times like these you need equipment you can trust and that will simply get you a great result.
Black card, tape and Velcro are all you need to add extra creativity to out-of-focus highlights.
If there’s one thing that Fujifilm XF lenses are well known for it’s bokeh. Some folks mistake this term as referring to purely out-of-focus highlights, but in reality it means the whole out-of-focus area of an image and how appealing it looks. But there’s fun to be had with highlight areas, particularly pinpoints of light the likes of which are created by fairy lights. Take a look at the two shots below, the one on the left is a defocused shot taken with an XF55-200mm at the 200mm setting and its widest aperture. The shot on the right was created by slipping a piece of card with a heart cut in it in front of the lens. Cute, eh?
And it’s easy enough to do.
First up, you’re going to need some materials. I used the following:
1x sheet black card
1x scalpel
1x scissors
1x roll of electrician’s tape
1x pack of Velcro strips
1x Fujifilm camera and lens
The more eagle-eyed among you will also notice there’s an X Series box inner as well. More on that later…
Start by taking the card and a pencil and drawing round the lens you want to creating the bokeh shape for.
Once you’ve got a nice outline (not wonky like mine), cut it out using the scissors, then place it back on the lens to make sure it’s the right size.
Measure the diameter of the card and then use the scalpel to cut out a second circle that’s approximately 1cm across.
Once you’ve done that, cut a strip of black card and apply the electrician’s tape to one edge of it.
Slowly wrap this around the circle you’ve already cut out, creating a shallow holder in the process.
The holder should now slide neatly over the front of the lens.
Take the Velcro and cut two short strips, sticking them on either side of the small hole.
Finally, cut a final small piece of card and then either the scalpel to cut a shape you want to appear in the bokeh. A heart is easy enough to cut by hand, but if you want something more intricate shaped punches are available in craft stores and provide a smooth edge. Stick the other part of the Velcro on this card and attach. This way you can easily make other shapes and remove/attach as you wish.
You’ll need to do some experimentation with different lenses and aperture settings. Naturally, the wider the aperture the better, plus you’ll find that manual focusing is better. After my initial tests with this shape to produce the shot at the top of this blog, I created a second slightly fatter heart shape for the shot below, which I prefer. To add a bit more interest, I also added a lily as it’s my wife’s favourite flower and I thought it fitted the heart theme.
And the X Series box inner? Well that was used for the shot on the right. See, Fujifilm even produce creative packaging as well as great cameras!
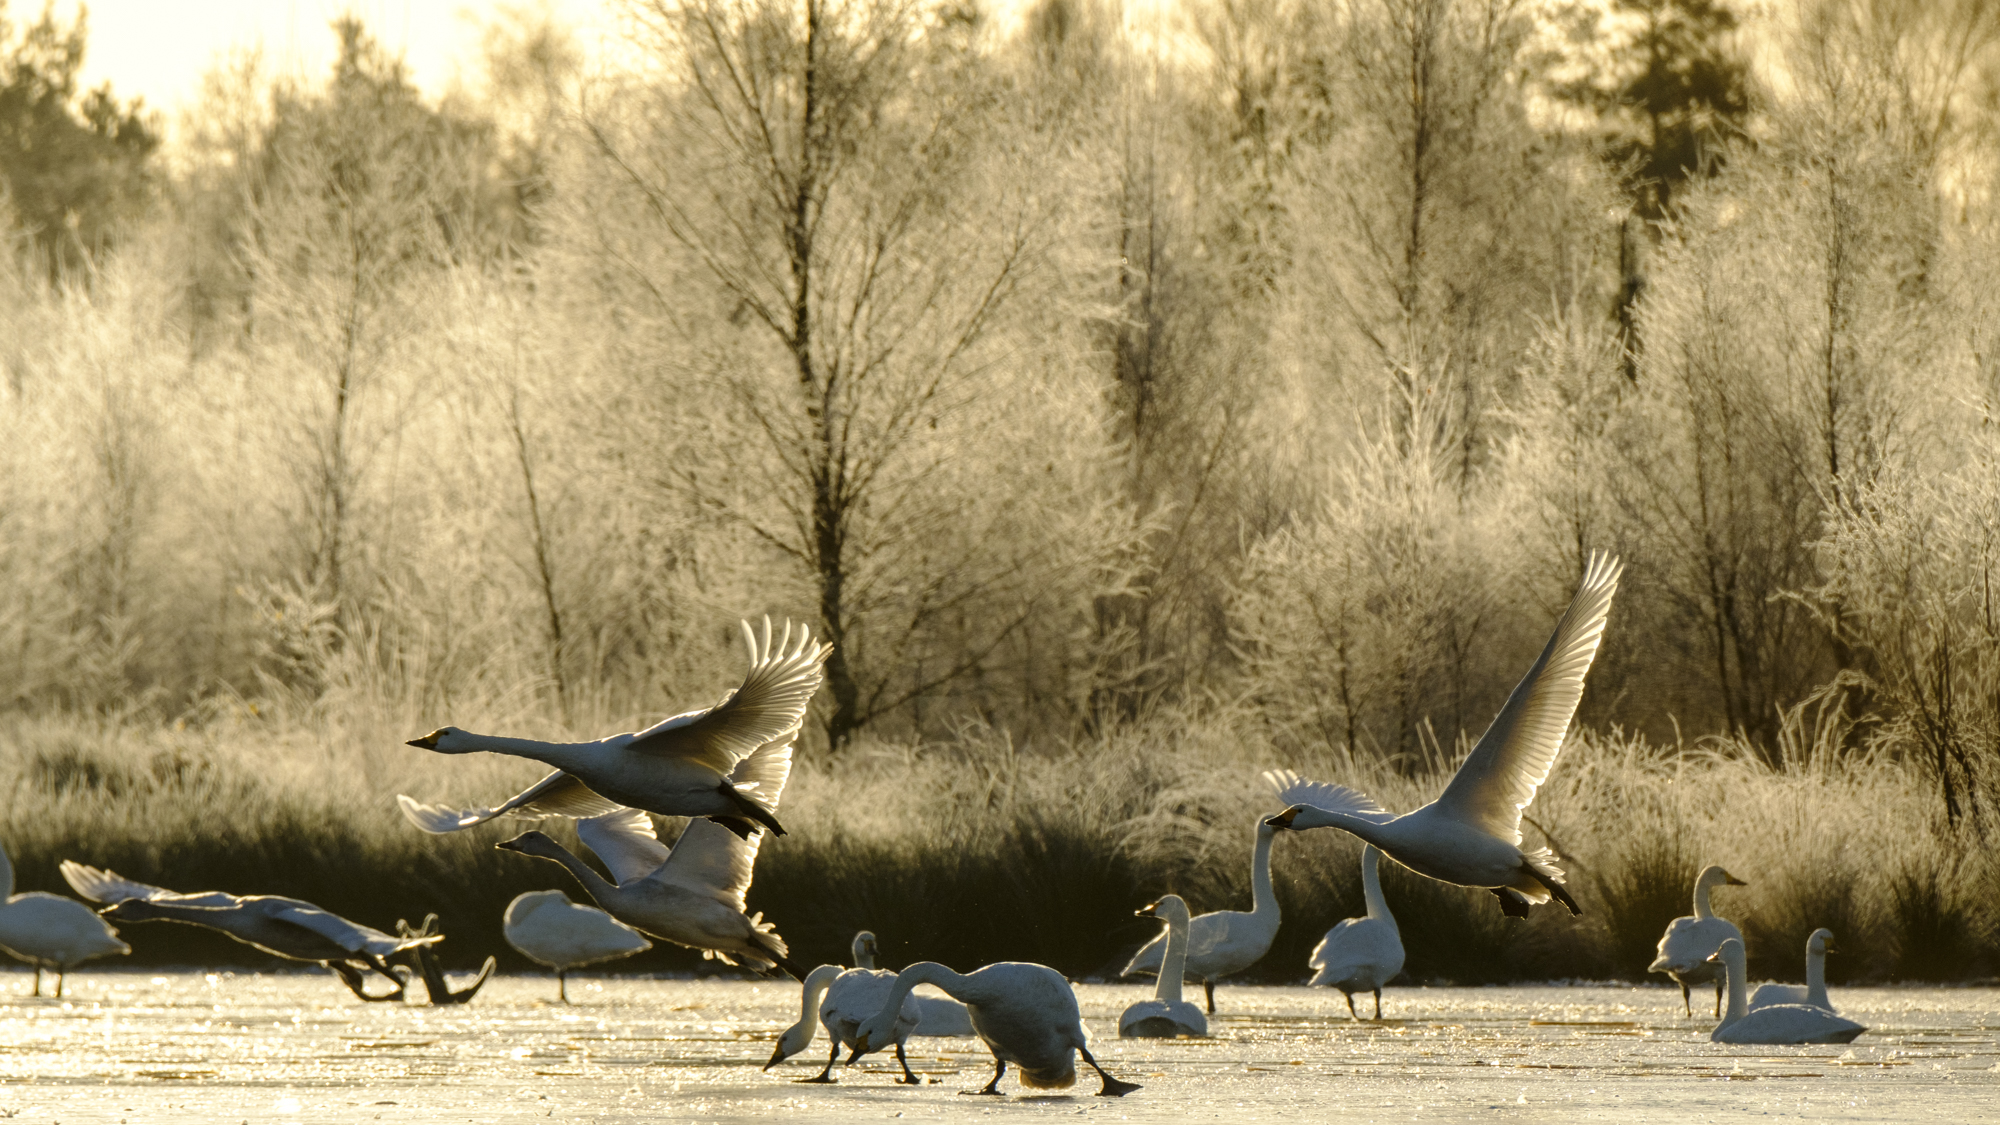
Flight of the Swans has finally left Russia, only ten days behind schedule… Ten extra days I am very happy to have spent in this dramatic country. Enormous in every sense of the word, we barely scratched the surface, but what we did see left a lasting impression. From incredible generosity to gorgeous autumnal scenes, this rugged place has wilderness to truly get lost in.
X-Pro2 and XF10-24mm F4 ISO6400 30 Seconds
Hazard lights cast against the roadside trees as the convoy headed to Kimzha. We were very much alone on this dirt road and the stars were simply spectacular!
The 19th September greeted us with a 32 hour stay at the Estonian – Russian Border, an experience that I’ve recently had a case of deja vu with as we returned from the other direction on the 19th October for a 18+ hour stay to return to the EU. In-between that time we have raced up to Kimzha, Arkhangelsk region, 1800+KM away within five days, via roads where for periods our trailer towing vehicle had to crawl at 6kph. It was a mental run, marred by a diesel spill in the trailer at 2am and paramotor pilots arriving at the collection point ahead of schedule, resulting in some all-nighters.
X-T2 XF10-24mm (24mm) F8 ISO 400 1/20
X-T2 XF100-400mm (330mm) F16 ISO 1600 30 seconds.
Once we linked up with the pilots who had just crossed the tundra section, things were marginally less hectic, marginally.
X-T2 XF100-400mm (100mm) F8 ISO 200 1/125
X-T2 XF100-400mm (370mm) F5.6 ISO 1000 1/680
X-T2 XF100-400mm (360mm) F5.6 ISO 1000 1/900
X-Pro2 XF16-55mm (55mm) F10 ISO 800 1/550
X-T2 XF100-400mm (226mm) F11 ISO 800 1/550
X-Pro2 XF16-55mm (16mm) F6.4 ISO 800 1/1900
Sacha has done an amazing personal journey so far, she even dislocated her knee! But still going via a trike to take stress off her legs. The Flight of the swan’s team have been featured on news channels all around the world and the ground team are doing their best to engage local communities, particularly through school programs. All to raise awareness of the Bewick swan and other migrating wildfowl. The aim is to improve international awareness and cooperation, to find out more and to sign the WWT’s petition to help their conservation, which can be found here.
Personal highlights included witnessing the northern lights and catching a glimpse of a wolf as it slinked off into the darkness of a moonlit woodland road. But the biggest surprise has the be the incredible generosity that our team witnessed in Russia, I haven’t experienced anything like it before, where families would happily take in 8-12 people, feed us, give us a place to stay and even offer us a banya (Russian bath)! We were welcomed with open arms. Meeting conservationists, or simply random families along our journey, all seemed to have a deep connection for nature and the importance for managing it suitably, including the declining Bewick’s swan. We would be let into the lives of these people and get to know them, usually over a skinful of vodka.
One too many..
Time-lapse taken with X-Pro2 and XF16mm F1.4 using the in-camera intervalometer.
X-T2 XF10-24mm (10mm) F4 ISO 200 960 seconds.
Frame from the time-lapse. X-Pro2 XF16mm F1.4 2 seconds ISO 1600
Cine Fujinon Lens
As well as using my personal X-Series kit on this project we are very proud to be sponsored by Fujifilm with a Fujinon ZK3.5×85 (85-300mm). Our media team are documenting the project in as wide a means as possible, from virtual reality experiences to documenting the project with various filming equipment, to hopefully continuing to share this project to a wider audience and help communicate the importance of Bewick’s swans conservation.
Here is one of our cameramen, Ben Sadd in the Gulf of Finland, Russia searching for swans.
Because so much of this trip is about communicating with as many people as possible, I have been using my instax SP-1 printer a lot to leave little mementos. It always gets a fantastic reaction, the business card sized prints are perfect for travelling with. Giving a physical print has such a positive effect on an experience compared to simply tagging someone in a digital photograph. instax has for a long time been one of the first things in my bag whenever I travel, this feeling has been encouraged further. The benefit-to-cost ratio isn’t even worth talking about as the effect it has on a situation is huge, it sounds cheesy but seeing the smiles appear as the photo develops on the instax is worth it.
I’ve found that it develops a situation from a set of friendly acquaintances to the start of friendships, leaving both the recipient and photographer with lasting, fond memories.
Some of our media team were taken in by a Russian family and joined them for a big meal. instax proved to be really popular and it was a pleasure to leave them with a dozen little prints.
Leaving a physical memory from one of our school visits.
It even proved popular with our team medic for her birthday!
Connectivity
As well as directly sending images to my SP-1 printer, the ability to send lightly edited files (via the in-camera RAW converter) to my phone and then share on the Flight of the Swans social media channels has helped to massively streamline my image sharing process. You can follow these channels here:
The team are now in Estonia. Russia was an amazing experience but the project is still very much on the move. There is a major set of wetlands in Estonia which we want to visit and hopefully witness more migrating Bewicks. You can stay up to date via our live map, with trackers on birds, vehicles and of course Sacha! Click here.
Summary
Flight of the Swans is a fascinating project, where WWT has taken a big leap into the unknown to try and reach a new level of engagement to help improve conservation of wildfowl. If you’re interested in travel, extreme sports or wildlife then hopefully this project will be of interest. If so, then please help us by signing our petition here. Until my final instalment in a month’s time, here are a few more photos from our Russian experience. In the next blog I will update you on the project as well as talking about the 4K capabilities of the X-T2 and how it has been incredibly helpful to film the swans.
X-Pro2 XF16-55mm (35mm) F2.8 ISO 400 1/750
X-Pro2 XF56mm F1.2 ISO 400 1/2700
X-T2 XF100-400mm (190mm) F5.6 ISO 1600 1/120
X-T2 XF100-400mm (150mm) F11 ISO 200 1/200
X-T2 XF100-400mm (150mm) ISO 200 1/200
X-Pro2 XF16-55mm (37mm) F2.8 ISO 1600 1/60
X-Pro2 XF16mm F1.4 ISO 1600 10 seconds
Steve Flanagan being won over by the X-Series. X-Pro2 XF16mm F2 ISO 200 1/250


 Think about it, it’s your dream job. You’re a Liverpool season ticket holder and supporter and as a professional photographer you are asked if you’re interested in photographing the portraits of a number of former and famous Liverpool FC captains for an upcoming book.


