fujifilm

Fujifilm Instax Share SP-1 Smartphoto Printer – Review by Kevin Mullins

A little while back someone showed me the Fujifilm Instax Share SP-1 Smartphoto Printer.  At first, I though…meh!  I could see it’s uses, but I couldn’t see it’s uses for me.

Instax-Share-SP-1-1Instax-Share-SP-1-2

Instax Share SP-1 next to an X100S for size comparison

This changed once I received it last week.

Let me tell you a little anecdote;  My daughter has one of the Instax Mini 8 cameras.  It’s pink (she’s five years old).  She adores it and she snaps away at anybody who will allow her.  She has a little album and it’s been a wonderful way for her to enter into the world of photography.

So, when I received the Fujifilm Instax Share SP-1 Smartphoto Printer I was intrigued, more than anything, to see how I could utilise it in my day to day work.

The Fujifilm Instax Share SP-1 Smartphoto Printer is nicely designed, and rounded.  The buttons are tactile and well positioned.  There is a neat battery indicator and also an exposures remaining LED.

It looks good and is really quite discrete too.  I have a white one, and I’m not sure if other colours will be offered.

Instax-Share-SP-1-3
Battery indicator and exposures remaining LED are very useful
Instax-Share-SP-1-4
A very handy reprint button will duplicate your last exposure. Good thinking Fuji!
Instax-Share-SP-1-5
The device simply looks good and the branding is discrete.

As you probably know, by day, I’m a professional documentary wedding photographer, and my other passion is Street Photography.

Street Photographers I think will simply love this device.  If you shoot portraits on the street, as I do occasionally, I usually end up offering the subject a business card and asking them to email me (I always send them a small print in the post if they do email).  This is a laborious task right? and an even more pain if you are shooting abroad.

I can see me taking the Fujifilm Instax Share SP-1 Smartphoto Printer with me when ever I shoot street now.  It’s small enough (101.6mm x 42mm x 122.5mm / 253g ) to slip into a bag and the two CR2 batteries will last for around a hundred exposures.  Plenty for a few shooting trips for me.

So; engage with subject, shoot, print…..away you go.  Very cool.

I was a bit reticent about using it at a wedding.  My style is totally candid.  I don’t really do bridal portraits etc.  However, I gladly took the SP-1 with me to a wedding I shot in the South of France last weekend.

This is what I did – and this is where I think it will be amazingly powerful for wedding photographers:

  • Shot the wedding all day using my X-T1 and X100S
  • During the down time I WiFi’ed (is that a real word?) over an image from the X-T1 to my iPad.  If you don’t have a wifi enabled camera you can of course simply ingest the card to the device.
  • I used Snapseed to edit the image sightly.  A bit of contrast and conversion to black and white.
  • I printed on the Instax Share SP-1
  • I gave it to the bride and groom as I left
  • They cried….said it was wonderful….and showed it to everyone else.
  • Boom!  Added value for wedding photographers right there.

Instax-Share-SP-1-7Instax-Share-SP-1-8Instax-Share-SP-1-10Instax-Share-SP-1-6Instax-Share-SP-1-11Instax-Share-SP-1-12Instax-Share-SP-1-13

 Connecting the printer, editing and printing the image took around one minute in total.
Connecting the printer, editing and printing the image took around one minute in total.

I can see wedding shooters who offer a more formal type of photography benefiting from this as well.  Being able to take a portrait of Aunty Mabel and print it there and then is going to make you the good guy (or girl).

Fujifilm Instax Share SP-1 Smartphoto Printer Print Quality

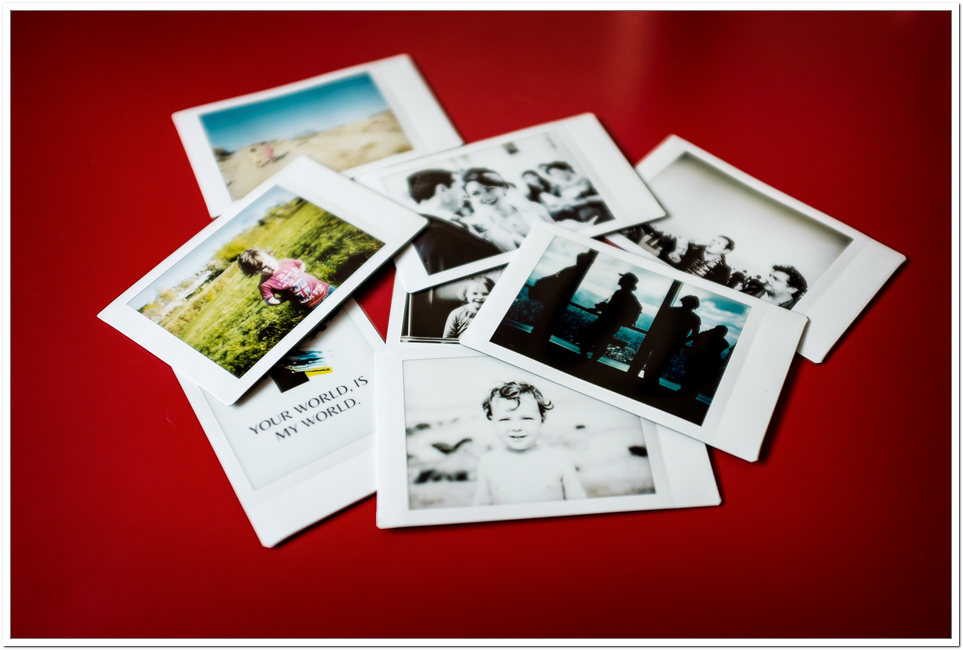
The print quality is fine.  You are not going to lose print sales post event by handing these out.  They are very much aimed at resembling the Poloroids of past and that, they do very well.  According to Fuji the print resolution is 10 dots/mm (254 dpi) with 256 levels per color (RGB).  It’s not hi-res printing but the images that do come out are snappy and certainly of a high enough quality to make people go “Ooooo” and even, perhaps “Aaaaah”.

The physical size of the images are 62mm x 46mm, so not huge….but perfect for street shooters and wedding photographers a like I think.

Cool things I like about the Fujifilm Instax Share SP-1 Smartphoto Printer:

  • Very quick to connect.
  • The App Software is very easy to use.
  • The printer itself tells you via the green LED lights how many exposures are left on the roll.
  • The App Software tells you which images you’ve already printed, or if an image is not usable.
  • Print time is around 9 seconds in total.
  • Didn’t have a miss communication once.
  • It’s a pretty small device.
  • Comes with batteries and two cassettes of film in the box.

A couple of things I’d like to see with the Fujifilm Instax Share SP-1 Smartphoto Printer in the future:

  • The ability to print direct from a WiFi enabled camera (X-T1 for example) would be awesome.
  • A better set of templates and editing options in the App
  • It would be cool to have a strap too.  I know, I know, you aren’t going to walk around all day with this around your neck but if you are doing a run of portraits, at a wedding perhaps, it would be useful.

Using the Fujifilm Instax Share SP-1 Smartphoto Printer:

  • You need the Instax Share App.  I believe this is available for iOS (iPhone and iPad) and Android devices.  I just used the iPad version.
  • Simply hold the power button the printer down for about a second and it comes to life.
  • At the same time, it creates and ad hoc wi-fi network (you can change the name, password etc if you are security conscience).
  • Go into your device settings and connect to that network.
  • Launch the Insax Share App.
  • Select the image.
  • Edit, add text, rotate the image etc as you see fit.
  • Press PRINT.
  • Then wait around 9-15 seconds for the emulation to be exposed in front of your eyes.
  • Stand back and admire your work.

The application comes with some themes and basic editing functionality (though I suspect any serious photographer will edit the images first in another image editing app on their device).  There are some neat uses of the themes where I can see it being useful to put your name or your website address on the image via the software.  All very cool stuff.   You can make the image Sepia or black and white too but, as mentioned, something like Snapseed is far better positioned for this type of editing.

In summary – I think this is a great device.  I know there are similar things on the market but for me this is a well rounded all in one solution for printing your phone photos or from a wi-fi enabled camera.

I really, really, really, really want to be able to print directly from the X-T1 and other wifi enabled cameras though.  I think that would make this device go from seriously useful, to absolutely necessary for travel photographers, street photographers and wedding photographers who want to give their clients that little extra.

Enjoy it.  I did.

Written by Kevin Mullins

Alex Lambrechts and Fujifilm Fashion X Street workshop

Date: Sat 3rd May
Time: Arrival at 10.00 and continue shooting for six hours.
Venue: Sanderson Hotel , 50 Berners Street, London, W1T 3NG
Limited to 6 attendees only.

2_800

Format of the day

This hands-on Fashion X Street workshop will focus on the various techniques and ideas Alex frequently uses when shooting an ‘On-Street’ Fashion, Press or Portrait, shooting with both daylight and flash for varied environmental and lighting effects. During this free 6 hour course, you’ll be learning/testing loads of tips, tricks and secrets. Suitable for all levels of photographers, you’ll be receiving personal hands-on tuition, tailored to your experience level, especially exciting for those still on the fence about switching to the X-Series from traditional DSLR, rangefinders and/or other formats.

You will receive hands-on coaching to achieve the results which have helped Alex become a very sought after UK fashion photographer.

The street shoot portion will be followed by an hour of post processing, Q&A and optional portfolio review

3_800

What you’ll learn

We’ll be shooting a professional international Fashion Model you’ll will be taken right the way through the process, from set up to directing your model for maximum results, learning the following along the way:

  • In-depth manual control and familiarisation of the various features unique to the X-Series, as well as basic manual photography.
  • Accurately & confidently selecting and using the new Fujifilm Fujinon lenses, in both Auto & Manual focus modes, with a variety of focusing techniques for different lighting and environmental situations.
  • Knowing how and when to switch between the various view options of the Hybrid viewfinder and LCD to get the most out of these great tools in every situation.
  • Looking for, identifying and creating dynamic compositions on the go, for that ‘reportage look’ whilst avoiding the typically boring/posed images.
  • How to shoot in the ‘real world’ and ‘on the fly’ with varying lighting conditions and moving subjects on the Streets of Soho.
  • How to use your flash in various ways, for either fill or creative lighting, as well as incorporating existing or external light sources, to enhance your creations.

The final part of this day will then be spent post processing and editing your new images using Lightroom, to prepare them for your portfolio as well as going over any aspects you might want to revisit or discuss again.

4_800

Equipment needed

Simply bring your camera, desired lenses and flashes.
Fujifilm will be providing a selection of X cameras on the day for you to use – including the brand new X-T1 and X100S.
Those wanting to post process your own images on the day will need to bring your own laptop (with the latest version of Lightroom already installed)

T + C’s

No additional, further or other costs or expenses are included in any prize unless stated. For example, the costs of transport to and from the event are not included.
There is no cash alternative

Where do I sign up?

The competition is now closed and congratulations to the winners. Details of the day will be shown on here and on Facebook after the weekend!

About Alex Lambrechts

Alex_800

Professional photographer Alex Lambrechts has already exhibited in London and New York and currently shoots commercially for magazines, brands, companies, music and fashion labels, travelling internationally.
Whilst he is well recognised for his ‘Quirky, often Edgy’ Children’s campaigns, and incorporating a ‘raw/street documentary’ style to his fashion editorials, Alex is forever closely studying the Masters of past & present, and is MOST passionate about the genres of ‘Social Documentary and Street Photography’ of which he is tirelessly working on personal projects. Alex’s most recent published works can be found in GQ Japan, Vogue Italia, 3 regional Elle and 2 L’Officiel mags and Nylon to name only a few, all these shoots were executed using Fujifilm X-Series cameras.

For more information on Alex, visit his website here

Fujifilm X-Photographers website update

The Fujifilm X-Photographers website has been updated. We’ve added new galleries for Ben Cherry, Dave Wall, Jamie Stoker and our first female UK X-Photographer, Kerry Hendry.

Visit the X-Photographers website

bencherryBen Cherry

Ben is a 22-year-old Zoology student who combines his love of nature with photography. Focusing on capturing moments, Ben has travelled the world through these two passions discovering new cultures and visiting some of nature’s wonders; from the Great Barrier Reef, the Victoria Falls, Simian Mountains of Ethiopia, and the rainforests of Borneo. He has won photographic competitions with National Geographic and the Rotary Foundation as well as being highly commended in Travel Photographer of the Year and finalised in BBC Wildlife Photographer of the Year.

See full gallery
Visit Ben Cherry’s website

davewallDave Wall

Dave Wall is not just an Award Winning Commercial Photographer, but professional retoucher and highly regarded trainer traveling the globe teaching both Adobe Photoshop & Lightroom. His most recent accolades include winning The SWPP Commercial Photographer of the Year award, not once but twice in consecutive years.

See full gallery
Visit Dave Wall’s website

jamiestokerJamie Stoker

Jamie is a freelance photographer based in his home city of London. He honed his craft at the London College of Communication and University of Brighton and now shoots a mixture of fashion and portrait commissions alongside personal work. He has photographed editorial assignments for Dazed & Confused, Port Magazine and The Fader and has recent commercial clients that include Nike and Warner Music.

See full gallery
Visit Jamie Stoker’s website

kerryhendryKerry Hendry

Kerry is an outdoor photographer who is passionate about landscape photography, alongside fine art equestrian commissions and adventures. Her equine images have been widely published in national media and sell worldwide. A keen rider from a very young age, Kerry combines her three main passions in life – horses, photography and travel.

Visit Kerry’s Love The Image website
See full gallery

Guest post: Fujifilm X for Destination Weddings

By V.Opoku

I just got back from documenting a destination wedding in Montego Bay Jamaica, and I can’t help but think that the Fujifilm X cameras have an enormous potential to be incredible wedding cameras. I have been shooting exclusive with two X-Pro 1’s + an X100s for the past year and I have gotten to know these cameras quite well.

They are a joy to work with, I love them but this past week something clicked – every destination wedding photographer needs a Fujifilm X camera in their bag – X100s, X-E1/2 X-Pro 1 and the newly announced X-T1 ; pick your poison.

Here is why :

Processed with VSCOcam with b1 preset
1. Travelling light, I pack my kit in my carry on bag, I don’t have to check in and it’s easier to carry smaller luggage around once I arrive at my desired destination.

3. sunset image
2. Wedding days are long hours, for this wedding I started documenting from 10am and it wasn’t until after 12am that I packed it all in. Over 14 hours of coverage – anything heavier, especially as a two-body set up will kill me.

4. pre-wedding
3. Documenting events pre and post the wedding day. This is where the x100s comes into a league of its own – I am able to hang out with my clients, their family and friends effortless, I am able to capture moments without a photographer sticker on my forehead.

I am not saying ditch your entire DSLR setup like I did, but I will highly recommend all my fellow wedding photographers out there, especially those who travels around the world, to add one of these gems to their arsenal.

Here is preview of the wedding I documented, images are either the X-Pro 1 + 35mm or the X100s. I can’t wait to add the 56mm & 14mm lenses into my setup during the course of the year.

About Me:

I am a Creative, Contemporary Wedding Story-teller. I love to travel, experience different cultures and discover awesome stories. London is home (for now).

blog : http://vopoku.com
twitter: https://twitter.com/vopoku

Fujifilm X Magazine – Issue 1 reader images 3/3

X-series users from across the globe share their finest images and the stories behind them

Here’s another selection of users’ images published in our Fujifilm X Magazine. If you would like to see your images in our magazine, and if you’re an X-series user, we’d love to see your shots. Email your images, along with details of the story behind them and some information about you and your photography to: xmagazine@bright-publishing.com


ERALDO MOSTINI – KORNATI

eraldo mostini
Camera: X-E1 Lens: XF55-200 at 128mm
Exposure: 1/800sec at f/14, ISO 200

Eraldo took this shot during the summer on a trip to the Croatian archipelago of Kornati. Attracted by the silhouetted shapes set against the glistening sea, he used his X-E1 and XF55-200mm telezoom lens to capture the scene.

I’m not a professional photographer, but I love using my X-E1 for shooting a wide variety of images,” he says. “It’s so lightweight, and offers an excellent electronic viewfinder that makes framing images really simple.

Picture quality is excellent, as well. I shoot mostly JPEGs, which look great straight out of the camera and the XF55-200mm telezoom delivers impressive levels of sharpness.

PRASHANT BUDHATHOKI – OLD WOMAN

Prashant Budhathoki
Camera: X100S Lens: 23mm fixed
Exposure: 1/1000sec at f/2, ISO 200

As soon as Fujifilm announced the X100S, I put in an order for one and I haven’t been disappointed. The image quality is what I love most, both JPEG and Raw. It’s a great all-rounder and I carry it everywhere with me, whether I’m taking street images or shooting landscapes. Thanks to the X100S, I’ve been able to explore a new side of photography that I was finding hard to achieve with my big DSLR.

This old woman was begging for food in the Pashupatinath area of Kathmandu. I offered her some money and then stayed for a while to take a few shots. I chose to work in Monochrome mode because I wanted to show the age lines on her face. I don’t think shooting in colour would have had the same impact.

PAUL REMMELTS – CHILDHOOD MEMORY

Paul Remmelts
Camera: X-Pro1 Lens: XF 35mm f/1.4R
Exposure: 1/340sec at f/3.2, ISO 200

I went to a local park and spotted this boy burning his name into a piece of wood with a magnifying glass. It reminded me of my own childhood, so I asked if I could take his picture. Having the X-Pro1 puts people at ease – because it’s smaller than a digital SLR, my subjects seem to be more relaxed.

Photographs like this always start with a conversation, then I just work with what is around me at the time. It’s hard to say where my ideas come from specifically, it’s just what feels right at the time.

Before I got the X-Pro1, I had an X100. It took great pictures, but I prefer the handling of the X-Pro1 and I’ve even used it for some of my commercial projects.

http://paulremmelts.tumblr.com/

X marks the spot: The Lake District, UK

One photographer, one Fujifilm X-series camera, a whole lot of great images

Ian Allington
Ian Allington

The Fujifilm X-M1 was made for photographers who like to travel light. Incorporating all the best elements of the X-series, including the superb X-Trans sensor, its compact dimensions and light weight set it firmly in the sights of photographers who don’t want a day in the field to result in a bad back or poor-quality images. Photographers like England-based Ian Allington (right), in fact, who regularly treks many miles in the picturesque Lake District to combine his two great passions: walking and photography.

We gave Ian an X-M1 along with the XC 16-50mm to accompany him on his latest trip into the hills and asked him to report back on his findings as he walked around the famous Old Man of Coniston. Click on the map to see his images and read his thoughts about the X-M1 and lenses.

1.The old man and dow crag

The old man and dow crag
Lens: XC16-50mm at 35mm setting
Exposure: 1/50sec at f/10, ISO 200

I decided on an early morning start and took this shot of The Old Man (on the right) and Dow Crag (on the left) from Torver before I started climbing. At this time, there was a deep shadow across the lower fields whilst the top of the hill was enjoying some early morning sun, so I was interested to see how the X-M1 coped with these conditions. As you can see, it’s coped extremely well with the contrast, retaining detail both in the shadows and the sunlit peak.

The camera offers different Dynamic Range settings to cope with strong contrast like this. Although this was taken with the standard 100% setting, 200% is available at ISO sensitivities of 400 and above, while the highest 400% setting is available at ISO 800 and above.

2.Winch cable tower

Winch cable tower
Lens: XC16-50mm at 16mm setting
Exposure: 1/200sec at f/9, ISO 200

One of the most striking features on the landscape in this area is the number of slate mines dotted around the hillside. I’ve taken many pictures here before, but what I particularly liked was being able to take pictures from ground level without having to lie on my stomach in the mud! Thanks to the huge three-inch tilt LCD screen on the X-M1, getting creative with low-level shots was a piece of cake. This is a picture of one of the old winch cable towers and the X-M1 has captured plenty of detail in the cables and the distant spoil heaps on the slopes of The Old Man of Coniston.

3.Old winch room

Old winch room
Lens: XC16-50mm at 30mm setting
Exposure: 1/350sec at f/6.4, ISO 320

Climbing up from the ruins you get a view down on the old winch room, or what’s left of it. The area below is known as Smithy Bank, which was one of the platforms used to transport the slate down the mountain. Here, I tried some of the X-M1’s in-camera filters. The first of these two shots was taken with the Miniature setting and gives an impression of the hut being a model, similar to the tilt shift function created by Photoshop editing, but much quicker and simpler! The second image was taken with the Toy Camera filter giving the effect of being shot with a plastic lens camera. The filters are fun to use and can change a simple image into something far more interesting.

4.Summit of the old man

Summit of the old man
Lens: XC16-50mm at 50mm setting
Exposure: 1/350sec at f/10, ISO 200

After a short climb from Low Water, which nestles below The Old Man, I finally reached the summit which stands at 803m. This view over the summit trig point is looking towards Wetherlam with the Eastern fells in the distance partly obscured by low cloud. I had been mainly shooting in the manual exposure mode up to this point, but here I took the opportunity to switch to the Landscape function on the camera. Comparing results to ones taken in Manual, there was very little difference so the X-M1 can clearly be relied upon for point-and-shoot simplicity. Again, the tilt screen was used to get a low down shot across the summit. My very first Fuji camera – the S9600 – had one and I’d forgotten how useful it could be!

5. View of low water

View of low water
Lens: XC16-50mm at 16mm setting
Exposure: 1/320sec at f/11, ISO 640

Time to start heading back down, and I took this picture looking over the edge towards Low Water below. The village of Coniston is visible nestled just at the end of Coniston Water with a glimpse of Windermere beyond. The colour reproduction is excellent with the greens in the distance well displayed. All the images today were taken using the standard setting as the light and natural colours were vibrant enough, but there are also a range of Film Simulation modes that replicate popular Fujifilm emulsions, should I have wanted to boost or mute colours. I’m sure in the future I’ll be pressing these into service.

6. The Scafell massif

The Scafell massif
Lens: XC16-50mm at 50mm setting
Exposure: 1/320sec at f/11, ISO 200

I descended via Goat’s Water, mainly because I love this view across England’s highest mountains; the Scafell massif. From left to right Scafell, Scafell Pike, Broad Crag, Ill Crag and Great End viewed across the dappled flanks of Grey Friar. The X-M1’s 49-point AF system with the ability to select your focus point was very useful when composing shots like this. Normally, I would select the focal point in the image, half depress the shutter then recompose before shooting. With this facility it was so easy to select the correct point without the need for recomposing. Just press the AF button on the back of the camera, then use the selector buttons to choose the focusing point on the rear LCD.

7.The cove

The cove
Lens: XC16-50mm at 16mm setting
Exposure: 1/125sec at f/14, ISO 200

After leaving Goat’s Water, the footpath leads you across the Cove. This shot was taken looking back at the imposing face of Dow Crag and the wonderful blue skies above it; I made no adjustment to the saturation on this shot, another example of the vibrancy of the images produced from the X-Trans sensor.

By this point, I’d spent some time with the camera round my neck. I usually store my DSLR in a camera rucksack as I walk because of the weight and the bulk, but the X-M1 is so light and compact it was no problem. It also speeds up picture-taking, as does the inclusion of the Q button, which provides quick and easy access to all the major features of the camera.