CP+, an international comprehensive camera and photo imaging show presents the latest products and technologies, all in order to help further the development of the photo industry and photographic culture from Japan — the heartland of the photo imaging industry — to the world
CP+ Camera and Photo Imaging Show 2015 will be taking place in Yokohama, Japan next week and I’ve been lucky enough to be invited to go along to help out.
I’ll be there for a week and I’ll be shooting for work pretty much constantly, but will hopefully also get the opportunity to shoot for myself, something that will be made especially amazing since I’ll be in great company with an amazing bunch of professional photographers:
Damien Lovegrove – portrait photographer and lighting guru from the UK Chris Weston – wildlife photographer from Switzerland / UK Knut Koivisto – portrait photographer from Sweden Tomasz Lazar – reportage photographer from Poland and winner of a World Press Photo award 2012.
So now I’m left to decide what gear to take…
Documenting the show
The “show bag”. Everything I’ll need to shoot and share at the show.
I want to travel light during the day, and at the show I will be looking to capture images that will reflect what is going on. I’ll be writing some blog posts and I’ll want some images that will help convey the general atmosphere and feeling of the show. For this I can’t think of a better option than my trusty X100S. (Actually an X100T is a better option for the wireless transfer but my Eye-Fi card lets me work around this). If I can get hold of one before next week, I’ll also be packing the WCL-X100 as it’s tiny yet that slightly wider angle of view can make a big difference when I don’t have any more space behind me to step into. Finally, I’ll also be using my trusty Gordy’s camera strap to hold my camera secure and close to my hand at all times.
Shooting for me
My wife has challenged me to help her decorate the living room. This basically means she wants some nice landscape shots (that I took so there’s a personal attachment) to print and frame. I’m not entirely convinced how plausible this might be looking at my schedule, but assuming I’ll get at least some free time in either Tokyo or Yokohama, I’ll need to make sure I’m prepared.
Camera + lenses
Fujinon XF35mmF1.4 and the X-T1 with XF14mmF2.8
For this I’m going to pack an X-T1 and XF14mmF2.8. I know the XF10-24mmF4 is also a great choice, firstly for the flexible focal lengths, and secondly for the pretty amazing OIS for handheld shooting in low light, however the smaller size and the focus scales on the outside of the lens, as well as the ability to shoot wider than f/4 if I really need it, mean the XF14mm is going to be my wide lens of choice.
I think I’ll also take an XF35mmF1.4, mostly as a backup. If I find in the evenings that I could really use the wider apertures, you can’t go far wrong with any of the “trio” (soon to be “quadro”) of fast primes. As much as I love the XF56mmF1.2 for portraits, I find it fairly inflexible for general use, and since I’ve already got the equivalent focal length to the XF23mmF1.4 in the X100S, process of elimination leads me to the super all-round XF35mm.
Remote Shutter
The Fujifilm RR-90 will come along for the trip to avoid any camera shake for any long exposures. Which brings me onto…
ND Filters
LEE Filter Seven5 Deluxe kit plus rings to attach to X100S and also the XF14mm lens
I will certainly afford a bit of space in my luggage to hold my LEE Filter Seven5 deluxe kit. It’s small and gives everything I need for my level of photography. It comes with the holder, a polarising filter, a 0.6 ND Soft Grad, 0.6 ND Hard Grad and a 0.9 ND Hard Grad, and finally the 10-stop Big Stopper. Whether I’m fighting off the glaring sun to balance the exposure across my images better, or just trying to slow everything down to capture a more peaceful scene, I should hopefully have whatever I need.
Tripod
My 3LeggedThing “Brian” will be coming along. He’s small and light and still stable enough for what I’ll be shooting. I’ve also got the smaller AirHed 0 ballhead that not only compliments the size of the X100S and X-T1, but also carries our own “X” branding! (almost)
Bag
The “show bag”. You can also see the little felt camera bag that keeps the X100S extra safe inside the soft bag
I’ll actually take two bags. I have a lovely little bag called “Daniel” made is a collaboration between my faithful emploters and Millican that will serve as my “show bag” for when I know I’m only working. It’ll hold my X100S, WCL, wallet, iPad and other sundries like spare memory cards, spare batteries and charger very comfortably. It doesn’t add much in the way of protection – I learnt this the hard way when I discovered a broken filter that had been in the bag for one afternoon – but for what I’m carrying perfectly suitable, not to mention very light and (if I may say so myself) rather stylish.
The “full kit bag”. This’ll basically be what I’m carrying when I’m out specifically shooting.
I’ll also be taking a ThinkTank Retrospective® 7. Although it’s a lot bigger than the Millican bag, this is a seriously good bag that pretty much lives on my hip if I go anywhere I know I might want to shoot. It’ll more than comfortably hold everything I’m taking, including the contents of the Millican bag, so if I do get the change to go out specifically to shoot, I’ll have everything with me at all times.
Other bits
I’ll take the EF-X8 (the one that comes with the X-T1) and EF-X20 flashes “just in case”, although I tend to just try to shoot with natural light. Also 2x spare batteries for each camera, chargers and pin adaptors.
I’d love to hear your feedback in the comments below. In fact, if you post it soon enough I might even have a chance to change my mind if anything is recommended that I hadn’t thought about. What would you take if you were planning a similar trip?
Notes
The use of third party products here is as result of my own choice, not that of Fujifilm’s. This blog post is not an official endorsement of any of these products from Fujifilm. It is simply my own opinions on which camera gear I will take on a trip, and why.
Follow me at CP+
I’ll be posting regularly on the following pages, as well as hopefully on here as much as I can.
The Photography Show is our annual excuse to talk all things camera, and to add to the excitement we have an expert line-up of pro X photographers who will be sharing their hands-on experience with you throughout the show.
Bert Stephani
Bert is a professional photographer from Belgium who spends most of his time shooting creative portraits for editorial, commercial and private clients. He believes in sharing knowledge with other photographers by teaching workshops around the world, blogging and producing educational videos.
The Beauty of the Imperfection
Here you will learn tips and tricks for shooting creative portraits with simple camera & lighting equipment. Bert will also talk about the importance of subject interaction.
Date: Tuesday 24 March 2015
Time: 11:30 – 12:00
Stage: Live Stage
Date: Monday 23 March 2015
Time: 11:30 – 12:00
Stage: Live Stage
Kevin Mullins is a Wiltshire-based award winning wedding photographer who specialises in telling stories, through pictures, of weddings. The style of wedding photography he uses is known as documentary wedding photography, or reportage wedding photography and he is passionate about photographing weddings authentically, sympathetically and responsibly.
Reportage Photography for Weddings
Explore reportage photography from a wedding and social documentary point of view. Learn how to get close to your subjects without disrupting the event and how to look for humour and emotion in a scene.
Date: Monday 23 March 2015
Time: 13:00 – 13:40
Stage: Behind the Lens theatre
Paul became a professional photographer in 1984, and moved into newspapers in 1991, eventually becoming Picture Editor of The Times. In 2011 he left The Times to pursue his love of landscape photography and to launch a project for young children to develop visual and creative awareness through photography.
His work conveys the emotional and spiritual responses he has to the landscape in front of him. His journey from news photographer to landscape photography began as a form of therapy to help deal with the stress of his job. Through photography he was able to express himself where words failed him.
Connecting with your Landscape
Learn a mindful approach to landscape photography and how to connect with your subject. Paul will also show you the importance of equipment that doesn’t get in the way of your vision.
Date: Monday 23 March 2015
Time: 17:00-17:40
Stage: Behind the Lens Theatre
Matt Hart is a black and white Street and Event Photographer based in Liverpool. He is an official Fujifilm X Photographer; a Formatt Hitech featured Artist and the founder of The Fujiholics Social Media Group.
Matt is passionate about Street Photography, he has developed the skill to observe and be virtually invisible, letting the world carry on around him without affecting the scene. The subject is unaware. Matt keeps the system and process as simple as possible so as not to over complicate the task. This is why he has chosen the Fuji X system for his professional work which helps him to achieve his style.
Street Life
Here you will learn Matt Hart’s modern street style and how to be invisible when shooting street photography. You will also be shown street camera techniques that Matt uses to maximum effect.
Date: Saturday 21 March 2015
Time: 12:00-12:30
Stage: Streetscape
Date: Sunday 22 March 2015
Time: 15:00-15:30
Stage: Streetscape
All shows listed above are free of charge (as long as you have purchased a Photography Show entry ticket) – the show recommends that you arrive 15 minutes early to ensure a seat.
We look forward to seeing you all there very soon!
For my travel photography, I now work entirely with the X-system. I like the fact that it’s lighter, smaller and manages to look great yet unobtrusive and produce great looking images at the same time. I love the direct feedback of the manual controls, dials and aperture rings. I use two X-T1’s, a X100s and a slew of Fujifilm lenses. One of the advantages of using a smaller and lighter system is that it frees up some space (and weight) in your camera bag for other accessories that can help you create better shots. In this two-part series, I’ll have a look at my top-ten favorite accessories for Fujifilm cameras – from a travelling point of view. Here are my first 1 – 5 accessories.
1 – Flash and modifier
I love using flash while traveling. In fact, I wrote two eBooks on the subject: Making Light 1 and Making Light 2, available on http://www.craftandvision.com. Generally, I like to use my flash off-camera, but on those rare occasions where I use it on-camera, I will often bounce it to my side or my back in order to diffuse the light as much as I can. When I’m moving around and bouncing an on-camera flash, I prefer to work in TTL because the flash-to-subject distance (and hence the required flash output) varies continuously. TTL will automatically calculate and adjust that power for me. For those instances, Fujifilm’s own EF-42 flash is just perfect because it’s fairly powerful and it has TTL.
When I use the flash off-camera however, I prefer to work in manual mode but I do like the ability to wirelessly trigger my remote flash and set its power. For off-camera use, I really like the Godox V850 flashes: they’re powerful, affordable, built like a tank and thanks to the optional radio FT-16s triggering system, I can change the power remotely. But best of all, the V850 is powered by a rechargeable Li-ion battery that lasts up to 600 full power flashes. No more fussing around with AA batteries! One of the few dislikes I have about the Godox flashes is that the receiver comes off way too easily. Therefore, I’ve stuck some Velcro and gaffer tape to it.
From left to right: The Godox V850 manual flash with its handy Li-ion battery, the trigger to put on the hotshoe of the camera and the receiver which clips on the side of the flash.
For the 2015 Rajasthan Photo Workshop (a 2 week workshop in India hosted by fellow X-Photographer Matt Brandon and myself which attracts a lot of Fujifilm shooters and for which at the time of writing were only 2 spots left), I have my eyes set on another, bigger flash: the HD600 II, a 600 Ws (that’s about the lighting power equivalent of 6 to 10 small hotshoe flashes) portable system by Jinbei.
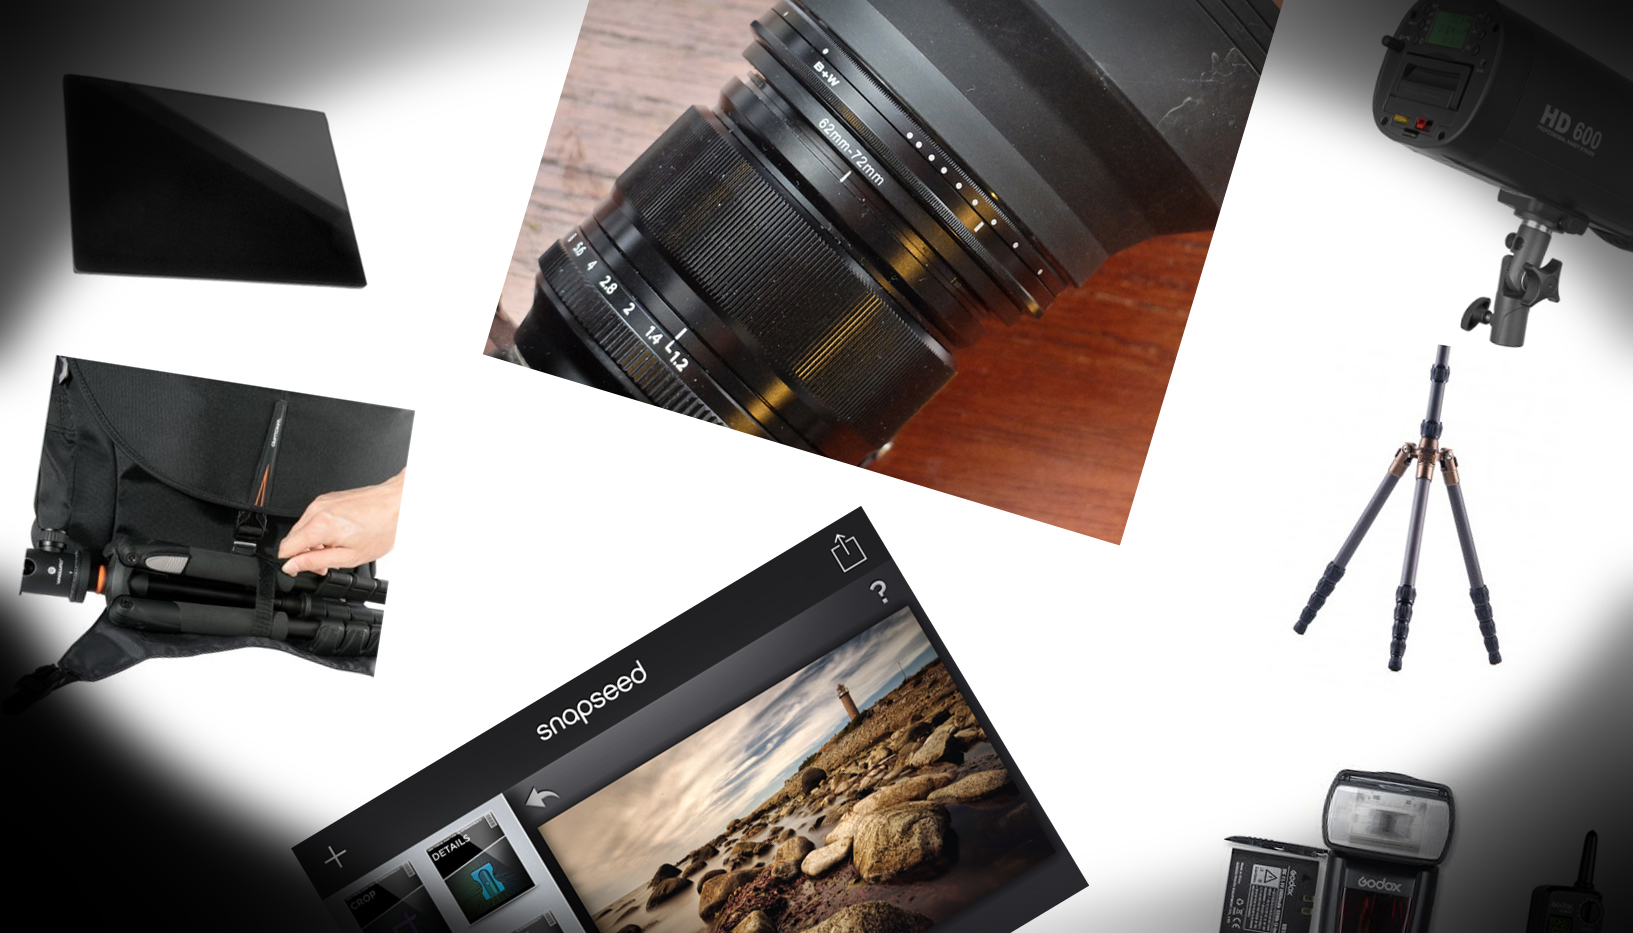
The Jinbei HD600 II packs 600 Ws of power (that’s about 6 to 10 regular speedlights) in a relatively lightweight 2.4 kg package, battery included.
Now if you go through the trouble of bringing a flash, there’s one accessory that’s almost as important as the flash itself, and that’s something to diffuse it: by itself, a flash is a very small light source and therefore it will create harsh shadows. That’s where modifiers like softboxes and umbrellas kick in: they increase the size of the light source (at the expense of some flash power) and throw softer shadows, especially if you use them close enough to your subject. Although I generally prefer the increased control that softboxes offer, while I’m travelling I have three big constraints: my modifier must be easy to set up, light enough to carry and small enough to put into my camera bag. That’s why I love the Lastolite Trifold umbrellas. As a bonus, they’re cheap, too. A flash and umbrella add some 800 grams to your camera kit, but they also add a wealth of opportunities.
To paraphrase Capa: ‘If your pictures aren’t good enough, your clothes aren’t dirty enough’. In this case, I’m holding my Godox flashes and Lastolite Trifold umbrella while participants of the Rajasthan Photo Workshop are practicing their off-camera flash skills on these great characters we rounded up at a small tea-stall.And the resulting image…I call this my two lights for the price of one technique: I will often put my subject between the sun and my flash. The sun acts as a rim light (look at how beautifully it backlights the water coming out of the pump) and the flash will fill in the shadows. By positioning my flash to the left, I created a so-called Rembrandt look. Using an umbrella made for softer shadows and created big catchlights in her eyes.In this case, I lay down and handheld the flash and my umbrella in my left hand. I used the sun as a natural rim light, exposed for the sky and then brought my underexposed foreground up with flash. On moments like these when you’re handholding a flash and umbrella in one hand, it’s not difficult to appreciate the light weight of the XT-1 and a prime lens you’re holding in the other.
When I’m not using my Brian tripod (see tip #3) to hold the flash for me, I’ll either handhold it myself (a lot easier to do when you have to hold less than one kilogram of camera equipment in your other hand) or have someone hold it for me.
I use flash mainly to increase the quality of my light, rather than the quantity. That’s why the sunnier my destination, the more likely I am to bring a flash with me!
In this shot, I could have pushed the ISO to 3200 and make an available light shot. But it would have been a flat, poorly lit available light shot with a washed-out sky as well. By adding an umbrella’d flash coming from the left, I was able to bring out the texture in these goat’s skin and give more dimension to the woman’s face.
2 – Camera bags
Ah. Camera bags. If only the perfect camera bag existed. The be-all-end-all camera bag. But I haven’t found The One yet. Instead, I pick one depending on my shooting plans for the day. So I want to give you my top-three of camera bags.
The Vanguard Heralder 38
The Vanguard Heralder 38 won’t win any beauty awards, but it’s a highly efficient bag that can also help you carry a tripod without bumping in to everything and everybody.
I love this bag for its versatility: it can hold a lot of gear (in fact, it can probably hold all of the other accessories in this top-10) and has a separate laptop compartment. It has a big zipper at the top for quick access and the bright orange interior is more than a fashion whim: it makes your mostly black camera gear easier to find. Now, there are a gazillion other bags that are similar to this one (including a couple of smaller editions of the Heralder), but what the Heralder 38 has that few others have is a secret latch that can hold my tripod (see tip 3). The only downside is that, compared to the stylishness of my Fujis, it just pales.
Think Tank Speedracer
The Speed Racer by ThinkTank nicely distributes the weight between your shoulders and your back. I also like the fact that you can add extra modular pouches to the waist belt. This lets you pack as light or as heavy as you need.
Although the Fujis themselves are light enough and a lot lighter than my fullframe DSLRs and lenses are, when you add enough lenses, accessories, flashes and a tripod to the mix, the weight can start to add up again. A bag that only hangs from your shoulder can become hard to carry all day. And I don’t like backpacks. I find them good to transport gear from A to B, but not to walk around in A or B. So, if I want to go easy on my back, I use the Think Tank Speed Racer. This bag has a shoulder belt but also a waist belt that you can tuck away if you don’t need it. The waist belt helps to divide the weight between your shoulder and your waist and lets you attach extra modular pouches to it. It’s a great system and my partner-in-crime on the Rajasthan workshops Matt Brandon (www.thedigitaltrekker.com) uses the smaller Speed Freak much the same way. I just wished they looked better. The bags, not Matt Brandon. He looks fine. For his age, at least J.
Ona Astoria
The Astoria is Ona’s biggest bag. If you carry less gear than I typically do, you might want to check out their gorgeous but slightly heavy full leather Brixton.
So, this brings me to the last in this round-up. When style does matter, the classical black nylon camera bags just won’t cut it. In those cases I turn to the Ona Astoria. This mixed canvas and leather bag holds a laptop, two bodies, a couple of lenses and even a flash. It’s not the cheapest bag in this overview nor is it the biggest or the most practical, but it makes up for all of that by its stunning looks. Visually, it is a perfect match for my Fujis. In fact, the bag looks so good that putting a regular DSLR in it would be a crime! In the same league, I recently discovered the Roamographer by Holdfast Gear. This leather bag opens like a doctor’s bag and also has a strap for a tripod. The only thing holding me back is forking out another $500 on a bag and the fact that it weighs almost 6 pounds. Empty.
3 – Tripod
The Brian by 3 Legged Thing. It doubles as a light stand, too!
The smart way to go about the weight savings that switching to a mirrorless system offers, is to pass those savings on to your back: it will thank you later. However, I decided to ‘reinvest’ some of those economies into more gear that would allow me to do things that I previously could not do. One of those extra items I now bring with me a lot more than when I was lugging DSLRs is a tripod. I use the Brian, by British manufacturer Three Legged Thing. I specifically chose this model because it’s the only one I know that extends to over 2 meters. Not that I’d want to put a camera that high, but I’ll often use my tripod as a makeshift light stand as well.
The Brian in use: I thought the daylight (left) was too flattering and soft for the drama I wanted to add to this shot of this memorial stone at the German war cemetery of Langemark in Belgium. So I put up my tripod and used it as a light stand for my Godox V850. A grid (by Honl Photo) helped to concentrate the light even further.
At GBP 359, it’s not the cheapest tripod around, but if I’ve learnt one thing, it’s that with tripods cheaper often means compromising, which in turn makes me leave it at home. My first tripod only cost me $100. But it was big, bulky and didn’t extend high enough for what I wanted. As a consequence, I’ve used it twice and now it’s collecting dust. So it cost me $50 per shoot. My Brian’s only one year old and it’s already averaging a lot better than that!
Although 1.2 kilograms is very light for a tripod as versatile as the Brian, sometimes even that is too much to carry. In those cases, I’ll almost invariably bring an alternative solution: the Joby Gorillapod. It exists in a heavy and quite bulky DSLR version, but for my Fujis, I chose the much more convenient (and affordable) Hybrid version. That’s just one more advantage of a smaller and lighter system like the X-system: not only your camera and lenses are smaller: your accessories (like filters, or in this case tripods) can be lighter and often cheaper, too.
For this night shot of a cruise ship in Stockholm, I needed a five second exposure. Too much even for the OIS of my 18-55 lens. Luckily, I had brought my Gorillapod with me. I simply attached it to a metal fence to my right. There’s even a small hotshoe accessory available that allows you turn it into a light stand or should I say light ‘hanger’…
4 – Filters
I use Formatt Hitech’s graduated filters when I need to balance out a sky and foreground beyond what Lightroom’s Highlights and Shadows recovery can do. Alternatively, I might make a series of bracketed shots and merge them into an HDR. I’ve recently started to experiment with long exposure photography.
This picture was taken during the highly recommended London by Night and Low Light workshop by Doug Chinnery. Doug is also a Fujifilm user.
For my long exposure photography, I use the Formatt Hitech ProStop 10 stops IRND filter – I like that it’s relatively neutral compared to other brands – and I can’t wait to use their new Firecrest 16 stop ND filter. That’s 16 stops of Neutral Density in one filter! No need to stack multiple filters and run the risk of vignetting or other image degradations. To give you an idea: a 16 stop ND filter will do: it will turn an exposure time of 1/250th of a second into 4 minutes so you can use it for long exposure photography at noon!
As mentioned higher-up, I also use a lot of flash. Because the Fuji has a sync speed of 1/180th, this means that during the day, in sunny conditions, even at my lowest ISO of 200, I’ll be stuck with apertures of f/11 to f/16. But what if I want to shoot my fancy 56 f/1.2 at f/1.2? I might need a shutter speed of 1/4000th or even beyond that. Which is way beyond the sync speed of my flash. The solution lies… again… in neutral density filters. A neutral density filter allows me to use flash in bright daylight (e.g. for fill flash) with a wide open lens and still keep my shutter speed at or below the 1/180th sync speed. But on the other hand, when using ND’s for flash, I don’t want to use a fixed ND, because the lighting conditions can often change quickly by a couple of stops. So, suppose I’d need a fixed 6 stop ND in one outdoor location, 30 meters further the light might be 3 stops less intense. With the same filter, I would suddenly be at 1/25th of a second, which becomes dangerous to handhold. And I don’t want to have to continuously change filters. So, the solution I came up with is the following: I use a 6 stop ND and a variable 1-5 stop ND. Depending on whether I stack them or not, that gives me between 1 and 11 stops of sun-stopping power without having to change filters too much.
This setup may look complex but you get used to it pretty quickly. By combining a fixed and a variable ND, I can use my 56 1.2 and the other fast Fujinon primes wide open in bright sun and still keep the shutter speed at or below the 1/180th sync speed, so I can use flash if I want.
And the beauty is that, if there’s enough sun (and I wouldn’t use them if there wasn’t), my X-T1 still manages to focus through 10 stops of ND! Brilliant, isn’t it? Oh, and by the way, that lens hood you see is a collapsible one by Caruba: I needed a lens hood with a wider diameter because instead of buying separate circular NDs for each lens diameter, I bought them to suit my biggest lens (the 10-24) and I use step-up rings.
The image to the left was made with flash, but I did not have any filters handy. As a result, I had to use an aperture of f/11, which made the entire background too much in focus for my taste. The image to the right was shot a year later with a three stop ND filter. This allowed me to open up the aperture to f/4, giving a softer background.
5 – My iPhone
An iPhone (or any smartphone, for that matter) is a great travel photo accessory. First of all, by means of the Camera Remote App (iOS link, Android link), I can remotely trigger my X-T1. That’s not only helpful when doing longer exposures, but it also helps me if I want to take photos inconspicuously. Mind you, I generally ask permission (with the flash setup that I often use, it’s hard not to, anyway) but every once in a while there are scenes where raising the camera to my eye would probably kill the scene. In those cases, I use the Camera Remote App and frame the shot from my iPhone. I can even tap the screen to choose my focus point! I also have the free Snapseed editor – it’s so good at improving your images that on the last Rajasthan Photo Trek, we’ve come to call it ‘Snapcheat’! (iOS link, Android link).
If you have an iOS or Android smartphone or tablet, you just have to pick up a copy of Snapseed. Don’t let the price deter you: it’s free, which saves you some money for the other goodies in this overview!
Other essential apps are the instax SHARE App (iOS link, Android link) which – while waiting for the firmware update that allows for direct printing from my X-T1 to the portable Instax Share printer (see tip 9) – lets me print images that I saved from my X-T1 and processed in Snapseed to that little wonder of a mobile printer.
The Instax Share App. You can even add some text to the photos you print (not shown).
Finally, I also like to use the Camera Remote app for bracketing for HDR. For reasons unknown to me, the bracketing in the Fuji cameras is limited to 3 shots with only 1 stop difference between them. For capturing scenes with extreme contrast, that’s often not enough, as shown below. While I could use the EV compensation wheel on the camera, that causes me to physically touch it and even the smallest displacement can lead to alignment issues and ugly artifacts afterwards.
A super tip for HDR-lovers: use the exposure compensation on your Camare Remote App to get up to 7 bracketed shots, one stop apart, without touching your camera!The end result: I often convert my HDR images to Black and White.
Other than that, my iPhone comes in handy because it allows me to geotag my photos using the same Camera Remote App. However, because that requires me to set up a connection each time I want to geotag, I generally use a dedicated geotagging App (I use Geotagphotos Pro) (iOS link, Android link) and then sync the App’s tracklog with my photos in Lightroom. Finally, I also have a Depth of Field calculator app.
The Geotag Photos Pro app creates a GPS tracklog which you can then sync up with your images in Lightroom.
Piet Van den Eynde is a Belgian freelance travel photographer, author and trainer. He’s a Fujifilm Ambassador and has published over 10 books and eBooks on digital photography and postprocessing with Adobe Lightroom. He also organizes two travel photo workshops each year in India with X-Photographer Matt Brandon from www.thedigitaltrekker.com. Next one up is the beautiful Indian state of Rajasthan and has only two spots left. His English eBooks such as his bestselling Lightroom 5 Unmasked are published by Craft & Vision. Discount code FUJISAVINGS will save you 30% on any of his Craft & Vision eBooks and his Photoshop for Photographers video training until end of February 2015. Piet’s own blog can be found here: http://www.morethanwords.be/blog
Image by John Armstrong-Millar Highly Commended – Food for Sale Category – Pink Lady® Food Photographer of the Year 2014
The competition
The theme is Snap the Rainbow. It’s really simple, all you have to do is capture the beautiful colours of food with your camera (doesn’t have to be a Fujifilm camera) and share them on Thursday 13th November 2014.
Enter by Twitter:
Upload your image to Twitter and include the twitter accounts @foodphotoaward and @Fujifilm_UK and the hashtag #allfoodsbrightandcolourful
The Fujifilm X-E2 is a multi-award winning CSC (compact system camera), packed full to the brim with technology and delivers outstanding image quality. The X-E2 comes with a XF18-55mm lens. The 18-55mm versatile short zoom lens which covers a variety of frequently used focal lengths from 18mm wide angle to 55mm telephoto. A perfect range for nearly all photographic subjects.
The personal touch
Not only will you win this stunning camera and lens, but it will also be customised with one of the Fujifilm Signature colours and textures. Choose from any of the colours in the slideshow below:
Good luck!
One winner will be selected from all entries received and notified by Twitter or Facebook on Wednesday 20th November 2014
To allow participants to contribute around the world, all entries must be tweeted or posted on Facebook between midday GMT on the 12th November and midday GMT on the 14th November 2014.
For further information please contact, Sue Richmond at Kenyon Communications by emailing sue@kenyon-communications.com
Full Terms and Conditions can be found at http://www.internationalfoodphotographyday.com
I’m so lucky. I have one of those jobs where I get to speak to creative people on a daily basis, share ideas, see amazing images all the time. It can be quite overwhelming, inspiring visions springing out of nowhere, ideas being converted from the written word to a physical printed image. In an industry which is (thankfully) teeming with creative types, there are certain names which keep being talked about. One of those names is Trevor Yerbury, in fact two names Trevor and Faye Yerbury. For those who don’t know Trevor and Faye own the Yerbury Studio, based in Edinburgh, one of the most highly respected and regarded photographic studios in the UK. Trevor Yerbury is a 4th generation photographer, the business founded by his great grandfather in Edinburgh in 1864.
Trevor joined the family business in 1968 and has been driving the business forward, with his wife Faye and team, ever since. Together they create the most amazingly simple, striking and sophisticated images, creating an overall elegant and timeless collection of images. Both Trevor and Faye have received accolades over the years from Masters of Photography, Fellowships and between them hold 15 Kodak European Gold Awards. Internationally they are also respected judges.
Trevor and Faye organise a series of very successful seminars, both in the UK and abroad, sharing their experience, skills and passion with fellow professional photographers.
Both Trevor and Faye are now passionate users of the Fujifilm X range of cameras and Fujinon lenses, using them pretty much exclusively for all their work now. Trevor uses the X-Pro1 and Faye the X-T1, but as with all married couples they are pretty happy to share cameras and lenses. That’s how it works, right?
I recently joined them on one of their seminar tours in the UK at St Albans. They’ve been producing a series of seminars based around The Power of the Portrait. Here they spoke to an eager congregation of professional photographers, who were there to learn the secrets to success in portrait photography and help fine tune skills in marketing and promoting a profitable portrait business.
There are many things which I found fascinating. Firstly, just how generous Trevor and Faye are with their knowledge and understanding. Of course, they are experts in terms of photography skill, but they’ve fine-tuned all aspects of their business, will talk about most commonly made mistakes and also how to maximise the profitability, the relationships and the longevity of the business. They will talk to photographers in a way which really resonates, especially elements such as creating your own photographic style, the importance of relationships, after sales and creating unique products.
Secondly, how passionate they are about our cameras – you may find this hard to swallow and a bit contrived coming from the PR Manager, but they really are. To hear terms like, ‘The Fuji system is the future of photography’ and ‘they should change the shutter sound to one that makes the same sound as a cash register’ is totally from their mouths, not ours. It’s wonderful to hear because you know it’s honest. They wouldn’t be using the X cameras if it wasn’t going to work for them and help produce shots to showcase their work. Obviously these guys have been in the business a good while now and know what they like and what they don’t like. It made me very happy to hear what they were saying and to see so many people in the audience already with their X cameras ready.
Throughout the day they shot a few attendees, showing how simply you can produce an amazing image, using one camera, one lens, one reflector and one light box. Amazing.
After the seminar you could tell that all the delegates were energised and motivate, ready to get back to their studios with fresh ideas and a revitalised view of how to run their business and also seeing some of the amazing pictures taken by two of the most respected photographers in the UK, on the X-cameras.
Further information regarding The Power of The Portrait can be found here, new dates have been added:
For those who don’t know, Aspire Photography are based in the Lake District. Set amongst the beautiful and dramatic landscape, along a windy road and built within converted stable yard, you have to walk over an old cattle grid to enter. This may not sound like a very poetic or creative start, but hang on a mo. As you walk over the cattle grid something really rather magical happens. You can’t see it, you can’t smell or taste it, but you can feel it. It’s as though invisible fairies are perched on the gates and sprinkle you with fairy dust as you walk into the entrance.
You may be thinking that I’ve had a bit too much to drink, or perhaps been out in the sun for too long, but bear with me.
Aspire Photography (rather, multi-award winning Aspire Photography) are a very special group of photography trainers, running courses for all different levels throughout the year. They specialise in styled shoots and empowering photographers to understand how they can become better photographers, and how to run a successful photography business. They also have a strong, but by no means exclusive, female engagement. It’s not just down to things looking pretty, or sets being styled to the most amazing standard. What Aspire teach is that it’s a totally safe environment to ask questions, to challenge your limits and to play – to really play with photographic techniques and leave with a portfolio of new images and a fresh outlook on your personal style of photography.
One of the reasons we wanted to engage with the Aspire “tribe” is because the X-Series of CSC cameras has really connected with female photographers – they love how light the system is, the amazing image quality and the damage limitation the price point has on their business expenditure.
The day started with Kerry Hendry, our first UK female photographer, talking us through her journey from Nikon to Fujifilm. Why did she decide to make the switch? What did it mean to her style of photography? We then move on to the technical aspects of the X-T1, X-Pro1 and lens line-up. There’s a mixture of attendees. Some are curious and open to the idea of the X-Series and others are already X converts but want to know how to get more out of their camera.
After lunch the real fun begins, and I mean the opportunity to play! Three models have been dressed to embrace the Midsummer’s Night Theme and amazing stages of beautiful woodland fantasy scenery were created to make an amazing photographic landscape. Everyone was encouraged to interact with the models, to capture stunning still images that would demonstrate the creative capabilities of the camera and to have fun. The images from the day, from all the attendees were stunning.
I interviewed both Kerry and Catherine to understand their view of the day:
Going back to using Fuji has been a remarkably natural progression for me. I shot grainy Fuji film as a teenager and fell in love with the Fuji way right back then.
I am the one who misses the smell of film in the fridge! More recently I’d gotten drawn into the whole ‘bigger is better’ perception – and that’s all it is, a perception – and it just didn’t feel right. I was looking to find my photographic mojo again – and bought a Fuji X-E2 and one kit lens, and I’ve not looked back.
I adore the unique image quality the Fuji’s produce, after all, quality is still the primary influencer. The smaller, lighter system gives allows me to feel free again – to try new things, to capture landscapes without 10kg of kit in my bag. Travelling light in any respect is liberating – and for me, using Fuji kit has made me excited about photography again, given me new inspiration – and it also seems to bring a smile to my face.
I’ve worked with Aspire for almost a decade, in a marketing capacity and as a photographer – the Aspire way really does change your life!
The team teaches you to look at your strengths, concerns, opportunities, your creative ‘wish list’ and so many other aspects of becoming a better photographer – whether that’s as a hobby or with the aim to going pro. And then of course, they help you achieve these goals.
On the Aspire/Fuji courses we leave the every day aspects of life – pressures, distractions and worries – at the Aspire gate.
Once you drive onto the estate it’s all about freedom to express your creativity within – while learning and developing too.
On the Fuji days of course we talk kit – and there’s the opportunity for guests to try and of the cameras and lenses they like – including all the latest releases.
Many courses will talk theory, but there’s no better way that putting what you learn, or new things you want to try, straight into practice on a professionally styled shoot.
It’s the perfect opportunity to capture amazing images for your portfolio, or simply immerse yourself in a friendly, explorative environment in which to learn.
Think gorgeous models, magical styling, likeminded new friends to work with, technical expertise to quiz – and of course Fuji freedom & fun!
Catherine –
Aspire Photography Training designs educational programs that teach and inform whilst inspiring those to push the boundaries of their photography.
We train those that have a keen interest in photography and those who are passionate about photography. Whether you are a hobbyist or seasoned professional we have a range of courses to suit all. We have been a significant influencer on some of the best businesses in the UK. Education is at the core of all we do.
We believe the Fujifilm X-Pro1 range will revolutionise the perception of what a professional photographer should look like and already is essential gear for a professional to have over their shoulder. Women and men alike are leaping to change over to the X range, all for differing reasons. We have witnessed photographers reach out to the X-range to seek sheer quality of the product, we also have seen many photographers change to the X-range to liberate themselves from an overweight camera bag, enabling them to deal with any scenario with ease. The Fuji X-Pro1 is high on Aspire’s agenda, we will be giving this camera and system a great deal of conversation, time and training space. The X range is making it’s mark with the professional photographers who are at the coal face of weddings, commercial and portrait shoots, mainly due to the freedom given and the sheer level of technical ability it gives them on a daily basis.
Aspire Photography Training is all about looking ahead, liberating and thinking out of the box. In fact we don’t even have a box, just a broad and open mind to all the possibilities photography can give you when you choose to think creativity.
The next Aspire and Fujifilm workshop takes place on Wed 20th Aug, in the Lake District.


 Bert is a professional photographer from Belgium who spends most of his time shooting creative portraits for editorial, commercial and private clients. He believes in sharing knowledge with other photographers by teaching workshops around the world, blogging and producing educational videos.
 Kevin Mullins is a Wiltshire-based award winning wedding photographer who specialises in telling stories, through pictures, of weddings. The style of wedding photography he uses is known as documentary wedding photography, or reportage wedding photography and he is passionate about photographing weddings authentically, sympathetically and responsibly.
 Paul became a professional photographer in 1984, and moved into newspapers in 1991, eventually becoming Picture Editor of The Times. In 2011 he left The Times to pursue his love of landscape photography and to launch a project for young children to develop visual and creative awareness through photography.


 After lunch the real fun begins, and I mean the opportunity to play! Three models have been dressed to embrace the Midsummer’s Night Theme and amazing stages of beautiful woodland fantasy scenery were created to make an amazing photographic landscape. Everyone was encouraged to interact with the models, to capture stunning still images that would demonstrate the creative capabilities of the camera and to have fun. The images from the day, from all the attendees were stunning.