A new exhibition of more than 20 original pictures by world renowned photographer Markus Klinko will open in Basel on March 24th. Following a very successful exhibition at the Markowicz Fine Art Gallery in Miami, the prints will now be available to see in Europe at the Licht Feld Gallery, Basel. Further exhibitions will follow across the world, such is the popularity of the images.
Tell us about yourself and what got you into photography?
I’m a photographer based just outside of Bath, UK. Reading books as a child was all about the pictures. I’m a visual person and love to create. I guess being a visual person photography has become a natural creative outlet for me. I’ve had an interest in photography for as long as I can remember, I don’t recall a specific moment that made me fall in love with taking pictures, it’s just been a life long love that crept up on me.
I did the whole college course thing, read books (looked at the pictures) and tried to improve my photographic knowledge and skills. My first ‘real camera’ was an Olympus OM-1n. Learning on film was slow and expensive.
In 2004, I moved to a digital DSLR with which digital photography brought a whole new learning curve. But the addition of Photoshop and digital processing really opened up a new world of creative options for me.
I think that having children of my own was what really got me hooked. I started to appreciate the significance of capturing moments in time. Kids are one of the most challenging and rewarding subjects to photograph.
As my photography progressed I found myself leaning towards studio shooting as a firm favourite, as I liked being able to experiment and control light. I don’t think that you can beat great natural light but you are at the mercy of mother nature – when you are shooting to a schedule, artificial light is your friend.
Why did you choose to shoot with the Fujifilm X series?
I have always been an SLR shooter, but it got to a point where my gear was impractical to carry everywhere with me. Even carrying a “Lightweight” bag wasn’t really that portable – and after a whole day on the shoulder you certainly felt it.
My journey into the X-System started with the X100 in 2012. This gave me the quality that I wanted in a small & light package. As a result, I started to carry a camera about with me everywhere.
Having used the X100 for a while I found that I was using my SLR system less and less for personal work. And when the X-T1 came out I decided to take the jump – flogged my SLR kit and moved to Fuji. The layout of the controls on the X-T1 is an absolute godsend for me. I love being able to turn a physical dial for all the important stuff and in 2015, I used the X-T1 for a 365 project. I used it with just the XF18-55mm and a Samyang 12mm. This little combo went everywhere with me, everyday for a whole year.
It didn’t let me down, not once.
I don’t consider myself to be a niche photographer. If I see something that interests me, I’ll shoot it. I enjoy portraiture and people do make up the majority of my work. Part of the appeal of the Fuji system was its small size. When photographing people with the X100 or X-T1 it stays out of the way so I can get a better connection with my subject, it’s less imposing.
Credit: Ben Lowrey
What is your favourite lens in our range and why?
I guess with portraiture making up the majority of my work, it has to be my most recent addition – The 50-140 f2.8. Yes it is starting to get into heavy gear territory but not so much that I notice it. The quality of this lens is simply stunning, at any focal length and at any aperture.
Model: Freyalily
The above image was shot using the X-T1 and 50-140mm in very low light (using UV) the autofocus had no problems locking on, and the OIS really helped here.
It’s great in the studio too. Having the flexibility of a zoom really helps. If your lucky enough to have the extra space you can make the most of it -from mid telephoto to telephoto gives a great deal of flexibility quickly without breaking your flow.
Model: Paul Walker
Models: Jaz Talbot & Paul Walker
Do you have any tips or tricks you could share with us?
I’ll admit that I’m not the most organised photographer. I don’t plan things in any great detail and tend to shoot by feel. When shooting people it’s always tricky to get them to relax in front of the camera, very few people feel completely at ease under the spot light – even models. Communication before the shoot is key – even if you don’t have every last detail planned, share what you do know with your client.
When you are ready to shoot, don’t. Put the camera down and talk to your victim (I mean subject). The usual pleasantries are fine, “How was the traffic” or talk about the weather (I’m allowed, I’m British) anything to break the ice and try to build rapport.
Once I’m all set up a trick I often use is to ask my subject to keep looking in my general direction and don’t worry about me. I tell a little white lie and say that I’m just testing my light / exposure to make sure I get everything set up correctly. I know my gear and through experience I know my settings are fine. The thing is that the subject doesn’t think that the photos will be used. I find quite often these first few frames can be the most natural.
Model: Layla Leigh
The image above was taken with a beauty dish against a white wall, using the “Don’t mind me I’m just mucking about technique”
Talking of mucking about, relax and enjoy yourself. Everyone likes to have fun and a bit of silliness now and again makes great images.
Model: Layla Leigh
What’s next for you?
The last 12 months or so have been amazing for me. I’ve met so many great new people through photography. I’ll keep on getting out and about, planning shoots and producing more themed work. The summer will soon be here and I’m hoping to be ready for it. I’m always on the lookout for a great location that can be used to shoot in / on / over / under. I have a couple of things in the pipeline that are still just concepts at present but will develop over the next few months – I just need to find the time somewhere !
Contact info
To see more of Andy’s work, please visit his website and social channels.
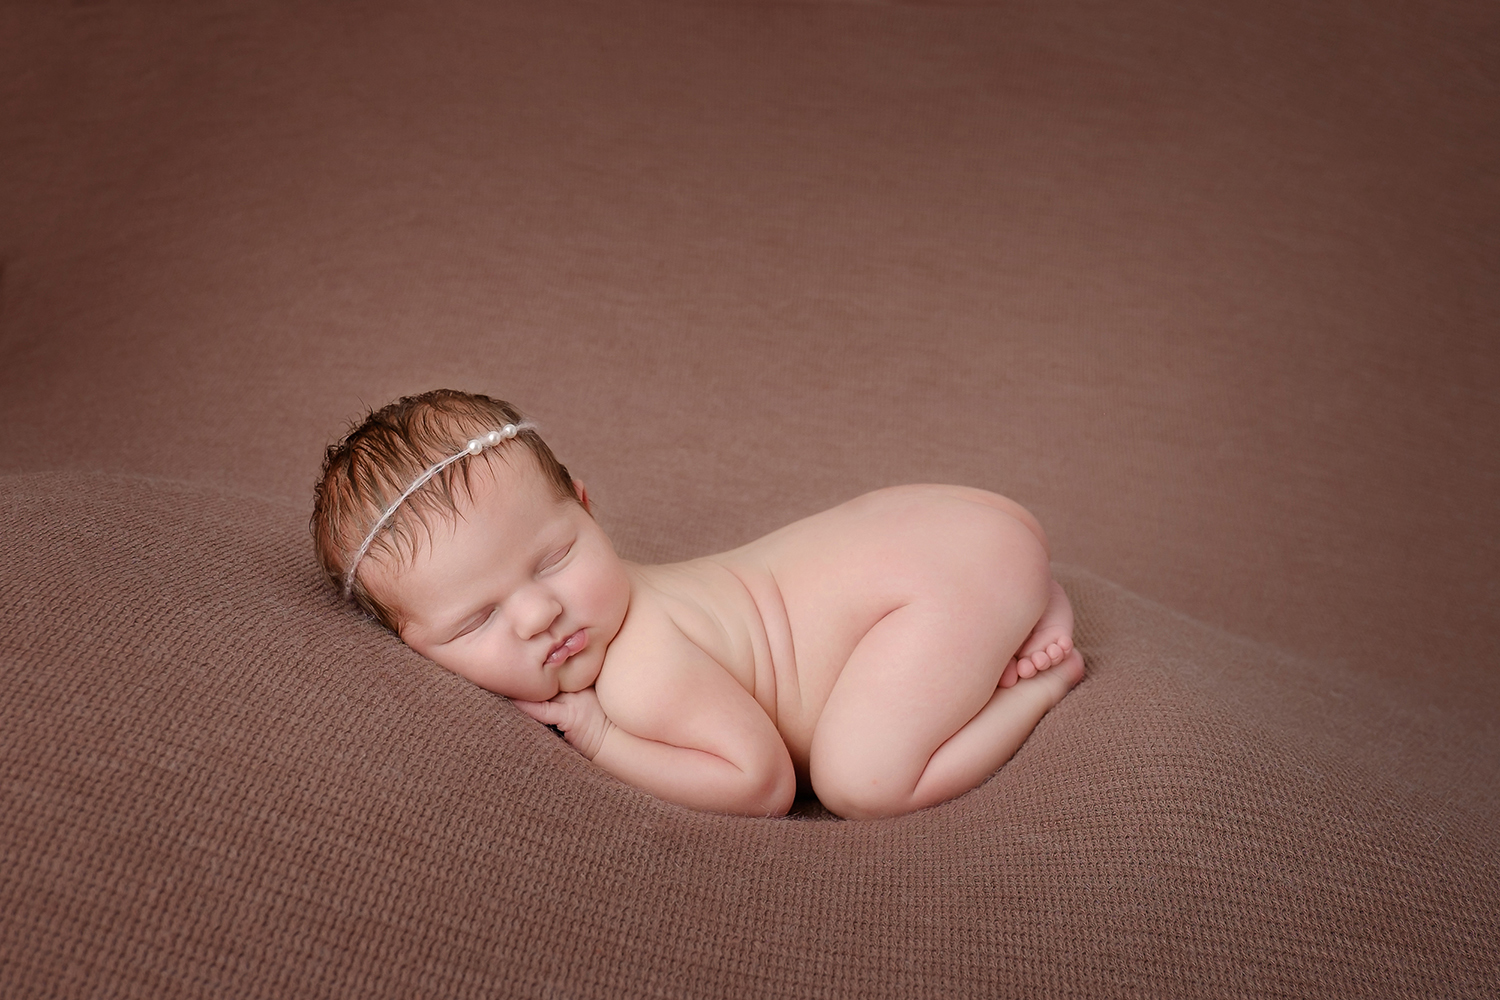
I’m a newborn and maternity photographer and trainer based in Lincolnshire and also in London, UK. I’m often asked why I recommend the Fujifilm X series for my newborn work so I’ve outlined the main reasons below.
I bought an X100S in 2013 which I intended to use as a personal camera for photographs of my children as my DSLR was just too big to carry around daily. I fell utterly in love with both the look and feel of the X100S and also with the files it produced. I soon concluded that I need to progress to Fujifilm for my client work, so I sold my existing DSLR camera and lenses and bought an X-T1 for the studio, it has the same Fujifilm feel, and again, wonderful files. Once I started using the X-T1 for client work I found it really came into it’s own, so many of it’s design features helped make my sessions run smoother.
When posing babies on my beanbag set-up I need to stay within close proximity to them so that I am always within arms reach if they were to stir or startle when in a pose. My favourite lens for these images is the 16-55mm as it enables me to get full body shots and also closer crops all whilst staying right next to the subject. I will sometimes use my 35mm too, as I love the extra shallow depth of field I can get when shooting wide open, it helps the blanket backdrops naturally fade off without having to manipulate it in photoshop after.
To help babies settle I often keep my hand on them so they still feel some contact, at around 6-12 days old they aren’t use to being left alone yet, and this is where the X-T1 makes a massive difference to the way I work. It is light enough that even with the 16-55mm lens, I can shoot steadily with one hand, only removing my other hand from the baby just before I take the shot.
The silent shutter is also a winner, once the baby is asleep it’s great to know that there won’t be any heavy shutter clunks to disturb them.
X-T1, 16-55mm, 1/180s, f/2.8
For prop shots I usually use my 56mm or again the 16-55mm zoom. When I shoot against my wooden backdrop the 56mm at f/1.2 gives a wonderful separation between the baby and the backdrop and really makes them stand out. For these shots I do ask a parent to spot the baby for me and they are right next to them, just out of the frame, ready to hold the baby should they roll or startle. On these portraits I tend to use the tilt screen so that I can hold the camera just above the floor enabling me to capture the baby at their eye level which gives a really intimate feel to the images.
X-T1, 56mm, 1/180s, f/2.2
Another set-up I like to do is with the flokati rugs, the baby is all curled up in womb-like pose and I shoot from above looking straight down. With the X-T1’s tilt screen, I stand next to the baby and using a light weight wrist strap, hold my camera directly overhead using the screen to frame the image. Before I moved to Fujifilm I had to use a small step to stand on to be able to compose the same image with my DSLR, it was heavy to hold and I never felt that standing on something near the baby was the safest way of working, so I’m delighted now that the X-T1 lets me work around this easily.
When including older siblings within a newborn shoot I have found the X-T1 to be less intimidating and intrusive to my young clients. It’s not big and menacing like large DSLRs and using live view means I can keep eye contact with them too which makes for a much more relaxed image.
X-T1, 35mm, 1/125, f/2.2
An obvious benefit I felt when swapping to Fujifilm was the improved practicality, after a day of shooting my wrists, arms and back really thank me for the weight difference. I certainly couldn’t have entertained the idea of shooting as freely as I do know, sometimes one handed and frequently over the top of my tiny model.
I love that the settings I tend to change within a session are all easy to access, the ergonomics of the X-T1 have always felt ‘right’ to me, I can twist a dial without having to go hunting through menus. I spot focus and find the D-pad easy to use to toggle my focus points, and the auto white balance seems to do a fantastic job with tricky baby skin tones.
I genuinely do think my little X-T1 combined with the great line up of lenses are the perfect match for my little clients.
Not many people realise it, but before I started travelling and shooting Motorsport, photographing pets was a major part of my business. I would shoot a lot of equine and dog portraits with the odd cat, snake or rat thrown in now and then. I still run Pawfolio, but it’s now more a project of love, or reserved for when people who know me as ‘the pet photographer’ really want me to shoot their most beloved….. not the kids, yep it’s always the dog!
I see a lot of people posting photos of their pets on instagram lately, with some pets even having their own pages. So I thought I would put a few tips together that might be fun to try out if you want to get a great shot of your own pooch…. some of the tips might even work on pictures of the kids too!
For my doggy model, I’m going to use Bria aka ‘The Beast’, my beautiful Sprocker Spaniel. These shots all involve natural light as I wanted this article to be of use to everyone. As long as you have a camera and a lens you can get stunning shots of your beast without expensive lighting.
Preparation
In my ‘Pawfolio’ bag. Don’t panic! You don’t need all of this! this is just some of the equipment I use on various shoots… If you have only one lens and a camera you’ll be fine 🙂
Camera: XPro1, XT1, XT10
Lenses: 18mm F2, 35mm F1.4, 10-24 F4, 90mm F2, 50-140mm F2.8
Lighting: Ambient/Natural Light
Extras: Dog, lead, willing assistant (wife, kid, person you met on a dog walk?), dog treats / squeaky toy / bouncy ball / whistle, silly voice, insurance (if you want to shoot other peoples dogs!), mobile phone
Top Tip! Things become massively easy in life once a dog knows how to sit, stay, and look at food!! this is where all that training pays off! You will need a few basics such as;
Sit, Paw, Down/Sleep, Stay, Come…
(We had to learn some of these commands in polish once for a clients dog we photographed.)
A food-orientated dog is perfect, if this isn’t working then it’s down to the favourite toy, bouncy ball or failing that, making stupid noises…..dogs love this! The right noise will get a dog to tilt it’s head in a way that looks cute but whilst saying ‘what are you doing, human?’
Play with your beast first;
this builds a little trust between the dog and yourself.
It’s fun for both of you,
it burns off the dog’s energy reserve
A few minutes playing around the kit isn’t a bad thing either, it lets the dog know that the camera is nothing to be worried about and not something strange and dangerous…
Around the house – Your own dog
Ideal for practice and often the easiest of images to shoot are where the dog is relaxed in their own surroundings or favourite spot. I normally wait for ‘Beast’ to find somewhere nice to settle or I encourage her to sit roughly in the right place. Quite often I’ll pap her as she drifts off to sleep. These are candid based shots but can turn into gorgeous intimate photos.
I use any of the following 18mm f2, 35mm f1.4 and the 90mm F2 mostly to achieve the shallow depth of field for this type of shot. The XF35mm f2, XF16, XF23 and XF56mm would be amazing also. Any lens at F1.2 – F2 will make a stunning image. I often use the X-Pro1 and X-T1. The OVF on the X-Pro1 can be really useful in hybrid mode during low light if the EVF wont preview the shot.
#Tip – You can put the Fuji camera to silent mode if the dog is too distracted by the shutter sound. Beast used to hear the shutter then pounce on me because she thought the sound meant that the shoot was over.
The candid shots I usually try to get for every dog shoot are:
Nose
That big snuffler is amazing. Shot at 1.2 or on a Macro it makes a stunning detailed image.
Paws
The texture of the pads or the hairy paw is beautiful. If it’s your dog, hold the paw and capture a paw & hand selfie #TooCute
Face
Poor beast with the collar of shame
“What’s going on down there?”
Like any face or portrait I shoot, I always focus on the eye closest to me. If you shoot the furthest one and the closer one is blurred, the image just looks wrong – please don’t do it!!
#Tip – Try shooting the dog from ‘a dogs view’ or from below the dog looking up. Crawling around in the dirt is just an everyday thing for me, but I think it’s really worth getting the unusual perspective. This is also now where the flip out screen is genius and the X-T1 or X-T10 becomes king.
That said, don’t rule out the standing up traditional viewpoint. Sometimes if you stand right over the dog looking down, you get that ‘puppy face’ beaming back up at you, and there is nothing cuter.
Outdoors
For outdoor shots, choose a nice spot your dog is going to love and that has some features or atmosphere about it. The beach is an awesome place for dogs, and one of our favourites, with lots of space, great light, and lots of zooming. For this a 90mm, 50-140 or the new 100-400 is ideal because the animal can move around freely but you can still fill the frame. This situation is ideal for the X-T1 or X-T10 because of their high frame rate. I would probably go for the X-T1 more to help keep the sand, salt and spray out of the camera. I would also recommend the weather resistant lenses for this type of shoot. A rogue wave splash or a shake down from the Beast can spray your gear from a surprising distance.
You won’t believe the range on this thing!
Rivers are great too, but always check the current is safe. Look for a spot on the bank with space and great moody lighting, perhaps between some trees. You should make sure your beast can get in and out easily, and I always have someone with me to throw a ball or something safe for the dog to chase, or I sometimes just sit and watch the animal play and have fun on their own.
Before river
After river
My favourite lens for outdoor dog shoots has to be the 50-140 F2.8. With good flexibility and a shallow depth of field at F2.8 there’s always gorgeous bokeh in the background. I try to keep the shutter up between 2000th and 4000th of a second to keep the motion frozen. If the light is changing or the dog is running through light and dark patches, try ‘auto ISO’.
Set the the auto ISO range function to work between ISO 200 and 6400. To control the aperture, try to stay in the range of F2.8 – F4/5.6 or if you want some amazing textural shots and there is loads of light, dial in F8 – F11. Again get low… I have the tilt screen for this, or just get in the dirt and sand and the shots will be amazing.
You could also try the 16-55 F2.8 if you want the shot to be a little more environmental, shoot wide and get more of the landscape in your photos. When you print this type of shot they look great printed large.
If you want to get really creative try ‘panning’ the dog. This is a technique we use on the track to shoot cars at the races. Select a shutter speed between 1/8th (very creative) up to 1/200th (suggest you start there and work your way down to 1/8th), and rotate your body at the hips following and tracking your dog as it runs past. You want to work your shots at slower and slower shutter speeds to create a wonderful action arty shot…
Doggy pan
More about the author
John + Beast
John Rourke has been shooting professionally for 15 years and is the owner of Adrenal Media, the Official Photography Agency for the FIA WEC (World Endurance Championship), and the ELMS (European Le Mans Series) including the world famous ‘Le Mans 24hr’. He shoots all of his professional and personal work on Fujifilm X series cameras.
Portrait photography is one of the most amazing genres in my eyes. Simple on the surface, yet complex and diverse underneath. At first glance, photographing people is pretty simple, but when it’s broken down into the 4 main elements: Location, Lighting, Subject & Camera we start to understand the subtle nuances of what it takes to build up a wide and diverse portrait portfolio.
To get started with artificially-lit portraiture, there are 3 main lighting types: Rembrandt, Split and Butterfly. Each of these lighting types has characteristics which allow us to be creative. And it’s by experimenting with each of these lighting types you will learn how to control the shadow placement on your subject, and how by combining these techniques you’ll discover the art of the portrait.
Here is a quick way to identify each lighting type:
Rembrandt lighting: Light will come across the face from a 45 degree angle in an elevated position from the eye-line of the subject. The bridge of the nose should create a triangular area of light under the eye the other side.
Split Lighting: the light will hit one side of the face or part of the head creating a deep shadow on the other side. Normally the light source would be behind the eyeline of the subject.
Butterfly lighting: Commonly used in beauty set ups, the light should present evenly across the face in line with the nose and high above the subjects eye-line. Even shadows under the nose are a sign of this lighting set up.
The shot
In the example I am using here, I have mixed two of these lighting types to give me the effect I am looking for. I have also used two types of light known as Hard light and Soft Light.
Hard light creates shadows with sharp edges; it is made by using undiffused light sources such as a Speedlight aimed directly at the subject.
Soft light creates shadows with a smooth transition between light & dark; it is made by using indirect light sources or by using diffusers to scatter and soften the light before it reaches the subject.
In our example we have set up the split light to have a hard light and the Rembrandt light to be soft.
How to create ‘The shot’
Firstly I set up the ‘Key Light‘ (most important light in the shot) to the Rembrandt Lighting position using a Cactus RF60 Speedlight & a Roundflash modifier. I found the exposure setting I wanted by selecting the f-stop I wanted on the camera after setting the ISO at 200. I left the shutter speed at 1/125th of a second.
Our ‘Hair light‘ is in the Split Lighting position and is set up to be used as a hard light. In the sample for this blog we used another Cactus Speedlight but this time modified with a piece of black wrap. This is the same as cooking foil or aluminum foil that you would find in a kitchen, but is matte black. It is very common in the film industry as a quick and effective way to shape light or to block light ‘spilling’ over to an area that was not intended. Here I have rolled it up and created a homemade snoot to give me very close control of the placement of light.
I then used a V6 Cactus Trigger mounted on to the camera hotshoe to control the power output of the flashes; which were mounted on a set of tripods remotely. This allowed me to work faster and in a more controlled way. Once ready, I took three images: one of each light firing independently and then one shot with both firing together to create the final look.
Image 1: Split light
Image 2: Rembrandt light
Image 3: Split & Rembrandt lighting combined
The angle of the camera for this shot was placed just below the subjects eyeline to give her a powerful look, and in this example I used the XF90mm lens to get rid of any unwelcome distortion that wide angles can give.
Focal lengths from around 50mm to 200mm are good for a head shot or portrait.
Join official X-Photographers Damien Lovegrove, Kevin Mullins and Trevor & Faye Yerbury at The Society of Wedding and Portrait Photographers (SWPP) 2016 Convention in London between the 20th and 24th January 2016.
Damien Lovegrove
An official Fujifilm X-Photographer, Damien Lovegrove has become one of the foremost trainers of portrait photography in our industry. A published writer and regular columnist, Damien has traveled the globe sharing his knowledge and expertise.
Damien left his role as a cameraman and lighting director at the BBC back in 1998 after 14 successful years to create the renowned Lovegrove Weddings partnership with his wife Julie. Together they shot over 400 top weddings for discerning clients worldwide.
In 2008 Damien turned his hand to shooting beauty & portraiture and has since amassed a dedicated following for his distinctive art.
Superclass: “Master Location Lighting” 10:00 – 16:00 Wednesday 20th Jan
On this 6 hour photography workshop at a unique London Location, you will learn a variety of trade-secret interior portrait lighting techniques. You will use the beauty of natural light as well as use continuous spotlights to add a sense of drama to your shots.
This is a styled, fashion orientated shoot that will give you the knowledge and skills to recreate a repertoire of lighting setups – changing the way you see the world around you. Throughout the session Damien will provide you with hands-on instruction and an excellent grounding in how you and your camera can achieve amazing results.
Masterclass: “Top tips to create Striking Portraits” 16:00 – 18:00 Thursday 21st Jan
Damien will discuss the 7 top techniques that he uses to create and capture those key moments in portraits. He will explain in detail a number of important elements that you can combine to produce great images. Having a strategy and a vision is fundamental in creating portraits that wow and this is your chance to learn from a contemporary master at first hand.
Kevin is a wedding photographer by trade with a passion for people watching. He wants his wedding photographs to be snapshots of real, uncontrived but tender moments in time.
He wants his clients to be taken right back to that moment in time when the image was exposed and see it from their guests eye view. For Kevin it is imperative that his clients don’t remember their wedding day as a fashion shoot with the photographer. He would rather they forget entirely about him, but in 50 years’ time when they are showing their grandchildren the pictures of their wedding they can point to real moments, real people, real photographs.
Location seminar: “West End Street Photography” 10:00 – 16:00 Thursday 21st Jan
Join Kevin on this six-hour sojourn around the streets of the West End of London.
The session will start with a briefing where we will discuss the core elements of good street photography and we will finish off with a beer and de-brief.
Kevin’s Street Photography workshops sell out each time and this is a great opportunity to dip your toes into the fascinating world of candid street shooting, or, for the more experienced, understand how Kevin works in more detail when shooting on the streets.
Masterclass: “Pure Wedding Photojournalism from the Heart” 9:00 – 11:00 Friday 22nd Jan
The session will explore what’s needed to be a successful wedding photojournalist, from both an artistic point of view and from the business elements.
There will be a frank and open discussion about client management, expectation and the mechanisms of building a business based on candid wedding photography. You will spend time analysing images, see full weddings, and dissect the factors of this genre that are so appealing to clients. Kevin will also talk about his migration from DSLR to a fully mirrorless configuration.
Most wedding photographers shoot at least some candid photography and this Masterclass is aimed at anyone who wants to either improve that element of their photography, or, who want to move their business more in the direction of wedding photojournalism.
Superclass: “SEO is Changing” 14:00 – 18:00 Saturday 23rd Jan
In this session Kevin will discuss everything you need to know to get up to date with the changing world of Search. Be prepared to take lots of notes and take away with you the knowledge that will get you onside with Google.
We will talk about the huge power of Social Media, Graph Search and the Network so… If you think SEO is about Keywords, think again!
As true educators with a wealth of experience behind them you could do no better than attend one of Trevor and Faye Yerbury’s workshops where you will learn how they light their portraits in the studio and on location or how they designed one of the most successful boudoir marketing promotions.
Trevor Yerbury comes from a long and historic family of professional photographers. Trevor’s Great Grandfather established the company in 1864 and Trevor is the 4th generation to carry out the family tradition.
Faye joined Trevor full time in 1996 and has earned an enviable reputation for her work. On 3 occasions she has won the title of “Kodak UK Child Photographer of the Year”. She also holds a Kodak Gold Award and, like Trevor, is a Master of the Society of Wedding & Portrait Photographers.
They are both Fellows of the SWPP, MPA and are invited Fellows of the Royal Photographic Society a rare honour. In 2014 they both were awarded Lifetime Achievement Awards.
Seminar: “Fine Art Nude Location Class” 10:00 – 16:00 Friday 22nd Jan
Trevor and Faye Yerbury have been photographing the Fine Art Nude for over 30 years and are represented by galleries in Amsterdam and New York. Collectors worldwide seek out their work, which are printed on the finest art paper using the platinum/palladium process. Their work has appeared in countless books and magazines. The Glasshouse Hotel commissioned over 240 of the art nude images from their archives for wall artwork to grace the hotels bedrooms and suites. They have also had exhibitions in Edinburgh – London – Madrid – Malta – Paris and Vancouver.
This unique Location Shoot provides a unique opportunity to spend a day with Trevor and Faye exploring their world of fine art photography of the female figure.
Masterclass: “Lighting Portraiture” 14:00 – 16:00 Sunday 24th Jan
Trevor and Faye will take you through their history in portrait photography with examples from 4 generations of the Yerbury dynasty including original portraits of Andrew Carnegie, J M Barrie, King George 1V and many others.
This will be a very inclusive seminar as they take you through a series of their classic and contemporary portraits and talk about the session, how they approached it and how the subject reacted. They will also demonstrate how they approach a portrait session and what equipment they use.


 I’m a photographer based just outside of Bath, UK. Reading books as a child was all about the pictures. I’m a visual person and love to create. I guess being a visual person photography has become a natural creative outlet for me. I’ve had an interest in photography for as long as I can remember, I don’t recall a specific moment that made me fall in love with taking pictures, it’s just been a life long love that crept up on me.


 By
By 


 An official Fujifilm X-Photographer, Damien Lovegrove has become one of the foremost trainers of portrait photography in our industry. A published writer and regular columnist, Damien has traveled the globe sharing his knowledge and expertise.
 Superclass: “Master Location Lighting” 10:00 – 16:00 Wednesday 20th Jan
 Masterclass: “Top tips to create Striking Portraits” 16:00 – 18:00 Thursday 21st Jan
 Kevin is a wedding photographer by trade with a passion for people watching. He wants his wedding photographs to be snapshots of real, uncontrived but tender moments in time.
 Location seminar: “West End Street Photography” 10:00 – 16:00 Thursday 21st Jan
  Masterclass: “Pure Wedding Photojournalism from the Heart” 9:00 – 11:00 Friday 22nd Jan
 Most wedding photographers shoot at least some candid photography and this Masterclass is aimed at anyone who wants to either improve that element of their photography, or, who want to move their business more in the direction of wedding photojournalism.
 As true educators with a wealth of experience behind them you could do no better than attend one of Trevor and Faye Yerbury’s workshops where you will learn how they light their portraits in the studio and on location or how they designed one of the most successful boudoir marketing promotions.
 Seminar: “Fine Art Nude Location Class” 10:00 – 16:00 Friday 22nd Jan
 Masterclass: “Lighting Portraiture” 14:00 – 16:00 Sunday 24th Jan