Here’s the challenge – take ONLY three pictures in one hour – No deletes & no post-processing.
Today, the challenge was simple – at least with the rules anyway. You can only take three photos in one hour, you’re not allowed to delete, post process or even retake the photo. This meant you had to really think hard about the subject, the composition, all the camera settings combined and…. get it right, first time.
And for your info – all images are shot straight-out-of-camera.
Picture one
As my first image I wasn’t sure what to shoot, or when I should take my first image. This was easily solved however, when I wandered to the riverside and saw this beautiful light bouncing off the water. I took my time to find the right angle and also noticed this small bird sitting near the edge nearby. With this, I shuffled along on my knees (was definitely worth it) to incorporate him/her into the top left third of the image.
Fujifilm X-E2 XF35mm f/3.6, 1/1300th, ISO200
Picture two
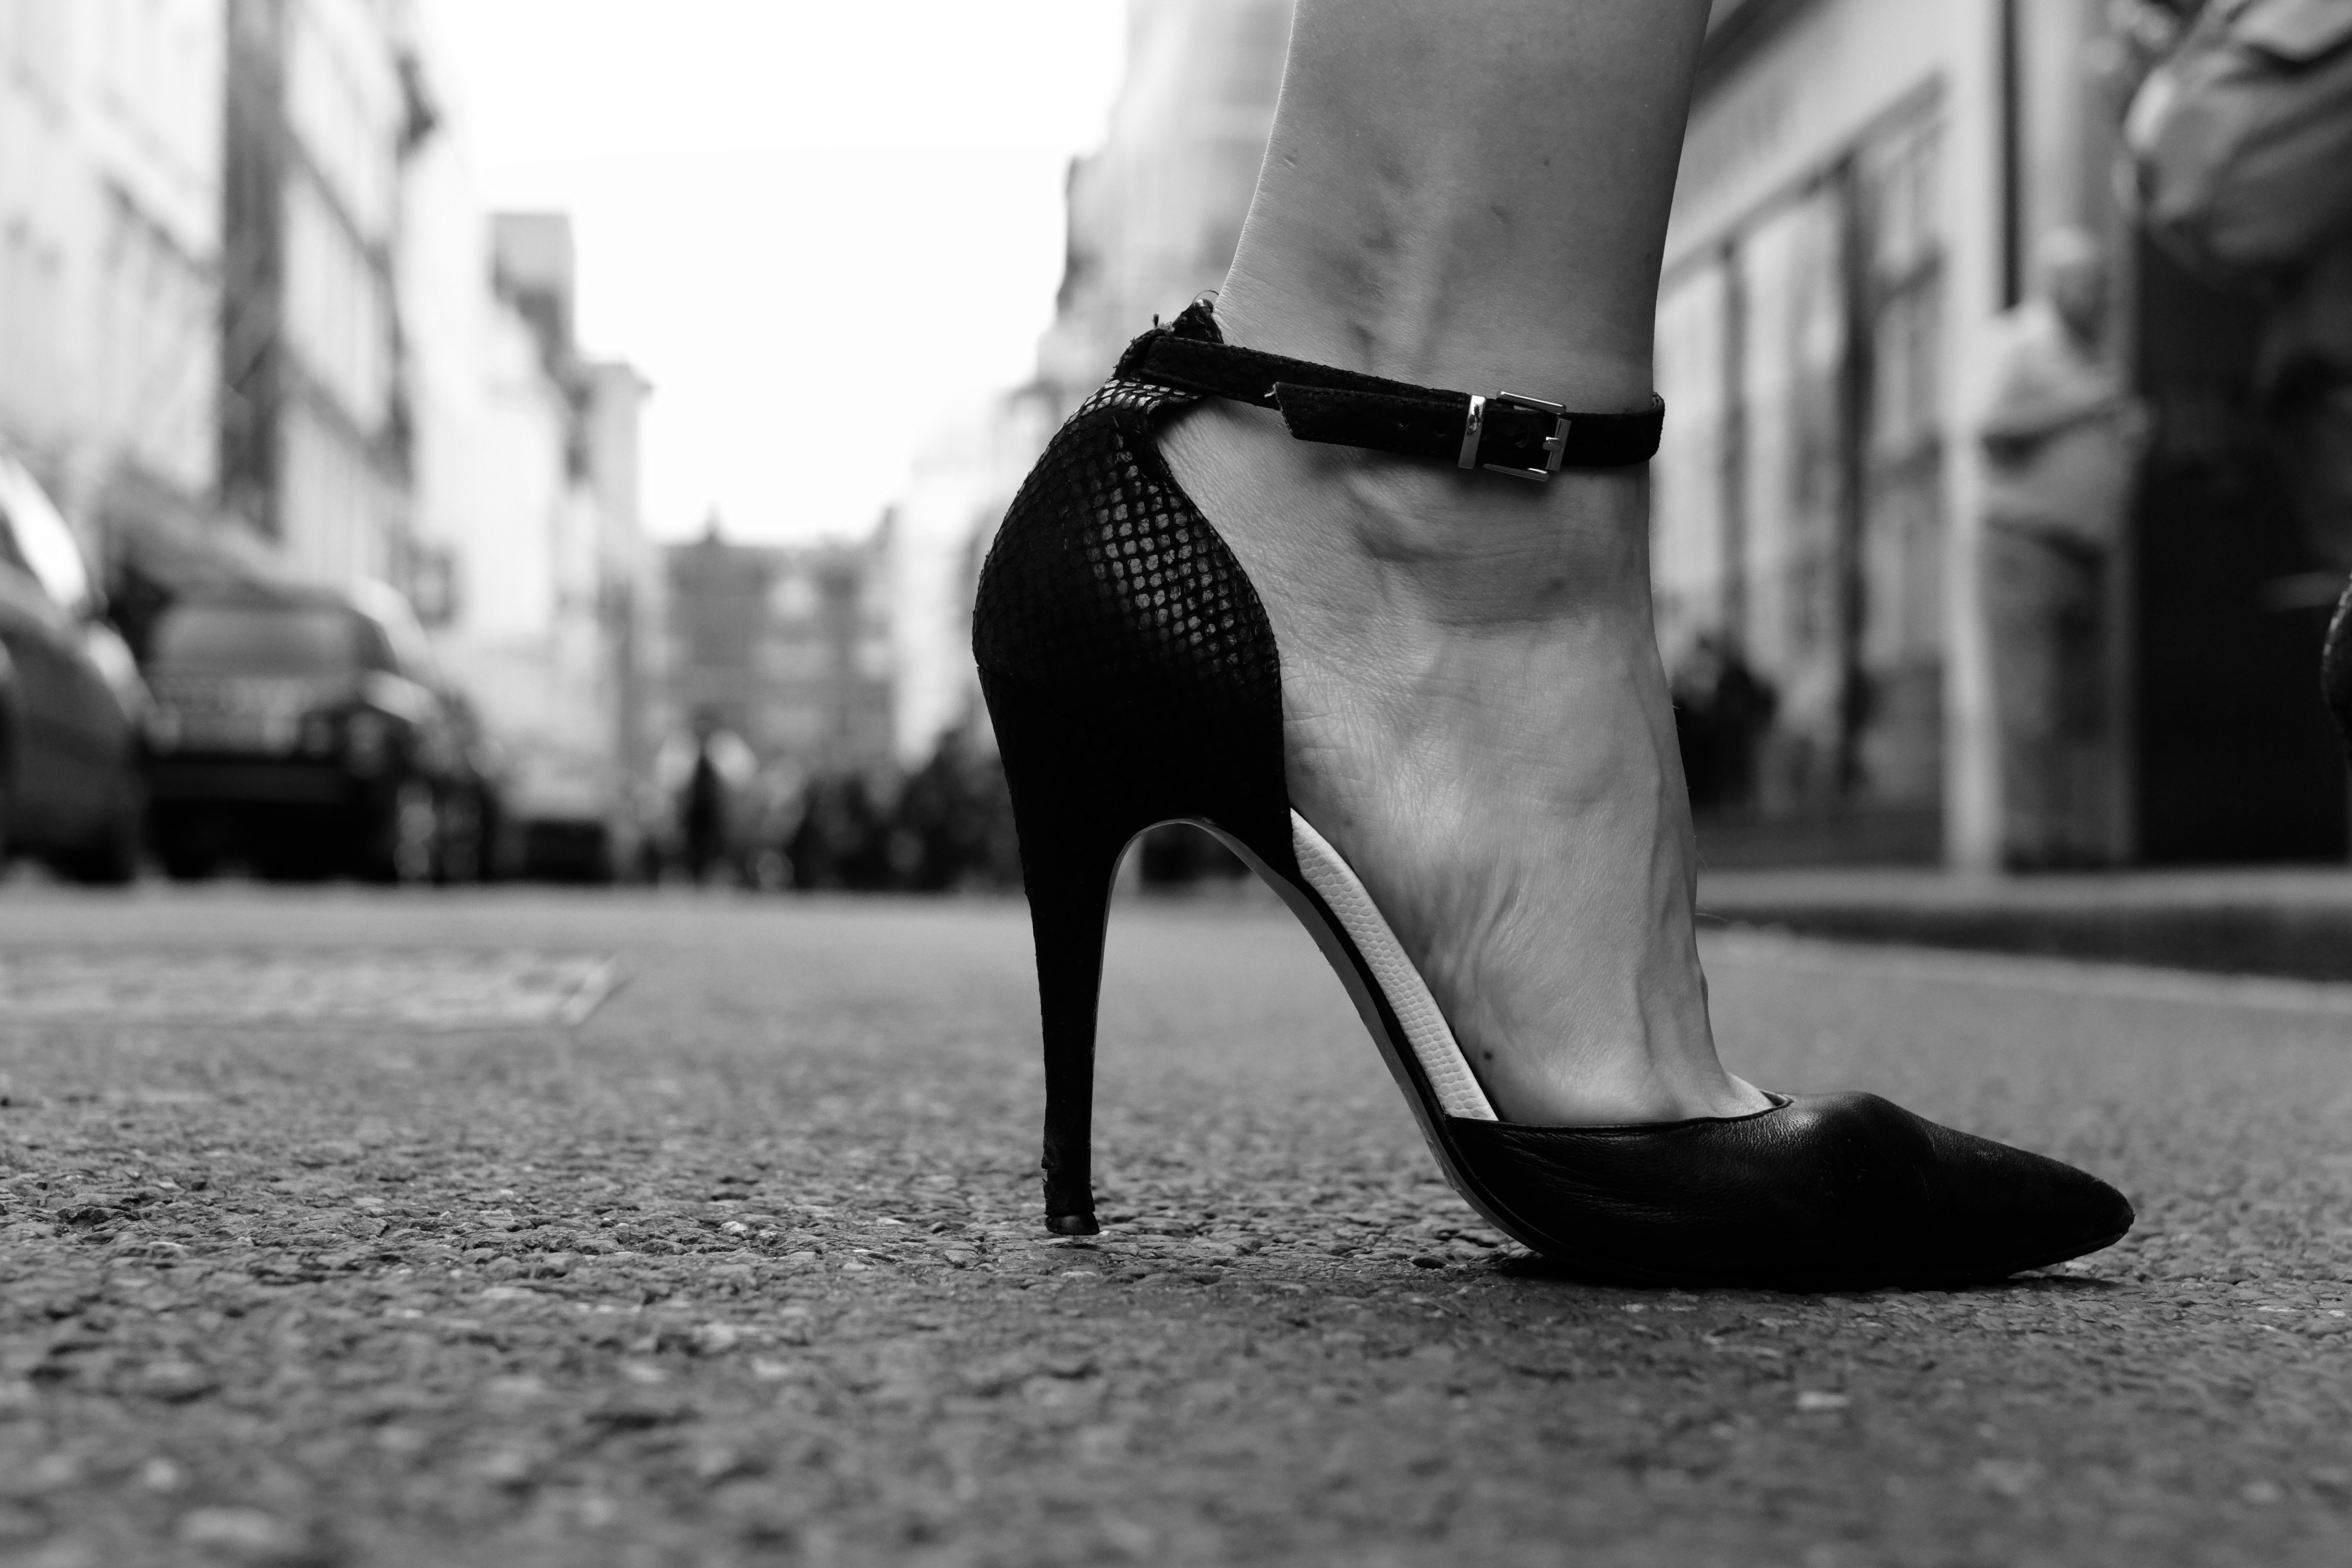
This shot I couldn’t resist, the car belongs to a colleague of mine (*cough* Marc’s) and for me, it captures that humorous moment when you know you should re-park your car, but in Marc’s case… you just don’t. I also, from a photography aspect love the lines that flow from the back of the car and along the path to the left. I chose black and white to take the attention away from the colour of the scene and more to what is going on in the scene – being the damage to the rear bumper and ‘eccentric’ parking 😉
Fujifilm X-E2 XF35mm f/2.8, 1/125th, ISO200
Picture three
As my final image, I wanted to capture a peaceful mood. As we walked along Bedford Embankment I spotted this couple relaxing in the crisp winter air. I crept behind them and silently began looking through my camera settings to find the right choice. As there was so much contrast in the scene I jumped instinctively towards the black and white film simulations. This is where I broke the rules! I literally couldn’t decide which B&W filter to use, so, I shot the same scene three times (one on each B&W filter). I found that the B&W with red filter gave me the most pleasing tones so this was the keeper, and yes I did admit to Marc that I cheated slightly!
Fujifilm X-E2 XF35mm f/2, 1/2500th, ISO200
My thoughts
All in all, even though I cheated a bit, it was super exciting & an excellent exercise to undertake – I highly recommend it. It just turned my normal way of shooting on its head. I would normally frame up a shot and take a few images, experimenting with different apertures etc but with this exercise, I just needed to put my knowledge to the test. I looked through my camera menu selecting specific settings that would suit my style and thought much harder about the composition to ensure it was just the way I wanted it, first time.
It also made me connect more with the environment we were in, internal thoughts like “Where is the best light coming from?”, “What angle should I take this from?” & most importantly “What is actually interesting to shoot in my current area?”.
At one point I actually went right under the bridge to look for a new viewpoint, got my knees dirty, banged my head and came back out without an image! But this was worth it, for I knew that the shot I wanted, wasn’t there. My advice is to try strange angles & odd perspectives, this way you’re either eliminating bad shots or discovering great, new shots that you wouldn’t have known about before.
Happy Snapping! 🙂
Fujifilm X-T1 XF18-55mm at 55mm f/8, 1/1300th, ISO200Fujifilm X-T1 XF18-55mm at 18mm f/8, 1/60, ISO200Fujifilm X-T1 XF18-55mm at 35mm f/16, 1/420, ISO200
“Join me as I walk you through my photographic expedition into the world of street fashion photography with the masterful” – Alex Lambrechts.
In this ‘episode’, Marc and I were given an excellent opportunity to join the exciting Fashion X Street workshop with Alex Lambrechts. The aim of the workshop was to get photographers using the system in-the-wild, on the fly and to build upon an individual’s confidence in a shooting style, which is to my mind, full of adrenaline, passion and presence.
The group met inside a beautiful coffee/pizzeria house located in the heart of Soho, and it was here that Alex began to explain his craft and the general structure of the day. As part of the ‘FujiGuys UK’ we took along some of our new Fuji toys for the group to have a play with. These included the X100T, XF18-135mm lens and the pocket-rocket X30. After a coffee and a chat, we set out to the streets of Soho armed with our Fuji cameras in hand!
Alex led us to our first destination; a small, dark and empty alleyway – sounds ominous so far I know, but bear with me 😉 Alex showed us how the light between two buildings gave the perfect softbox lighting effect, and that this would prove excellent for the style we were going for.
He gave the client’s brief, which was what he wanted to see in our shots and practical suggestions as to how to achieve exactly that. The brief immediately grabbed my photographic appetite and I couldn’t wait to see what I could achieve.
The fictitious brief was this (not a word for word quote):
“Because the subject is a musician and a model. I want to see you capture and explore the human element within the shots, not just the standard model expressions but ‘who’ our client is. And as this is to be published in a fashion magazine, I want to see shots off-angle, gritty and real.”
You can probably see why I was excited; it was something completely new to me and just wanted to get as much experience out of it as possible.
This is where Alex’s stunning wife & professional model Jasmin Lambrechts came in, and what a combination! As they worked side by side, Alex explained things in an informal, yet very informative style. He gave some seriously useful tips on how to direct your model, how to set the camera and how to achieve the perfect lighting on the subjects face.
We started with some slow shutter speeds ‘1/30 to 1/60’ of a second panning shots, this was to capture movement and a unique style, only really achieved in this manner. I think we all found this a pretty tricky technique, but it was probably the most rewarding when you actually got a “YES, I got a good one!”.
X-E2 – XF35mm – 1/40 – ISO 200 – f4.5
As the workshop progressed, we started giving some direction to Jasmin, it was bits and pieces at first, and I’m sure this was down to some of us never having shot a model before. It did however, become more and more natural as we built a rapport with Jasmin and as we found what camera settings worked best.
One of the most helpful tips Alex gave in my opinion was regarding lighting. He really wanted to focus our attention to the exposure of the shot, to ensure we were exposing for the highlights of her face. It may seem an obvious piece of information, but I found really focusing on it turned images from delete to keep. It ensured all the detail was kept on the face, especially when dealing in this ‘contrasty’ environment.
The shot above is one of my favourites from the day. I asked Jasmin if she would throw her hair back so I could try and capture it in full swing. Here I used a fast shutter speed of 1/3000, a generally accepted no-no of ISO6400 (because I needed the fast shutter speed) and had the camera set to manual focusing to make the shot ‘instant’ when the shutter was depressed – and yes, this was not the first attempt, maybe more like the fifth to get it right! The ISO performance on the X-E2 is SO good.
This was another great tip from Alex in regards to action and street photography. He said if you pre-focus on an area where your subject is going to walk and then switch to manual focus, you know every single time that your image is going to be in focus when the subject / model hits that spot. This is particularly useful in street photography, it allows the photographer to frame up a shot and then simply wait for the subject to walk into that frame.
Here are other shots I took that ‘made-the-grade’, at least in my book anyway 😉
Alex had great presence when talking us through ideas as we shot in this environment, throwing us suggestions, checking our shots on the go and even highlighting some great shots our fellow photographers were getting whilst there. This all helped spur me on to try and get the best results I could.
Once we had shot this location from every possible angle, other than hanging off the side of the building (which I would have tried if I could have found a way!), Alex talked us through the next stage in this exciting photography voyage.
Basically, we were going to be on the move, shooting fashion in the streets of Soho amongst the general public. This was where my adrenaline levels went from 7 to 15 (out of ten!) in less than a second. Alex explained how he wanted us to capture the more human element in this environment, the ‘circus’ as he put it, and it really was just that.
Jasmin stepped into the busy, bustling streets of London and we needed to be ready. We were advised to keep ahead of Jasmin to ensure we could scope out the best framing, best angles and to be more aware of great photographic, candid moments. For me, this involved running like mad to stay ahead, trying not to get run over by cars, bikes or pedestrians, not photobombing other photographers shots and still find a good angle myself with the correct exposure! All in all, super exciting, very challenging and incredibly fun!
The reason it was such a circus is because we looked like the Paparazzi. Imagine 12 -14 photographers chasing a beautiful model down the street, all trying to get the perfect shot will certainly draw some attention. People were taking pictures on their mobiles, just-in-case she was famous, asking who she was & who we were – what a buzz I can tell you!
We even had a local restaurateur take to the street stage to grace us with his surprisingly good singing voice. These were the kind of quick paced moments you needed to really know your camera settings, luckily I was just about ready to capture this one below.
After the crazy, brilliant and thrilling roller coaster ride, it was nothing short of perfect to get back to the pizzeria for a beer, pizza and have a chat. The group mingled beautifully, each sharing our successes, failures and our ‘what we would try next times‘. Alex wrapped the day up nicely by highlighting things we did well, things we could improve upon and again, going through individual’s images to give personal feedback – this was a nice touch.
For me, I compare this experience to that warm fuzzy feeling you get at Christmas. I had been given the experience to meet our lovely photographers face-to-face, develop my skills as a photographer and share this experience with like-minded individuals.
The Gang
If you get the chance I highly, highly recommend going on this course and any other that gives you the chance to learn your photography with others. It not only is a great sociable experience, but most importantly, you get to learn how others seeshots that you, yourself may have missed.
If you have any thoughts, questions or comments, please do drop us a line below and we will try and assist where we can.
Click here to see images taken by other members of the group (Log into Facebook required to view).
Here’s a quick, hopefully informative snippet as to why you might choose one focal length over another, and why.
The idea for this blog came about when I was asked recently “Why don’t you just zoom-out to get the person in the frame?”. This is a very good question and I felt it needed a mini demonstration to really help answer it. All one needs to conduct this experiment is the following:
A willing volunteer – I had a Marc
A zoom lens of any kind – In my case, the XF18-135mm lens
Oh, and a camera!
The experiment is simple; frame your subject (Marc) the same each time and take a picture at different focal lengths. I chose four focal lengths along the barrel of the lens to best demonstrate. With this, we had the ever-helpful Terry to hand with a camera to capture the experiment from the third person perspective.
Focal Length: 18mm
Focal Length: 36.6mm
Focal Length: 135mm
Focal Length 18mm
Focal Length 36.6mm
Focal Length 135mm
Hopefully what you will notice is that the wider the angle, (18mm) the more clutter there is in the image whereas at the 135mm setting, pretty much all clutter has ‘disappeared’.
Why does this happen?
Without going into huge mathematical detail (that I don’t even fully understand) it is because wide angle shots will achieve a larger angle of view and long zooms won’t. This is how much ‘fits’ into the shot – peripheral vision if you like.
As a rule of thumb, wider angle lenses work great for landscape photography and indoors (where you don’t have a lot of room to manoeuvre) as they can fit more in. Wider angles, however, are not great for portrait shots as they will pull the centre of the frame forwards creating distortion in perspective – example image below.
Longer zooms on the other hand work great for de-cluttering a frame to create stunning portraits. This is because the angle of view is smaller, and more importantly, they have a compressing effect. In essence, a long zoom pulls the background closer to the foreground and can give a more natural, slim looking head shape whilst also helping aid the bokeh effect – increasing the focal length of a lens decreases the depth of field.
Here are two example shots I took that hopefully help demonstrate the difference:
The image on the left (135mm) shows Marc’s head in proper perspective. However, the right shot (18mm) shows the nose being ‘pulled’ forward towards the lens and his head being turned into a rugby ball! You will also notice there is more of Marc’s surroundings in the wider angle shot – this diverts some attention away from his face, which, in a portrait shot we don’t want to do.
Focal Length: 135mm
Focal Length: 18mm
I hope this post gets you thinking more about which focal length to use rather than just zooming in and out for convenience.
Having a zoom lens is incredibly helpful at times, but it would best to think of your zoom lens as a series of prime lenses. Most photographers, if not all, use specific focal lengths for specific purposes; this is due to the individual optical effects each focal length provides. It really does make a difference to the end result – as (hopefully) shown above 😉
If you can, please go and try this yourself to get a real feel for it. It will help with your own understanding as to what focal length you might want to use, and for which subjects
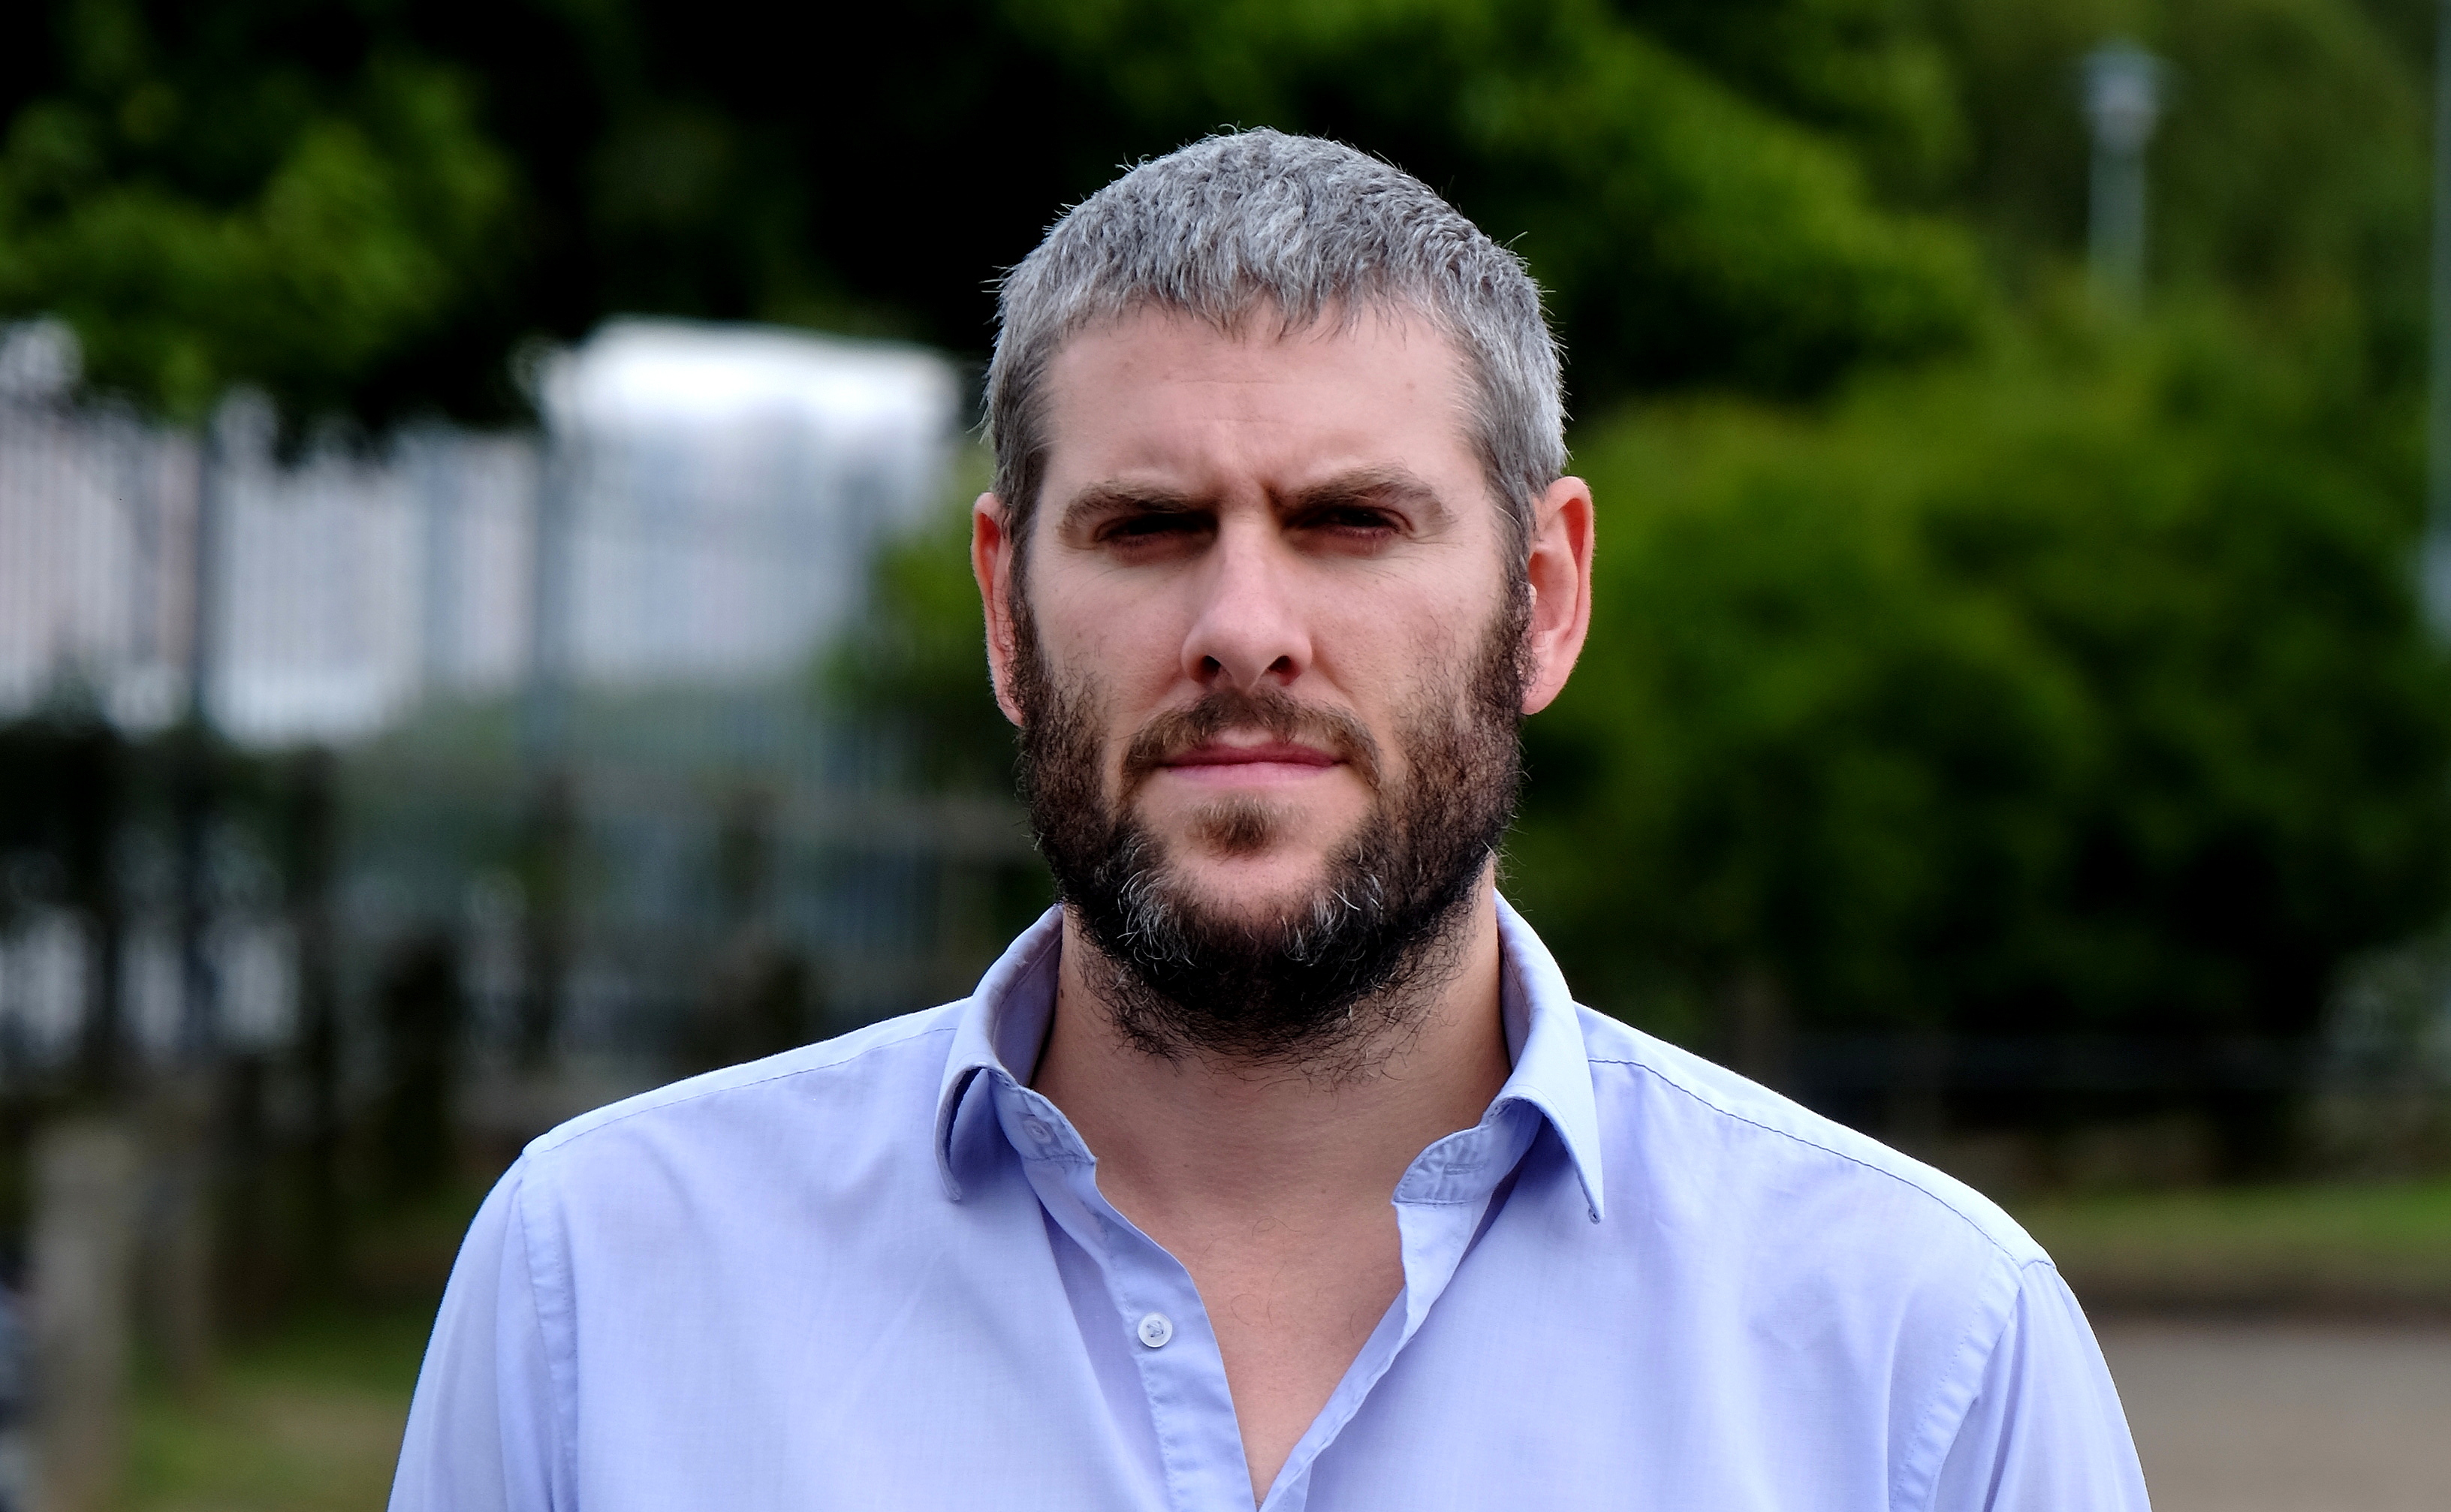
We recently held a small internal training course for the Fujifilm UK team and we asked professional photographer Paul Sanders to join us and help teach us more about landscape photography. After spending some time with Paul and listening to him talking about his work and his thought process in regards to photography, it became apparent that Paul had a very interesting story that I’d love to share.
Below is Paul’s story from being a trainee photographer in 1991, up to his current passion, hobby and luckily for him, profession – Fine Art Landscape Photography. If you have any thoughts or questions for Paul, please feel free to leave a comment at the bottom of this blog.
Fine Art Landscape Photographer Paul Sanders
“I’ve been involved in news photography since 1991 when I started as a trainee photographer at The Daventry Express in Northamptonshire. I’m incredibly driven and knew straightaway that I wouldn’t settle for life on a weekly newspaper, I wanted the big time, the only place I could see myself working was for a national newspaper and one in particular; The Times. I think essentially it was because The Times is in my opinion the best newspaper in the world for it’s reporting and accuracy. I got my head down, worked hard sacrificed everything, relationships, family, friends and social life all in the single minded pursuit of my dream job.
X-T1 with XF10-24 @10 – F8 – 120 Seconds – ISO200
“By 1998 I was working for the international wire agency Reuters in London and in 2002 I got the call from The Times to join their team. When The Times changed from broadsheet to the more modern compact format I was given the job of revitalising the way pictures were used in the new format. Finally on 1 April 2004 I was made Picture Editor, I had total responsibility of the entire visual content and a team of the finest researchers and photographers working with me. To say I was in my element was an understatement. However success at that level comes with a high price. Daily I would view between 17 and 20 thousand images, direct photographers, manage budgets, layout pages and train young hopefuls. By 2010 I had reached breaking point, I suffered with chronic insomnia and depression, my marriage started to break down and the wheels came off my train. I hid this all from the world until December 2011 when I announced that I was leaving the job I had pursued for years.
“When you have a breakdown your body and mind are telling you to change a few things, I needed to slow down, take stock and recover. My recovery began with shooting large format landscapes. I’d wander the country 5×4 camera and tripod over my shoulder trying to be Ansel Adams or Joe Cornish and failing miserably. The process of shooting film again slowed me down, enabling me to organise my mind a little and start to get in touch with the joy of photography. In many respects my early foray into landscape work was such a failure because I wasn’t being true to myself – I wasn’t connecting with my subject at all.
X-Pro1 with XF14mm – F16 – 140 Seconds – ISO200
“During 2013 I had an epiphany in seeing, I realised that actually it was ok to shoot the images I wanted, not the classic views, but using my emotional and spiritual connections with the landscape to create images that resonated with my soul. I had switched from 5×4 to DSLR during 2012, to save weight and money. Still I was finding it hard to work, I would always think can I be bothered, many times I would lug my equipment to a location and not bother getting it out of the bag; it was too much hassle. I wasn’t enjoying my work at all.
“However what I had realised was that to truly see what I wanted, the sitting, watching and listening had really opened my eyes and my heart to the images I wanted to create. What I needed was a camera that didn’t get in that way of my connection or creativity.
X-Pro1 with XF14mm – F22 – 1/2 sec – ISO 200
“In early 2014 I handled the Fuji X-T1 for the first time and instantly fell in love, I actually had goose bumps on my skin, such was my connection with this camera. It was a bit like the moment Harry Potter picked up his wand for the first time!
“As soon as they came to market I bought two, a variety of lenses, and swapped out much of my DSLR equipment totally committed to these tiny miracle workers.
XT-1 with XF55-200 @ 100mm – F4.5 – 1 second – ISO320
“My energy and creativity were revitalised, the camera wasn’t in the way, it was literally a plug in to my imagination allowing me to record what I wanted in the way I wanted without the weight or cumbersome nature of my previous equipment. I pushed myself out of my comfort zone and shot the images I had been feeling. I stopped trying to be accepted by the majority and concentrated on being true to myself. If no one likes my work really it doesn’t matter to me at all. If people do and I sell a few pictures then that’s a bonus.
“I still sit for hours watching and feeling the landscape in front of me, but now I feel that I am truly connected with my work through the little Fuji. The X-T1 isn’t a barrier like my Canon, it’s a conduit. They are virtually invisible to me, instinctively my hands fall in all the right places, there’s a wonderful simplicity to them which helps me as I’m quite simple in many ways too. The less complex the process of making pictures the less I have to be concerned with. I have no desire to pixel peep or get bogged down in the technical arguments about shadow detail or sharpness, I just want to create images that please me.
X-T1 with XF55-200 – F16 – 180 Seconds – ISO200
“The work I shoot now totally reflects how I feel about the world and myself, I can pour my soul into those little black bodies and know that they are keeping it safe for me.”
Good day everyone, I will have to call this a mini-blog as normally I ramble on for ages and bombard you with images – who knows, maybe I still will 😉
As you may or may not know I’m an amateur photographer who loves to try out new types of photography – I’m sure this is not to different from many of you out there. When I first started out with photography I was educated that the more zoom you had the better. So when I was given the X100 for the first time I was quite baffled as to how to work a fixed prime lens. I felt restricted and puzzled as to why I would want one. Of course once I looked at the pictures from it, I was sold and this opened my eyes to the real aspects of what makes a great camera. The images were crisp, clear and full of vibrant colour, all I had to get used to was zooming without a telephoto lens – AKA the Hokey Cokey. Once I got this down though, there was no stopping me, I was out with my original X-E1 and 35mm prime lens and I loved every minute of it!
This leads me to the XF18-135mm. This time I had the promise of excellent image quality but with that lovely versatility of a zoom lens. When I first clicked it into position on the camera body and fired up the camera I was taken back by just how much I could see or not see depending on the focal length. It was something that took me back to the olde days of me using a camera, I was VERY excited to get out and use this new kit.
I decided upon a location in the local area that always seems to make a good picture, this being the Stevington Windmill. I looked at when the sun was going to set and got there about 50 minutes earlier to allow time for running across fields, fumbling with tripods and such like. Once I got a good position near to the windmill I shot this image.
Focal Length: 49mm – f/5.6 – ISO200
I shot this image at the slightly wider-side of the lens to open up the landscape a bit – this to me gives a very peaceful feel to the shot. Compositionally (is that really a word?) I have dedicated two thirds of the frame to the sky as it is a sunset after all, and I think this really helps the landscape silhouette ‘POP-OUT’ from the skyline.
This next shot I really wanted to focus on the windmill and give a more intense feel. To do this I have used the lens at a longer focal length as this has a very clever effect on the composition. The more you zoom towards a subject, the more the background and foreground are compressed together. So this in turn pulls the Sun closer to the windmill and vice-versa. Not only that, but it also reduces the angle of view – cutting out all the peripheral stuff we perhaps don’t want in our shot.
As a side note – To get the composition I wanted using more zoom, I did have to move further back to accommodate the extra focal length. Basically this means I had to run like crazy across a field and keep checking to see if the composition was right as every moment I wasted meant the sun was getting lower and would soon disappear behind the hillside.
Focal Length: 98.6mm – f/7.1 – ISO200
These next two shots show this compression effect quite well I feel. It really brings the background closer to the foreground making for a more intense composition that would not have been possible with my 35mm prime lens.
And in case you were wondering, this is my better-half with her camera at her side relaxing whilst I’m running about like a madman saying things like “That’s great, just don’t move. Pretend I’m not here..” which was all great fun. Photography should be fun and if you can get your friends and family involved, so much the better.
Here’s a playful shot of some hot air balloons in the distance. I framed it up so that they sat on the furthest third of the frame to sweep your eyes across the beauty of the landscape. Because of the compression effect (pulling the background and foreground together) I could give the hot air balloons a bit more presence in the shot, especially when you consider the real distance between the main tree and the hot air balloons.
I really hope this inspires you to go out and have a play with your camera, shoot a sunset, bring a friend, mix up your compositions and most of all have fun. When you do all that great pictures will naturally follow.
P.S: Seems I managed to get a good ramble and bombardment of images in after all 😉
Follow Dale as he takes a journey round Devon’s beautiful Croyde Bay & Lundy Island.
As you may or may not know the XF35mm is my ‘everyday’ lens but when it comes to landscape photography the XF10-24mm is my next ‘must-have’ lens. I used to use the XF14mm lens – which by the way is superb, but I’ve realised that I just cannot get enough of that ultra-wide 10mm setting.
I have only been delving into the landscape photography world of late and am still very much finding my feet. When looking back through my landscapes I have noticed that I clearly love the slightly stranger viewpoints, mainly from a wide-angle, ground-up perspective. It may be that the world is just more interesting down there!?
I like trying to ‘add a little epic’ to my landscapes. The way I have found myself doing this is to locate a small object, whether it be a footprint, a rock etc and get it right up close to the lens. This distorts its perspective and makes it a real important part to the composition. It’s very easy to miss the small details in a beautiful view, so doing this can really shake-up the images and give a new feel to your photography.
We’ve always been told practice makes perfect right? Well, I don’t know if it makes ‘perfect’ but it certainly helps with repetition. I find that the more I shoot, the more I know how a shot is going to turn out before I’ve even turned the camera on. It can give great insight as to whether I should get set up for a shot or move on to a new area / viewpoint.
XF35mm – ISO200 – f/4 – 1/2900 – Lundy Island – Had to sneak my XF35mm lens into this blog somewhere! 😉
In an effort to create better landscape images I have been using the Rule of Thirds more and more consciously. Across the board this has rewarded me with more “That’s a keeper!” shots.
In addition to this, I’ve been thinking more carefully about where to ‘put’ the horizon line. I usually just ponder which is more interesting – the sky or the foreground? If the sky is more interesting it takes up two thirds of the image and vice versa. I thought the scene below had a more interesting foreground to shoot, so the foreground takes prominence.
On the opposite side of things, I found this sky (below) to be more dramatic and I loved how the church had an on-the-edge-of-the-world feel to it. So, I gave the sky two thirds of the frame and the church the lesser attention to increase this on-the-edge-of-the-world theme. I post-processed this one to give it a more matte-like / painted finish.
XF35mm – ISO200 – f/11 – 1/420 – Lundy Island
The XF10-24mm isn’t just for landscape either, it worked perfectly inside the Lundy Island lighthouse to capture the whole winding staircase – which on a different note, was very steep!
The next few images are some of the best I could get while shooting in the ‘golden hour‘. It’s not an area I have had great amounts of experience with, but, I wanted to share a few tips that could save you some stress as I found out the hard way.
Firstly, give yourself lots of time to get to the location you are going to shoot. Set up and relax way before the sun has started setting. Otherwise, you may find yourself fumbling with ND grad filters and tripods like I was.
I always thought a sunset was a peaceful, enjoyable thing, but when you are trying to shoot it the sun seems to set faster than you can say Usain Bolt!
The second piece of advice is to know where the sun is going to set. One night I literally found myself running across a beach. I had the camera attached to a tripod while dangerously navigating slippery rocks pools and small sand holes that the kids had dug during the day! I must say though it was some of the most exciting photography I have done in a long time.
On the bright side, the running down the beach to capture the sunset actually made a picture in itself. Again, emphasising the foreground subject by getting on my hands and knees to put the lens right up close.
I hope you have enjoyed taking my very short tour of some truly photogenic places. Here are some other shots I captured from the trip away that you may like. Any questions, feel free to leave a comment below.


 Here’s a quick, hopefully informative snippet as to why you might choose one focal length over another, and why.


 As you may or may not know I’m an amateur photographer who loves to try out new types of photography – I’m sure this is not to different from many of you out there. When I first started out with photography I was educated that the more zoom you had the better. So when I was given the X100 for the first time I was quite baffled as to how to work a fixed prime lens. I felt restricted and puzzled as to why I would want one. Of course once I looked at the pictures from it, I was sold and this opened my eyes to the real aspects of what makes a great camera. The images were crisp, clear and full of vibrant colour, all I had to get used to was zooming without a telephoto lens – AKA the Hokey Cokey. Once I got this down though, there was no stopping me, I was out with my original X-E1 and 35mm prime lens and I loved every minute of it!


