Help! I don’t know whether to buy and X100T or an X70.

X-Photographer Kevin Mullins looks at the benefits of both cameras. But which one does he prefer?..

By Kevin Mullins

KevinMullins-Headshot-200x200When I first received the Fujifilm X70 I looked at it and thought…….hmmmm.  Then I scratched my head and glanced sideways at my X100T which was looking back at me with suspicion and concern.

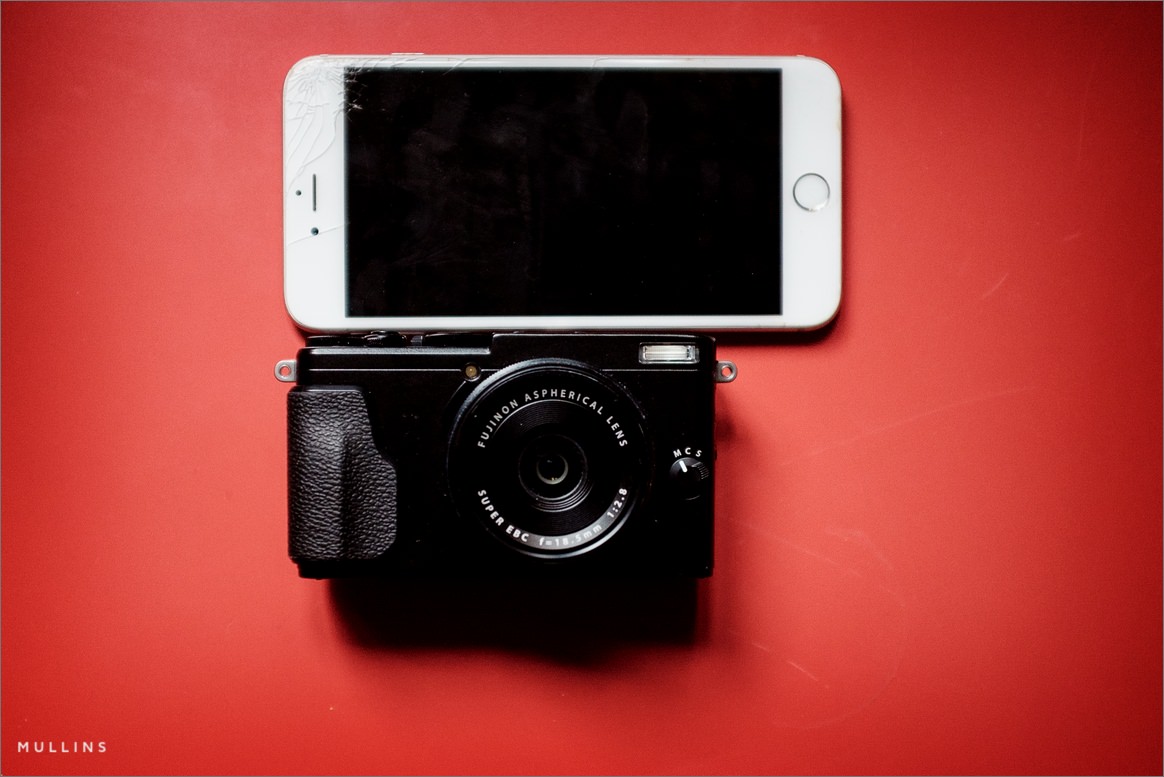
I have to admit that I also had suspicion and concern when I first picked up the X70.  It’s teeny.  In terms of length and width it’s almost a third smaller than my mobile phone.

My X100T, on the other hand, is larger.

So I challenged myself to see if size really does matter and, more importantly, does the X70 live up to its big brother X100T when it comes down to image making.

fuji-x70-review-1-2

Brief Differences and Similarities between the X70 and X100T

This isn’t a review of either camera but it makes sense for me to point out the fundamental differences, and similarities between the two cameras.

Both cameras share the same 16-megapixel APS-C X-Trans II sensor but that, possibly, is where the similarities end.

We already know about the size difference, but really the biggest differences are the interface to shooting and the lens and so I will concentrate on these during this post.


“Beat the fear of Street photography by allowing people to come to you, instead of you to them.
Then just… Click.
No pressure.


The Lenses

The X100T has an excellent 23mm F2.0 lens.  Way back when I was shooting DSLR, my preferred focal length was 35mm (full frame equivalent), and actually it still is.

I LOVE the lens on the X100T and this is one of the critical changes because if you also LOVE the lens on the X100T, you need to know that the lens on the X70 is different.

The lens on the X70 is a slower F2.8 but wider 18.5 mm focal length or 28mm (35mm equivalent).

So straight away, we can see that the X100T is going to be better at low light shooting, albeit marginally.

However, the size and weight of the X70 means we can shoot at slower shutter speeds to mitigate this to a certain extent (depending on the subject matter of course).

For me, I love that 35mm FF focal length and I’m getting used to the slightly wider view from the X70.

cheltenham-festival-2016-7

Taking Pictures

I instinctively lifted the X70 to my eye when I first got it out of the box.  Big mistake as there is no viewfinder in the camera (you can purchase an external viewfinder attachment that slots into the hotshoe).

For me, the reason I never really gelled with the Fujifilm X-M1 was because of the lack of viewfinder.  But then the X-M1 was bigger…..and didn’t have the X-Trans II Sensor.

I’ll give it a try I thought.

And you know what, I have learnt to really like the LCD shooting experience of the X70.  I’m not a hundred percent convinced I wouldn’t prefer a viewfinder as at least an option, but obviously one of the reasons this camera is so small is because of the removal of the viewfinder.

Instead of the traditional way of shooting, in the X70, you have a remarkably versatile tilting screen, which even tilts vertically above the camera to allow you to take “selfies”.

When shooting with the X100T I have to use the viewfinder, or shoot from the hip using a zone focus technique.

I can still use zone focusing with the X70 of course, but the benefit of the flip down screen is plain to see.  Additionally, the X70 implements some neat touch screen features where you can use your finger to very quickly touch, focus & shoot.

That’s a great advantage when out on the street shooting.


“I adore elderly people holding hands and I strive to look for pictures like that.
Pretty much, I just want to be like that with my wife when I’m elderly too.”


Which camera would I use?

This is the question I’ve been asking myself a lot.  When would I use one over the other?  And I actually sat down and came up with a list of scenarios where I would use either the X100T or the X70.

In really low light I’m going to need the X100T.  I don’t use flash, and I find that I use the Optical Viewfinder on the X100T a lot when shooting in low light.

For that reason, and also because of the build and form factor, the X100T will remain one of my primary cameras as a wedding photographer.

However, the X70 really comes into its own when I pick up a camera to go and shoot street photography.

In fact, for me, its superseded all other cameras in the range when it comes to shooting on the street.

I like to get in close and I like to observe and prepare to shoot.  Unless I need to use different lenses (for example, I may use a MF lens on the X-Pro2 or X-T10 for rapid zone focusing and shooting), the X70 is an ideal camera for shooting on the street.

The fact that you don’t even have to press the shutter button is a marvellous thing in itself and lends the camera perfectly to candid street shooting.

The X70 isn’t going to replace my X100T, but at the same time, my X100T will be a lot less active for my personal and street photography work.


“These images below were shot using Auto Focus, at F2.8 without the flip screen down.
Simply pointing and shooting from the hip.
One handed (as the other was occupied with Guinness at the time).”


To see more of Kevin’s inspirational images, click here.


Using white balance to take better photos

white balance

w360_6415757_tutorialbannerfordotmailerWhite Balance is a term that may seem foreign to most photographers. Especially as a setting that you could adjust that would make a drastic impact on your photos.

If you ever have taken a photo inside with fluorescent lights as your main source of lighting, you may notice a slight “bluish” look to your photos.

Why did this happen? All light sources have different colour tones based on a temperature reading scale ranging from red (warm) to blue (cold) known as Kelvin (K).

2

Your choice of lighting will impact the overall look of your image and the actual colours shown in your photo. A photo mainly lit with a candle will give off a slightly deep orange colour tone. Likewise a photo mainly lit by fluorescent lights will give off a light bluish colour tone. Usually undetectable by the naked eye, we only really notice the difference when we look and compare photos side by side.

3

The term ‘White balance’ (WB) is the process of removing unnatural colour tones in photos. All FUJIFILM Digital cameras have ‘White Balance’ controls to help change or correct these colour tones.

Why would a photographer need to change the camera’s white balance setting? Depending on the subject and lighting source used, a photographer can adjust the camera’s white balance setting to properly show colours as the naked eye sees them or to change the “mood” of a particular photo.


So why experiment with white balance?

You may find that the Auto White Balance setting corrects colour tones when you don’t want it to. This can happen with sunsets or landscapes, where the colour of the light is an integral part of the picture. By using one of the preset settings, you can better control the colour tone of your  photos based on the light source used. In addition to one of these “preset” settings, most FUJIFILM cameras offer the ability to pick a custom white balance setting also known as colour temperature (measured in Kelvin).

Here are some of the most commonly found and used white balance settings in Fujifilm cameras:

Auto – this is where the camera takes continuous readings of the light sources and makes adjustments automatically to the colour tone of the photo.

Daylight/Sunny/Fine – not all cameras have this setting because it sets things as fairly ‘normal’ white balance settings.

Tungsten/Incandescent– this mode is usually symbolized with a little bulb and is for shooting indoors when traditional incandescent lighting is used. It generally cools down the colors in photos.

Fluorescent – this compensates for the ‘cool’ light of fluorescent light and will warm up your shots.

Shade – the light in shade is generally cooler (bluer) than shooting in direct sunlight so this mode will warm things up a little.

Colour Temperature – This option allows you to select the colour temperature using the measurement known as Kelvin, this gives you even more creative control. And without getting too technical here’s our handy hint: If your photos are coming out yellow/orange turn the temperature down (lower number value, for example 2500K) and if they are a bluish colour tone, turn the temperature up (higher number value, for example 8300K). You will soon pick up what lighting environments are around which value of Kelvin.

The other option you have is to shoot in RAW, select Auto White Balance and adjust later in post processing. This does give you more flexibility after the shoot but will add more time to your processing, plus a bit more technical know-how to get best results.

As you can see above the white balance chosen for a shot can make a huge difference to the feel of an image and in some cases what season the image was taken in.

We hope you have found this tutorial helpful and that it will get you out and about experimenting with white balance.

And as an added bonus, check out FujiGuy Billy as he shows you how to get your White Balance settings up and running in camera here.


The right gear for the job – Wildlife

I thought this could be a helpful blog series for individuals looking to invest in equipment with particular interests in mind. This blog series will hopefully cover gear and techniques to help those getting into photography, who want to develop their skill set and knowledge. Because one of my main subject matters is wildlife I thought I’d start off with this genre.

Wildlife photography is a genre that can massively benefit from having suitable equipment, in my eyes more so than many other photography genres (but I’m biased!). To that end it’s good to be prepared with the most suitable gear for the task.

Best Camera – X-T1

The X-T1 has a number of features that make it the most suitable camera for wildlife:

Dolphins
Knowing that my X-T1 and 18-135mm lens set up was weather sealed meant that I could stop worrying about splashes and focus on capturing the dolphins.

First of all it is a weather sealed camera, so when used with a weather sealed lens you have a completely sealed system which is important when outdoors if you’re having to counter water in wet conditions or dust in dry conditions.

Then there is the fast auto focus, which the X-T1 is definitely the best at in the X-Series at this moment in time. The auto focus is very quick in single focus mode with basically every lens available and the continuous focusing mode is also very reliable and quick once focus has locked.

Terns
Fast continuous focus and 8 frames per second meant that I could get the composition just right as these terns flew at me on the Farne Islands.

Being able to shoot at 8 frames per second and take advantage of the latest UHS-II SD cards for fast writing speeds means that this camera can cope with quickly evolving situations where you need fast bursts to capture the action and to be quickly ready to repeat the process.

As well as the camera being great, the accessories can be really helpful, namely the battery grip. Often with wildlife photography you are out and about for many hours and the last thing you want to happen is to be stuck changing batteries just as something exciting is happening (this has happened to me far too many times!). The battery grip holds an extra battery so doubles the time before you need to change your batteries.

Finally, the big thing about to come to the X-T1 (black version) is the electronic shutter. Being able to shoot at up to 1/32000 second is great but is generally not necessary for the lenses used with wildlife photography; but what will be very beneficial is the silent shutter. If you’re close to wildlife or in ear shot then even the slightest sound can set off a timid animal. The X-T1 shutter is by no means loud but certain animals have such finely tuned hearing that the mechanical shutter sound can be enough to scare off your subject.

Back up camera – X-E2

Having two cameras is a good idea for wildlife photography. It is often helpful to have two different lenses on the cameras so you can quickly capture images at different focal lengths, going from the close up headshot to the animal in environment shot. If an X-T1 is out of the question, let alone two of them, then the X-E2 is a brilliant compromise. It offers a more affordable option and though it may not have weather sealing and all the bells and whistles I mentioned above it is still a very capable camera. With 7 frames per second and a hybrid AF system that includes contrast and phase detection, this camera is able to capture fast paced action almost as well as the X-T1.

Lenses

Puffin
The 55-200mm in action.

The 55-200mm is currently the longest lens available for the X-Series until the 140-400mm comes out very soon. Covering a good range with a very useable widest aperture (F3.5-4.8), this lens is a super lightweight option for wildlife photography. The auto focus is fast and accurate plus the lens has OIS (optical image stabilisation) which is great to help you capture sharp shots if you’re handholding.

Moving into the weather sealed lenses, the 18-135mm lens is a brilliant all-in-one wildlife/nature lens to carry around if you’re wanting a one-lens solution. When used on the X-T1 this is a sealed system that has snappy auto focus and OIS to help make sure your shot comes out sharp. If you’re looking to have a more specialist lens(es) then the new 50-140mm is a good place to start, though not as long as the 55-200mm lens it offers a widest constant aperture of F2.8. This is brilliant for photography in darker conditions, such as golden hour at sunrise and sunset. This has been combined with OIS and the world’s first triple linear motor auto focus system to ensure you focus in on your subject quickly and get sharp results. This lens has internal focusing and zoom, helping ensure that no moisture or dust can get into this weather sealed lens.

Wildlife doesn’t always require the longest focal length possible. Often framing your subject within the environment can have a much more powerful effect than the classic headshot close up. The soon to be released 16-55mm lens will be the perfect partner for the 50-140mm lens, providing another weather sealed option with a fast widest aperture of F2.8.

Highland cattle
Highland cattle of the Isle of Skye at 18mm. Not the best ‘wild’life photograph but it helps emphasise the point of framing an animal in its environment.

If you’re interested in macro photography then you have two options, the Fujifilm XF60mm F2.4 or the Zeiss 50mm F2.8. I have used the Fujifilm version and love it, though if you want 1:1 scale then the Zeiss is the way to go. These lenses are also great general purpose lenses, the orang utan photo at the top was taken with the XF60mm.

Ants
Ants crawl over a vivid red plant in the heart of the rainforest in Borneo.
Beetle
An emerald green beetle’s shell glistens from my off camera flash. The XF60mm is a great lens to cover a wide variety of shots.


I hope this has proved helpful to those of you that are looking to invest in the Fujifilm X-Series for wildlife photography. If you have any questions then please leave a comment below or contact me via:

Twitter – @benji_cherry

Facebook – https://www.facebook.com/BenCherryPhotography