Through a Photographer’s Eye: 9 Photographers Share Their Advice

Over the last two and a half months, you would have seen a series of interviews which formed Series One of Through a Photographer’s Eye. In each interview, we heard from a handful of Australian photographers and how they use Fujifilm X Series cameras to photograph the world around them.

Before Series Two of Through a Photographer’s Eye begins next week, let us take a look back at what advice was shared when each photographer was asked the question:

If you have some advice for someone starting out in photography what would it be?


Drew Hopper

Just get out there and shoot! It is not about becoming famous or having all the gear available on the market. It is about enjoying yourself and finding your own style. Shoot what you like shooting, and avoid copying the work of others with the belief that it will make you a ‘better’ photographer. It’s totally fine to follow other photographer’s work, that’s how you find inspiration, but don’t compare yourself to other people’s success. Make your own success. Most importantly, save your money for a flight somewhere, not camera gear. Memories are worth more, and great photos wait for no one.

Fujifilm X100S – 23mm – F4 – 1/100 second – ISO 200


Alamby Leung

Social media is a great place for inspiration and to receive feedback, but developing your personal style and be creative with your ideas are important too.

Fujifilm X-Pro2 with XF18mmF2 R – 18mm – ISO 400 – F2.8 – 1/6000 second


Ian Tan

Advice for new photographers? Don’t get hung up on the gear. I go a bit nuts about gear myself but at the end of the day, they are just tools. You use the right one for the job, and everyone has their preference for which tools they like to use. Cameras and lenses from any major brand these days are all very capable – heck, even the iPhone takes awesome images – provided you use them properly. So learning how to use your chosen camera (and editing software) well to translate the creative vision that you see in your mind into beautiful images is more important than staying up to date with the latest and greatest gear.

Get out and shoot more. Learn to connect with others and draw inspiration from them, not intimidation. Having said that, I love Fujifilm, the way the cameras handle, the image quality, and the company’s philosophy in how they make cameras and support them through continuous firmware improvements (gotta love kaizen!).

Ice Patterns: X-T2, XF14mmF2.8 – ISO 500 – F4 – 1/125 second


Dale Rogers

If you are just starting out in photography, I recommend you follow and watch other photographers on social media especially those who are shooting similar things to yourself. By watching others, you see perspectives or ideas for shooting that you would not have thought of or you start analysing the images trying to determine how the shot was achieved.

Have a look at some of the old masters (or current masters) of photography and see their images. My inspiration for intimate landscapes came from Eliot Porter, one of the first professionals to use colour film, and Jai Maisel who currently shoots street photography in New York City. Have a look at their work and see if you can see the connection I made between them.

I also encourage photographers to try one of the 52-week challenges that exist. On our Photo Rangers Community Facebook page, we host a 52-week challenge. This is a personal challenge and not a contest or competitive event. The purpose is to get photographers creating photos and shooting subjects they would not have done otherwise. If you want to join along in this supportive community, come on over to http://facebook.com/groups/photorangerscommunity.

Fujifilm X-T10 – XF18mmF2 R – ISO 200 – F9 – 1/30 second

Josselin Cornou

Buy a camera with a fixed manual lens. In a day of automation, it is easy to go into the classic auto mode. It works really well in most cases, but this also means that the user will hardly learn any photographic concept. Having a limited focal length will help the user reframe the shot, avoiding any bad practices like constantly zooming. My first camera was a Panasonic GH2 + Voigtlander 25mmF0.95. That setup really helped me step up my game.

If you want to do landscape, then get an ultra wide angled lens. These lenses are expensive, but they will help you frame those ultra wide shots – making it totally worth it.

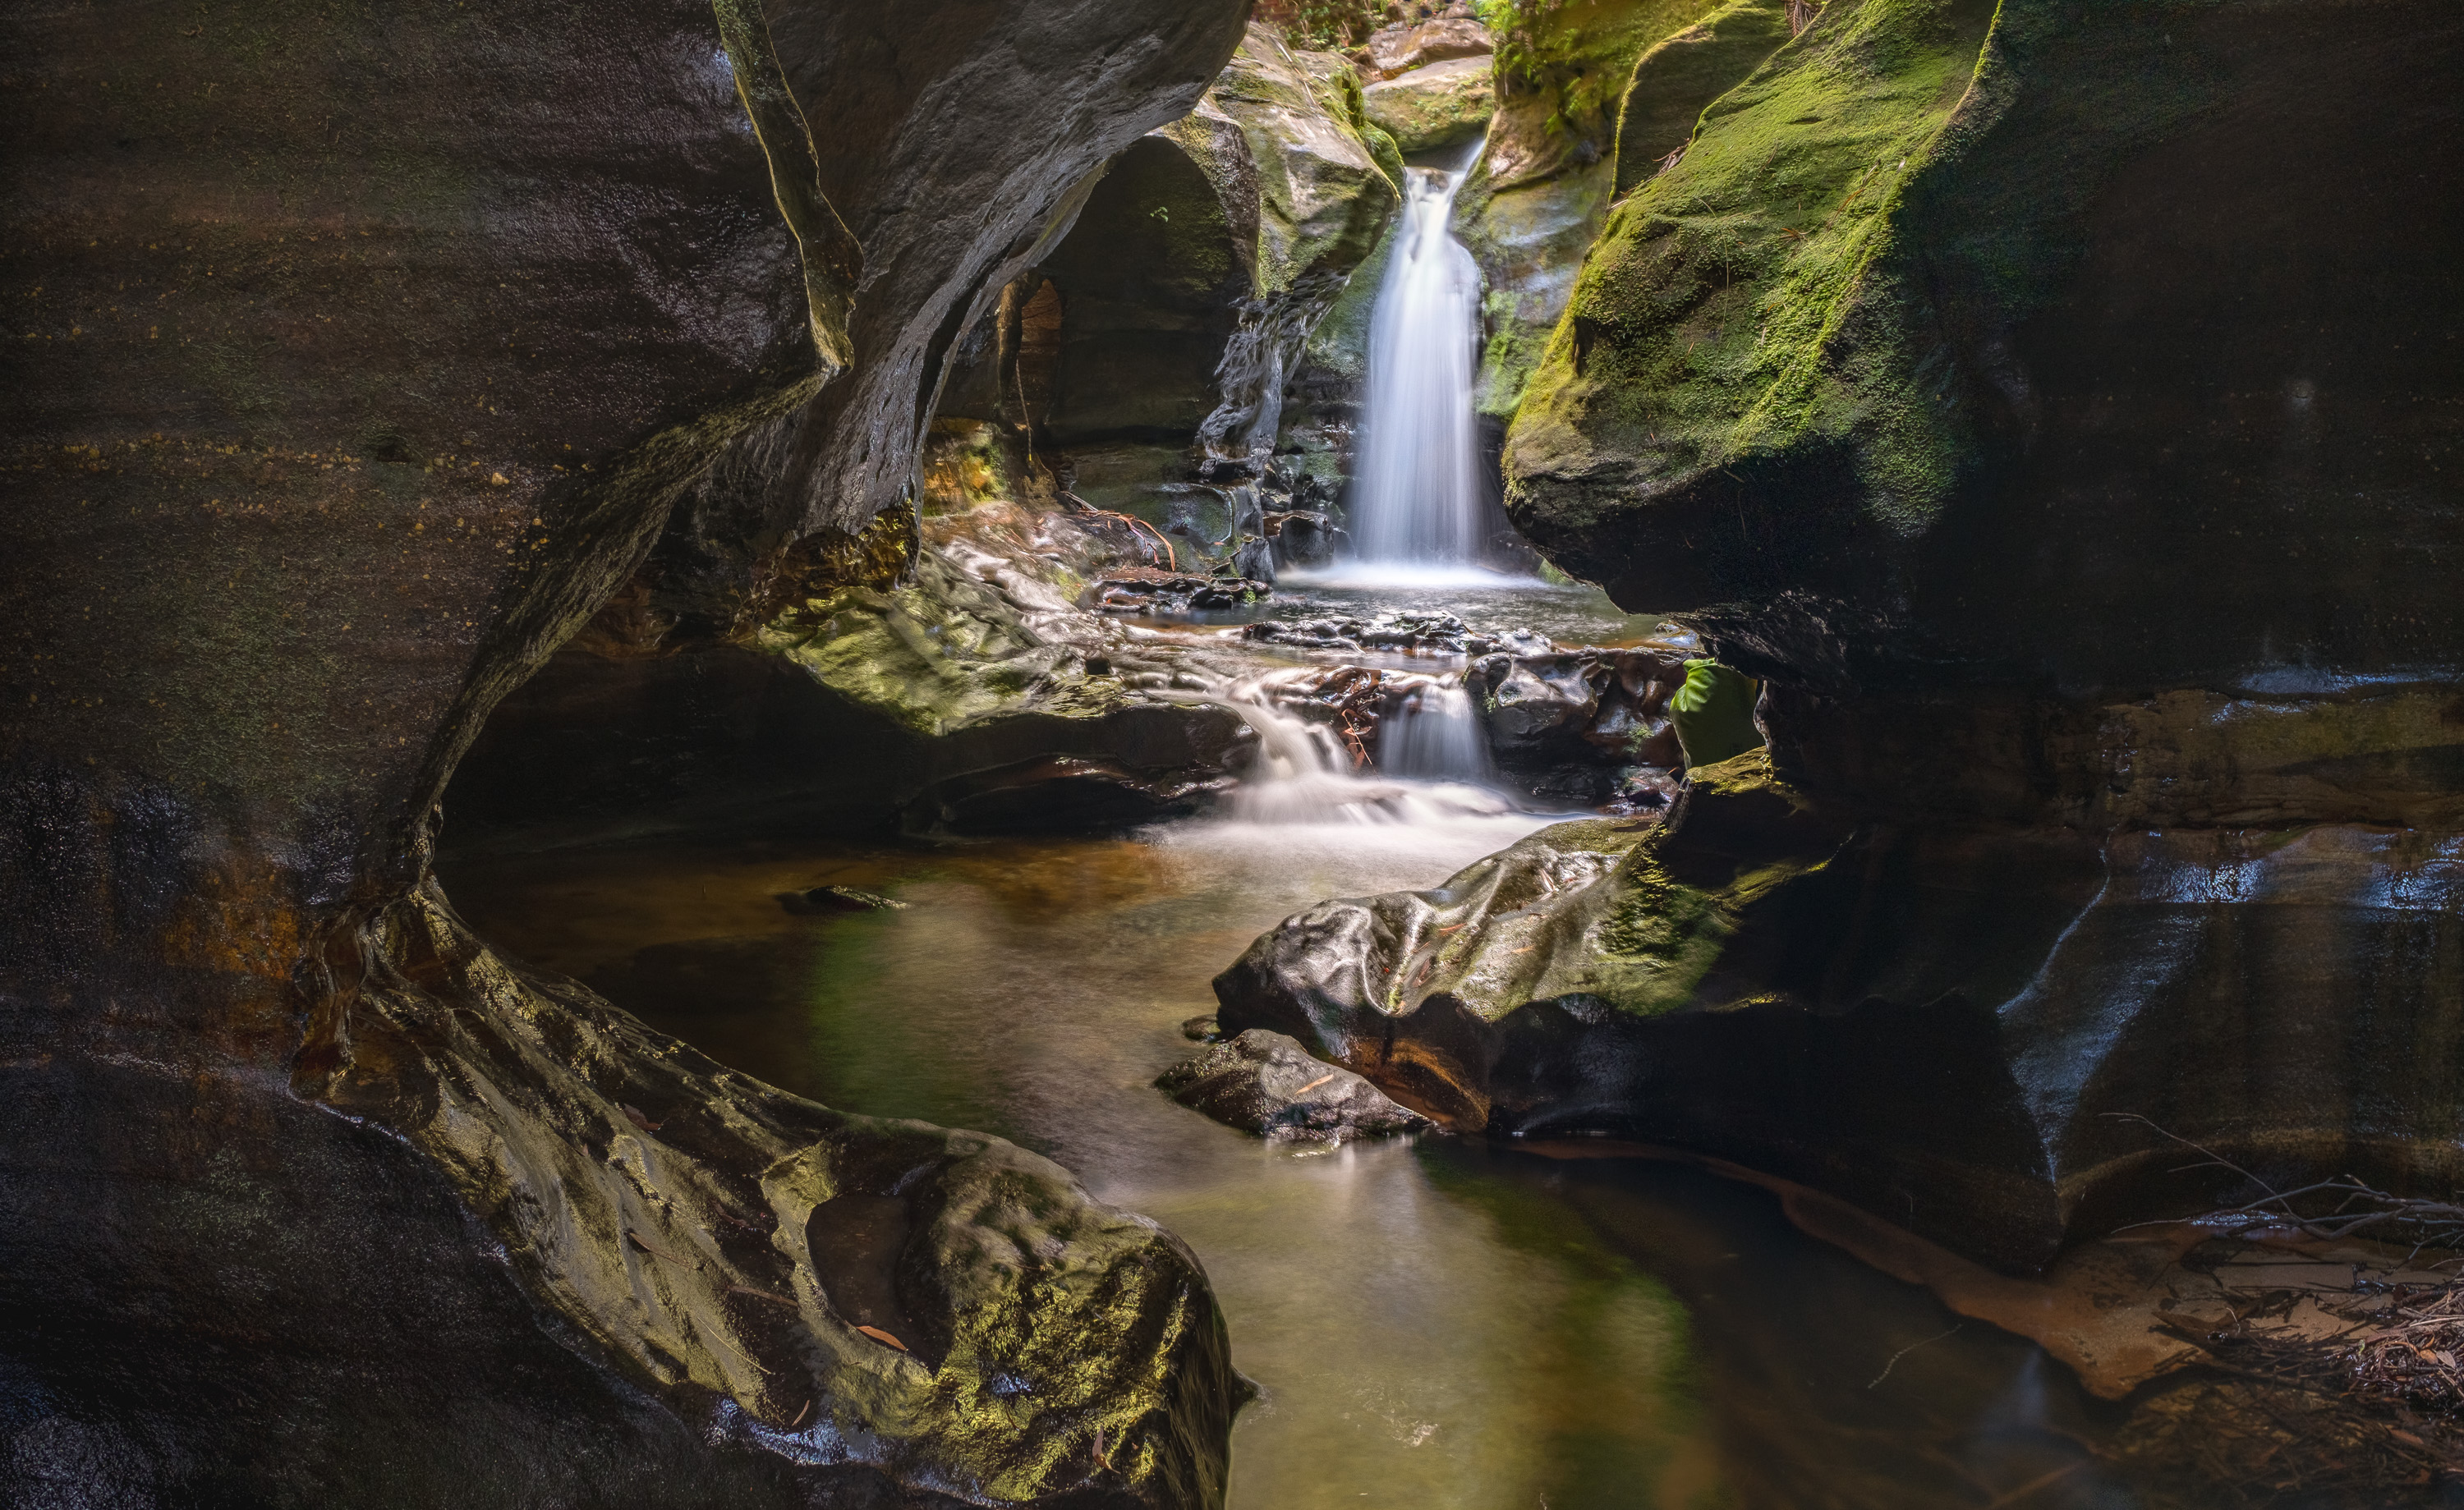
Fujifilm X100F – ISO 200 – F7.1 – 4.3 seconds

Anirban Chatterjee

Have fun and enjoy. You can be the most technically gifted photographer, but if you are not having fun or enjoying the process, your images will be boring.

And if you are starting to do photography on the street, please be respectful to others. In Australia, it is perfectly legal to do photography in public places, but that doesn’t give you a licence to be a nuisance. As much as we have the right to take photographs in public places, the other person also has a right to walk on the street minding their own business. We live in a community, and respect must be mutual. An image is not worth it if it ruins someone’s day. So please be respectful.

Fujifilm X-T1 – XF18-135mmF3.5-4.8 – ISO 6400 – F16 – 1/210 second


Harmeet Gabha

Don’t be scared, just do it (as the Nike ad says). There are so many free resources available online that you will be able to learn and pick up any area of photography very quickly and easily. Google is your best friend; just type in what you are looking for and you’ll find the answer within minutes.

I’m also focusing more on my blog (photoinsomnia.com), by creating content for people just starting out in photography. It’s a resource where they can learn some techniques quickly that will make them more confident and inspired.

“Casa Balto, Barcelona” – Fujifilm X-T1 – XF18-135mmF3.5-4.8 – ISO 400 – F3.5 – 1/180 second

Benjamin Lee

⁃ Shoot everything and as often as possible

⁃ Explore all types of photography, take note of the genre’s aesthetic of photography that really motivates you and hones in on it.

⁃ Consume and view as much photography and art as you are producing (if not more). This will really help you refine your taste and personal aesthetic.

Fujifilm X-Pro2 with XF16-55mmF2.8 R LM WR – 1/100 – F2.8 – ISO2500

Joe Jongue

Don’t be caught up in the gear, just go out and shoot. Don’t be afraid to step out of your comfort zone; chances are, you may be good in a particular genre than you may think. Join a local photography community, be open to advice and more importantly, interact with other photographers.

Fujifilm X-T1 with XF16-55mmF2.8 R LM WR – 1/180 – F4 – ISO200

Through a Photographer’s Eye: Josselin Cornou

Through a photographer’s eye is the first in a series of interviews featuring Australian photographers. In each interview, we learn about the person behind the camera and how they use Fujifilm X Series cameras to photograph the world around them. Our fifth interview is with Sydney based photographer, Josselin Cornou.

Josselin, your photography is extraordinary, can you tell us about yourself, what you do and why you enjoy taking photos?

Photography is simply more than just a hobby, it’s sometimes a way of life. Working in a highly competitive and technical environment, I see photography as a way to express my feelings and develop my artistic mindset. I also see a real opportunity to use photography to gain impact by campaigning, in order to help great causes, like the reduction of CO2 in the world.

Funny enough, I was lucky to follow the training “Search Inside Yourself”, the #1 most popular training program at Google, and I was stunned to see that photography is actually really similar to the process of meditating and journaling. Slowing down and appreciating without judging, in order to capture the moment at its fullest!


You recently ventured to the Rocky Creek Canyon in New South Wales to test out the new Fujifilm X100F. Tell us, how did you find the experience and did the X100F perform well?


The Fujifilm performed well, it felt like the previous X100S, just better. The top ISO dial was really useful in order to change settings on the fly. This is actually really useful, as you can’t always carry a tripod while venturing through canyons.

It is interesting to know that, while shooting in a long ‘technical’ Canyon, you need to be aware that time can be against you:

  1. You spend typically at least a good 80-90% of your time swimming/abseiling/jumping around/throwing bags in the water. You need a camera that you can take quickly, and being able to change setting in a click of a button is a real advantage.
  2. You will spend less than 20% of the time with a tripod. Time counts, and trust me – you don’t want to get stuck in the water (it’s freezing)

To add to the complexity of canyoning photography, you need to manage really wide dynamic range, and bracketing is sometimes the only option to capture the moment.

I think the X100F is a nice camera to venture into incredible landscapes. While I am a big adept of ultra wide angle, it is good sometimes to keep yourself at a 35mm focal length (full frame equivalent). If I needed a wider field of view, I would simply create a stitched pano. The fact that the X100 series has a small lens is actually a big plus for panorama photography. You will unlikely see any parallax issues while composing your panorama.


Again, I have to say I do love the new top dial to change the ISO on the fly. Also, I like the compact size of the body.


The canyon was quite treacherous in some parts, can you let the readers know how you kept the Fujifilm X100F dry? Also, did the battery life perform for the day-long expedition?


My solution: Use a dry bag in a dry bag 🙂 Macpac do sell those small 5L dry bags for a couple of dollars, and that should cover you for most situations when venturing through the water. Using an underwater housing would be best, but those dry bags do the job just fine.

I only needed to use one battery. That was actually more than enough for a day shooting in a canyon (about 400 shots). I personally never wondered why battery life on mirrorless was an issue. Those batteries are much lighter than DSLR cameras.


How do you like to push the photographic boundaries from a technical imaging aspect and can you show us an example of your imaging process and explain how you formed the final shot?


Below are two examples on how I process my photos from start to finish.


Example One: My personal three-way incremental techniques. A technique to render photos within 5-10 minutes:


  1. First, you have to think about the colour pattern that is going to be used for the photos (e.g. colour wheel). Start with the original image and edit it using Lightroom. I quickly work on the highlights, shadows, white and blacks in the photo. I also correct the hue/saturation of the different colour channels in order to follow my preferred colour wheel scheme. I finally correct distortion and the general aspect ratio in order to bring back the photo as close as I saw it with my own eyes.


2. I continue to the second step by opening the photo with Nik Software Color Efex Pro 4. I usually apply a custom version of the recipe named “Soft Landscape” and remove any vignetting but add some sharpness back to the photos. Also, I apply some of the filters to the selected part of the photo.

3. Then, I reiterate on step one and two until I am happy with the photo.

 Before

After


Example Two: HDR (High Dynamic Range)


One of my best photography techniques is to bracket multiple exposures of the same shot. Why would you do this you might say?


Sometimes you need more dynamic range, and you don’t have time to manually change your settings. This is particularly useful if you go on a non-photography tour. This technique should give you way more flexibility to edit your photo.


Originals:


  1. Here I am happy with the general colours of the photos so I will stick with the Analogous colour scheme (groups of three colours that are next to each other on the colour wheel) to portray the natural colour of the rock.
  2. Following this, I will then create my HDR using Lightroom. This technique should work 99% percent of the time. If not, I would recommend using Photoshop to merge your HDR.


  1. At this stage, I generally disable auto tone, because it sometimes gives an unrealistic (and ugly) result:


  1. Instead of enabling this feature, I reset the auto tone, and play with HDR photos produced by Lightroom. My rule of thumb here is to only edit incrementally, slowly so that I don’t go over the top with any settings:


Settings:
In this image you can see the settings I used in Lightroom to achieve the overall look.


  1. As seen in the photo, during our expedition, the sunlight was hitting the green fern and trees, adding a green ambient light. However, the rock colours remained with a warmer tonality. (It is also interesting to note that Bayer sensors are twice more sensitive to green). I decided to bring back the original colours of the rocks by using an elliptic tool. The end result gave me a nice gradient between the two colour tones. It was important to note that I had to make sure to keep the colours within the predefined Analogous colour scheme.


  1. I then process two copies of the photo using a Lightroom Plugin called Color Efex Pro and Analog Efex Pro with two different tonalities:

left image – Analog Efex Pro, right image –  Color Efex Pro.


  1. Here you can see the final result of both photos. The Analog Efex Pro layer will be used for vignetting, while the Color Efex Pro layer(a warmer version of the original photo) will be used for the centre area to obtain the following rendition. Again changes are extremely subtle:


  1. Finally, we can reprocess the image with Lightroom. The goal here is to slightly increase the exposure of the centre of this frame and slightly accentuate the contrast of the underexposed areas. This should create an all round better depth in the image.


This should give me a more natural, more realistic photo – depicting a better vision of what was seen during that moment.

Before


After


Something worth noting is that you can use the following programs to continually reprocess your image to recreate the scene. By making small incremental changes in Lightroom followed by Nik software and then Photoshop, you will be able to recreate the scene as you saw it with your own eyes. I personally used this processing workflow for some of my most popular shots, such as these: ‘Lonely Solitude‘, ‘Sunrise with the old Gods‘ and ‘Sakura, from the leaves to the sky‘.


If you have some advice for someone starting out in photography what would it be?


Buy a camera with a fixed manual lens. In a day of automation, it is easy to go into the classic auto mode. It works really well in most cases, but this also means that the user will hardly learn any photographic concept. Having a limited focal length will help the user reframe the shot, avoiding any bad practices like constantly zooming. My first camera was a Panasonic GH2 + Voigtlander 25mmF0.95. That setup really helped me step up my game.


If you want to do landscape, then get an ultra wide angled lens. These lenses are expensive, but they will help you frame those ultra wide shots – making it totally worth it.


You mentioned in a conversation you had a previous X Series model, what made you decide on Fujifilm X Series equipment in the first place and how do you see it’s future unfolding with the introduction of mirrorless medium format?


I love the compactness of the system. One camera that really interested me was the X70. I liked it because it provides a 28mm with an adapter to go to 21mm. I travel a lot for work and leisure, and I want to keep my gear light.


I think Fujifilm is going toward a good direction with the medium format:

  1. The camera market is shrinking, it’s very evident with CIPA shipment hitting a new low this year. In the way I see things going, I wouldn’t be surprised to see the interchangeable camera market becoming a niche. To prevent this, camera manufacturers needs to innovate on a hardware and software point of view.
  2. Full frame cameras are now proposing higher megapixel cameras. The problem is that effective resolution on full frame camera tops around ~50-70MP. Two solutions to increase those: scale up the size of the sensor, or change the design of the sensor (3 layers stacked one, etc.).


Now you have had some time with the X100F, were there any features you enjoyed using and what would you like to see improved in future X Series models?


Enjoyed using:

  1. ISO dial, it was great!
  2. Quick menu settings.
  3. The small joystick that can be used to navigate and change focus points.
  4. Backwards compatibility with X100 series lens and accessories.


Things to improve:

–   ISO dial is great, I love it. It is sometimes hard to change it on the go.

–   Please provide an app store where we could install apps for time-lapse, overlay with apps (e.g. predicting the position of the sun, etc), social media apps (snap, etc.). Transferring photo to a laptop is old. Sometimes we just want to share on the go.


Looking at your photos we noticed you love to travel. Are there any essential pieces of equipment you like to take with you before travelling and what’s the best way to conduct research on the places you are planning to visit?


I usually like to bring with me:

  1. Drone (DJI Mavic Pro).
  2. Camera with wide angle lens (15-30mm ~), 50mm lens and 70-200mm. And the kit lens of course (for my underwater housing). Oh and I always have a second old body, just in case one breaks.
  3. Underwater housing, if I plan on bringing the camera underwater. I have a cheap one that does an excellent job (Meikon).
  4. Solar panel to charge on the go + 10,000 mAh battery so that I can quickly charge my camera and equipment.
  5. A phone camera, that is always good to have.
  6. A small tripod, and sometimes a bigger one.


The best way to conduct research on places I am planning to visit: That’s a tough question – I usually look at travel guides, I also look at the weather, and the likelihood to see wildlife and scenery (that will dictate which lens I am taking). Also use an app like Photopills to know what I am going to shoot (night photography, etc.). In most cases, I wait only a few days before booking my hotel. The weather might change, and this may dictate your choice of location.


I don’t like to look at too many photos from other photographers of the place I’m going to, because it sometimes might spoil the feeling of that place, and it will also give me too much temptation to imitate them. It also gives the opportunity to look at a place differently.

To see more photos from Josselin follow him on Instagram or visit his website here.

Other interviews in this series

Through A Photographer’s Eye: Drew Hopper

Through A Photographer’s Eye: Alamby Leung

Through a Photographer’s Eye: Ian Tan

Through a Photographer’s Eye: Dale Rogers