HOW TO: Photograph Fog

As winter starts to set in, photographers are looking for ways to capture this cold season. For me, winter is best covered in the morning. This is a personal preference but in the mornings you have frost, a reasonable hour for sunrise and (if you’re lucky) fog or mist.

There are three types of fog,  so you need to decide what you are looking for and this will depend on your location:

  • Ground fog – In mountainous/hilly areas and cold patches you can get ground fog collecting in valleys. After a rainy night or over wet ground you can get shallow precipitation fog.
  • Sea fog – Also called advection fog, this is where warm air passes over cold sea water.
  • Sea/River smoke – Where the air is colder than the water, creating a generally shallow level of fog, this is generally restricted to water areas, hence river smoke.

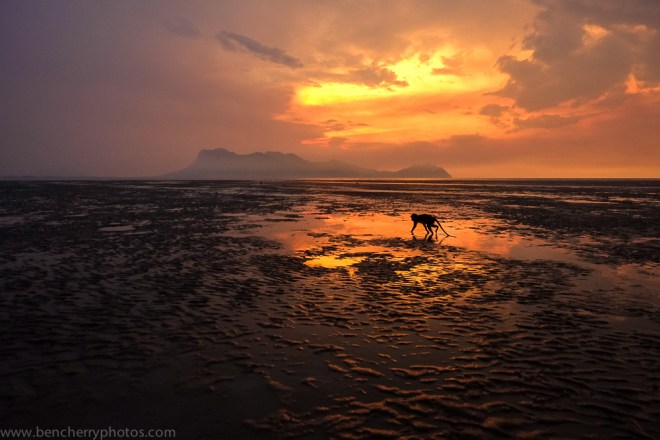
When trying to photograph fog you need to use the weather forecast to understand what the evening will be like in your desired location. I was fortunate enough to visit Curbar Edge in the Peak District the afternoon before my first morning I was there to scout the location. It was just before sunset and the fog was forming in the valley below and at that point I decided to try it out the following morning to see how it would look.

The weather for my first morning at Curbar was drizzling and there was a thick layer of cloud, which meant it was pretty unlikely I’d witness much golden light, I thought I’d set out and give it a go. I am so happy I did! This was my first real experience of photographing mist and it is incredible how quickly the spectacle evolves in front of your eyes. I one point I was photographing down one end of the valley, taking some long exposures, only to look over my shoulder and see that it had dramatically changed down the other end of the valley!

I used the X-T1 and the XF18-135mm lens for my main set up. As it was a wet morning the weather-sealed kit meant that I could stop worrying about the system and focus on the spectacle. As well as offering weather sealing, the XF18-135mm meant that I had great versatility, meaning that I didn’t have to worry about changing lenses the entire time. However, I also ended up using a neutral density filter to reduce the amount of light reaching the sensor to further extend the shutter speed. This was great but because I was using a filter set instead of screw in filters it meant that the front element was exposed to the conditions. Long exposures and rain drops do not mix! Thankfully a little umbrella tucked away in my bag helped to shelter the filter.

Generally I was not bothered about using a fast/moderate shutter speed so I set up the system on a tripod and used ISO 200 (the lowest RAW compatible ISO) and generally around F8. The addition of the ND filter, which was a 10-stop filter, meant that the shutter speed required was dramatically decreased. This results in the mist smoothing out, giving quite an interesting effect. See the comparisons below (note that despite the fact the ND filter is meant to be neutral it has put a distinct colour cast on the images).

This slideshow requires JavaScript.

The ND filter extended the shutter speed so much that I had to use the bulb setting, as the required shutter speed was longer than 30 seconds. For this I used the remote trigger that allowed me to hold down the trigger (lockable) to keep the shutter open for as long as required. The X-T1 shows the length of the shutter speed on the back screen, this is very helpful. There is something to consider thought when using long exposures: the processing time. As soon as you go beyond 30 seconds, the processing time dramatically increases from seconds into minutes, this isn’t a problem but is something to be aware of when trying to photograph a scene that is evolving constantly.

To make sure I didn’t miss any moments while the X-T1 was processing and to get some different shots, I used the X100s with ISO 1600 to produce a fast enough shutter speed to allow me to use the camera one handed. Picture the scene: a wonderful valley filled with fog unfolding in front of me, one camera on a tripod; my left hand sheltering it with an umbrella; photographing the scene with the X100s in my right hand at the same time! Who says photographers can’t look cool…

Mist-15 Mist-16Mist-14

The three above photos were taken with the X100s using the monochrome + red filter jpeg preset.

The reason I chose Curbar Edge is because it provides a high vantage point. This is really important to optimise your chances for good mist photography. It generally means that you should be hit by the early morning light and so should warm up faster! This is a valid point to consider on crisp winter mornings, not that it happened this time around. A high vantage point allows you to see for a greater distance, hopefully providing you with a greater number of layers to your picture. At the top of a valley, Curbar Edge allowed me to see for miles along the valley, which offered both valley fog and river smoke. The ability to then use a telephoto lens to zoom in on particular areas can result in some quite striking shots.

Mist-5

But also having the ability to instantly zoom wide was a great asset to try and obtain a variety of photographs.

Mist-3

The colour photos were all taken with the X-T1 and I used the Classic Chrome camera calibration in Lightroom which produced wonderful colours in my opinion. I have only just started using this camera calibration and I love it.

Mist-17

Though on this occasion the sun didn’t break through the thick cloud cover, the spectacle was nevertheless remarkable and I can only imagine what it would have looked like if sun rays had broken through.

The second morning

Despite being very happy with the previous morning I decided to give it another go as the forecast suggested there was a better chance of a proper sunrise. This time round I decided to not focus too much on lengthy shutter speeds, but instead the details in the fog. What I didn’t expect was the amount of fog!

Mist-2

Mist
Mist-10

The range of the 18-135mm meant that I could capture the grand scale of the fog at 18mm, with the car in the first of these pictures giving a sense of scale. Then using the longer end of the lens I pulled out particular parts of the landscape, such as the little cottage that looks like it should be in Harry Potter and the hilltops surrounded by a sea of fog, turning them into islands. As well as the incredible amount of fog, the sun did make a bit of an appearance too. Despite this it was a very cold morning, producing a wonderful frost. I was very happy to have packed a hat and pair of gloves.

Mist-4

Mist-13

I positioned myself so part of the hilltop was between me and the rising sun, creating a backlighting effect on Curbar Edge, which brings the fog alive.

Mist-8

Because of the brighter sky this time round I needed to use a ND gradual filter, where unlike the filter I used during the first morning, this one changes from one end to the other, as the name suggests. At one end it is darker (you can buy filters at different stops, depending on how dark you want to make part of the image), while at the other it has no effect on the light. I use these when I am photographing something with a sky that is much brighter than the ground below. With the above image I used a filter which didn’t stop down the light enough to correctly expose the sky but I like it nevertheless because of the frost (it get particularly difficult to expose correctly when the sun is in the image). While the picture below is a slightly better example of a ND gradual filter in use.

Mist-7

I hope this has proved helpful and now it is your turn to get out there and photograph the wintery conditions. Let us know how you get on.

Why lens choice is important?

Use of different focal lengths

This blog is going to try and cover the fundamentals of lenses, explaining when to use them and why. If you have any questions after reading this then please get in touch via:

If you haven’t already seen Dale Young’s great blog on “What focal length I should use and why?” Then check it out here.

I too took some photos at different focal lengths (see the below slideshow), between 10mm and 135mm, to emphasise how certain focal lengths are generally better than others for portraiture. This topic has brought up lots of comments and I have edited this part a number of times to try and get the best brief explanation, without going off on too big a tangent! To break it down to fundamentals, the thing that affects perspective is distance, the distance between the camera and the subject. The focal length you choose affects the framing of a subject. With the series of photos below, I tried to keep the framing the same for all the focal lengths; the thing that changed was the distance between the subject and me. At 10mm I was a mere few cm’s from the subject’s face (awkward), while at 135mm we were a few metres apart. This longest example (135mm) shows a flattening effect, where the content seems compressed. This occurs because of greater distance between the subject and myself. Making the depth of the face (e.g. from the nose to the ear) proportionally less compared to the distance between the subject and the lens… The opposite is true for the wide-angle photos. Take the 10mm example again; I am so close to the subject that the depth of the face makes up a larger distance than the distance between the lens and the nose, making the perspective exaggerated (also note how you can see the shadow behind the model with the wide-angle shots but you can’t with the telephoto portraits because of the narrower angle of view).

In full frame or 35mm film terminology, 50mm is deemed the ‘standard focal length’, as it is close to our eye’s central angle of view. This means that a 50mm lens produces a perspective very similar to what we see. Because the sensors in Fujifilm X-Series cameras are generally 1.5X smaller than full frame sensors (APS-C sensor size), this standard focal length equates to a 35mm lens, like the XF35mm F1.4 R. This is quite complicated to explain (it could be a whole other blog!)… So much so that I have spent hours editing these paragraphs, but hopefully you get the gist of how different focal lengths affect the perspective of a picture. There are some very informative comments about this topic at the bottom of this blog if you want to find out more.

This slideshow requires JavaScript.

Wide-angle lenses can create exaggerate perspectives which produce amusing (which is good as it’s engaging) portraits, especially with animals!


Apertures

Before we go any further, lets just check you understand the fundamentals of using apertures. If not then check out my previous blog that helps to explain how different apertures affect a picture (plus there are cute labrador puppies!).


Putting both together

35mm f1.4
35mm f1.4

Now that we understand how different focal lengths and apertures affect the look of a picture we can look at how to combine the two. First of all lets think about portraits: If you want to isolate a subject generally you are going to want to use a standard or telephoto lens with a low F-stop, such as the XF35mm F1.4 RXF56mm F1.2 R or the imminent XF50-140mm F2.8 R OIS WR. For the image to the left I wanted to try and isolate the woman from the background as it was very busy and distracting, and while it isn’t entirely clean it is made better as a result of using F1.4 for a shallow depth of field.

If you want to capture an environmental portrait generally you would use a wide-angle lens and depending on how much of the environment you want to make out in the background you’d range the F-stop between F2 and F11.

Both of the pictures above were taken with the X100s (I love using it for these kinds of photos). The left image is at F2 and while you can make out the room the clarity of it is poor. Compare that to the right image where the use of F11 results in the mountain behind the boarder being sharp.


Prime vs. Zoom

This is very much a personal preference, there is no right choice. It depends on lots of factors, from space and weight restrictions to financial limitations. Because prime lenses have a fixed focal length, they tend to be smaller, lighter and have larger minimum apertures (F1.2-2.8) compared to zoom lenses. While zoom lenses have the convenience of effectively including many different prime lenses, generally these have more restricted apertures (F2.8-5.6). For me, it depends on the situation. I prefer prime lenses because of the greater depth of field control. As well as this I believe that the fixed focal length makes you think more about your photography, particularly composition. However, the convenience of zoom lenses in situations that are changing quickly can be invaluable as you don’t have to change lenses as often to obtain a variety of photographs. When conditions are unpleasant this is vital in order to protect the sensor. A point to consider is that the XF18-135mm F3.5-5.6 R LM OIS WR plus the recently released XF50-140mm F2.8 and XF16-55mm F2.8 R WR (hopefully arriving in the first quarter of 2015) are all weather sealed making them ideal partners for the X-T1, creating a weather sealed system.

If I am working in relatively controlled conditions where it is easy for me to change lens regularly then I try to use prime lenses.

But if conditions are not suitable for continuous lens changes or a situation is quickly evolving and I need to be on my toes the zoom lenses are what I grab.

The zoom lens examples above are all wildlife examples (which are often taken in difficult conditions where a situation is quickly changing) were captured with the telephoto half of the XF18-135mm F3.5-5.6 R LM OIS WR. The reason why I chose these examples is because I wanted to show what can be done with F5.6 as the maximum aperture, showing nice bokeh in the images where I’ve tried to keep the attention on the subject. Now imagine what will be possible with the new XF50-140mm F2.8 R OIS WR! Can you tell I’m a bit excited about it…?


What lens for the occasion?

The main reason I first moved to the Fujifilm X-Series was the prioritisation of high quality lenses. With the announcement of the X-Pro1, the first lenses available were the XF18mm F2 R, XF35mm F1.4 R and XF60mm F2.4 R. These are all high quality, lightweight prime lenses that, together, offer a wide focal length range package. From there the lens road map laid out Fujifilm’s intentions to create a strong lens collection covering a wide range of uses.

Generally lenses are associated with a particular genre of photography based on their focal length. For example wide lenses such as the XF14mm F2.8 R and XF10-24mm F4 R OIS are intended for landscapes and long lenses like the XF55-200mm F3.5-4.8 R LM OIS are for wildlife and sports. But rules are made to be broken and your lenses don’t necessarily have to be used to fit those stereotypes. The photograph below was taken with the 14mm lens, generally intended for landscape photography, however I used this lens to capture this macaque foraging for stranded marine life amidst a sunset scene.

14mm - Foraging macaque
14mm – Foraging macaque

The important thing to remember with your lens choice is to think “what do I want to convey?” On this occasion I wanted to show the scene as a whole. In the landscape shot below I focused on the distant hills over a bay with the setting sun using the 55-200mm lens, which is usually associated with wildlife and sports. This helped to emphasise the golden glow which wasn’t as prevalent with a wider-angle view.

120mm - Landscape
120mm – Landscape

Conclusion

Hopefully you now understand that lens choice can have a huge impact on your end result. If you understand the principles of focal lengths and apertures then you have a grasp on what lens to use and why. Remember that lenses are tools designed to help fuel your creativity. For me, a lens that I am very much looking forward to is the XF50-140mm F2.8 R OIS WR. This lens offers the versatility of a zoom but with a constant aperture of F2.8 it gives very good depth of field control. A lens such as this has many uses and I’m sure it is going to be a big hit with photographers from all genres.

A good exercise to try would be to force yourself to use one focal length next time you go for a walk. No matter if you’re using a prime or a zoom lens, try and restrict yourself. The purpose of this is to understand what you can capture with certain focal lengths so that in the future you will hopefully be more decisive with what focal length to use in a given situation. Remember that you can change the end picture dramatically through different apertures. Why not give it a go and then share with us the variety of photographs you managed to capture with the same focal length. Or you can change it up and use one aperture but change your focal lengths. Share your results with us and if you have any questions please get in touch via the contact details at the top.

Until next time, happy Shooting!

Ben Cherry

What focal length should I use and why?

w360_6415757_tutorialbannerfordotmailerHere’s a quick, hopefully informative snippet as to why you might choose one focal length over another, and why.

The idea for this blog came about when I was asked recently “Why don’t you just zoom-out to get the person in the frame?”. This is a very good question and I felt it needed a mini demonstration to really help answer it. All one needs to conduct this experiment is the following:

  • A willing volunteer – I had a Marc
  • A zoom lens of any kind – In my case, the XF18-135mm lens
  • Oh, and a camera!

The experiment is simple; frame your subject (Marc) the same each time and take a picture at different focal lengths. I chose four focal lengths along the barrel of the lens to best demonstrate. With this, we had the ever-helpful Terry to hand with a camera to capture the experiment from the third person perspective.

Hopefully what you will notice is that the wider the angle, (18mm) the more clutter there is in the image whereas at the 135mm setting, pretty much all clutter has ‘disappeared’.

Why does this happen?

Without going into huge mathematical detail (that I don’t even fully understand) it is because wide angle shots will achieve a larger angle of view and long zooms won’t. This is how much ‘fits’ into the shot – peripheral vision if you like.

As a rule of thumb, wider angle lenses work great for landscape photography and indoors (where you don’t have a lot of room to manoeuvre) as they can fit more in. Wider angles, however, are not great for portrait shots as they will pull the centre of the frame forwards creating distortion in perspective – example image below.

Longer zooms on the other hand work great for de-cluttering a frame to create stunning portraits. This is because the angle of view is smaller, and more importantly, they have a compressing effect. In essence, a long zoom pulls the background closer to the foreground and can give a more natural, slim looking head shape whilst also helping aid the bokeh effect – increasing the focal length of a lens decreases the depth of field.

Here are two example shots I took that hopefully help demonstrate the difference:

The image on the left (135mm) shows Marc’s head in proper perspective. However, the right shot (18mm) shows the nose being ‘pulled’ forward towards the lens and his head being turned into a rugby ball! You will also notice there is more of Marc’s surroundings in the wider angle shot – this diverts some attention away from his face, which, in a portrait shot we don’t want to do.

I hope this post gets you thinking more about which focal length to use rather than just zooming in and out for convenience.

Having a zoom lens is incredibly helpful at times, but it would best to think of your zoom lens as a series of prime lenses. Most photographers, if not all, use specific focal lengths for specific purposes; this is due to the individual optical effects each focal length provides. It really does make a difference to the end result – as (hopefully) shown above 😉

If you can, please go and try this yourself to get a real feel for it. It will help with your own understanding as to what focal length you might want to use, and for which subjects