Portrait

Making the switch – Why these three professional photographers choose Fujifilm X

T_39-1Recently we teamed up with Amateur Photographer (AP) to create an experience day for 60 of their lucky readers.

While we were there we interviewed our three guest speakers and asked them all to tell own story as to how they made the switch to Fujifilm. Check out what made Damien Lovegrove, Matt Hart and Paul Sanders switch to the Fujifilm system, and also what has made them stay using it.


damien2bDamien Lovegrove

Portrait & lighting guru Damien Lovegrove talks about how he made the switch to the Fujifilm system and how using the smaller system helps him connect more with his subject. Can you guess which Fujifilm camera first caught his eye?

To see more of Damien’s work, click here.

https://www.youtube.com/watch?v=h-fQ-vclAZo


matt hartMatt Hart

Street & event photographer Matt Hart tells his system switching story and praises the benefits of using the Fujifilm cameras; from the exposure previewing LCD screen, to the discrete ergonomics and quality of the final imagery.

To see more of Matt’s work, click here.

https://www.youtube.com/watch?v=Okc-WE3BLvQ


paul-avatarPaul Sanders

Former Picture Editor of The Times Paul Sanders explains how DSLRs created a barrier between him and the landscape and how using the smaller Fujifilm system brought back his passion for shooting. Not only that, he also shares some excellent philosophy to shooting pictures.

To see more of Paul’s work, click here.

https://www.youtube.com/watch?v=tOX5I7B542k


The day itself was a perfect opportunity for Amateur Photographer readers to get hands-on with the Fujifilm X system and to learn from our very own Fujifilm X-Photographers. Throughout the day, multiple workshop sessions were held, allowing the experienced professionals to pass on their photographic tips & tricks covering long exposure landscapes, single light portraiture to the in-the-moment street photography.

To read more about the day, please visit AP’s website.

Shooting ‘Lifestyle’ with X-Photographer Kerry Hendry

Kerry Hendry - webOfficial X-Photographer Kerry Hendry was recently asked to shoot a product-lifestyle photoshoot for a very special client – us! Here she shares some useful tips and techniques to help you produce similar, stunning results.


The brief

Shooting the ‘X-Lifestyle’ was the brief – featuring lovely creative hipsters, out and about with their beautifully styled beards and retro looking cameras. The desired outcome: a collection of images that can be used worldwide for marketing the (fabulous) X-series cameras.

Planning

My mind was immediately racing with ideas – where, when, models, styling – what if it rains?

I love the creative side of life – and working out how you can translate the images in your mind into reality.  What look am I going for? Styling? Locations? Where to capture the best light – and how?

Aim high – super ambitious ideas will challenge and stimulate your creativity. Get out of that comfort zone and work out the ‘how’ !

And so it began – working up a mood board of ideas, selecting outfits, booking models, styling and location ideas.  For that true ‘hipster’ style Cheltenham was perfect, and as I only live a few miles away I know the town like the back of my hand.

Know your kit – I probably shouldn’t say this but I only ever read the manual if I get stuck or if I’m working out a new feature. Fuji X-Series are very intuitive and once you ‘get’ the Fuji way – you’ll never look back. Make sure you know all the key features to squeeze the very last drop of performance out of your camera

Making it Reality

Models were booked, outfits agreed, hair & make up booked, locations recce’d – and double recce’d!  We were super lucky to have a two very special locations on board to work with.

Light & Locations – ensure you recce your locations at the time you want to shoot them. We deliberately ended up at the boating lake as late in the afternoon/evening as possible to get the best light

For the first day we shot at The Boathouse & boating lake at Pittville Park in Cheltenham and for our second day of shooting, I managed to arrange early morning access to one of the most beautiful locations in town – the Sandford Park Lido – a 50m Art Deco open air pool in the centre of Cheltenham.

Be clear what you want to achieve with styling, less is often more – better to have 2 or 3 key outfits ready to go than a room full of clothes to wade through. Think accessories – shoes, jewellery, hats – all great props

Location, location, location

Some locations are perfect – no outside interference, no people in the background, no traffic, no kids playing football around you.  Others – you have to be a bit more creative, or dodge the traffic at least!

Engage & Direct – unless you have the luxury of a seasoned model (and sometimes even then), you will need to direct the shoot. If you can’t find the words to describe what you want, show them! It’s always entertaining to see a photographer try and model, which always breaks the ice

www.kerryhendry.co.uk DSCF8224

We shot in peaceful parks, standing on a traffic island on a busy road, shooting across two lanes of traffic, waist deep in wild flowers – not to mention balanced on the edge of the boathouse deck trying not to fall in.  Boats drift artfully, photographers just sink.

www.kerryhendry.co.uk DSCF7774

Experiment with depth of field – we all love the fast Fuji lenses with the delicious wide apertures, but do experiment. Putting your subject in context for a commercial shoot can be important, so look at your backgrounds and stop it down from time to time

www.kerryhendry.co.uk DSCF8324

Work it – if you are just setting out, don’t be afraid to use some of the assisted options – face detection, the tracking autofocus, it’s all there to help you achieve the best photos possible

www.kerryhendry.co.uk DSCF0166

Deliver – rule No 1 of any commercial shoot – deliver what the client needs. Listen, plan, deliver – only then cut loose and add those bonus images

Above all have FUN. Fuji to me is freedom – freedom to be individual, freedom to create, freedom to experiment.

www.kerryhendry.co.uk DSCF7595

After two days of shooting the team was exhausted – most important thing of all – one very happy client (and no one fell in the lake!)

I hope you find these tips helpful and may they inspire you push the boundaries a little more and try something new in your own photography. Go on, sprinkle some Fuji magic!!!


About Kerry

Kerry Hendry is a fine art equestrian photographer who is passionate equestrian commissions and adventures. Her equine images have been widely published in national media and sell worldwide. A keen rider from a very young age, Kerry combines her three main passions in life: horses, photography and travel.

Visit Kerry Hendry’s official website here
Visit Kerry Hendry’s official Facebook page here
Visit Kerry Hendry’s X-Photographer gallery here

Upcoming event

You can meet Kerry at Wilkinson Cameras Digital Splash show in Preston, on Sunday 11th October.
Kerry will be giving two talks which will cover her adventures with the Fuji-X system – looking at landscape, portrait and fine art equestrian photography:


Thoresby. The end of an era

By Chris Upton

person
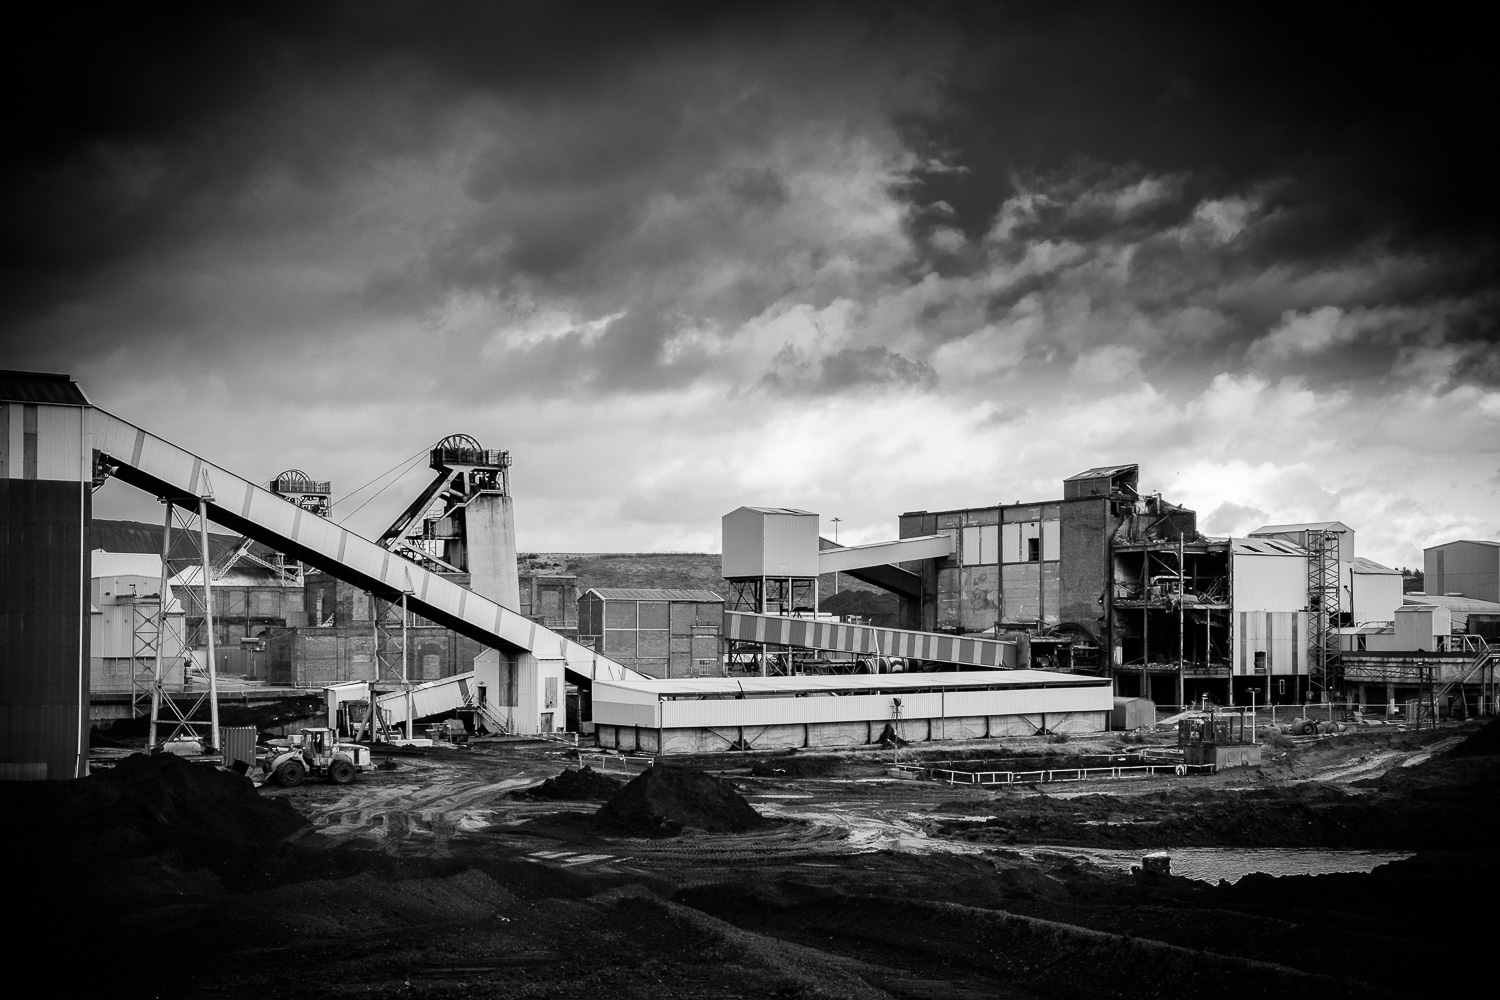
The 10th July 2015 was a landmark date in the history of Nottinghamshire. When the last shift at Thoresby Colliery finished on that day not only did it mark the end of 90 years of mining in the village of Edwinstowe but it signals the end of mining in Nottinghamshire.

The pit opened in 1925 and over the years has employed tens of thousands of local people. It was one of 46 coalmines in Nottinghamshire, which supplied more than 14 million tonnes of coal per year at their peak in the early 1960s.

The first two shafts were sunk to 690m in 1925 and subsequently deepened in the 1950s to the current pit bottom at around 900m depth.

Thoresby Colliery was the first to have fully mechanised coal production and also the first to achieve an annual saleable output of more than a million tons, it became a star performer in the British coal mining industry.

In the late 1980s it raised output to exceed 2 million tons, regularly smashing it’s production records, and the colliery became known as the Jewel in the crown of Nottinghamshire mines. A crown sits proudly on the headstocks in recognition of this achievement.

When the coal industry was nationalised in 1947 it employed a million men at 1,503 pits; prior to the miners’ strike in 1984, there were 180,000 miners at 170 pits. Today there are just two deep mines left, employing about 5,000 men, at Thoresby and Kellingley in Yorkshire. Kellingley will suffer the same fate as Thoresby and closes in the autumn.

UK Coal say market pressures have led to the closure of Thoresby Colliery. Coal generates more than a third of Britain’s electricity, but it is cheaper to import coal from countries such as Russia, South Africa and Colombia than to mine it in the UK.

For the past few months I have been recording the colliery, it’s buildings, plant and people for posterity. It was my aim to create a comprehensive record of the pit at a specific point in time immediately prior to its closure.

It was a chance conversation after giving a camera club lecture that started the ball rolling. A chap in the audience worked at Thoresby and was unfortunately in the first wave of redundancies. He asked if I would be interested in visiting the colliery to take a few pictures. It was a fantastic opportunity and I jumped at the chance. He put me in touch with the Health and Safety manager, I explained what I would like to do and we were off and running. It was at this point, after I had gained their agreement to document the colliery, that the full extent of the task dawned on me.

Starting the project

I visited the colliery on seven occasions, at different times of day, in different lighting conditions, including dawn and dusk. I planned each shoot but found that an outline plan whilst retaining a degree of flexibility to react to opportunities worked best.

At the outset I just toured the site to give me an understanding of the buildings, the machinery, the operation and the people. I took snaps to create a digital scrapbook to help me plan my approach. Essentially I was imbibing the atmosphere much as I would do when visiting a foreign destination for the first time. I wanted to get a real feeling for the place before I started the photography in earnest.

Health & Safety manager Grant was so supportive of my visits giving me more time than I could have wished for.  Even coming in at 3.30am for a dawn shoot and returning to work late in the evening to get “the best of the light” didn’t diminish his enthusiasm. In fact he joked that, after watching me, he would now be able to take the best holiday snaps ever! I hope he does.

20150617_thoresby_0049-Pano

Gear used

All of the images were shot on a Fujifilm X-T1 or X-E1 camera using a selection of Fujifilm XF lenses including the 10-24, 18-55 and 55-200 zoom lenses and 14, 23, 35 and 56mm primes. I also used a Nissin i40 flash for some shots, though preferred to use natural light wherever possible.

For my portraits, the unobtrusive Fuji equipment allowed me to concentrate on building a rapport with my subjects rather than intimidate them with a large DSLR and f2.8 lens combination. Miners might be tough guy’s and supermodels they certainly are not but they seemed to relax pretty quickly in front of my Fuji lenses.

20150701_thoresby_0111

20150319_thoresby_0288-Edit-2

There were several challenges to overcome not least the light levels that were typically pretty low in all of the buildings. Because of the poor light I used a tripod fitted with a ball and socket head for as many shots as possible. My cameras are fitted with arca swiss type plates so that I can switch from landscape format to portrait very easily and without having to waste time readjusting the tripod.

The mix of different light sources from tungsten, to fluorescent and natural meant it was difficult to assess the ideal colour temperature. However the decision early on to convert all the images to black & white certainly helped counter that problem!

In a coal mine dust was another inevitable and unavoidable issue. As the miners told me it’s not only the dust you can see that is the problem and I was very careful when changing lenses and using two bodies certainly helped. Thankfully the in camera sensor cleaning worked well and I was pleasantly surprised at the minimum amount of dust spotting required.

20150422_thoresby_0189-HDR-Edit

Working on a project

As my photography has progressed I have found that I prefer to look at a series of images that tell a story rather than seeing individual impactful pictures. Whilst I have adopted this storytelling approach in my travel and landscape photography this project was a whole different ballgame. This wasn’t going to be a six or ten image set but a large body of work that had to be planned and created in a certain style. I found this experience fascinating, though at first it was pretty daunting. However after a couple of visits I had captured some shots I was very pleased with and the plan started to fall into place. I think the discipline required in a project such as this has helped me to improve my photography and it felt good to be succeeding in this new genre of social documentary photography.

In an attempt to capture the “feel” of the colliery, and to bring completeness to the project, I also recorded various sounds around the pit and organised a series of interviews with miners past and present. I will be producing mini AV’s including these sounds and using the miner’s comments in my presentations.

20150115_thoresby_0097-Edit

20150115_thoresby_0006-Edit

Stretch yourself

It is very easy to stick to what we know in photography and limit yourself to a particular genre. Whilst my experience as a travel photographer, where you are required to be adept at many different genres, undoubtedly helped me there were aspects of this project that were not so familiar. As a result I feel I have grown as a photographer and I would urge you to move out of your comfort zone and try something new. There will be similar opportunities in your area, seek and ye shall find!

20140723_thoresby_0046-Edit

Capturing a piece of history

As I progressed through the project I realised that I was not only taking pictures for myself but that I was actually recording a piece of history, an enduring record of a place that, in just a few months time, would be gone forever. With that came a feeling of responsibility, not only to do myself justice but also to represent the life and work of the mining community. Apart from my family photographs, this project is the most important and worthwhile piece of work that I have ever created. Whilst there is clearly interest in the work now, what will its importance be in another 10 or 20 years?

20150115_thoresby_0052-Edit

A personal perspective

This project has been a fantastic experience. It has improved my photography, taken me into a different genre and enlightened my knowledge of an otherwise mysterious industry.

It has been a pleasure to work with the team at Thoresby, without whom I would not have been able to produce this body of work. Whilst the colliery may not draw its workers from the immediate village area, as in years gone by, their camaraderie, team spirit, hard work and no nonsense attitude in this tough and uncompromising industry epitomise the best of British workers. The closure of Thoresby truly is the end of an era.

20150513_thoresby_0257

20150513_thoresby_0267

What next?

I feel it is important to showcase my images to as wide an audience as possible, especially in the local area. Therefore, after securing feature in the local and national press, I will be staging a major exhibition in Nottinghamshire and am planning to produce a book – more details to follow.

To see more Thoresby images and to keep updated on the project developments please visit my website  www.chrisuptonphotography.com

20150422_thoresby_0301-Edit-3


Story behind the photo – The goat herders on Triund Hill

Fuji Blog Triund (22)

By Danny Fernandez

As I took the final few steps and reached the peak of the hill, the Himalayas came into full view for the first time, and left me speechless.

But let’s begin the story several hours earlier.

I had been staying in Dharamkot, in the foothills of the Himalayas, for an incredibly relaxing 2 weeks. My days had been spent walking through beautiful forests, reading in a hammock and eating delicious organic food.

Fuji Blog triund (1)
A monk walking through the forest in Dharamkot

But before leaving Dharamkot, there was one thing left that I had to do; spend a night on Triund Hill (don’t let the name ‘Hill’ fool you, as for me it seemed more like a small mountain, casting a shadow on the village of Dharamkot and standing at 2,875m high).

On the morning of the trek I left my guesthouse and began the ascent up the hill. The beginning of my trip did not go smoothly. There are 3 things in life which I suck at: singing, playing football and following directions. Somehow, I managed to get exceptionally lost – before I had even found the path which takes you up the hill. The problem began when I came to an intersection along the track which I was following. I glanced in both directions as I tried to remember the directions that the lady at my guesthouse had given me, and then took the path leading to the right. I passed through the garden of a house, and asked a young girl if I was walking in the right direction. She said that I was, and gestured to me to continue walking up the side of the hill (which was essentially a pathless mountain covered in thick, and at times impenetrable vegetation). My instincts told me that this couldn’t be the right way, and I debated turning back and starting again, but as I had already been walking uphill for most of an hour I chose to continue up the side of the mountain.

The bush became thicker and thicker and started cutting at my legs, but stubbornly, I refused to turn back. After a long struggle, I eventually crossed a foot-wide, crumbling flint ridge, which then opened into an area of flat ground which I thought offered some hope in leading me to the top of Triund. I carefully paced back and forth through the labyrinth of plains, but I kept facing dead ends; thick wild bushes that required a machete to pass through. After about 20 minutes of trying to find a walkable route, I decided that this had been one big bad idea, and turned around, attempting to retrace the steps that had led me to this next level of lostness. I walked along the ground on which I thought I had trodden, but to my frustration, I was hit by another dead end. I walked back and tried again and faced another dead end. I began to panic as I remembered those basic tips you hear when doing things like walking up a mountain. Things like “tell someone where you’re going”, “make sure you have a phone” or “make sure you are wearing appropriate clothing”. I hadn’t told anyone where I was going (other than the lady at my guesthouse), I didn’t have a phone and was wearing a pair of old beat up Nikes with barely any tread left.

It was one of the first times when I’ve felt truly scared and alone in the wilderness. I thought about how this is how people probably end up dying on mountains, and became annoyed at myself for getting into this situation. I was frustrated, scared and felt defeated. I decided that as soon as I found my way out, I would check into another guesthouse (as I was too embarrassed to return to the guesthouse where I had been staying – as it was supposed to be an easy trek), spend the night in a bed, and then leave Dharamkot the next day without reaching the top of Triund Hill.

Fuji Blog Triund (2)
On the left of the image is the path I took. Clearly not the right way.

I knew that I had to remain calm, and took a few moments to recompose myself and look over the way which I thought I had walked. I tried to logically plan a route back to my starting point and to my relief, I eventually came across the narrow flint path which had led me into the labyrinth. From this point, it was easy to return down the side of the mountain and past the house with the garden.

I finally relaxed and felt an extreme sense of relief. My negativity began to lift as I walked towards familiar territory and came across a path which actually looked walkable. I came to the crossing that had been the origin of my nightmare, and after a few meters saw a spray painted sign reading ‘Triund’, with an arrow next to it. After my brief ordeal of getting lost, I finally felt safe again, and made the decision that I would not return to Dharamkot today, but would trek to the top of Triund Hill.

I soon crossed paths with two American girls who were also walking to the top, and shared the journey with them. The trek to the top was a breeze in comparison to my first attempt. The walk took about 3 hours and took us though some incredible scenery. Hand built wooden Tea shacks were dotted along the route where trekkers could rest and stock up on supplies. Occasionally we would have to squeeze to the side of the path as a drove of donkeys passed, hauling supplies to the top of the mountain.

Fuji Blog Triund (3)
Walking up the mountain. A tea shack in the top left of the frame.
Fuji Blog Triund (4)
Donkeys hauling supplies to the top of the hill.
Fuji Blog Triund (5)
Tea with a view; trekkers rest at a tea shack on their way to the top.

After a few sweaty but exciting hours, I approached and took the final few steps over the peak of the hill, and as I did, the Himalayas came into full view for the first time, and left me speechless.

I was extremely satisfied with reaching the top, and after walking along the ridge of the hill taking in the beautiful views, I needed to organise my night’s accommodation as well as get something to eat. I entered one of the few huts at the top that supply tents and food to tired and hungry trekkers. As I rested and ate a snack there was a middle aged man sitting opposite me. He was smoking a cigarette and had an incredibly interesting face. His looked different to most of the Indians I had seen until then, with light eyes and thick skin. My X100s was in my hand and after a few minutes, I began taking photos, firstly of the hut and the area, to allow him to get used to the camera. After a few frames, I gestured to him to ask if I could photograph him. He agreed and continued doing what he was doing, and looked lost in his thoughts. I shared my food with him and then left, as I didn’t want to be intrusive.

Fuji Blog Triund (6)
The goat herder in the tea tent.

I hired a tent, found a clear spot on the ridge and set it up. My view overlooked a part of the Himalayan mountain range. I was blown away by the beauty.

Fuji Blog Triund (7)
A room with a view.

The mist that was present as I approached the peak subsided and the golden light of the setting sun began to illuminate the mountain. I became excited as I was basically in landscape heaven and everything I saw looked astonishingly beautiful.

Fuji Blog Triund (8)

Fuji Blog Triund (9)

Fuji Blog Triund (10)

Fuji Blog Triund (11)

I decided to take advantage of the golden light and explore the length of the ridge. As I passed the other campers and approached the elevated side of the hill, I could hear the bleating of mountain goats in the distance.

Fuji Blog Triund (12)

I continued walking up the hill and came across the goats. There were lots of them, grazing and playing on the rocks. I enjoyed quite some time taking pics of them. They were very fun and cute to watch and I found their noises very entertaining.

Fuji Blog Triund (13)

After a few minutes I saw the man from the hut. I now realised that he was tending to the goats, and had taken them to the other side of the ridge to graze. He had made a fire and was drinking chai tea. He had seen me taking photos of the animals and after a while I approached him with a smile. He invited me to sit down and poured me a cup of tea. With few words being spoken we shared each other’s company, and again, he allowed me to take some photos of him. He seemed extremely peaceful.

Fuji Blog Triund (14)
Sharing tea with a goat herder

The sun was going down behind the mountain and I was excited to carry on shooting. I shortly came across another animal herder, this time a man who was shearing some of the goats.

A herder shearing his animals

After maybe an hour with the goat herders, I walked back down the hill as dusk approached.

Fuji Blog Triund (16)

Fuji Blog Triund (17)

On the horizon the reddest moon that I have ever seen began to rise. I watched in astonishment as it peaked over the mountains and into the sky. I chatted to fellow trekkers about the colour of the moon.

the blood red moon rises over the mountains
The blood red moon rises over the mountains

As night fell, small bonfires lit up the hill to keep the trekkers warm. I joined a group of Indian guys around the fire for food and tea, but decided to get an early night as I knew I wanted to be up before sunrise to take photos.

Trekkers keeping warm around a fire.

After a pretty bad night of rest (due to a lack of warm clothing) I crawled out of my sleeping bag, unzipped my tent and walked into the fresh mountain air. It was still quite dark as the sun had not yet began to reach over the mountain top. I decided to walk to the far end of the ridge that I hadn’t ventured to the day before. I had my mini tripod with me and began taking photos. In a distant tree I saw a huge eagle, which was another first for me. After about 40 minutes, I heard the familiar bleating sound that I had heard the day before coming from behind me. As I turned around, I saw lots of goats (perhaps more than 100) running and jumping towards me. This instantly made me smile and as they ran past me, I climbed onto a rock so they could pass without knocking me down. The goats raced past playfully.

It was around this time when the sun began to appear over the mountain, bathing Triund Hill with glorious golden light, which also brought a warmth to the brisk mountain air.

Fuji Blog Triund (20)

Fuji Blog Triund (21)

I followed the herd of goats and whenever possible, climbed upon a rock to get a better view of the scene. There were different goat herders from the previous day, and I followed them along the length of the ridge, snapping away. As the other trekkers were sleeping, I was grateful to be witnessing this unique moment and felt invigorated to be there.

Fuji Blog Triund (22)

Fuji Blog Triund (23)

Fuji Blog Triund (24)

The walk along the length of the ridge took about 30 minutes, and on my part, it was a process of running ahead, stopping, shooting, and then running ahead again. These leap-frog manoeuvres lasted until we reached the elevated end of the ridge.

I gestured to one of the herders with my camera, and he stopped for a moment to allow me to take his photo.

A portrait of a herder.

After reaching the high end of the hill, the herders stopped and allowed their animals to feed. I thanked the herders and returned to the camp feeling extremely grateful and happy with the events that I had just seen.

After some breakfast, I began my descent back down Triund Hill, with extremely high spirits (and an increasingly swollen ankle – which later turned into an infection). My experience on top of the hill was fantastic, and reminded me how nice it is to be surrounded by nature and simplicity. I’m so glad that I didn’t give up on the trek after my bad experience at the start, as Triund Hill proved to be one of the most memorable events of my trip.

About Danny

Danny Fernandez is a creative photographer living and working in Barcelona. He likes cycling, records and vegetarian food.
To see more of his work, please visit:

Danny Fernandez’s official website

follow him on Flickr

follow him on Instagram

Shooting amazing nightlife with New York-based social photographer Jay “Electroblum”

pic30333by Jay Blum

Photographic style and foundation

pic19895My style of photography is social and intimately in your face. I’m not sure if it’s because I don’t feel close enough with my 18mm f2 lens. My goal is to capture your alter ego raging or to strip you of it to show a contrast between you and the environment. Depending on the parties, I aim to capture shots that one may never want to show their parents. I have heard a comment that my work is a cross between the board game candy land and blade runner. I love neo-noir and post apocalyptic films and I am a drop out toy designer so maybe that explains? Other inspiration draws from the 90’s X-Men cards by Fleer company, the color on those illustrations just popped.

pic23811

My weapons of mass (“Oh god, can you please take down that pic! I don’t want my boss seeing that”} destruction!

I use Fujifilm X series cameras for all my EDM adventures. I shoot manual and control my flashes manually as well. I started out with a Fuji X10 because I loved the manual look and feel of the camera.
I soon followed with an X-E1 and recently to an X-T1. The X-E1 really gave me the results I was looking for and though the focusing was not as quick as it’s successor it still gave me satisfying results.

I currently use a X-T1 and the results are just art. This camera really gave me the courage to shoot on an ISO higher than 400. There are photos I do not have to adjust color or clarity. This camera is so on point that it locks on to the subject quickly and the results of the shots are crisp and clear.

On average my settings on the X-T1 are currently ISO 640, F5.6 at 1/4 on Velvia film simulation mode. My two flashes are set to 1/4 @ 23mm as my main light and my fill light set to 1/8 at 23mm (I set my second flash to 1/8 so the light fills the bottom of the portrait but not as bright as the main light on the subject). I always direct the main light on the upper body as one might usually do when shooting a portrait with an external flash. If the subject has an amazing outfit I set both my main light and fill light to f1/4. Mind you, these settings work for me in a dark venue that has disco lights and it also depends on how great the venue’s light is.

pic17673

I use an assortment of light diffusers and pieces from old video rigs I have acquired over the years. However, nothing beats having an assistant to help you out with positioning lights.

I use X-T1’s new WIFI connection and use it with the Fuji apps along with an app called shutter snitch. I use these apps to beam a photo to my iPhone in which I can upload to instagram immediately. An event photographer is like a journalist and a club promoter. You can upload a photo to social media with a hashtag and convince people to say “This looks wild and crazy, we’re going there for the night.”

As mentioned earlier I shoot with an 18mm f2 lens and it’s really made me a better photographer than any 50mm on a crop sensor. The lens has made me get up close and personal with my subjects because there is not much room to move around with in a packed club or concert.I had a 35mm f1.4 but that was stolen off my belt one night during a DJ set. I used it only a few times for those moments where I had space to focus on a portrait. I am currently taking in donations for a 56mm 1.2 lens so I can achieve some “bokehlicious” photos and take my work to new places!

pic15141

Shooting night life and what I’ve learned “so far”.

Night life is so fast paced, the emotions and energy people bring out with them are intense. What is not intense is their attention span.

Situations escalate and fade out quickly so pay attention because you may miss out on interesting photos.

You have at most 15 seconds to compliment your subject, tell them what you like about them, and be their friend. The faster you can relate with your subject and construct a relationship the better your love life might be (Just kidding, I mean your photos).

pic31322

Also, get lost on tumblr, pinterest, soundcloud and see what is inspiring people to express themselves. This will also inspire you and your work.

Use a prime lens. You aren’t shooting wild life. Night life is a social activity, get in there and meet people.

Want to take a photo of a hot girl with a boyfriend who doesn’t seem too excited to be out? No problem! Respectfully make your intent clear that you would like a portrait of the lady followed by a photo with her boyfriend. This will almost work 99% of the time and smooth out any uncertain feelings.

pic04664

Have a side pouch to store extra batteries, gum, mints, and SD cards.

Smile and look relaxed. If you’re nervous and timid this will reflect on your subjects and onto your photos like a mirror. Keep positive and remember that your goal is to get great shots of the night.

If you don’t want to take someone’s photo just tell them you’re out of film and walk away like you really got to reload film.

That’s all for now!
happy shooting and partying X-Toggies! <3

ElectroBlum

——-Facebook——-  ——-Instagram——-

Print

Cuba with X-Photographer Chris Upton

20150309_cuba_2804

by Chris Upton

Cuba, the largest island in the Caribbean is a stunning and diverse location. The noise, hustle and bustle of Havana, teeming with brightly coloured vintage American cars contrasts with the quiet verdant plantations and gorgeous beaches. The wonderful Spanish architecture is at odds with the decaying beauty of some of its poorer areas.

Cuba has had a turbulent history from Spanish colonial rule and the slave trade to Batista’s dictatorship and overthrow by Fidel Castro and it’s subsequent economic struggle. Throughout this it’s culture, music and arts have remained as colourful and vibrant as ever.

I have recently returned from a trip visiting Havana, the plantations in the west around Vinales and the towns of Cienfuegos and Trinidad on the south of the island.

What you were looking to capture?

20150316_cuba_4060

20150304_havana_0685

Cuba is simply a photographer’s paradise, there is so much to photograph. I wanted to capture the spirit of the country, it’s unique feel, from it’s people, architecture, landscape, crumbling urban beauty, to it’s political heritage and, of course, the wonderful array of vintage American cars.
From my research, the colour and the vibrant feel to the country captivated me and my goal was to reflect this in my images.

There was clearly going to be an emphasis on Street, People and Architectural photography whilst in Havana, Cienfuegos and Trinidad with more traditional landscapes when in the west of the country around Vinales.

I also wanted to capture the incidentals, the detail shots that “shout” Cuba. The American cars topped that list, but signs, revolutionary slogans, images of Che Guevara, graffiti and of course the famous Mojitos and Daiquiri’s were in my plans too!

How did you plan your adventure?

20150304_havana_0759-Edit

20150307_cuba_2145

Of critical importance to successful travel photography is the research before you go. The more planning you put in the greater the chance of capturing great images. Having the best technique is no use if you’re not in the right place at the right time or you return home and realise you have missed some great locations.

Before I discuss how I planned the trip it is important to understand the objective. You need to be so well planned that when you arrive on location you should feel like the place is familiar, as if you’ve been there before. You will then find that you are comfortable in your surroundings, already having some shots planned in your mind. You can then concentrate on shooting those and then look around for other shots, for your own personal interpretation. This approach saves you time and helps ensure that you don’t miss important shots.

Not surprisingly the first port of call when planning is the internet. Whatever did we do before?! I will look at Tourist information / Government sites, Google images, Flickr, 500px and Stock Libraries. It is important to note that this is not to simply copy pictures that have been shot by others but to give you an idea of what is possible and to help you then put your own stamp on a place.
Good guide books are also an invaluable source of information and offer plenty of hints, tips and recommendations, especially for food and hotels. Well you’ve got to be comfortable when you’re out shooting all day! They also provide you with some basic language, very important to break the ice with the locals. I prefer the Dorling Kindersley Eyewitness Guides as they have sufficient historical and background information but are also much more visual than some of the other guides.

Not only is it imperative to have a list of planned shots but you also need to have locations for sunrise and sunset. The best source for these timings is the Photographers Ephemeris, a web app which shows you not only what time the sun rises and sets for any place in the world on any particular date but also the direction of the sun. This makes it an invaluable tool in your planning armoury. I planned my pictures taken on the Malecon (seafront) by using this app.

I also looked at Travel brochures and the Travel sections in newspapers.

You will also need a good Weather forecast so that you can amend your plans to suit the conditions. If the weather is really bad spend time inside buildings or churches though don’t miss out on the opportunities that bad weather presents by shooting outside, you might be really surprised at what you achieve and it will most likely be very different from the standard shots.

From all this information I prepare a Shoot List including all the details. This is invaluable and I check it every night. I always buy a decent street map and mark the key locations to ensure that I cover all the shots when in that area.

What kit did you take?

20150306_cuba_1750-Edit-Edit

20150307_untitled_1960-Edit

One of the most common questions when I give my Travel Photography lectures is: “What kit do you take”?

So here is a list of the equipment I took:
• Fujifilm XT1 and XE1 bodies
• Fujifilm Zoom lenses XF10-24, XF18-55, XF 55-200
• Fujifilm Prime lenses XF35 f1.4 and XF56 f1.2
• Nissin i40 flash
• Lee Seven5 filters
• Cable release
• 6 spare batteries
• 80gb SD Cards in a Think Tank Pixel Pocket
• Giottos Vitruvian Carbon Fibre travel tripod with Really Right Stuff B30 ballhead
• Gorillapod
• Cleaning cloths, rocket
• Headtorch
• Think Tank Urban Disguise 50 shoulder bag

• 13” Macbook Pro and Lacie Rugged Hard Drive
• i-phone
• 4 gang adaptor.
• Twin Battery charger

Here is some background to my choices.
I always take two bodies with me, primarily for insurance in case one fails or doesn’t survive being dropped onto a marble floor as happened to me on this trip! Thankfully the XE1 and 55-200 must be made of sturdy stuff as they survived and continued to work perfectly, but it just goes to show how important this is.

My lenses needed to cover wide angle, for interiors, to long telephoto to capture detail or compress the perspective. My three zoom lenses 10-24, 18-55 and 55-200 zooms are ideal for this. On this trip I also took along the XF35 f1.4 and 56mm f1.2 primes. These are stunning lenses superb for portraits, with their wide apertures, and great when the light is low.

The Nissin i40 flash is a fairly new acquisition and complements the Fuji form factor superbly, being extremely small and light and with enough power for most tasks. I tend to use it mostly for fill in flash on portraits.

My Lee Seven5 filters include a polarizer, ND Grads and ND filters for long exposures.

Tripods usually cause much debate. There simply isn’t a perfect tripod as the conundrum of size, weight, robustness and price cannot be solved! That said I am very happy to pair my Fuji cameras with the Giottos Vitruvian tripod (a few years old and I think there is a newer version) and Really Right Stuff Ball head. This tripod packs down small, with it’s legs folding back over itself, is light and sturdy and best of all weighs little over 1kg. The RRS ball head is superbly engineered and holds the camera in position really well with no droop even with the 55-200 lens.
In certain places the tripod police are only too keen to assert their authority preventing you from using your large tripod. In these situations I have a Gorillapod which I can attach to a support, chair, barrier or even place on the floor.
I use the Arca system of quick release L brackets on both my cameras for ease and speed of use.
When the power supply is unreliable it’s vital you have sufficient battery power. Therefore I took 6 spares plus the ones in my camera. I always take a lightweight 4 gang adaptor and a twin battery charger. When you need to charge your batteries quickly, together with your phone and laptop you need the extra sockets and hotel rooms usually have a dearth of wall sockets.

All of this packs into my Think Tank Urban Disguise bag and weighs in at less that 10kg! Think Tank products are superb, so well made, extremely functional and they are like the tardis, you can just keep filling them up! On this type of trip I prefer a shoulder bag to a backpack both for security reasons and ease and speed of use.

Any general tips?

20150304_havana_1171

20150303_havana_0098

When you arrive at your destination familiarise yourself as quickly as you can, good planning will help here. Look for interesting viewpoints and check to see where the sun rises and falls. In Cuba the streets are laid out on a grid system so I found streets that ran east / west where the sun would backlight my subjects early or late in the day.

When you photograph buildings or churches always snap the sign when you finish, you won’t remember the names of the places you visited.

You will need to work quickly, the lighting is challenging, very contrasty in the middle of the day and the sun rises and sets very quickly so you don’t have too much time to get your shots. Be in place an hour before sunrise and stay at least 45 minutes after the sun has set.

It will help if you have practiced other techniques that you might find useful such as panning. You don’t want to be learning and missing great shots whilst old American cars are speeding by on the Malecon.

If you are shooting a panorama to stitch together later I always shoot a frame first and last of my hand so the pictures in between can be easily identified as a pano set.

Walk, walk and walk more. If you find an interesting background in the streets, wait a while until someone interesting walks into the frame, it will happen.

Finally, the most important tip, always carry a camera. You never know what might present itself at the most unexpected time!

How did you get those stunning portraits? Did you ask them. etc.

20150310_cuba_5049-Edit

20150309_cuba_2777

The people in Cuba were full of character and life and capturing this is a must.

There are various ways of approaching this. A street approach using wide lenses and getting amongst the action to achieve reportage type, unposed, images. Using a long lens and shooting without the subjects knowledge or getting posed shots after asking permission to take a photograph. Many photographers find walking up to total strangers and asking to take their picture very difficult. However if you can overcome this and your subject agrees, the pictures you get will be far better than any long distance grab shots. This is my preferred method with which I have found most success. Sure you will get some rejections in which case I simply smile, wish them a good day and move on. But get a willing, interesting, character and you will get some stunning shots.

My technique when I see a subject, before I approach them, is to check my camera. I will select the appropriate lens then check camera settings, battery level, memory left on the card and my flash settings if appropriate. Only when that is completed do I walk up to them keeping my camera to one side. I smile introduce myself and ask if they speak English. I try and learn these words in the native language which immediately breaks the ice and often makes them laugh! I might ask a little about them before asking to take their picture. If you are already prepared you can get to work straight away, you don’t want to be checking your screen or fiddling with your settings. Don’t just grab one shot and move on, take several, some people will move to a different area for you or pose as you request. It’s important to show them some images on the back of your camera and thank them before moving on. Children love to see their pictures and the best shots are often when you’ve just shown them so be ready!

So to the thorny subject of payment. My rule is generally not to pay money as I think it simply sets a precedent for other photographers and encourages the practice of begging. However I will sometimes take pencils, pens or soap and shampoo and sweets for children. This rewards them without actually paying them cash. If I have worked with a person for say 10 minutes or more and they have been really helpful then I may give them a small tip but usually I try not to.

I had wanted to visit Cuba for some years and often such high expectations can be cruelly dashed. However this was definitely not the case here, it is a stunning destination perfect for photographers. My recommendation is to go soon, before it changes too much.


To see more of Chris’ images from Cuba see his website www.chrisuptonphotography.com