Photography

Capture and share memories.

10 Lighting Tips To Up Your Portrait Game

By Dave Kai Piper

It has been said many times that photography is about light, which is true but it is also about shape, shadow and creating story, drama and emotion. Getting to grips with how you can shape light and how your camera can control light, is one of the stepping stones to unlocking more of your skill as a photographer. Here are 10 tips on how to up your portrait game using lighting. Read More

Art and Mind – 10 Days in Japan [Part Two]

By Chris Weston

Part 2: Art and Mind

Hokkaido (Days 6 – 10)

We often hear or read the quote, “It’s not the camera, it’s the photographer”, meaning the creation of great photographs is not dependent on having the latest or most expensive gear but on having a keen eye, an open and inquisitive mind and the artistic skills to turn vision into a reality that is a photograph. After sixteen years as a professional photographer, I can attest this is absolutely true. Read More

Untethered: 7000 – Adventure to another world with the Fujifilm X-Pro2 and X100S

Maya Sugiharto and Aviva Minc are Visual Storytellers. Photographers and Short Filmmakers based in Melbourne, Australia.  They are the Co-Founders and Creative Directors behind Agent Morphe.  They love to travel (with their cameras) on adventures and road trips, off the beaten tracks. To see more of their photos, visit them on Facebook and Twitter or on their personal Instagram accounts.

Maya Sugiharto –@mayasugihartophotography  and Aviva Minc –@photographersassistant.


Untethered: 7000 – Adventure to another world with the Fujifilm X-Pro2

Photography Road Trip Fact Sheet:

– 1,449km travelled
– 7 days
– Fujifilm X-Pro2 with XF35mmF2 R WR + XF23mmF2 R WR
– Fujifilm X100S


Part 1: City Forest Cave

From the sand storms in the isolated deserts in Broken Hill Northern Territory, to the ice blizzards in the most southern state of the nation, Tasmania, we are putting ourselves, and our Fujifilm X-Pro2 and X100S cameras to the test.

We set ourselves the goal of seeing and photographing the circumference of Tasmania over a seven-day period, by road in winter – to document the landscape and to test how well our Fujifilm digital appendages would cope in the extreme conditions.

We jumped on a plane from Melbourne to Hobart – first stop our Hotel – top recommendation Ibis Styles (only a few month old) for views as we stayed on Level 9, great photography ops and clean, modern facilities.

As soon as we landed and had our car hire sorted, our first day goals were to get as far South as we could drive in Australia. We travelled down to Kettering, Middleton, Charlotte Cove, Huonville, Southport and all the way down to the most southern point in Australia – Cockle Creek.

The best way to describe this part of Tasmania would be quant and serene. There were fishing villages dotted along the journey, a wooden boat shed and builder, apple cider cellars and caves with thermal springs (Hastings) which we didn’t get time to see. There are heaps of photo opportunities as you can see below are just a few.

On our second day, our goal was to scout and find the filming locations of the Kettering Incident created by Vicky Madden and staring Elizabeth Debicki (Porchlight and Sweet Potato Films). The show was filmed at various locations around Kettering and Bruny Island itself, however it was apparently also filmed around Myrtle Forest – where you get the awesome green, mossy lush forest scenes. The film is about two women who go missing – not necessarily the best premise to head into the woods on our own, but we really wanted those beautiful lush photographs that many of us know Tasmania to show off.

We collected all of our gear and were about to head off onto the Myrtle Forest trail up to the waterfall, which was dark, wet and slippery. However were greeted by an odd man and his barking pit bull who seemed to appear again at various parts of the track. We had flashbacks to Wolf Creek crossed with the Kettering Incident itself, and to be honest were actually a little concerned about our safety.

In retrospect, we probably should’ve turned around – however the determination to get what we came for, out won our logic and we headed up the track. It was spooky, but beautiful.

After surviving the forest and its inhabitants, we drove east towards Dunalley, where you find a fish and chip shop that is on Tasmania’s top eats, and then we drove down to the Tessellated Pavement where our plan was to get some shots at sunset but things don’t always go to plan – however when we arrived, two guys told us about three whales that were playing in the bay at Remarkable Cave; so we took their word, jumped in the car and headed down there pronto! We didn’t have the zoom lens to be able to capture the whales but we certainly heard them talking all the way past sunset, which was pretty amazing.

Next up: to the mountains.

“The only way of finding the limits of the possible is by going beyond them into the impossible.” Arthur C Clarke


Part 2: Mountain[s]

Otherworldly.

It was time to go north. We were heading to Cradle Mountain to photograph, hopefully, a snowstorm that was due to arrive overnight and possibly the Southern Aurora if the clouds/snow passed.

There’s two ways to get to Cradle Mountain from Hobart – via the West or straight up. The more picturesque route is via Georgetown to the West, where you go through some pretty amazing terrain, however because of an incoming storm warning for snow thunderstorms that night, we decided to play this one safe.

You pass by some beautiful jagged mountains, such as Mount Roland, on the way. So Jurassic, other worldly, and powerful. As we were driving, our GPS announced “ turn right, and you will arrive in Paradise (photograph below) – that it certainly was. To top it off we were driving through this whole area during golden hour! As you’re approaching Cradle, the landscape changes significantly. It is surreal, and ethereal – eerie and another dimension perhaps.

We arrived safely after a long 5 hours drive to our lodge at Cradle Mountain. The closest supermarket is 45 minutes away, so be prepared – bring supplies! You have limited choices for places to eat, and those available are pricey, so be ready for that. Once we re-fueled our body, charged our cameras, it was time to rest our souls and get ready for the next adventure the following day.

The next morning, sure enough we woke up to -1 degree temperatures and a covering of snow and continuous snowfalls and blizzards – beautiful and breathtaking! Now we had the day to explore Cradle Mountain and Lake St Clair with a big dose of snow, and an opportunity to really test the Fujifilm X-Pro2 (which is promoted as being weather resistant) and the Fujifilm X100S!

The mountain pass costs $20 per adult for the day, but in fact is for 24hrs, so if you enter at 1pm as we did, it lasts until 1pm the following day, which is fantastic. We were fortunate to be there whilst it was snowing very heavily, and got the chance to throw the Fujifilm X-Pro2 and the WR lenses into the snow, to test them for their durability. We can honestly say that they live up to our expectation and their reputation. Even the X100S performed awesomely in the snow. Fujifilm does not recommend using it in a snowstorm, but we found the casing and the design made it really easy to use in those conditions.

Timing is everything, and again, we were at Lake St Clair during the golden hour for sunset, which was gorgeous. Highly recommend, especially when it’s snowing. The park gate counts the cars and only allows a certain amount of cars in at once, mainly due to the road only being a single lane but also to stop it getting too crowded there. A brilliant idea because we really got to experience it without the huge crowds you might see at the Twelve Apostles for example. Although it might have been because it was snowing so much too, that the traffic was low.

The next morning, we went back into Cradle Mountain Park to see the Waldheims Cabins – there was talk from the locals of wombats hanging around the area, so we were very keen to get up close and personal with them.

We only had a few hours before we needed to begin our long drive back to Hobart, but our wish did come true and we got to meet a wonderful friendly wombat whom was very willing to have their photograph taken.

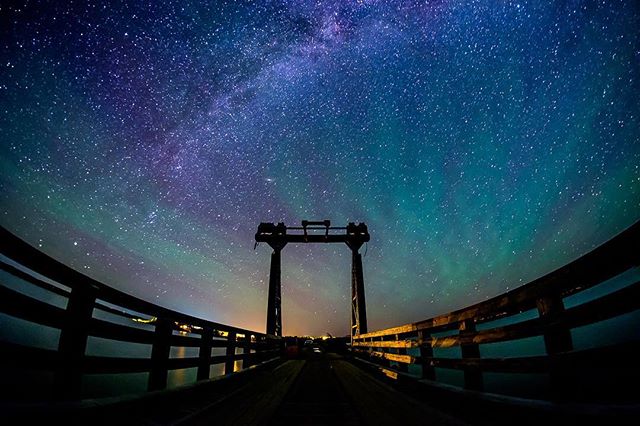
Sadly, we had to leave Cradle Mountain without any opportunity to see or photograph the Southern Aurora and her dancing lights. The cloud cover just never passed, as we had snow the whole time we were there, but according to the readings and reports we had, if the clouds had passed, there was meant to be some pretty amazing lights.

We have to say, it was pretty difficult to leave Cradle Mountain, and a definite highlight to the trip. Such a surreal and majestic place to spend time in, and the snow just added to the whole mystique. We wished we had planned a longer visit there, a chance to go on the many walk trails around Lake St Clair in the park that would have been beautiful with the snow covering (and very cold!).

We were meant to spend the last two days of the road trip driving down the east coast, but fell ill with the flu, and had to skip it and headed to Hobart instead.

Hobart is a great base to work from, especially when travelling to the lower parts of Tasmania. We decided to go back to the Tessellated Pavement at Eaglehawk Neck (because we had missed it when we went chasing the whales on our second day) and get some shots of the gorgeous rocks on the beach.

That was followed by a drive up to snow covered Mt Wellington, with the plan of getting some great shots of Hobart, and some footage of more snow. Whilst driving up the mountain, we came to a Whippet that was running scared on its own on the road in front of our car, and instead spent the rest of our day helping a local couple find that same dog that ran into the forest in the cold past sunset. So we never reached the top, or got any photographs, and as it turns out, the road to the top of Mt Wellington was blocked (which can happen on the spur of the moment) due to ice and snow. So it’s best to call the City of Hobart and the rangers to get updates before you go!

This was an incredible trip. Definitely not enough time in many of the places we visited, and not enough time to get to all the places we had hoped to see. We missed a lot. In researching the places to visit, other people had said that a week was not enough to drive around and see all of Tasmania. And we have to agree. You can rush it, but you’d be doing yourself an injustice because Tasmania is a good-looking place to photograph and you deserve to see it all. One way to do that would be to break the trip into three parts: the east coast; the south and the west.

Our heart breaks that we missed the Aurora Australis. However there are awesome opportunities to get some incredible shots from what I’ve heard and seen from others, in fact just a few days after we left, there was a peak in activity and a beautiful show in the sky, that could even be seen over Hobart. As they say, next time, in Tasmania, with our Fujifilm cameras!

“One’s destination is never a place, but a new way of seeing things.” Henry Miller


9 Ways to Develop Your Own Photography Style

You are getting serious about photography and want to develop your reputation. You feel like establishing a look so that each photo fits into a greater catalogue of work.


Develop a recognisable and genuine photography style by following a few tips.


Exercise patience and dabble in many styles.


Take time to become comfortable as a photographer. Master fundamentals of composition, angles and lighting. Experiment with every photo style you can imagine. Expand your creative eye and learn what shots you take best.

Image by Clément Breuille


Study the work of others.


Imitation is the highest form of flattery. So review the work of other photographers, past and present. Learn what inspires you and what resonates with you emotionally.


Imagine beyond your current equipment.


You might have too much gear but be best suited as a nimble photographer who carries one camera and one lens in order to move freely around a subject. You might have a savvy eye for wildlife photography but lack the zoom to capture animals quickly from afar. Borrow or rent and experiment with photo equipment to delve into any style that intrigues you. Make your creative path more about your passion than today’s possessions.


Express yourself.


All creative work is, in some sense, biographical. Even in picturing other people and sites, you give the world a sense of yourself. Be in touch with your own hopes, desires and fears so you convey a sense of sincere yearning through your art.

Image by Chelsey Elliott


Separate subject from style.


Saying you shoot portraits, cityscapes or sports is not enough. True style is not just what you photograph but how you photograph it. The perspective you offer to stage, frame and light your shots defines you. Think about the smallest details as you create your portfolio.


Contemplate your business model and your market.


Think of how genres of photography follow different economic models. Portrait photographers acquire clients and guarantee pay by booking sessions, whereas landscape photographers often sell shots long after shooting. Consider your market. It is easier to do portraits in a bustling city where many people need headshots. If a genre appeals to you, decide whether relocation increases opportunities.

Image by Nadeesha Rathayake


Find the moments when people compel you.


When your style involves people, think about the instant when you see their true essence. It could be when they talk about difficult times, have a drink or belt out a laugh. Determine when people seem to you their true selves, capture them in it and make that an element of your signature style.


Create recurring elements using aperture, light and colour.


Many photographers are known for their use of lighting, whether natural, interior or DIY. Others are known for revisiting a colour or two in many shots. Set at least a few attributes of lighting, colour palette or depth of field to coalesce your photos into a grouped look.


Harness post-production to mark your style.


Refine images with photo-editing software to further establish your aesthetic. Subtle but persistent changes to contrast, highlights, shadows and other elements give photos a unified look and set your aesthetic.

Image by Scott Grant


As you learn how you view the world and what elements you bring to each shot, you make recognisable work with a photography style that wows.


11 Ways to Shoot Stunning Astrophotography

If you want a new challenge in your photography, take shots that are out of this world. Astrophotography, the art of recording objects beyond Earth, seems much like other time-lapse photography styles, but its dark skies and distant, moving lights present unique challenges to push you creatively.

Take stunning astrophotography shots by getting your physical setup and camera settings right for this genre.


Before you shoot, know your stars.


Study what you are capturing. By learning about star constellations, you can decide which stars you want to include and where in your composition you want them displayed.

Stake your spot to study the sky.


Determine where you want to shoot your astrophotography images. Get away from big cities and their light pollution. Go toward less-settled regions and their visible skies.

Photo by Bryan Minear


Fine-tune your whitest whites.


Astrophotography relies on stars’ luminosity, so make sure their whiteness is stark. Adjust your white balance, either through one of your camera’s preset or by manual alteration.


Increase your ISO.


Your camera’s ISO setting determines the light sensitivity of your camera’s image sensor, and astrophotography requires high sensitivity. Expect to shoot at ISO 400 or more.

Rely on manual settings.


Your camera’s autofocus mode is unlikely to stay locked onto a moving star. Use manual focus and if your camera enables focus peaking ensure it is turned on.

Photo by Photo Rangers

Stay steady for an unwavering shot.


Everything you know about camera sturdiness applies to astrophotography. Set up your most trusted tripod and, if you have one, use your remote shutter release. If you don’t have a remote turn on your camera’s self timer for two or ten seconds.


Place your focus on a single star.


With your manual settings, select a star or moon to test and improve your focus. For larger stars or the moon, locate their very edge and make sure it is optimally clear.


Embrace star trails.


As you shoot from the rotating Earth, your long-exposure photos show the path of stars in the sky. To highlight star trails, choose a wide-angle lens, which keeps a broader range of the paths in your focal region.


Or, alternately, eliminate star trails.


If you want to focus on the sky’s stillness, you can reduce star trails, though you may want to stash a calculator in your camera bag. Astro photographers follow the Rule of 600, or the Rule of 500, depending on whom you ask, to determine their maximum exposure before star trail becomes visible. Divide the rule’s number by the focal length of your lens. If you have a 28mm lens, divide 500 by 28 to get 17.85. This means you can shoot at an exposure of 17 or 18 seconds before star trail appears.


Do not forsake the foreground.


Astrophotography shots can still have earthly elements. Frame your shots with trees or hilltops to give your composition added dimension.


Utilise editing software for finishing touches.


Astrophotography benefits greatly from post-production edits. Alter your contrast, exposure and white balance until the sky tells the story you want.


Consider yourself an astrophotography expert, or at least more than a novice. Minding these principles of camera settings and general composition, you are ready to stun with your space shots.

Photo by Josselin Cornou


Want to purchase a Fujifilm camera, but not sure which one is right for you? Our Buying Guide can help you narrow down the list to find the best camera for your photography style.


Sports Photography as a Spectator – Mountain Bike Racing

By Jeff Carter

In a series of articles X Photographer Jeff Carter will be shooting at sports events in the UK and showing how to capture great images with the Fujifilm X Series without the need for a media pass.


Sports Photography as a Spectator – Mountain Bike Racing

So far in this series I have attended seven sports events which I have shot at some point in my 25 year career as a sports photographer but for part 8 of the ‘Sports Photography as a Spectator’ features I attended the Scottish X Country (SXC) Mountain Bike Racing Series event at Dalbeattie, a sport that is a first for me.

INTRODUCING THE SCOTTISH X COUNTRY MOUNTAIN BIKE SERIES

The Scottish Cross Country (SXC) Mountain Bike Series offers everything from Taster events for novice mountain bikers to full on Elite racing, and everything in between. The series of six events across Scotland on some of the most challenging mountain bike courses in the UK.

The event I attended in Dalbeattie in Dumfries and Galloway took part on the forest trails just south of the town. The SXC event attracted a large entry of riders of all ages from under 12s to veterans, with the top riders in the Elite category also taking part to build up their points for the national titles.

Races are run over a predetermined number of laps depending on the class. The Under 12’s race took place on a shorter course over two laps, while the Elite riders did five laps over the full course.

[youtube=https://www.youtube.com/watch?v=zH0zutLxKgE]


BE PREPARED – What to Take

This is Mountain Bike Racing and takes place on forest trails that can offer some rough terrain, so dress accordingly. Also check the weather forecast before traveling and take wet weather gear for yourself and your photo gear if necessary.

As you are out in the forest take food and water as it can be a long day. While there is catering in the start finish area, it can be a long walk back if you are out on the far point of the course.

This is the first event in this series of features where I didn’t need the XF100-400mm f4.5/5.6 zoom as I was able to stand right next to the course. The long focal length was not required for the most part and under the trees the light was quite low so the f5.6 maximum aperture on the long lens would’ve forced me to raise the ISO to the top end of the range on the FUJIFILM X-T2.

For Mountain Bike Racing the XF50-140mm f2.8 is the best choice as you can fill the frame with the long end of the zoom while keeping the ISO lower in the challenging light conditions thanks to the f2.8 maximum aperture. I also had the 1.4x converter in my bag which I did use on a couple of occasions to give the lens a bit more pulling power. However, on the whole, I just needed the standard zoom range on the lens.

I also used the XF16-55mm f2.8 and XF10-24mm f4 zooms to capture the action around the course.


GET IN POSITION

You can stand right next to the course and there are no barriers apart from around the start/finish area. Remember mountain bikes are fairly quiet, so if you are walking on the course make sure you keep an eye and ear open for oncoming competitors.

As this was a sport I had never shot before, I arrived early and walked the course, noting down where the best positions were for shooting. Look for water splashes and jumps, which will make your images more interesting.

Also don’t just shoot from eye level, get down low or up high if possible to vary the angle. Another good position is to go off the course and shoot through the trees. A long exposure of a rider with the trunks or branches of the trees can produce a different composition.


SHOOTING THE ACTION

Mountain Bike Racing is not as fast as motorised sport but the riders can move quickly. It is good to inject a sense of speed into some of your images by dropping the shutter speed down to 1/60s or lower using the panning technique.

A fast shutter speed of between 1/250 and 1/1000s is necessary to freeze the action, especially for jumps and water splashes.

The X-T2’s AF system has no problem in tracking the competitors easily but with trees and other obstacles on the course the autofocus can get confused and lose the lock. I always set both of my X-T2s to ‘boost’ to improve the reaction time and the AF-C custom setting is set to Ignore Obstacles (set 2).

For this event I used single point AF and focused on the riders face or upperbody.

Be careful when shooting riders under the trees with a bright background. The final image could be under exposured because of the backlighting confusing the metering if you use matrix or centre weighted. If you are using programme, aperture or shutter priority modes I recommend using spot metering and dialing in the necessary exposure compensation to get the right exposure for the competitor.

For metering I used the centre weighted setting most of the time to see the exposure in the viewfinder. I shoot in manual exposure mode, with the shutter speed dial set to T and the rear command dial used to adjust the shutter speed. I also set the ISO dial to ‘A’ and use the front command dial to select the required ISO.

With the aperture ring adjusted by my left hand, I can adjust all three elements to get the correct exposure without taking my eye from the viewfinder.


FLASH GUNS

There were no restrictions on the use of flash at the SXC event but I chose not to use my EF-X500 flashgun just in case it distracted any of the competitors. If you want to use flash at a mountain bike race I recommend you check with the event organisers beforehand.


CHOOSING AN EVENT

There are six events in the SXC Mountain Bike Racing series and there are other series all around the UK. For more information on the Scottish series visit the SXC website and for the national scene visit the British Cycling website for more information on mountain bike racing and other forms of two wheel sport.


CAMERA AND LENSES

• Fujifilm X-T2 with battery grip
• Telephoto Zoom – XF 50-140mm f2.8 + 1.4x converter when needed. A good alternative lens in the 55-200mm f3.5/4.8 or the XF100-400mm.
• Standard zoom (16-55mm f2.8 or 18-55mm / 18-135mm) for wide action shots and portrait images.
• 10-24mm f4 wide angle zoom lens can also be useful a different perspective of the action.

Find out more about the X Series cameras and Fujinon Lenses.


CAMERA SETTINGS

• Shutter dial set to ’T’ (and locked). Shutter speed selected on rear command dial
• Optical Image Stabilisation (OIS) on.
• Metering set to Center Weighted, with Spot selected when the lighting conditions proved to be challenging under the trees.
• Autofocus – AF-C with camera set to ‘boost’ to improve reaction time.
• AF custom setting on Set 2 (Ignore Obstacles)
• AF Mode – Single Point
• Drive set to CH (8 or 11 fps)
• Action freezing images – 1/250s to 1/1000s with aperture wide open. Adjust ISO accordingly.
• Panning images – 1/125s to 1/30s will inject lots of movement in the image. Choose a suitable aperture and drop the ISO down to 100/200.
• People shots – Autofocus to AF-S and use wide aperture to isolate the subject from the background when using telephoto lenses.


PREPARING FOR MOUNTAIN BIKE RACING

• Check the weather forecast and dress accordingly.
• Take covers for your cameras. The X-T2 / X-Pro2 / X-T1 and the majority of Fujinon lenses might be weather resistant but I always cover the equipment when not in use. It is not just water, Mountain Bike Racing courses can be very muddy.
• Food and drink. There are usually facilities at an event but the courses are big and are in some rough terrain, so a snack and a bottle of water is recommended.


SAFETY FIRST

• You are standing right next to the course so keep your eyes and ears open at all times.
• Stay behind the marked areas in the start/finish area.
• Obey the instructions of the officials.


MORE INFORMATION

Scottish X Country Mountain Bike Racing: www.sxc.org.uk
British Cycling: www.britishcycling.org.uk


JEFF CARTER

X-Photographer: fujifilm-x.com/photographers/jeff-carter/
Website: www.macleanphotographic.co.uk
Blog: www.fujifilmXadventure.com
Instagram: www.instagram.com/maclean_photo/
Facebook: www.facebook.com/macleanphotographic
Flickr: www.flickr.com/photos/macleancomms/
Vimeo: www.vimeo.com/fujixadventure