Landscape / Cityscape / Seascape

Iceland, a most curious island – Part 1

By Danny Fernandez

I could not help observing with interest the mineralogical curiosities which lay about me as in a vast museum, and I constructed for myself a complete geological account of Iceland, [a] most curious island.
— Jules Verne, A Journey to the Center of the Earth


Iceland; a place which I had never considered visiting before, became the destination of my most recent, and most beautiful venture.

Why Iceland?

The reason I had never considered visiting Iceland was due to a lack of knowledge of this magnificent country. The name ‘Iceland’ conjured images of Björk, vikings and ash clouds. However, around 1 year before the trip, my girlfriend (who had been to Iceland 6 years ago) suggested that we visit. As I began looking at google images of Iceland, I soon realised that there would definitely be much more to see than Björk, vikings, and volcanoes (I acknowledged that the likelihood of seeing the first two were slim.) I reacted to the image search by quietly saying colourful profanities under my breath. It was at that point that my mind was made up, and soon after our flights had been booked.

Our ideas for exploring the island changed throughout the year leading up to our departure. Limited to time (15 days) and budget, we quickly decided that we wanted to explore at our own pace and freedom, so any type of tour was out of the question. Our original plan was to cycle and camp around the island (thank god we changed our minds. It would have been an incredible, but incredibly challenging experience.) We then decided that a car+tent combination would be better, but after hearing stories of gale-force, tent-destroying winds, plus the expectation of a lot of rain, we finally decided to rent a camper van. For our needs, the camper van (from KuKu Campers) was perfect; giving us our own freedom and shelter, and being able to wake up and travel at a moments notice. Our camper was modest (more like a builders van with a mattress in the back) but it did the job perfectly!

In preparation for this trip, I had decided to prioritise our own travel experiences above those of photography. This wasn’t, after all, a dedicated photography tour of Iceland, but instead (probably) a once-in-a-lifetime trip. I like to remember special moments as myself being in the moment, and not just being a witness to the moment through a viewfinder. Also, I’ll be the first to admit that I’m not a landscape photographer, and there is no way I could compete with the thousands of awe inspiring images of Iceland, so once I had taken the pressure off myself of trying to get the best images of Iceland, I was left to enjoy the journey for what is was; an exceptionally breathtaking one.

That being said, I did try to plan as much as I could, and some resources which I found invaluable were: The lonely planet (my ‘go to’ for guide books), an ebook called ‘Photo guide to Iceland’ by Hawk and Finn (http://www.icelandontheweb.com/articles-on-iceland/travel-info/photo-guide-to-iceland) and The Photographers Ephemeris (a website and app which allows you to view the sunrise/sunset time and direction from any point in the world. I bought the app so that I could use it on my iPad without internet connection.)

The gear

Iceland Fuji blog Danny Fernandez Photography (36)

I spent a long time (as always) deliberating what camera equipment to bring. Having a van meant that I didn’t have too worry (as much as normal) about travelling lightly. I wanted to have as much versatility as possible. I decided to bring:

X-T1 + grip.
XF14 prime.
XF10-24.
XF16-55.
XF55-140. (the zooms were generously on loan from the friendly guys at Fuji Spain).
X100S (I kind of saw the X100s as my ‘personal documentary’ camera while the X-T1 was the workhorse. It would also serve as a backup if I dropped the X-T1 in a volcano).
Haida 10 stop ND filter (plus step up rings so I could use it on all lenses).
Manfrotto BeFree tripod.
A remote timer (for exposures longer than 30 seconds).
A bunch of batteries (along with car charger).
And my MacBook Pro/Hard drive (so I could add photos to Lightroom/Backup on the road).
All of this was packed inside a Billingham Hadley Pro bag (which holds all the essentials plus fits on as cabin baggage on the plane).

Other important items included a Moka pot with damn good coffee, a notepad, and a miniature dancing hula girl. All the essentials.

The experiences

I’m a road trip newbie (Iceland being my second; my first was in New Zealand several years ago), but picking up our van instantly reminded me of the huge sense of freedom that comes with road tripping. The van was to become our carriage, our kitchen, our restaurant, and our penthouse for the next 11 days.
Iceland Fuji blog Danny Fernandez Photography (35 of 35)
Iceland Fuji blog Danny Fernandez Photography (21 of 35)
Iceland Fuji blog Danny Fernandez Photography (34 of 35)

With a fully loaded iPad and tank of petrol, we hit the road with an electrical level of excitement. The industrial area surrounding the car pickup location quickly opened up into a wide expanse of green mountains. I couldn’t stop smiling at the landscapes and was amazed at how ‘big, open and beautiful’ everything was. My girlfriend looked at me, and with a soft laugh said “This is just the tip of the iceberg”. And she was certainly right, as what we saw during those first 30 minutes (although incredible) paled in comparison to what we would see during the following weeks.

Doing a road trip in Iceland is very easy, as there is one ‘ring road’ that goes around the circumference of the island. The recommended time to do the ring road was about 7 – 10 days. We had 11 to do the ring road so were sweet. This also gave us time to deviate from the ring road and explore as much as we could. Our first decision was in which direction to drive. We decided to drive anti-clockwise as by the time we were on driving the northern stretch, there would be a higher chance of seeing the northern lights (a lifelong wish of ours). On average, I would say we spent between 3 – 6 hours a day driving/stopping to take photos.

If you’re thinking of doing a trip around Iceland, I would strongly recommend a camper van (if on a budget), or renting a 4×4 and staying in accommodation (if you don’t mind splashing out). Having a 4×4 would have been a big advantage for taking photographs as you are able access many places which you are unable to in a van. But saying that, the ring road (accessible by all vehicles) leads you to an uncountable number of stunning places.

This was our route:

Roadtrip-route

Reflecting on the trip, it is very difficult to put the experience into words. I hope that my photos can somewhat evoke the sense of natural beauty and magnificence in you (the reader) that Iceland did on me. I will do my best to share some experiences.


TO BE CONTINUED..

Check out part two where Danny takes you right into the heart of Iceland and shows what it really has to offer..

Iceland Fuji blog Danny Fernandez Photography (14 of 35)


“Why I love the Fujinon XF50-140mm F2.8 R LM OIS WR lens”

Welcome to the first “Why I love” XF lens series. Find out why the X-Photographers love our fast, long telephoto zoom, the FUJINON XF50-140mm F2.8 R LM OIS WR.

 Wayne Johns – Fashion & Beauty

A Beauty Photo shoot, with photographer Wayne Johns, for an advertising campaign.

quote-left
When Fuji released this lens (75-210mm DSLR Equivalent), my intrigue questioned whether this would be an equal to the 70-200mm F2.8L series I had used on my DSLR; would the optics be as good? After trying it I could only describe the results in 2 words ‘Blown away’; the image quality was absolutely outstanding. I use this lens a lot in the studio for its narrower angle of view and the compression it applies to the depth of my images. The focusing & sharpness of this lens, even when hand held is amazing!… I had no need to question this lens, it more than equaled my DSLR equivalent and it’s much lighter too.
It’s obviously a little bigger than the other Fujinon lenses, but who cares when it delivers truly incredible results like it does.quote-right

Click here to see more of Wayne’s work


Kerry Hendry – Fine Art Equestrian

quote-left
I’ve shot on Fuji for almost two years now, but it was the release of the 50-140mm lens that really sealed the deal for me. Shooting fast equestrian sports needs a fast, longer lens – whether you are looking to capture pin sharp action pictures, or deliberately looking to include creative movement with interesting bokeh.

Even in low light the wide aperture, teamed with the brilliant OIS means I can still hand hold at slower shutter speeds. Also, shooting horses, whether on the polo field or out in the wild, means one thing – rain and mud! The X-T1 body with the 50-140mm gives me a robust weather sealed system I can take anywhere.quote-right

Click here to see more of Kerry’s work


 Derek Clark – Documentary & Music

quote-left
I shoot prime lenses most of the time, but as my primes top out at 56mm (85mm in old money), I often need the reach and speed of the 50-140mm f2.8 for music photography (especially for stage work). With a full frame equivalent of 75-210mm, this is the the classic workhorse zoom that has the beautiful look of a full frame 70-200mm f2.8. Put it together with the 16-55mm f2.8 and you have the ultimate fast twin lens zoom setup that can cover just about any type of event. The OIS is essential on a lens of this size and it does an amazing job, even allowing me to shoot handheld at 1/15th sec while zoomed all the way in.quote-right

Click here to see more of Derek’s work


Ben Cherry – Environmental Photojournalism

quote-left
This is strapped to the front of one of my X-T1s at all times. Sharp, fast and built to withstand some strong abuse, the XF50-140mm is designed for those who need a lens to rely on and not to let them down. With beautiful bokeh and tack sharp wide open, this F2.8 zoom has such a useful focal range that it is in the kit bag of nearly all working X-Photographers. The autofocus is able to track moving animals and it has turned out to be the game changer for many of my recent wildlife encounters. quote-right

Click here to see more of Ben’s work


Matt Hart – Events

quote-left
I love to shoot prime lenses but at events and festivals you just cant get close enough to your subjects due to the crowed density, so the next best lens to a fast prime is a fast Zoom and the 50-140mm lens is just stunning. I have used top of the range glass from all the other big names when I used to use DSLR’s but nothing compares to the sharpness of this 75-210mm equivalent. What makes it even better is I can shoot with this lens all day and still not have shoulder and neck ache. It gives me beautiful out of focus areas, pin sharp subjects and the image stabilisation comes in to its own when the light drops.
quote-right

Click here to see more of Matt’s work


Paul Sanders – Landscapes

quote-left
The XF50-140 is a real workhorse of a lens and without doubt, a lens I am loathed to leave behind.

The incredible optics deliver superb definition and contrast throughout the entire aperture range. But for me it is not the technical specifications that make this lens worthy of the plaudits it receives across the web and throughout the photographic world.

It is the fact that in a cluttered world, I can isolate my subjects, drawing attention to them by shooting with the aperture wide open, deliver exceptional details, stunning candid portraits and most of all dramatic landscapes that have impact & power over the grace of a wide-angled image.

Shooting landscapes with a telephoto  lens is a different discipline but it is one worth persevering with & utilising every mm of focal length this stunning lens offers you.

It’s ideal for shooting panoramas and the tripod mount gives it an incredibly stable base for shooting long exposures without a hint of camera shake – but for those who only shoot hand held the image stabilisation is second to none.

In short, if you want to add one zoom lens to your bag, this is the one – it is worth every penny and will never let you down.
quote-right

Click here to see more of Paul’s work


Dave Kai-Piper – Portraiture

quote-left
When this lens was created there was nothing else much like it in the range. And to date, it is still the finest long lens in the line up. Tack sharp from 50mm to 140mm – this constant f2.8 lens is fast enough & stabilised enough for you to think less and shoot more. Combined with the most recent updates leaves this lens as one of the most reliable lenses – regardless of genre or type of photography.

It’s packed full of all the latest and greatest Fujifilm tech, such as nano Gi coating, LMO (corrects for diffraction), HT­EBC Coating (ensuring ghosting and flare are controlled), five ED lens elements, one Super ED lens, 23 glass elements in 16 groups and then seven rounded aperture blades to create a smooth, circular bokeh. It has a massive 5.0 stop stabilisation too. Internal barrel movements combined with large rubber grips give this lens a wonderful sense of balance whilst also feeling very natural to hold.

In short, this lens is one of the most vital items in my kit bag alongside the 56mm APD & 16-55mm lens. The real world interpretation of the technology being used in this lens is simply that it does what you would expect it to as a working professional photographer. Combine this with the focus tracking in the X-T1 and you can confidentially take on any genre of photography. Whether it be a fashion catwalk, motorsports or even wildlife photography knowing you can get the shots you are looking for, every time.
quote-right

Click here to see more of Dave’s work


pic_header_18d326_03_06d1a6a828Click here to see retailers selling the XF50-140mm lens 

Making the switch – Why these three professional photographers choose Fujifilm X

T_39-1Recently we teamed up with Amateur Photographer (AP) to create an experience day for 60 of their lucky readers.

While we were there we interviewed our three guest speakers and asked them all to tell own story as to how they made the switch to Fujifilm. Check out what made Damien Lovegrove, Matt Hart and Paul Sanders switch to the Fujifilm system, and also what has made them stay using it.


damien2bDamien Lovegrove

Portrait & lighting guru Damien Lovegrove talks about how he made the switch to the Fujifilm system and how using the smaller system helps him connect more with his subject. Can you guess which Fujifilm camera first caught his eye?

To see more of Damien’s work, click here.

https://www.youtube.com/watch?v=h-fQ-vclAZo


matt hartMatt Hart

Street & event photographer Matt Hart tells his system switching story and praises the benefits of using the Fujifilm cameras; from the exposure previewing LCD screen, to the discrete ergonomics and quality of the final imagery.

To see more of Matt’s work, click here.

https://www.youtube.com/watch?v=Okc-WE3BLvQ


paul-avatarPaul Sanders

Former Picture Editor of The Times Paul Sanders explains how DSLRs created a barrier between him and the landscape and how using the smaller Fujifilm system brought back his passion for shooting. Not only that, he also shares some excellent philosophy to shooting pictures.

To see more of Paul’s work, click here.

https://www.youtube.com/watch?v=tOX5I7B542k


The day itself was a perfect opportunity for Amateur Photographer readers to get hands-on with the Fujifilm X system and to learn from our very own Fujifilm X-Photographers. Throughout the day, multiple workshop sessions were held, allowing the experienced professionals to pass on their photographic tips & tricks covering long exposure landscapes, single light portraiture to the in-the-moment street photography.

To read more about the day, please visit AP’s website.

Thoresby. The end of an era

By Chris Upton

person
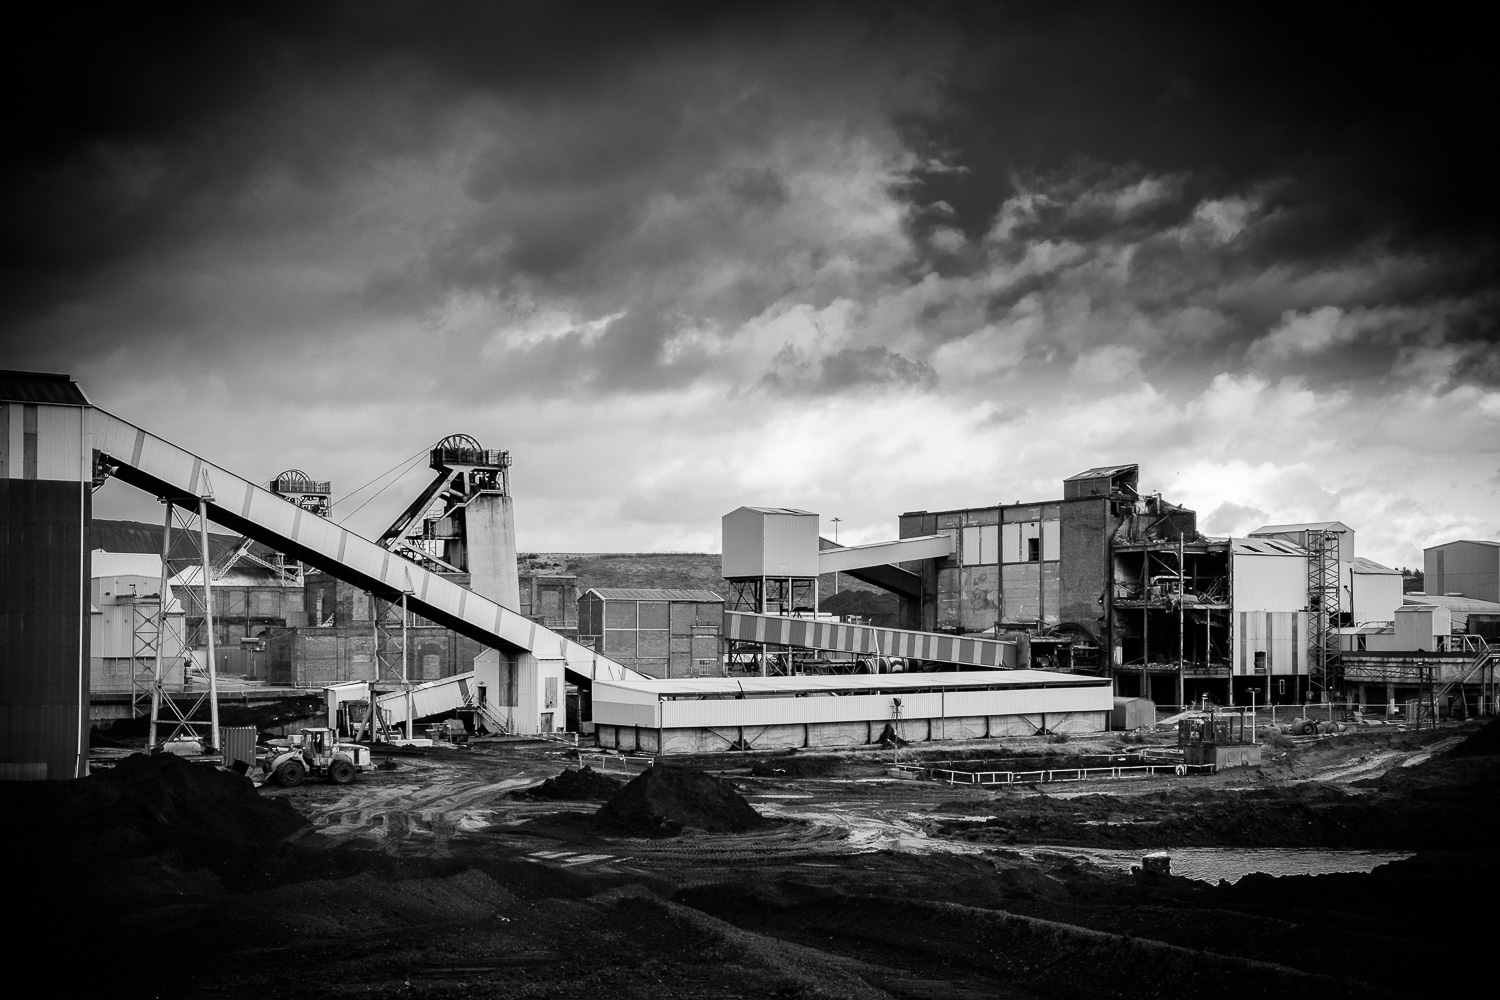
The 10th July 2015 was a landmark date in the history of Nottinghamshire. When the last shift at Thoresby Colliery finished on that day not only did it mark the end of 90 years of mining in the village of Edwinstowe but it signals the end of mining in Nottinghamshire.

The pit opened in 1925 and over the years has employed tens of thousands of local people. It was one of 46 coalmines in Nottinghamshire, which supplied more than 14 million tonnes of coal per year at their peak in the early 1960s.

The first two shafts were sunk to 690m in 1925 and subsequently deepened in the 1950s to the current pit bottom at around 900m depth.

Thoresby Colliery was the first to have fully mechanised coal production and also the first to achieve an annual saleable output of more than a million tons, it became a star performer in the British coal mining industry.

In the late 1980s it raised output to exceed 2 million tons, regularly smashing it’s production records, and the colliery became known as the Jewel in the crown of Nottinghamshire mines. A crown sits proudly on the headstocks in recognition of this achievement.

When the coal industry was nationalised in 1947 it employed a million men at 1,503 pits; prior to the miners’ strike in 1984, there were 180,000 miners at 170 pits. Today there are just two deep mines left, employing about 5,000 men, at Thoresby and Kellingley in Yorkshire. Kellingley will suffer the same fate as Thoresby and closes in the autumn.

UK Coal say market pressures have led to the closure of Thoresby Colliery. Coal generates more than a third of Britain’s electricity, but it is cheaper to import coal from countries such as Russia, South Africa and Colombia than to mine it in the UK.

For the past few months I have been recording the colliery, it’s buildings, plant and people for posterity. It was my aim to create a comprehensive record of the pit at a specific point in time immediately prior to its closure.

It was a chance conversation after giving a camera club lecture that started the ball rolling. A chap in the audience worked at Thoresby and was unfortunately in the first wave of redundancies. He asked if I would be interested in visiting the colliery to take a few pictures. It was a fantastic opportunity and I jumped at the chance. He put me in touch with the Health and Safety manager, I explained what I would like to do and we were off and running. It was at this point, after I had gained their agreement to document the colliery, that the full extent of the task dawned on me.

Starting the project

I visited the colliery on seven occasions, at different times of day, in different lighting conditions, including dawn and dusk. I planned each shoot but found that an outline plan whilst retaining a degree of flexibility to react to opportunities worked best.

At the outset I just toured the site to give me an understanding of the buildings, the machinery, the operation and the people. I took snaps to create a digital scrapbook to help me plan my approach. Essentially I was imbibing the atmosphere much as I would do when visiting a foreign destination for the first time. I wanted to get a real feeling for the place before I started the photography in earnest.

Health & Safety manager Grant was so supportive of my visits giving me more time than I could have wished for.  Even coming in at 3.30am for a dawn shoot and returning to work late in the evening to get “the best of the light” didn’t diminish his enthusiasm. In fact he joked that, after watching me, he would now be able to take the best holiday snaps ever! I hope he does.

20150617_thoresby_0049-Pano

Gear used

All of the images were shot on a Fujifilm X-T1 or X-E1 camera using a selection of Fujifilm XF lenses including the 10-24, 18-55 and 55-200 zoom lenses and 14, 23, 35 and 56mm primes. I also used a Nissin i40 flash for some shots, though preferred to use natural light wherever possible.

For my portraits, the unobtrusive Fuji equipment allowed me to concentrate on building a rapport with my subjects rather than intimidate them with a large DSLR and f2.8 lens combination. Miners might be tough guy’s and supermodels they certainly are not but they seemed to relax pretty quickly in front of my Fuji lenses.

20150701_thoresby_0111

20150319_thoresby_0288-Edit-2

There were several challenges to overcome not least the light levels that were typically pretty low in all of the buildings. Because of the poor light I used a tripod fitted with a ball and socket head for as many shots as possible. My cameras are fitted with arca swiss type plates so that I can switch from landscape format to portrait very easily and without having to waste time readjusting the tripod.

The mix of different light sources from tungsten, to fluorescent and natural meant it was difficult to assess the ideal colour temperature. However the decision early on to convert all the images to black & white certainly helped counter that problem!

In a coal mine dust was another inevitable and unavoidable issue. As the miners told me it’s not only the dust you can see that is the problem and I was very careful when changing lenses and using two bodies certainly helped. Thankfully the in camera sensor cleaning worked well and I was pleasantly surprised at the minimum amount of dust spotting required.

20150422_thoresby_0189-HDR-Edit

Working on a project

As my photography has progressed I have found that I prefer to look at a series of images that tell a story rather than seeing individual impactful pictures. Whilst I have adopted this storytelling approach in my travel and landscape photography this project was a whole different ballgame. This wasn’t going to be a six or ten image set but a large body of work that had to be planned and created in a certain style. I found this experience fascinating, though at first it was pretty daunting. However after a couple of visits I had captured some shots I was very pleased with and the plan started to fall into place. I think the discipline required in a project such as this has helped me to improve my photography and it felt good to be succeeding in this new genre of social documentary photography.

In an attempt to capture the “feel” of the colliery, and to bring completeness to the project, I also recorded various sounds around the pit and organised a series of interviews with miners past and present. I will be producing mini AV’s including these sounds and using the miner’s comments in my presentations.

20150115_thoresby_0097-Edit

20150115_thoresby_0006-Edit

Stretch yourself

It is very easy to stick to what we know in photography and limit yourself to a particular genre. Whilst my experience as a travel photographer, where you are required to be adept at many different genres, undoubtedly helped me there were aspects of this project that were not so familiar. As a result I feel I have grown as a photographer and I would urge you to move out of your comfort zone and try something new. There will be similar opportunities in your area, seek and ye shall find!

20140723_thoresby_0046-Edit

Capturing a piece of history

As I progressed through the project I realised that I was not only taking pictures for myself but that I was actually recording a piece of history, an enduring record of a place that, in just a few months time, would be gone forever. With that came a feeling of responsibility, not only to do myself justice but also to represent the life and work of the mining community. Apart from my family photographs, this project is the most important and worthwhile piece of work that I have ever created. Whilst there is clearly interest in the work now, what will its importance be in another 10 or 20 years?

20150115_thoresby_0052-Edit

A personal perspective

This project has been a fantastic experience. It has improved my photography, taken me into a different genre and enlightened my knowledge of an otherwise mysterious industry.

It has been a pleasure to work with the team at Thoresby, without whom I would not have been able to produce this body of work. Whilst the colliery may not draw its workers from the immediate village area, as in years gone by, their camaraderie, team spirit, hard work and no nonsense attitude in this tough and uncompromising industry epitomise the best of British workers. The closure of Thoresby truly is the end of an era.

20150513_thoresby_0257

20150513_thoresby_0267

What next?

I feel it is important to showcase my images to as wide an audience as possible, especially in the local area. Therefore, after securing feature in the local and national press, I will be staging a major exhibition in Nottinghamshire and am planning to produce a book – more details to follow.

To see more Thoresby images and to keep updated on the project developments please visit my website  www.chrisuptonphotography.com

20150422_thoresby_0301-Edit-3


Desert Road Trip – California and Nevada

by Ian Boys

I’m a people photographer normally – portraits, the odd wedding and so on. But on this trip I decided I’d give landscape photography my first serious attempt ever, after 25 years of shooting. Of course, I’d taken landscapes before when I happened to come across something that looked good but this was different: I’d make sure I got to the right place at the right time for the best light even if it meant sleeping (or failing to sleep!) in the car.

Before I went I researched my route using Flickr and Google maps. The latter was especially helpful not just for seeing if a mountain would be lit at dawn or dusk but also to see what other images had been taken nearby. This pointed me towards quite a few fascinating sights that I would never have come across otherwise. In the very bottom right hand corner of a Google maps screen is a double up arrow that reveals scenes you may not otherwise have considered.

A08

Dear reader – I even bought a tripod. Many of you will wonder what the big deal is but it went so against my usual style of shooting that it felt like a jet pilot shopping for a submarine. But as it turned out it proved invaluable.

One last act of preparation – I looked at the absolutely stellar landscape work shown on the fredmiranda.com landscape forum and learned about things like focus stacking and night photography, things I vaguely knew about only in theory. One night before I left I went out and practised the techniques, with terrible results. But that’s how I learn.

Why the Desert?

In 1993 I worked in Somalia during the war there and travelled and lived in the northern desert communities. I fell in love with the open spaces, the peace of the evenings and the huge skies. Since then I’ve visited other deserts, notably on the India-Pakistan border and Arizona. I like the open road, the small communities and the sense that in the desert everyone can just be themselves. It is the polar opposite to the metropolitan posing of modern cities. In England I live in a small village on the doorstep of the Peak District National Park. Manchester is very close but I rarely visit.

I wanted to shoot the road, the space, the ghost towns, the mountains and the night skies, with a detour to Yosemite. There are so many fantastic wilderness parks on the Nevada/California border that going to LA or San Francisco was never an option. One tip though – when they say don’t walk in parts of Death Valley after 10 am they mean it! I once walked out at night and got back to the car at 0845 and it was already so hot. Those pictures of graves aren’t put there for your amusement.

A05

Kit List

For the last several years I have travelled only with a Fujifilm x100 series camera – Hong Kong, New York, Volgograd, Sri Lanka and elsewhere. The x100 series are superb, not only because of the results but also because of their size and weight. But this time I’d need a bit more choice in lenses.

I decided to take the X-T1 and the 14, 23 and 56mm lenses. These are widely recognised as the best primes available (although the new 16 may have usurped the 14, I don’t know for sure yet). The 23mm would be my standard landscape lens, the 56mm would give me the extra reach one sometimes needs to isolate part of the scene and the 14mm would be perfect for night sky photography as it allows a 25 second exposure under the “600 rule” that governs whether stars are rendered as points or streaks.

The 18-55mm was under consideration but although it’s good, these other lenses are fantastic. The difference does really show.

I also took my new Manfrotto 055 tripod, 4 batteries and a remote cable release as well as a charger that allowed the batteries to be recharged while driving. Definitely a bonus for this kind of trip. I also took a big LED video light that allowed me to get set up in the moonless desert night and sometimes to light paint foreground rocks. Backlit dials and controls would be nice but are probably impractical in a small camera.

Technical Notes

Although I shot everything in JPG+RAW, all the final images except the night shots were actually from the in camera JPG’s. I used the Astia setting for all of them – it helped keep the set coherent and provides great colours without the overblown look that Velvia brings. In particular Astia renders skies very well, better (to my taste at least) than any of the other settings.

A15

In general, I shot in Aperture Priority and used the Exposure Compensation Dial to give me the look I wanted. For some shots, especially those shot in the evening or at night I used manual exposure. One morning I rode the shutter dial all the way from 2 minutes to ¼ second as the sun rose over a freezing mountain lake. I was inside an aluminium shelter bag loving every minute of it as the light changed. The shots were terrible, as you’d expect from someone who has never done that kind of shot before. As I say, I’m not a landscape photographer but I’m so glad I saw it.

Some things did work better than expected though. Focus stacking involves sticking your camera on a tripod (weird!) and gradually changing focus so that over the course of a dozen shots or so you have focussed on all parts of the shot. You then combine them automatically (or manually, for the masochists) in Photoshop. The 14mm is absolutely perfect for this as the manual focus “pull clutch” allows you to gradually work the focus through the scene at an optimum aperture for sharpness of f5.6. In combination with the tilt screen and focus peaking (Red High for me) of the X-T1 it really couldn’t be easier, certainly much easier than with the optical viewfinder of a standard DSLR. Because it was a new technique for me, I also took a “safety shot” at f11 in case the intricacies of the procedure were beyond me but actually it is simple and the results were very much better than with the single high depth of field shot. It doesn’t matter how many times you read about it, doing it in the field is the best way to learn it. Here is a focus-stacked shot from Death Valley:

A06

Another technique that worked well was ultra high resolution patchwork shooting with the 56mm, where I’d take perhaps 20 shots of a scene in rows and columns and stitch them together afterwards. I’m not really sure what I’d need a 200 megapixel file for but it’s nice to know it works really well and that you can zoom in one the tiniest detail from miles away. One day I’m sure I’ll find a use for it and now that I’ve done it, it’s a technique in my arsenal. Sometimes though it was more practical to use the sweep panorama feature. In this particular shot I tried both techniques (a 4 shot manual blend and the in-camera panorama) and the in camera stitch was smoother, although lower resolution. At 6400 pixels across, it still has plenty enough for me.

A13

Night photography was fantastic in the desert: there are few lights to begin with and in Death Valley those that exist must be shielded from the sky. This was my first ever attempt at a Milky Way shot (thank you Youtube!) and as laughable as it might be to the more experienced night shooters, I’m rather pleased with it.

A02

Notes on individual shots

This shot was actually taken on Aperture Priority from the driver’s seat with -2 stops exposure compensation dialled in. I was using the 23mm at iso 1600. The extraordinary EVF of the X-T1 let me ensure that there was still some light visible on the ground while at the same time allowing me to make sure the highlights weren’t blowing out. The high dynamic range of the X-T1 kept it all together.

A09

This is a stitch of two horizontal shots taken at Mono Lake. There’s not a stack more to say about it except that a single 14mm shot would have looked quite different. Modern tools make this kind of stitching quite easy, even for a landscape novice and the methods are a simple search away.

A26

This was a ten second shot of my hire car. I had stopped for a sunset but frankly I’ve seen better. I did like the way the car looked though and with the interior light on and a long enough exposure to lighten the sky and ensure passing traffic left pleasing trails and illumination I think the shot works. It was also shot with my 56mm lens, perhaps an odd choice but something I’ll bear in mind to try again next time. I love that lens.

A19

Here’s a very different kind of car shot, a quick snapshot as I crossed the street. This old Mustang matched the sky and worked well with the yellow lines. It is (clearly) a quick grab shot – I was on my way to get a burger after several hours shooting one searingly hot morning – but it is a testament to how quickly the X-T1 will react if necessary. It starts up quickly, focuses quickly and fires without shutter lag. That’s what I want in a camera.

A24

OK, two last shots before I’m told to knock it off! Nevada’s an odd place. But I’d never have found either of these without doing some research before I went.

A20

A27

So in summary – every camera is a compromise. But the X-T1 offers high quality, superb lenses, light weight and bulk, accurate focus, exposure and white balance, a tilting LCD that is way more useful than I thought and a very high chance of getting the right photo on the first shot thanks to the excellent EVF with its exposure preview, focus peaking, colour rendition and other features. I use it for all my more serious work, together with the x100T. But the X-Pro 1 still has a piece of my heart.

You can see more of Ian’s images on his Flickr page here.

Story behind the photo – The goat herders on Triund Hill

Fuji Blog Triund (22)

By Danny Fernandez

As I took the final few steps and reached the peak of the hill, the Himalayas came into full view for the first time, and left me speechless.

But let’s begin the story several hours earlier.

I had been staying in Dharamkot, in the foothills of the Himalayas, for an incredibly relaxing 2 weeks. My days had been spent walking through beautiful forests, reading in a hammock and eating delicious organic food.

Fuji Blog triund (1)
A monk walking through the forest in Dharamkot

But before leaving Dharamkot, there was one thing left that I had to do; spend a night on Triund Hill (don’t let the name ‘Hill’ fool you, as for me it seemed more like a small mountain, casting a shadow on the village of Dharamkot and standing at 2,875m high).

On the morning of the trek I left my guesthouse and began the ascent up the hill. The beginning of my trip did not go smoothly. There are 3 things in life which I suck at: singing, playing football and following directions. Somehow, I managed to get exceptionally lost – before I had even found the path which takes you up the hill. The problem began when I came to an intersection along the track which I was following. I glanced in both directions as I tried to remember the directions that the lady at my guesthouse had given me, and then took the path leading to the right. I passed through the garden of a house, and asked a young girl if I was walking in the right direction. She said that I was, and gestured to me to continue walking up the side of the hill (which was essentially a pathless mountain covered in thick, and at times impenetrable vegetation). My instincts told me that this couldn’t be the right way, and I debated turning back and starting again, but as I had already been walking uphill for most of an hour I chose to continue up the side of the mountain.

The bush became thicker and thicker and started cutting at my legs, but stubbornly, I refused to turn back. After a long struggle, I eventually crossed a foot-wide, crumbling flint ridge, which then opened into an area of flat ground which I thought offered some hope in leading me to the top of Triund. I carefully paced back and forth through the labyrinth of plains, but I kept facing dead ends; thick wild bushes that required a machete to pass through. After about 20 minutes of trying to find a walkable route, I decided that this had been one big bad idea, and turned around, attempting to retrace the steps that had led me to this next level of lostness. I walked along the ground on which I thought I had trodden, but to my frustration, I was hit by another dead end. I walked back and tried again and faced another dead end. I began to panic as I remembered those basic tips you hear when doing things like walking up a mountain. Things like “tell someone where you’re going”, “make sure you have a phone” or “make sure you are wearing appropriate clothing”. I hadn’t told anyone where I was going (other than the lady at my guesthouse), I didn’t have a phone and was wearing a pair of old beat up Nikes with barely any tread left.

It was one of the first times when I’ve felt truly scared and alone in the wilderness. I thought about how this is how people probably end up dying on mountains, and became annoyed at myself for getting into this situation. I was frustrated, scared and felt defeated. I decided that as soon as I found my way out, I would check into another guesthouse (as I was too embarrassed to return to the guesthouse where I had been staying – as it was supposed to be an easy trek), spend the night in a bed, and then leave Dharamkot the next day without reaching the top of Triund Hill.

Fuji Blog Triund (2)
On the left of the image is the path I took. Clearly not the right way.

I knew that I had to remain calm, and took a few moments to recompose myself and look over the way which I thought I had walked. I tried to logically plan a route back to my starting point and to my relief, I eventually came across the narrow flint path which had led me into the labyrinth. From this point, it was easy to return down the side of the mountain and past the house with the garden.

I finally relaxed and felt an extreme sense of relief. My negativity began to lift as I walked towards familiar territory and came across a path which actually looked walkable. I came to the crossing that had been the origin of my nightmare, and after a few meters saw a spray painted sign reading ‘Triund’, with an arrow next to it. After my brief ordeal of getting lost, I finally felt safe again, and made the decision that I would not return to Dharamkot today, but would trek to the top of Triund Hill.

I soon crossed paths with two American girls who were also walking to the top, and shared the journey with them. The trek to the top was a breeze in comparison to my first attempt. The walk took about 3 hours and took us though some incredible scenery. Hand built wooden Tea shacks were dotted along the route where trekkers could rest and stock up on supplies. Occasionally we would have to squeeze to the side of the path as a drove of donkeys passed, hauling supplies to the top of the mountain.

Fuji Blog Triund (3)
Walking up the mountain. A tea shack in the top left of the frame.
Fuji Blog Triund (4)
Donkeys hauling supplies to the top of the hill.
Fuji Blog Triund (5)
Tea with a view; trekkers rest at a tea shack on their way to the top.

After a few sweaty but exciting hours, I approached and took the final few steps over the peak of the hill, and as I did, the Himalayas came into full view for the first time, and left me speechless.

I was extremely satisfied with reaching the top, and after walking along the ridge of the hill taking in the beautiful views, I needed to organise my night’s accommodation as well as get something to eat. I entered one of the few huts at the top that supply tents and food to tired and hungry trekkers. As I rested and ate a snack there was a middle aged man sitting opposite me. He was smoking a cigarette and had an incredibly interesting face. His looked different to most of the Indians I had seen until then, with light eyes and thick skin. My X100s was in my hand and after a few minutes, I began taking photos, firstly of the hut and the area, to allow him to get used to the camera. After a few frames, I gestured to him to ask if I could photograph him. He agreed and continued doing what he was doing, and looked lost in his thoughts. I shared my food with him and then left, as I didn’t want to be intrusive.

Fuji Blog Triund (6)
The goat herder in the tea tent.

I hired a tent, found a clear spot on the ridge and set it up. My view overlooked a part of the Himalayan mountain range. I was blown away by the beauty.

Fuji Blog Triund (7)
A room with a view.

The mist that was present as I approached the peak subsided and the golden light of the setting sun began to illuminate the mountain. I became excited as I was basically in landscape heaven and everything I saw looked astonishingly beautiful.

Fuji Blog Triund (8)

Fuji Blog Triund (9)

Fuji Blog Triund (10)

Fuji Blog Triund (11)

I decided to take advantage of the golden light and explore the length of the ridge. As I passed the other campers and approached the elevated side of the hill, I could hear the bleating of mountain goats in the distance.

Fuji Blog Triund (12)

I continued walking up the hill and came across the goats. There were lots of them, grazing and playing on the rocks. I enjoyed quite some time taking pics of them. They were very fun and cute to watch and I found their noises very entertaining.

Fuji Blog Triund (13)

After a few minutes I saw the man from the hut. I now realised that he was tending to the goats, and had taken them to the other side of the ridge to graze. He had made a fire and was drinking chai tea. He had seen me taking photos of the animals and after a while I approached him with a smile. He invited me to sit down and poured me a cup of tea. With few words being spoken we shared each other’s company, and again, he allowed me to take some photos of him. He seemed extremely peaceful.

Fuji Blog Triund (14)
Sharing tea with a goat herder

The sun was going down behind the mountain and I was excited to carry on shooting. I shortly came across another animal herder, this time a man who was shearing some of the goats.

A herder shearing his animals

After maybe an hour with the goat herders, I walked back down the hill as dusk approached.

Fuji Blog Triund (16)

Fuji Blog Triund (17)

On the horizon the reddest moon that I have ever seen began to rise. I watched in astonishment as it peaked over the mountains and into the sky. I chatted to fellow trekkers about the colour of the moon.

the blood red moon rises over the mountains
The blood red moon rises over the mountains

As night fell, small bonfires lit up the hill to keep the trekkers warm. I joined a group of Indian guys around the fire for food and tea, but decided to get an early night as I knew I wanted to be up before sunrise to take photos.

Trekkers keeping warm around a fire.

After a pretty bad night of rest (due to a lack of warm clothing) I crawled out of my sleeping bag, unzipped my tent and walked into the fresh mountain air. It was still quite dark as the sun had not yet began to reach over the mountain top. I decided to walk to the far end of the ridge that I hadn’t ventured to the day before. I had my mini tripod with me and began taking photos. In a distant tree I saw a huge eagle, which was another first for me. After about 40 minutes, I heard the familiar bleating sound that I had heard the day before coming from behind me. As I turned around, I saw lots of goats (perhaps more than 100) running and jumping towards me. This instantly made me smile and as they ran past me, I climbed onto a rock so they could pass without knocking me down. The goats raced past playfully.

It was around this time when the sun began to appear over the mountain, bathing Triund Hill with glorious golden light, which also brought a warmth to the brisk mountain air.

Fuji Blog Triund (20)

Fuji Blog Triund (21)

I followed the herd of goats and whenever possible, climbed upon a rock to get a better view of the scene. There were different goat herders from the previous day, and I followed them along the length of the ridge, snapping away. As the other trekkers were sleeping, I was grateful to be witnessing this unique moment and felt invigorated to be there.

Fuji Blog Triund (22)

Fuji Blog Triund (23)

Fuji Blog Triund (24)

The walk along the length of the ridge took about 30 minutes, and on my part, it was a process of running ahead, stopping, shooting, and then running ahead again. These leap-frog manoeuvres lasted until we reached the elevated end of the ridge.

I gestured to one of the herders with my camera, and he stopped for a moment to allow me to take his photo.

A portrait of a herder.

After reaching the high end of the hill, the herders stopped and allowed their animals to feed. I thanked the herders and returned to the camp feeling extremely grateful and happy with the events that I had just seen.

After some breakfast, I began my descent back down Triund Hill, with extremely high spirits (and an increasingly swollen ankle – which later turned into an infection). My experience on top of the hill was fantastic, and reminded me how nice it is to be surrounded by nature and simplicity. I’m so glad that I didn’t give up on the trek after my bad experience at the start, as Triund Hill proved to be one of the most memorable events of my trip.

About Danny

Danny Fernandez is a creative photographer living and working in Barcelona. He likes cycling, records and vegetarian food.
To see more of his work, please visit:

Danny Fernandez’s official website

follow him on Flickr

follow him on Instagram