Ben Cherry

Ben is an environmental photojournalist, zoologist and Fujifilm X-Photographer. His passion is showing the beauty and fragility of the natural world. Find more of his work at www.bencherryphotos.com

My love affair with EVFs

When I first started using the Fujifilm X-Series last summer I didn’t realise how helpful electronic viewfinders (EVFs) can be. Being able to see a live view of the exposure and then adjusting this via the exposure compensation dial means that I am more efficient. When using SLRs it is often difficult to get exposure compensation exactly right the first time around, this often means you take a photograph multiple times to get it just right. With X-Series cameras you are able to see how an exposure adjustment will effect the exposure of the image before you take the photo. This is especially helpful for fleeting moments, especially in quickly changing light.

The exposure compensation can be adjusted in post-production but I feel the live view produced by EVFs has helped me improve my photography. This makes my editing workflow shorter, which is always an advantage.

I found this feature particularly helpful when taking silhouettes, such as the images of Chesterton windmill in the gallery below.

EVFs are also very helpful with non-Fujifilm lenses or using Fujifilm lenses in manual mode as they can accurately show when the focus is correct. Even with the X100s and X-Pro1, which have hybrid viewfinders, I use them almost exclusively in EVF mode instead of OVF mode because, for me, it offers more benefits.

Weather resistance in windy Wales

A friend and I decided to go camping in Wales, which perfectly coincided with the passing of the ex-hurricane Bertha! To many this is a bizarre time to choose to go camping, but from a landscape photography perspective, angry weather equals exciting weather.

At the moment I am trying to train myself to only use prime lenses as Fujifilm offers such a wide variety covering lots of helpful focal lengths (the announcement of the XF90mm f2 R and XF16mm f1.4 R being added to the lens roadmap is very exciting). The reason for this is that to me they inspire creativity, using the fixed focal length makes me think more about composition and simply take more time with each picture. However, the thought of changing lenses in high winds and heavy rain atop a cliff wasn’t particularly appealing so the ever-camera-bag-present XF18-135mm came into its own. Having previously used a prototype version of the lens on the Farne Islands (see my initial impressions here) this was the first time I had really put the production version through its paces and I have to say it passed with flying colours.

Because I was generally taking landscape photographs I didn’t miss the wonderful wide aperture capabilities of prime lenses. The other bonus of using the XF18-135mm was the fast auto focus and probably, more importantly, the weather sealing. Once mounted to the X-T1 the weather resistance system left me with one less thing to think about while battling the hazardous conditions.

I wasn’t the only thing out enjoying the powerful winds though, a few fulmar were flying around the cliffs, putting on a very impressive aerial display. This was a great opportunity to try the continuous focus in mirky conditions with a very fast moving subject. Once locked on the keeper rate was very high.

Enjoying the conditions

Fulmar

Target ahead

Fulmar-3

Cliff flyby

Fulmar-2

Fulmar in the scene

Welsh cliffs

The other very helpful feature of the XF18-135mm lens is the 5-stop image stabilisation which proved very helpful in countering the blustery and often dark conditions.

Setting Welsh sun

Welsh sea

Going further against my plan to use only prime lenses, the other lens used extensively was the XF10-24mm R OIS on the X-Pro1. Again I went with the practicality and versatility offered by this wide angle zoom lens. Despite this being a zoom, I loved using it at the ultra wide 10mm end to capture as much of the impressive scenes in front of me as possible.

Incoming shower

Welsh coast

Boisterous waves

Welsh coast-2

Overall it was a great few days for photography, but before you go off camping in inclement weather, make sure you check with others you drag along, as the X-T1 – XF18-135mm set up is weather resistant and ready for anything, but they might not be so obliging.

Explaining apertures with puppies

Despite photographing lots of dogs prior to this I naively thought that I’d be able to line up eleven calm and collected Labrador puppies to demonstrate the effect of different apertures on a photograph.

Do these look calm and collected to you?

Labrador puppies-3

Despite the challenging subjects I hope that I can help you understand the fundamentals of using different apertures and how this affects a photograph.

To start off there are three things that are all intertwined in a photograph, these are your shutter speed, ISO/ASA and aperture. Shutter speed is the length of time your camera shutter is open for. This is important depending on what you are trying to photograph, if you are wanting to freeze action then you are going to want a fast shutter speed such as 1/1000 of a second. While if you wanted to create motion blur then you would want a slower shutter speed, for example, 1/60th of a second.

A shutter speed of 1/1900 of a second helped to freeze this leaping puppy

Labrador puppies-17

ISO is a way of setting the sensitivity of the camera sensor. The lower the ISO number (e.g. ISO 100), generally the better the overall quality of the image. However, the lower the number the more light required for an exposure. A sensor set up at ISO 100 requires a shutter speed four times longer than a sensor set up with ISO 400. With ISOs you have to decide what you want to prioritise, faster shutter speed or better quality, you have to find the compromise you are happy with for the situation at hand.

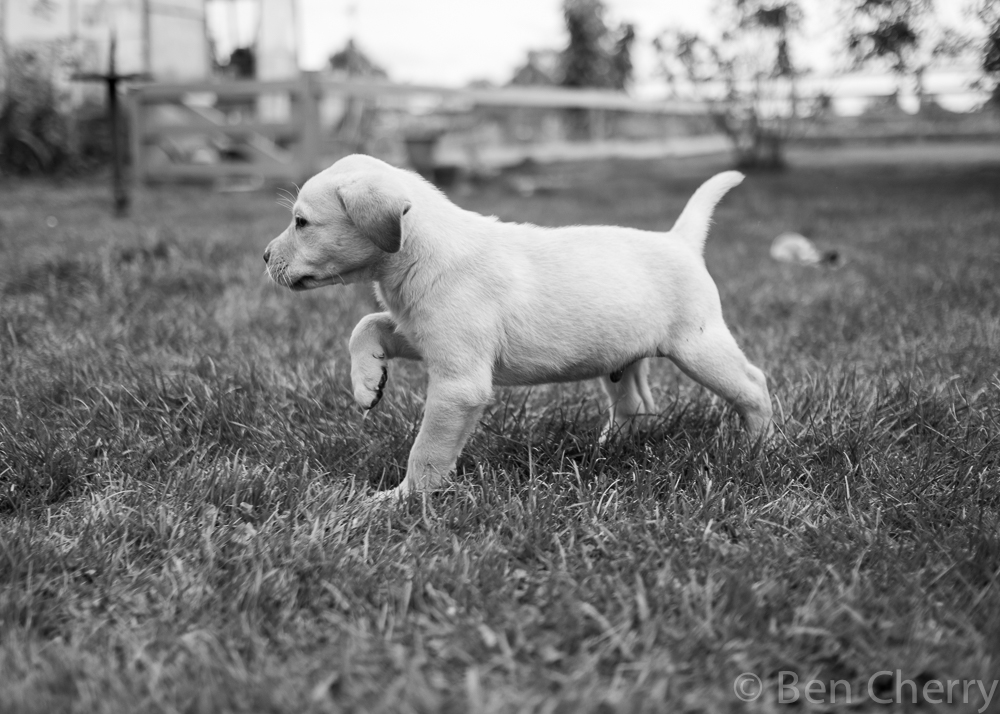
Tired puppy at ISO 200

Labrador puppies-26

Crop of puppy showing high levels of detail at low ISO

ISO 200 crop

Then there are apertures… This dictates how deep the depth of field will be in the photograph. For example f1.4 has a very shallow depth of field that is helpful for isolating a subject, while f11 has a large depth of field that means everything in a composition can be sharp. Again though there is a twist as the smaller the f number the larger the amount of light let into the lens, meaning faster shutter speeds.

At f1.4 the depth of field is so shallow that only the eyes are in focus

Labrador puppies-8

If one of the three factors change, then it affects at least one of the two other factors. For example if your camera is set up with ISO 400 and aperture f5.6, showing a shutter speed of 1/250 of a second and you want to increase your shutter speed then you can lower your aperture a stop to f4 (which will double your shutter speed) or another stop to f2.8 (quadruple your shutter speed). Alternatively if you don’t want to change your aperture then you can increase your ISO to 800 which would also double your shutter speed.

Using puppies was a difficult choice…

My intention for this blog was to have a wonderful selection of shots showing eleven puppies sat in a line using a variety of different apertures to show how this affects depth of field. The owner Ruth Mercer, who very kindly let me photograph the puppies, said the best time to do this would be when they’re being fed. As the birds eye view picture clearly shows, my dream of a nice orderly line was never going to happen! Why I thought this was possible with these little bundles of energy was beyond me. No matter though, the whole experience was utterly heart warming. And all is not lost as I did obtain some shots that highlight the difference in depth of field caused by different apertures.

Puppy at f1.4

Labrador puppies-18

Puppy at f10

Labrador puppies-20

You can see that with the second photo the depth of field is much greater than the first. This in turn shifts the focus away from the isolated, in-focus puppy in the first image to the whole scene of the second image. Note how your eye should be drawn a lot more to the bottom of the black puppy a lot more in the second image because it is in focus.

Despite being a rather unusual way to highlight how different apertures can affect the image produced, I hope this puppy inspired explanation has helped further your understanding. The lens used for the majority of these shots was the XF23mm f1.4 r which offers very fast autofocus and a very shallow depth of field, using f1.4, to give the photographer the greatest amount of control through a wide aperture range (f1.4-f16).

The take home message is that a small f-stop number allows you to create a very shallow depth of field to help isolate a subject. While a large f-stop number will mean that a larger proportion of the content in the picture will be in focus. To finish with here are a few more shots of the puppies, generally using a shallow depth of field to keep the focus on these adorable little characters. You can also check out a video of this adorable experience here by Ellice Dart.

Taking the X-T1 into the deep blue

Just to make it clear, I am not an underwater photographer. I have dabbled in it from time to time in locations of incredible marine life, such as snorkelling around coral reefs. The North Sea has a high abundance of marine life and the coast of Penzance is one of two places that you can consistently see blue sharks (the other is Cape Town). So when Danny Copeland, a fellow University of Sheffield Zoology graduate, spoke about his plan to go and see them with Charles Hood, a local charter skipper (http://charleshood.com), I jumped at the chance to join him.

Previously I have used DSLRs for underwater photography in a Ewa-Marine underwater housing. This time though I wanted to continue to push the X-T1 in difficult conditions so I put it in the same housing with the 10-24mm. Despite being dwarfed by the bag, the set up worked really well.

Thanks to Danny Copeland for this photo of me and the camera. Follow Danny on twitter to get the latest on underwater photography and marine conservation.

Ben Cherry XT1 underwater

Once we reached 10 miles out to sea we started chumming using mackerel heads (yum) to attract the sharks. Once they were in the area the four of us that went on the trip were able to slip into the water. Once I had checked the housing was sealed I swam around to find some subjects and came across this large jellyfish surrounded by lots of little fish. This example highlights the benefit of using a zoom lens underwater as I was able to get two very different perspectives using different focal lengths.

24mm

Blue Shark trip-6

10mmBlue Shark trip

Conditions were generally slightly overcast which actually meant there was a lovely soft light, which helped control the highlights that would have been a problem if it was a clear, sunny day. However this did mean that it was slightly dark in the water, even at the surface, so I shot at ISO 1600 to start and pushed this as the sediment levels rose throughout the day. Other settings I made sure I had set up on the boat were: continuous focus with focus priority, continuous high speed shooting (8fps), matrix metering and LCD only display. Generally I was using aperture f5.6 to strike a balance between a fast shutter speed and a good depth of field.

Because I was wearing a mask and the camera was in a housing I couldn’t utilise the wonderful EVF but instead found the LCD screen to be a great alternative. It allowed me to have a clear view of the shark(s) by not having my face to the camera and provided easy viewing of composition through the back of the camera. The advantage of the X-T1 is that I have not noticed any difference in focusing speeds between the EVF and LCD, which isn’t always the case. All of these factors meant that I could really take in this remarkable experience as one shark in particular became more and more inquisitive…

Rising out of the depth

Blue Shark trip-4

Coming in for a closer look

Blue Shark trip-8

Closer…

Blue Shark

Moments before bumping the lens!

Blue Shark trip-5

The camera only helped to make the experience more memorable, with the shark showing interest in it. With an animal like this it was so interesting to witness its intelligence and curiosity, the term ‘spaniels of the sea’ I feel is very apt. At one stage the shark photo-bombed a picture of Danny!

Shark photo-bomb

Blue Shark trip-7

Despite coming very close, it whole situation was very calm and meant that the interaction was an absolute joy. The shark even seemed to show a happy expression.

Playful shark

Blue Shark trip-2

Overall, the X-T1 and 10-24mm set up exceeded my expectations. I knew it would follow subjects well but I thought that shooting through water would probably lower the hit rate. However, the only factor that affected this was human error. With a specifically designed underwater housing, this camera and lens set up would be a brilliant choice for any underwater photographer, with its small size, clear controls and superb image quality.

Ben Cherry – Who am I?

Hi there, my name is Ben Cherry and I am a guest blogger for Fujifilm. My primary interests are wildlife and travel photography but I’ve previously covered events from motorsport and snowboarding films to fashion shoots and weddings.

I have been a Fujifilm X-Series user for a year now, ever since I used an X-Pro1 for a trip Malaysian Borneo.

Ben Cherry X-Pro1
This is me…

What I look for in a photograph is a moment, from a smile to unusual animal behaviour, I try to capture a photograph that encompasses a situation and can tell a story. To me, photography is a form of story telling, like writing and painting it is how the content is perceived by the viewer that is important. If someone experiences an image, feeling and/or viewing the subject the way the photographer did at the moment of clicking the shutter, then to me that is the ultimate prize in expressing your experience of a moment.

Why Fujifilm?

I use Fujifilm cameras because for me this is the best system for my work, offering superb image quality, a small compact size for travelling and a wonderful enjoyment factor through the manual controls. From the X100s to the X-T1, all of the products I use offer something different to my photography, whether it’s the low light capabilities of the 23mm f1.4, 35mm f1.4 and 56mm f1.2 or the pocket-ability, go nowhere without it, design of the X100s.

The clear purpose and design of each product gives me the clarity needed to choose the right gear for the job at hand. In future posts I will be discussing what the Fujifilm X-Series offers me and also explain some helpful hints and tips for those who are new to photography and to those who are new to the X-Series.

In the meantime you can check out some of my previous blogs here and check out my website and social media:

www.bencherryphotos.com
Facebook page
Twitter
Instagram