


By Paul Sanders
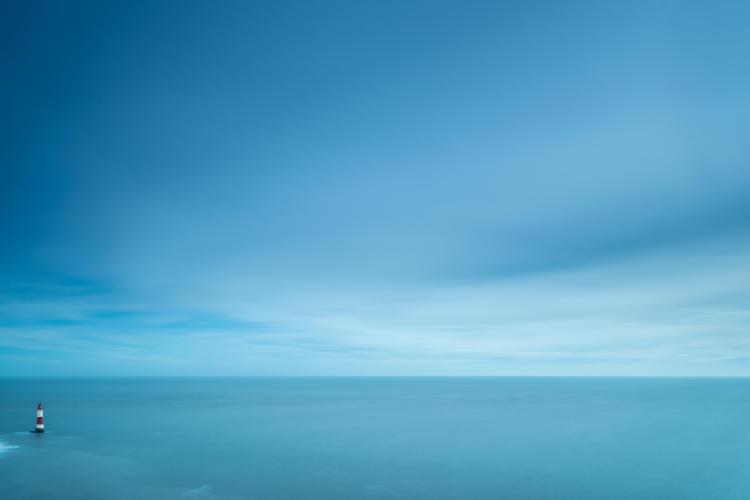
 For me personally, long exposure (LE) photography allows me to explore a sense of calm, a visual relaxation that matches the way I feel when I look at the landscape. But for some, the technical side of this style of photography makes it incredibly frustrating and stressful.
Before we get into the technical side of LE photography and counting exposure increase on our fingers and toes, there is something that is far more important than the technical issues. It is vision, interpretation and connection with your subject.
Ansel Adams said “A great photograph is a full expression of what one feels about what is being photographed in the deepest sense and is, thereby, a true expression of what one feels about life in its entirety.”
You have to be able to connect your emotions to the landscape around you. It’s no good just shooting lots of images in the hope of getting one good one, shoot one good one that really captures how you feel and perhaps take a second image. If nothing else, long exposure work will stop you shooting lots of images, the thing you’ll need in abundance is patience and not memory cards.
Lets get down to business and make long exposure a simple creative exercise rather than something that seems baffling to some people because of the exposure calculations.
Here are my top tips to get you shooting beautiful long exposure images.
The kit
You’ll need a camera with a “B” setting in the shutter speed range plus either an electronic or screw-in cable release with a lock and ideally a self timer – all Fujifilm X Series cameras have built-in self timers. You’ll need a sturdy tripod, a set of neutral density (ND) filters and some graduated neutral density filters.
Now it’s the filters that are the key bit of equipment that you should pay attention to. Which ones you choose to purchase will depend on your budget BUT, and it is a big BUT, brands like Lee Filters and Formatt Hitech are without a doubt (in my opinion) better in both manufacture, consistency of colour and density than others.
You can shoot long exposures on any lens, so don’t always stick a wide angle on and think it will make the best focal length for this type of work – lens choice is personal and entirely related to the subject. The lens I use most is my FUJIFILM XF35mm F1.4 which is equivalent to around 50mm.

Composition
Many people seem to think that milky water or a blurry cloud will make up for a well executed image, it won’t, so think about how you would normally compose your pictures and work with that, or allow yourself to start from the beginning again and use very basic composition rules to help you. Long exposure will highlight every mistake compositionally, so make sure that all the elements you want in the frame are exactly where they should be before you press the button. The devil is in the detail and pay attention to the edges of the frame too.

Focus
Obviously you need to focus your camera on the most important part of the image – this is usually, with long exposure the object that will remain stationary. Once you have focused accurately turn the Autofocus off. The reason for this is that many cameras struggle to focus with ND filters in front of the lens, remember if you cant see through them, neither can the camera. Always take a moment to recheck your focus just before you slide your filter in.

Exposure
This is the place most people come unstuck or wander into the world of guess work, this bit is important so let’s simplify it.
Exposure is a combination of shutter speed, aperture and ISO.
Each of these is important and each relates to and affects the other, but it doesn’t have to be complicated.
Set your ISO low – ISO200 on our beloved Fuji X series cameras is the lowest they will go in RAW, so use that. Simple so far?
Choose an aperture that gives you the depth of field your subject demands – most people start off shooting long exposures at F22 because this will automatically give you a longer shutter speed. You can shoot LE images at any aperture, you just need to put two or three filters together to slow the shutter speed down.
The final part of the exposure triangle is shutter speed, this is the bit that can seem difficult, but trust me it isn’t – I promise.
With your ISO and aperture set, alter the shutter speed until you get the correct exposure without any filters in front of the lens, use the EVF or the screen to judge when your exposure looks right. Take a test frame at that exposure – if it looks right on screen and you have checked the histogram for clipping in the highlights and shadows your test picture will look correct too. For the sake of argument, lets say that the exposure we took our test frame at was 1/4 of a second at F16 with an ISO of 200.

Now you can work out what your exposure will be with your 10 stop filter in place, you have ten fingers so you can count it out – or you can make life easy for yourself by using the exposure that comes with the filter or download an app for your phone. I use the Lee Filters App, it’s very easy, click on the filter you are using, then on the left hand wheel dial in your unfiltered exposure it will work out the exposure with your filter for you. Simple, and lets face it photography is meant to be fun not an exercise in how good you are at maths!
Using the Lee app – 1/4 second becomes 4 minutes with a 10 stop ND filter
Our new exposure is therefore 4 minutes at F16 ISO 200.
Filters
When it comes to filters buy a system with a holder and adapter rings. Don’t buy the variable ND as you cannot accurately predict what density you are shooting through or screw-in filters as you may inadvertently alter the focus of the lens, and don’t buy cheap brands of filters because the colour of a neutral density filter is meant to be neutral not pink or green.
What filters will you need? To get you started I would recommend buying the following; a 0.6 (2 stop) graduated ND filter, a solid 10 stop ND filter and a 3 stop ND filter.

The graduated filter will control the contrast between the sky and the land or water. The solid ND will allow you to slow down the shutter speed to give you the ethereal feel to your images.
Compose, focus and set your exposure without any filters, I always set my exposure to achieve detail in the dark shadows, I then add a graduated filter to darken the sky and finally when I have the exposure balance I want I add the solid ND filter. I then re-calculate the exposure depending on what filter I am using and shoot.
Left to right; Set your basic exposure with no filter remembering to expose for the dark areas, add a graduated filter to bring the sky back in and finally add your 10 stop filter and recalculate your exposure.


Shooting the image
 Before you press the button there are a couple of things to do, firstly turn the Long Exposure noise reduction off in camera – this can be found in the menu of the camera. The reason for this is because the camera records a second frame which takes as long as your original frame to take, so a four minute exposure takes eight minutes in total – believe me you wont want to wait the extra four minutes so turn off the long exposure noise reduction before you start.
Attach the camera to a sturdy tripod and attach the cable release, this will avoid any shake or camera movement.
Finally check everything, you’ve focused the image, worked out your exposure, turned the AF off, attached the filters.
Now with everything in place turn the shutter speed setting to B or Bulb, this will allow you to leave the shutter open for longer than 30 seconds as long as you press and lock the button on the remote shutter release cable.
So what are you waiting for? Press the button, lock it and watch the timer in either the viewfinder or on screen, when your exposure time has been reached unlock the button on the cable release and review your image.
Good luck and have fun.
Paul Sanders
http://www.paulsanders.biz/


Pingback: Fotografie-Blogbühne 2017 | Der Albfotograf