
As the sunsets and the moonrises, the approach for a good photo shifts. Low light photography requires you to think differently to compensate for the lack of available light and colour. But when you know how to use low light as an advantage, it opens up a new style, and a new time of day, for you to explore with your art.
Try the following five tips for low light photography.

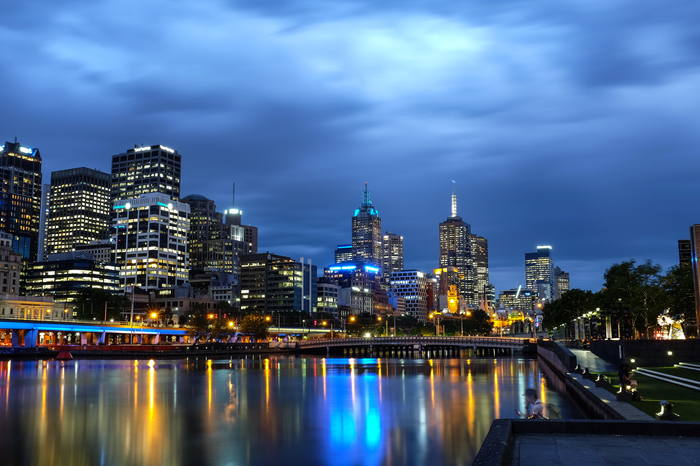
“Mel burns at night” taken by Kristoferus Andriono (@kristoferus) – Fujifilm X100S
Make use of your tripod.
With such little light available, you most often need to work with slow shutter speeds. The long lapse in the open shutter means you almost always need your tripod to stabilise your equipment, especially for exposures longer than a second. Tripods are especially useful when capturing star stacks or light trails from automotive traffic. Even when you use your tripod, you may decide to use an external remote release or the camera’s timer to begin your shot and limit detectable shake.
Explore your camera’s aperture priority mode.
Photographing in Aperture Priority (A) when the light is low will allow you to manually control the cameras aperture settings ensuring you get the best shot when photographing handheld. To obtain this result all you need to do is select Aperture Priority and change the lenses aperture to the largest F Stop – ie F1.2. The result of this will be a faster shutter speed that’s automatically selected, and in most cases, will leads to a shutter speed faster than 1/60 second allowing you to capture the photo without a tripod, handheld.

“Sydney Celebrates” taken by Daniel Karjadi (dkarjadi) – Fujifilm X-E2 + 35mmF1.4
Play with light trails.
Rather than lament the lack of light, use what little luminosity you have and give it time to tell a story. Capture light trails, whether the course of stars over several hours using multiple shots or the path of car headlights over several seconds. You want to control your camera’s aperture and shutter speed for this type of shot.
Find stark skies with little light pollution.
Much of night time photography includes the outdoor sky in its grandeur. If it is a starlit sky you want, make sure you shoot from a rural area. An urban setting emanates too much light pollution because of skyscrapers, streetlights and other signs that remain bright through the night. Make the drive to shoot stars from a setting that shows their beauty.

The Milky Way taken by Michael Davison (@michaeldavidsonphotography) – Fujifilm X-T1 + XF18-55mm
Climb high, explore your city and your ISO.
Not every night shot relies on a rural setting, though. You can take incredible shots of the city skyline or alleyways in the late-night hours. Most photographers rely on ground-level shots of city’s buildings and monuments, but you can think differently. Get up high and explore areas assessable to the public. See how the city appears from a balcony or rooftop and play with your ISO to obtain a suitable shutter speed for the lighting conditions.
With the right use of your photography equipment and a creative approach to limited light, you can take excellent photos no matter what the conditions.
Do you have any low light photographs captured using your X Series camera? Post a URL link of your online photo in the comments below and tell us a bit about the image – we would love to see them!
https://500px.com/photo/154130389/ceduna-jetty-south-australia-by-neil-guthrie?ctx_page=1&from=user&user_id=8105321
X-Pro2
XF16-55mmF2.8 R LM WR
27.4mm/ƒ/2.8/1/60s/ISO 6400
up way too early for sunrise and I hadnt tried out my XPro 2 in the dark so with a bit of time to kill I took a few photographs, messing around with different settings.
I would shoot in shutter priority of over aperture priority in low light handheld. Manually set iso and maybe set exposure compensation to +.3.
I photographed these images from the tallest building Burj Khalifa in Dubai. I was unable to use my tripod and only had a small opening in the glass above my head so used the tilt screen (X-T1 + 18-135 @ 800 ISO) and rested my arms against the glass and hoped for the best. Pretty happy with the results. Used ACR levels adjustments and de-haze. Did not use a high ISO as I didn’t want any noise but I think now I could have gone to a higher setting. This is the first holiday with the X-T1 and I am very impressed.
Wow! Excellent shot Neil!
Thanks for sharing. I really like the composition and mood you have created in this image. Well done!
love night photography
wow! I love your milky way shot, and thank you for letting me know what an 18-55 mm lens can do!
Surprised at what the XE-2 can achieve in low light, think I’ll be one of the many to sell their Canon gear and completely to FUJI!
https://500px.com/photo/178649119/waterfront-by-mike-bouchier?ctx_page=1&from=user&user_id=8763837
Thanks for sharing your experience. Color balance of Fujifilm looks very cool on nite photography.
This is my first Milky Way season with my X-T10. The photo was taken after a hike of 2 Hours up to 2100 metres in altitude. We had the clearest night sky I had ever seen.
http://www.matthias-foto.de/wp-content/uploads/2017/06/Zillergr%C3%BCndel_Quer-Portfolio-Matthias-Foto_1920px.jpg
Fuji X-T10 & Samyang 12mm.
3 Exposure for the night sky with ISO 6400, f/ 2.8 and 15 seconds exposure.
1 Exposure for the foreground with ISO 1200, f/5.6 and 5 minutes exposure.